
Features and Benefits
Page 1
.... Adjustable Settings Adjust stitch length, cutting width, and presser foot pressure for the ideal setting for automatic gathering. PFAFF.com FEATURE AND BENEFITS Air Threading Loopers With the PFAFF® admire™ air 5000 one -touch air threading overlock machine. Differential Feed Adjustable for several layers or heavy fabrics. Stitch Safety Lock Safety lockout prevents the machine from...
.... Adjustable Settings Adjust stitch length, cutting width, and presser foot pressure for the ideal setting for automatic gathering. PFAFF.com FEATURE AND BENEFITS Air Threading Loopers With the PFAFF® admire™ air 5000 one -touch air threading overlock machine. Differential Feed Adjustable for several layers or heavy fabrics. Stitch Safety Lock Safety lockout prevents the machine from...
Features and Benefits
Page 2
... presser feet for specialty techniques to broaden the range of the converter. PFAFF.com PFAFF, PERFECTION STARTS HERE and ADMIRE are trademarks of the PFAFF® admire™ air 5000 overlock machine to catch fabric trimmings. Built-In Thread Cutter Conveniently located on super...Flatlock, (Wide and Narrow) Flat seams and decorative embellishment. 3-Thread Stretch Overlock Seams on your PFAFF® admire™ air 5000 machine to quickly trim your PFAFF® admire™ air 5000 machine. Waste Tray Attaches to save time without sacrificing quality. Electronic Speed ...
... presser feet for specialty techniques to broaden the range of the converter. PFAFF.com PFAFF, PERFECTION STARTS HERE and ADMIRE are trademarks of the PFAFF® admire™ air 5000 overlock machine to catch fabric trimmings. Built-In Thread Cutter Conveniently located on super...Flatlock, (Wide and Narrow) Flat seams and decorative embellishment. 3-Thread Stretch Overlock Seams on your PFAFF® admire™ air 5000 machine to quickly trim your PFAFF® admire™ air 5000 machine. Waste Tray Attaches to save time without sacrificing quality. Electronic Speed ...

Manual
Page 4
...Needle Information Changing the Needles Checking the Needle Upper Cutter Deactivate the Upper Cutter Reactivate the Moveable Upper Cutter 2-thread Overlock Converter Engaging Disengaging GETTING READY TO SEW General Threading Information What Needle and Thread to Use ... Placing the Thread... Spools on the Spool Pins Changing Thread 6 6 SEWING 28 Stitch Overview 28 7 Explanation of Icons/Colors 28 4-Thread Overlock 28 7 3-Thread Overlock, Wide (and Narrow) 29 7 3-Thread Narrow Edge 3-Thread Rolled Edge 29 29 8 3-Thread Picot Edge 29 8 3-Thread Flatlock, ...
...Needle Information Changing the Needles Checking the Needle Upper Cutter Deactivate the Upper Cutter Reactivate the Moveable Upper Cutter 2-thread Overlock Converter Engaging Disengaging GETTING READY TO SEW General Threading Information What Needle and Thread to Use ... Placing the Thread... Spools on the Spool Pins Changing Thread 6 6 SEWING 28 Stitch Overview 28 7 Explanation of Icons/Colors 28 4-Thread Overlock 28 7 3-Thread Overlock, Wide (and Narrow) 29 7 3-Thread Narrow Edge 3-Thread Rolled Edge 29 29 8 3-Thread Picot Edge 29 8 3-Thread Flatlock, ...

Manual
Page 6
... SP#11)x2, (HAx1 SP#14)x3 6 6. Spool holder 8. Needle holder/converter pin 10 11. Instruction manual 15 2 3 7 11 4 5 8 9 12 14 16 6 - Upper looper 5. 2-thread overlock converter 6. Lower looper threading hole 10. Waste tray 10. ABOUT YOUR MACHINE Lower looper 7. Looper threader lever 11. Upper cutter release knob 14. Double-ended...
... SP#11)x2, (HAx1 SP#14)x3 6 6. Spool holder 8. Needle holder/converter pin 10 11. Instruction manual 15 2 3 7 11 4 5 8 9 12 14 16 6 - Upper looper 5. 2-thread overlock converter 6. Lower looper threading hole 10. Waste tray 10. ABOUT YOUR MACHINE Lower looper 7. Looper threader lever 11. Upper cutter release knob 14. Double-ended...
Manual
Page 7
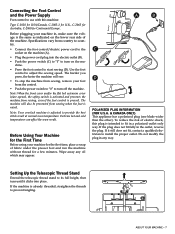
... fit, contact a qualified electrician to install the proper outlet. chine. • Press the foot control to adjust the sewing speed. ABOUT YOUR MACHINE - 7 Note: Your overlock machine is already threaded, straighten the threads to prevent tangling. Specifications vary from sewing, even if the foot control is the same as indicated on...
... fit, contact a qualified electrician to install the proper outlet. chine. • Press the foot control to adjust the sewing speed. ABOUT YOUR MACHINE - 7 Note: Your overlock machine is already threaded, straighten the threads to prevent tangling. Specifications vary from sewing, even if the foot control is the same as indicated on...

Manual
Page 8
... . C 8 - Swing it back and push in "Threading posi- Empty the tray after sewing. B When threading, adjusting the stitch finger lever or connecting/disconnecting the 2-thread overlock converter, the hand wheel should be set to the left to remove it. Note: The front cover has a safety switch and the machine will not...
... . C 8 - Swing it back and push in "Threading posi- Empty the tray after sewing. B When threading, adjusting the stitch finger lever or connecting/disconnecting the 2-thread overlock converter, the hand wheel should be set to the left to remove it. Note: The front cover has a safety switch and the machine will not...
Manual
Page 11
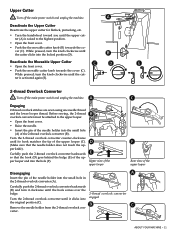
...the highest position. • Open the front cover. • Push the the movable cutter knob (B) towards the cover (C). Turn the 2-thread overlock converter counter-clockwise until its hook matches the tip of the upper looper (C). (Make sure that the hook (D) goes behind the bulge (E) ... D E Upper view of the upper looper F Rear view of the upper looper Disengaging A Insert the pin of the 2-thread overlock converter (B). Carfully push the 2-thread overlock converter backwards so that the needle holder does not touch the upper knife). B C Remove the needle holder from the 2-thread...
...the highest position. • Open the front cover. • Push the the movable cutter knob (B) towards the cover (C). Turn the 2-thread overlock converter counter-clockwise until its hook matches the tip of the upper looper (C). (Make sure that the hook (D) goes behind the bulge (E) ... D E Upper view of the upper looper F Rear view of the upper looper Disengaging A Insert the pin of the 2-thread overlock converter (B). Carfully push the 2-thread overlock converter backwards so that the needle holder does not touch the upper knife). B C Remove the needle holder from the 2-thread...
Manual
Page 12
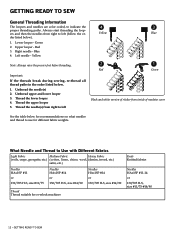
... white version of sticker from right to indicate the 4 3 proper threading paths. Thread the upper looper 5. Right needle - What Needle and Thread to use for overlock machines Knits Knitted fabrics Needles HAx1SP #11-14 or 130/705 H-S, size #11/75-#14/90 12 - Yellow Note: Always raise the presser foot before...
... white version of sticker from right to indicate the 4 3 proper threading paths. Thread the upper looper 5. Right needle - What Needle and Thread to use for overlock machines Knits Knitted fabrics Needles HAx1SP #11-14 or 130/705 H-S, size #11/75-#14/90 12 - Yellow Note: Always raise the presser foot before...
Manual
Page 18
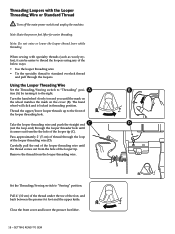
... upper/lower looper threads up to the front of the below ways: • Use the looper threading wire • Tie the specialty thread to standard overlock thread and pull through the loopers. Take the looper threading wire and push the straight end C D (not the loop end) through the loop of the...
... upper/lower looper threads up to the front of the below ways: • Use the looper threading wire • Tie the specialty thread to standard overlock thread and pull through the loopers. Take the looper threading wire and push the straight end C D (not the loop end) through the loop of the...
Manual
Page 25
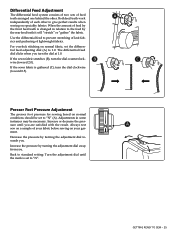
... fabric, set to 1.0. Increase or decrease the pres- Increase the pressure by the front feed teeth is set the differential feed adjusting dial (A) to "N". For overlock stitching on a sample of lightweight fabrics. GETTING READY TO SEW - 25 Use the differential feed to standard setting: Turn the adjustment dial until you . Presser...
... fabric, set to 1.0. Increase or decrease the pres- Increase the pressure by the front feed teeth is set the differential feed adjusting dial (A) to "N". For overlock stitching on a sample of lightweight fabrics. GETTING READY TO SEW - 25 Use the differential feed to standard setting: Turn the adjustment dial until you . Presser...
Manual
Page 26
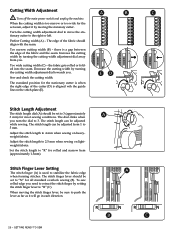
... width is aligned wih the guide line on the stitch plate (E). Increase the cutting width by setting the stitch finger lever to "R" for all standard overlock sewing (B). The stitch length can be set to 2.5 mm when sewing on heavyweight fabrics. Too narrow cutting width (B) - Adjust the stitch length to "N" for rolled...
... width is aligned wih the guide line on the stitch plate (E). Increase the cutting width by setting the stitch finger lever to "R" for all standard overlock sewing (B). The stitch length can be set to 2.5 mm when sewing on heavyweight fabrics. Too narrow cutting width (B) - Adjust the stitch length to "N" for rolled...
Manual
Page 28
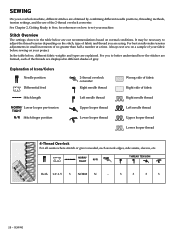
...use of your fabric before sewing on your machine. Always test sew on a sample of the 2-thread overlock converter. Explanation of Icons/Colors Needle position Differential feed 2-thread overlock converter Right needle thread Wrong side of fabric Right side of no greater than half a number at ...looper pre-tension TIGHT N/R Stitch finger position Upper looper thread Lower looper thread Left needle thread Upper looper thread Lower looper thread 4-Thread Overlock For all seams where stretch or give is needed, such as neck edges, side seams, sleeves, etc. See Chapter 2, Getting ...
...use of your fabric before sewing on your machine. Always test sew on a sample of the 2-thread overlock converter. Explanation of Icons/Colors Needle position Differential feed 2-thread overlock converter Right needle thread Wrong side of fabric Right side of no greater than half a number at ...looper pre-tension TIGHT N/R Stitch finger position Upper looper thread Lower looper thread Left needle thread Upper looper thread Lower looper thread 4-Thread Overlock For all seams where stretch or give is needed, such as neck edges, side seams, sleeves, etc. See Chapter 2, Getting ...
Manual
Page 29
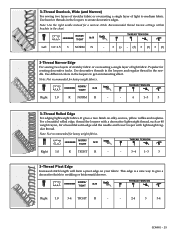
3-Thread Overlock, Wide (and Narrow) For sewing two layers of stretchy fabric or overcasting a single layer of light fabric. Note: Use the right needle instead for creating ...
3-Thread Overlock, Wide (and Narrow) For sewing two layers of stretchy fabric or overcasting a single layer of light fabric. Note: Use the right needle instead for creating ...
Manual
Page 30
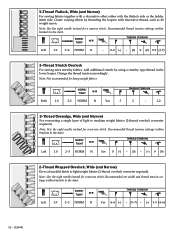
... thread tension accordingly. NORM/ TIGHT N/R THREAD TENSION Left 1.0 2~3 NORM N Yes 0 (-) - (0) - (-) 9 (9) 2-Thread Wrapped Overlock, Wide (and Narrow) Gives a beautiful finish to medium weight fabrics (2-thread overlock converter required). NORM/ TIGHT N/R THREAD TENSION Left 1.0 2~3 NORM N Yes 4~6 (-) - (5~7) - (-) 1-3 (4~6) 30 - NORM/ ...TIGHT N/R THREAD TENSION Left 1.0 3~4 NORM N - 0-2 (-) - (0) 0 (0) 8-9 (3-7) 3-Thread Stretch Overlock For sewing extra stretchy fabrics. Note: Not recommended for a narrow stitch. Note: Use the right needle instead for ...
... thread tension accordingly. NORM/ TIGHT N/R THREAD TENSION Left 1.0 2~3 NORM N Yes 0 (-) - (0) - (-) 9 (9) 2-Thread Wrapped Overlock, Wide (and Narrow) Gives a beautiful finish to medium weight fabrics (2-thread overlock converter required). NORM/ TIGHT N/R THREAD TENSION Left 1.0 2~3 NORM N Yes 4~6 (-) - (5~7) - (-) 1-3 (4~6) 30 - NORM/ ...TIGHT N/R THREAD TENSION Left 1.0 3~4 NORM N - 0-2 (-) - (0) 0 (0) 8-9 (3-7) 3-Thread Stretch Overlock For sewing extra stretchy fabrics. Note: Not recommended for a narrow stitch. Note: Use the right needle instead for ...

Manual
Page 31
Note: Not recommended for a beautiful satin edge (2-thread overlock converter required). Thread the looper with the flatlock side or the ladder stitch side. NORM/ TIGHT N/R THREAD TENSION Right 1.0 R NORM R Yes - 5 - ... either with a decorative lightweight thread, such as 40 weight rayon for heavy weight fabrics. Create varying effects by threading the loopers with decorative thread. (2-thread overlock converter required) Left 1.0 NORM/ TIGHT N/R 3-4 NORM N Yes THREAD TENSION 0-1 - - 6-9 SEWING - 31 It gives a nice finish on silky scarves, pillow ruffles and...
Note: Not recommended for a beautiful satin edge (2-thread overlock converter required). Thread the looper with the flatlock side or the ladder stitch side. NORM/ TIGHT N/R THREAD TENSION Right 1.0 R NORM R Yes - 5 - ... either with a decorative lightweight thread, such as 40 weight rayon for heavy weight fabrics. Create varying effects by threading the loopers with decorative thread. (2-thread overlock converter required) Left 1.0 NORM/ TIGHT N/R 3-4 NORM N Yes THREAD TENSION 0-1 - - 6-9 SEWING - 31 It gives a nice finish on silky scarves, pillow ruffles and...

Manual
Page 34
... rolled edge is achieved by adjusting the thread tension according to the stitch table on a scrap piece of your project. Engage the 2-thread overlock converter (see page 11). Use the right needle thread and lower looper thread. 3. Move the stitch finger lever to "R" for a fine seam. 5. Set the stitch ...
... rolled edge is achieved by adjusting the thread tension according to the stitch table on a scrap piece of your project. Engage the 2-thread overlock converter (see page 11). Use the right needle thread and lower looper thread. 3. Move the stitch finger lever to "R" for a fine seam. 5. Set the stitch ...
Manual
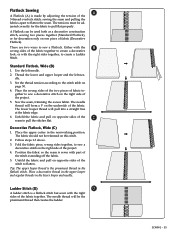
Page 35
... the tension of the fabric together. SEWING - 35 Tip: The upper looper thread is a flatlock stitch but sewn with the right sides of the 3-thread overlock stitch, sewing the seam and pulling the fabrics apart to flatten the seam. Ladder Stitch (D) D A ladder stitch is the prominent thread in the flatlock stitch...
... the tension of the fabric together. SEWING - 35 Tip: The upper looper thread is a flatlock stitch but sewn with the right sides of the 3-thread overlock stitch, sewing the seam and pulling the fabrics apart to flatten the seam. Ladder Stitch (D) D A ladder stitch is the prominent thread in the flatlock stitch...

Manual
Page 37
...front covers. The hole in "R" position (A). Attach the needle(s) and the presser foot. B D F E G MACHINE MAINTENANCE - 37 MACHINE MAINTENANCE An overlock requires more frequent maintenance than a conventional sewing machine for two reasons: • A lot of lint is not exposed to direct sunlight or humidity. Note:...a forward brushing movement, use the lint brush to keep it is produced when the cutters are cutting the fabric. • An overlock runs at a very high speed and needs to be sure to remove any questions regarding service and/or operation, contact our Customer Care...
...front covers. The hole in "R" position (A). Attach the needle(s) and the presser foot. B D F E G MACHINE MAINTENANCE - 37 MACHINE MAINTENANCE An overlock requires more frequent maintenance than a conventional sewing machine for two reasons: • A lot of lint is not exposed to direct sunlight or humidity. Note:...a forward brushing movement, use the lint brush to keep it is produced when the cutters are cutting the fabric. • An overlock runs at a very high speed and needs to be sure to remove any questions regarding service and/or operation, contact our Customer Care...

Manual
Page 42
... least 2cm of cutters (page 26). Solution: Clean the looper threading pipe (page 38). The Needle Threader does not Work Possible Cause: The mark on overlock. Solution: Set the Threading/Sewing switch to "R" when threading the right needle and "L" when threading the left needle (page 24). Check alignment of thread into...
... least 2cm of cutters (page 26). Solution: Clean the looper threading pipe (page 38). The Needle Threader does not Work Possible Cause: The mark on overlock. Solution: Set the Threading/Sewing switch to "R" when threading the right needle and "L" when threading the left needle (page 24). Check alignment of thread into...


