

Owner's Manual
Page 3
Parts of the coverlock 4852 1 Upper needle-thread tension 2 Upper needle-thread tension 3 Carry handle 4 Thread tension/upper looper thread 5 Thread tension/lower looper thread 6 Thread tension/two-thread chainstitch looper/cover stitch looper 7 Looper cover 8 Blade guard 9 Looper disengaging lever 10 Standard presser foot 11 Needle plate 12 Swivel plate 13 Adjusting knob for seam width 14 Seam width viewing window 15 Needle holder 16 Sewing light cover 17 Adjusting knob for presser foot pressure 18 Upper overedge looper 19 Lower overedge looper 20 Two-thread chainstitch looper 21 Threading ...
Parts of the coverlock 4852 1 Upper needle-thread tension 2 Upper needle-thread tension 3 Carry handle 4 Thread tension/upper looper thread 5 Thread tension/lower looper thread 6 Thread tension/two-thread chainstitch looper/cover stitch looper 7 Looper cover 8 Blade guard 9 Looper disengaging lever 10 Standard presser foot 11 Needle plate 12 Swivel plate 13 Adjusting knob for seam width 14 Seam width viewing window 15 Needle holder 16 Sewing light cover 17 Adjusting knob for presser foot pressure 18 Upper overedge looper 19 Lower overedge looper 20 Two-thread chainstitch looper 21 Threading ...

Owner's Manual
Page 5
... as a toy. The wrong plate can cause the needle to be used as threading needle, changing needle, threading bobbin, or changing presser foot, etc. • Always unplug sewing machine from the electrical outlet when removing covers, lubricating, or when making any adjustment in . It may deflect the needle causing it to comply with IEC/EN 60335-2-28 and UL1594 IMPORTANT SAFETY INSTRUCTIONS When using this sewing machine if it has a damaged...
... as a toy. The wrong plate can cause the needle to be used as threading needle, changing needle, threading bobbin, or changing presser foot, etc. • Always unplug sewing machine from the electrical outlet when removing covers, lubricating, or when making any adjustment in . It may deflect the needle causing it to comply with IEC/EN 60335-2-28 and UL1594 IMPORTANT SAFETY INSTRUCTIONS When using this sewing machine if it has a damaged...
Owner's Manual
Page 8
...Light bulb (sewing lamp), changing 60 Loopercover ...8 Lubricating the machine 58 Machine cover ...6 Maintenance ...58 - 60 Needle holder ...13 Needle inserting tool 13 Needle plate disengaging lever 38 Needle plate, removing 38 Needle position ...12 Needle threader ...25 Needle, changing ...13 Power table ...35 Presser foot lifter ...10 Presser foot pressure 28 Presser foot ...11 Presser foot, changing 11 Program overview ...40 - 43 Rubber feet, cleaning 58 Safety instructions...1, 2 eam width adjusting knob 33 Seam width viewing window 33 eam width, setting ...33 Sewing light cover...
...Light bulb (sewing lamp), changing 60 Loopercover ...8 Lubricating the machine 58 Machine cover ...6 Maintenance ...58 - 60 Needle holder ...13 Needle inserting tool 13 Needle plate disengaging lever 38 Needle plate, removing 38 Needle position ...12 Needle threader ...25 Needle, changing ...13 Power table ...35 Presser foot lifter ...10 Presser foot pressure 28 Presser foot ...11 Presser foot, changing 11 Program overview ...40 - 43 Rubber feet, cleaning 58 Safety instructions...1, 2 eam width adjusting knob 33 Seam width viewing window 33 eam width, setting ...33 Sewing light cover...
Owner's Manual
Page 9
... Spool holder ...9 Stitch formation correction measures 46 - 56 Stitch length adjustment knob 38 Stitch length, adjusting 38 Stitch width latch, swivelling 31 Telescoping thread guide 9 Thread chain cutter ...29 Thread chart ...57 Thread guide, clip on 10 Thread net ...9 Thread tensions, setting 39 Thread unreeling disc 9 Threading aid for the 2 thread chain stitch looped/cover stitch looped 19, 21 Threading paths/overview 26 - 28 Threading the 2 thread chain stitch looped/cover stitch looped (violet 18 - 21 Threading the lower overedge looper (yellow 16, 17 Threading the needle...
... Spool holder ...9 Stitch formation correction measures 46 - 56 Stitch length adjustment knob 38 Stitch length, adjusting 38 Stitch width latch, swivelling 31 Telescoping thread guide 9 Thread chain cutter ...29 Thread chart ...57 Thread guide, clip on 10 Thread net ...9 Thread tensions, setting 39 Thread unreeling disc 9 Threading aid for the 2 thread chain stitch looped/cover stitch looped 19, 21 Threading paths/overview 26 - 28 Threading the 2 thread chain stitch looped/cover stitch looped (violet 18 - 21 Threading the lower overedge looper (yellow 16, 17 Threading the needle...
Owner's Manual
Page 10
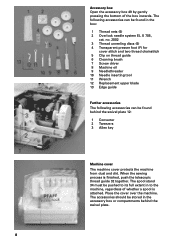
... the sewing process is attached. The accessories should be found behind the swivel plate. 8 The spool stand 34 must be found in the accessory box or compartments behind the swivel plate 12: 1 Converter 2 Tweezers 3 Allen key Machine cover The machine cover protects the machine from dust and dirt. no. 2002 3 Thread unreeling discs (5) 4 Transparent presser foot (F) for cover stitch and two thread chainstitch 5 Clip on thread guide 6 Cleaning brush 7 Screw driver 8 Machine oil 9 Needlethreader 10 Needle inserting...
... the sewing process is attached. The accessories should be found behind the swivel plate. 8 The spool stand 34 must be found in the accessory box or compartments behind the swivel plate 12: 1 Converter 2 Tweezers 3 Allen key Machine cover The machine cover protects the machine from dust and dirt. no. 2002 3 Thread unreeling discs (5) 4 Transparent presser foot (F) for cover stitch and two thread chainstitch 5 Clip on thread guide 6 Cleaning brush 7 Screw driver 8 Machine oil 9 Needlethreader 10 Needle inserting...
Owner's Manual
Page 13
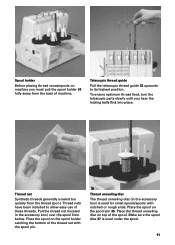
.... Place the spool on the spool holder catching the bottom of machine. Make sure the spool dise 37 is used under the spool. 11 Thread net Synthetic threads generally unwind too quickly from below. Thread unreeling disc The thread unreeling disc (in the accessory box) over the spool from the thread spool. Thread nets have been included to its highest position. Place the thread unreeling disc on the spool pin 35. Pull...
.... Place the spool on the spool holder catching the bottom of machine. Make sure the spool dise 37 is used under the spool. 11 Thread net Synthetic threads generally unwind too quickly from below. Thread unreeling disc The thread unreeling disc (in the accessory box) over the spool from the thread spool. Thread nets have been included to its highest position. Place the thread unreeling disc on the spool pin 35. Pull...
Owner's Manual
Page 14
... feeding of 6.5 mm for the presser foot for particularly thick fabrics can be raised if you activate the foot control. With synthetic threads, the spool discs help eliminate vibration of the cones/spools aiding in the illustration. It is automatically taken up and fed into the machine when you continue working with the same thread and presser foot. Clip on thread guide Use the clip on thread guide accessory when sewing with large spools...
... feeding of 6.5 mm for the presser foot for particularly thick fabrics can be raised if you activate the foot control. With synthetic threads, the spool discs help eliminate vibration of the cones/spools aiding in the illustration. It is automatically taken up and fed into the machine when you continue working with the same thread and presser foot. Clip on thread guide Use the clip on thread guide accessory when sewing with large spools...
Owner's Manual
Page 15
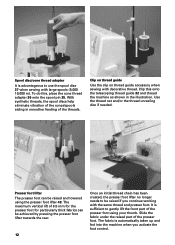
... locked into place. Changing the presser foot Switch off the electrical power To remove: Raise the needle(s) to the highest position by sliding foot away from the holder. To attach: Place the presser foot behind and perpendicular to ensure that the presser foot is directly under the presser foot holder clamp. Check: Please lift the presser foot lever to the presser foot holder. The presser foot will be used for the cover stitch (Prog. 02), the 2 thread chainstitch (Prog. 01), the 5 thread safety stitch seam...
... locked into place. Changing the presser foot Switch off the electrical power To remove: Raise the needle(s) to the highest position by sliding foot away from the holder. To attach: Place the presser foot behind and perpendicular to ensure that the presser foot is directly under the presser foot holder clamp. Check: Please lift the presser foot lever to the presser foot holder. The presser foot will be used for the cover stitch (Prog. 02), the 2 thread chainstitch (Prog. 01), the 5 thread safety stitch seam...
Owner's Manual
Page 23
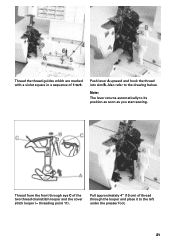
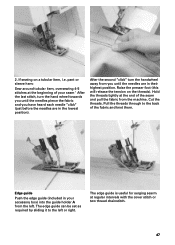
Thread from the front through the looper and place it to 9. Pull approximately 4" (10 cm) of thread through eye C of 1 to the left under the presser foot. 21 Also refer to its position as soon as you start sewing. Note: The lever returns automatically to the drawing below. Thread the thread guides which are marked with a violet square in a sequence of the two thread chainstitch looper and the cover stitch looper (= threading point 11). Push lever A upward and hook the thread into slot B.
Thread from the front through the looper and place it to 9. Pull approximately 4" (10 cm) of thread through eye C of 1 to the left under the presser foot. 21 Also refer to its position as soon as you start sewing. Note: The lever returns automatically to the drawing below. Thread the thread guides which are marked with a violet square in a sequence of the two thread chainstitch looper and the cover stitch looper (= threading point 11). Push lever A upward and hook the thread into slot B.
Owner's Manual
Page 25
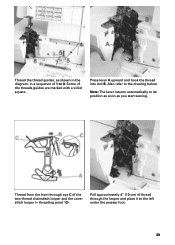
Some of the two-thread chainstitch looper and the cover stitch looper (= threading point 10). Note: The lever returns automatically to 8. Thread from the front through the looper and place it to the drawing below. Thread the thread guides, as shown in the diagram, in a sequence of 1 to its position as soon as you start sewing. Pull approximately 4" (10 cm) of thread through eye C of the threads guides are marked with a violet square. Press lever A upward and hook the thread into slot B. Also refer to the left under the presser foot. 23
Some of the two-thread chainstitch looper and the cover stitch looper (= threading point 10). Note: The lever returns automatically to 8. Thread from the front through the looper and place it to the drawing below. Thread the thread guides, as shown in the diagram, in a sequence of 1 to its position as soon as you start sewing. Pull approximately 4" (10 cm) of thread through eye C of the threads guides are marked with a violet square. Press lever A upward and hook the thread into slot B. Also refer to the left under the presser foot. 23

Owner's Manual
Page 28
... and placed to the spool and replace with the new threads, and pull the threads out of the needles. Raise the presser foot. If the looper threads break, you must always be pulled continuously past the last thread guide in front of the needle eyes. Should this sequence not be followed, thread breakage or missed stitches can be threaded last so that the needle threads do not run...
... and placed to the spool and replace with the new threads, and pull the threads out of the needles. Raise the presser foot. If the looper threads break, you must always be pulled continuously past the last thread guide in front of the needle eyes. Should this sequence not be followed, thread breakage or missed stitches can be threaded last so that the needle threads do not run...
Owner's Manual
Page 32
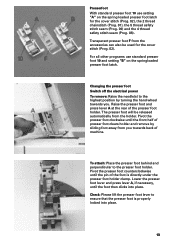
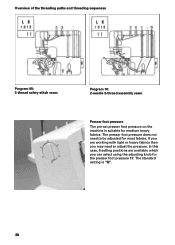
The standard setting is suitable for the presser foot pressure 17. The presser foot pressure does not need to be adjusted for most fabrics. In this case, 6 setting positions are working with light or heavy fabrics then you can select using the adjusting knob for medium heavy fabrics. If you are available which you may need to adjust the pressure. Overview of the threading paths and threading sequences Program 09: 5-thread safety-stitch seam Program 10: 2-needle 3-thread assembly seam Presser foot pressure The pre-set presser foot pressure on the machine is "N". 30
The standard setting is suitable for the presser foot pressure 17. The presser foot pressure does not need to be adjusted for most fabrics. In this case, 6 setting positions are working with light or heavy fabrics then you can select using the adjusting knob for medium heavy fabrics. If you are available which you may need to adjust the pressure. Overview of the threading paths and threading sequences Program 09: 5-thread safety-stitch seam Program 10: 2-needle 3-thread assembly seam Presser foot pressure The pre-set presser foot pressure on the machine is "N". 30

Owner's Manual
Page 40
... rear feed dog. The setting range is synchronized with the rear feed dog (B). The standard setting is 1.0, where the movement of the seam when working with the differential feed dog. Here you will be regulated using a rib knit (B). 38 Instead, a smooth seam (A) will avoid gathering/puckering of the front feed dog (A) is between 0.5 and 2.0. Differential feed The differential feed consists of fabric being used. This means that the front feed dog feeds...
... rear feed dog. The setting range is synchronized with the rear feed dog (B). The standard setting is 1.0, where the movement of the seam when working with the differential feed dog. Here you will be regulated using a rib knit (B). 38 Instead, a smooth seam (A) will avoid gathering/puckering of the front feed dog (A) is between 0.5 and 2.0. Differential feed The differential feed consists of fabric being used. This means that the front feed dog feeds...
Owner's Manual
Page 43
... described on pages 46 to secure the movable upper blade 23 before sewing heavy fabrics. Setting thread tension The following pages contain directions for setting thread tensions for adjusting thread tension are recommendations. Fabric type, thread quality and needle gauge will influence seam results. Securing the upper blade Switch off a test seam onto a piece of scrap fabric and check the thread loops. Raise the needle(s) to its highest position and open the swivel plate.
... described on pages 46 to secure the movable upper blade 23 before sewing heavy fabrics. Setting thread tension The following pages contain directions for setting thread tensions for adjusting thread tension are recommendations. Fabric type, thread quality and needle gauge will influence seam results. Securing the upper blade Switch off a test seam onto a piece of scrap fabric and check the thread loops. Raise the needle(s) to its highest position and open the swivel plate.
Owner's Manual
Page 44
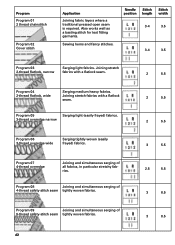
... serging of 4-thread safety-stitch seam tightly woven fabrics. 2.5 5.5 3 8.5 Program 09 Joining and simultaneous serging of all fabrics, in particular stretchy fabrics. Sewing hems and fancy stitches. Joining stretch fabrics with a flatlock seam. Needle Stitch Stitch position length width 3-4 3.5 3-4 3.5 Program 03 2-thread flatlock, narrow Serging light fabrics. Joining stretch fabrics with a flatiock seam. 2 5.5 Program 04 2-thread flatlock, wide Serging medium heavy fabrics. Also works well as a basting stitch for test fi...
... serging of 4-thread safety-stitch seam tightly woven fabrics. 2.5 5.5 3 8.5 Program 09 Joining and simultaneous serging of all fabrics, in particular stretchy fabrics. Sewing hems and fancy stitches. Joining stretch fabrics with a flatlock seam. Needle Stitch Stitch position length width 3-4 3.5 3-4 3.5 Program 03 2-thread flatlock, narrow Serging light fabrics. Joining stretch fabrics with a flatiock seam. 2 5.5 Program 04 2-thread flatlock, wide Serging medium heavy fabrics. Also works well as a basting stitch for test fi...
Owner's Manual
Page 48
... under a one inch (2.5 cm) fabric width to sew a finished hem of the seam. The speed may need to be adjusted slightly to allow your fabric to sewing the cover stitch. Position the fabric at the desired width using the H2 optional accessory guide, it is marked with the cover stitch The power table is useful to the end of the fabric: Tightly hold the threads at 3.5 cm. When starting to be pressed under...
... under a one inch (2.5 cm) fabric width to sew a finished hem of the seam. The speed may need to be adjusted slightly to allow your fabric to sewing the cover stitch. Position the fabric at the desired width using the H2 optional accessory guide, it is marked with the cover stitch The power table is useful to the end of the fabric: Tightly hold the threads at 3.5 cm. When starting to be pressed under...
Owner's Manual
Page 49
Raise the presser foot (this will release the tension on a tubular item, i.e. pant or sleeve hem: Sew around tubular item, oversewing 4-5 stitches at the end of the seam and pull the fabric from the machine. Hold the threads tightly at the beginning of the fabric and knot them. Edge guide Push the edge guide (included in your seam ' After the last stitch, turn the hand wheel...
Raise the presser foot (this will release the tension on a tubular item, i.e. pant or sleeve hem: Sew around tubular item, oversewing 4-5 stitches at the end of the seam and pull the fabric from the machine. Hold the threads tightly at the beginning of the fabric and knot them. Edge guide Push the edge guide (included in your seam ' After the last stitch, turn the hand wheel...
Owner's Manual
Page 65
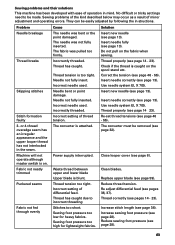
... Incorrect setting of minor adjustment and operating errors. Re-set tings need to incorrect threading Reduce thread tension. Machine will not operate although master switch is caught on the fabric when sewing. Thread correctly (see page 13). Sewing problems of the kind described below may occur as a result of thread tension. The needle was pulled too firmly. Insert needle correctly (see pages 14 - 23). Puckered seams Thread tension too tight. Sewing foot pressure too low for lightweight fabrics. Insert needle...
... Incorrect setting of minor adjustment and operating errors. Re-set tings need to incorrect threading Reduce thread tension. Machine will not operate although master switch is caught on the fabric when sewing. Thread correctly (see page 13). Sewing problems of the kind described below may occur as a result of thread tension. The needle was pulled too firmly. Insert needle correctly (see pages 14 - 23). Puckered seams Thread tension too tight. Sewing foot pressure too low for lightweight fabrics. Insert needle...
Owner's Manual
Page 66
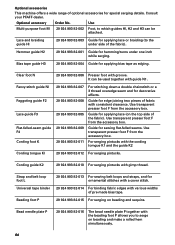
... 993 82-009 29 924 993 82-011 For stitching down a double chainstitch or a 3 thread overedge seam and for sewing flat-felled seams. Use transparent presser foot F from the accessory box. Hemmer guide H2 29 924 993 82-001 Guide for edge joining two pieces of the fabric). Clear foot N 29 924 993 82-006 Presser foot with various widths of pre-made bias tape...
... 993 82-009 29 924 993 82-011 For stitching down a double chainstitch or a 3 thread overedge seam and for sewing flat-felled seams. Use transparent presser foot F from the accessory box. Hemmer guide H2 29 924 993 82-001 Guide for edge joining two pieces of the fabric). Clear foot N 29 924 993 82-006 Presser foot with various widths of pre-made bias tape...

Owner's Manual
Page 70
Parts of the coverlock 4852 31 Thread guides with color coding 32 Telescoping thread guide 33 Thread chain cutter 34 Thread spool stand 35 Thread spool pin 36 Cone thread adapter 37 Spool disc 38 Electrical power master switch 39 Machine socket, foot control 40 Handwheel 41 Regulator wheel for differential feed 42 Stitch length adjustment knob 43 Presser foot lifter 44 Rear thread guides 45 Waste container 46 Foot control 47 Foot control plug for machine 48 Power cord 49 Accessory box 50 Power table
Parts of the coverlock 4852 31 Thread guides with color coding 32 Telescoping thread guide 33 Thread chain cutter 34 Thread spool stand 35 Thread spool pin 36 Cone thread adapter 37 Spool disc 38 Electrical power master switch 39 Machine socket, foot control 40 Handwheel 41 Regulator wheel for differential feed 42 Stitch length adjustment knob 43 Presser foot lifter 44 Rear thread guides 45 Waste container 46 Foot control 47 Foot control plug for machine 48 Power cord 49 Accessory box 50 Power table


