

Owner's Manual
Page 5
...operate where aerosol (spray) products are being administrated. • To disconnect, turn all moving parts. SAVE THESE INSTRUCTIONS Always unplug this sewing machine from the electric outlet immediately after using and before cleaning. • Always unplug before using an electrical appliance, basic safety precautions should never... be used or where oxygen is designed to comply with IEC/EN 60335-2-28 and UL1594 IMPORTANT SAFETY INSTRUCTIONS When using this household sewing machine. To unplug, grasp the plug, not the cord. To reduce the risk of lint, dust, and loose cloth. •...
...operate where aerosol (spray) products are being administrated. • To disconnect, turn all moving parts. SAVE THESE INSTRUCTIONS Always unplug this sewing machine from the electric outlet immediately after using and before cleaning. • Always unplug before using an electrical appliance, basic safety precautions should never... be used or where oxygen is designed to comply with IEC/EN 60335-2-28 and UL1594 IMPORTANT SAFETY INSTRUCTIONS When using this household sewing machine. To unplug, grasp the plug, not the cord. To reduce the risk of lint, dust, and loose cloth. •...

Owner's Manual
Page 7
... as simple to operate as this instruction manual is to -date sewing Congratulations! We wish you have bought a high-quality product that provides unique advantages. If you many enjoyable hours creating your authorized PFAFF dealer. Your PFAFF coverlock features the very latest in its features. It is certainly time ... is the best way to find out just what your machine can take the time to be of all its stride and will sew through thick and thin for you. Simple, up-to follow. Your new coverlock 4852 can do and make full use of service with any further questions...
... as simple to operate as this instruction manual is to -date sewing Congratulations! We wish you have bought a high-quality product that provides unique advantages. If you many enjoyable hours creating your authorized PFAFF dealer. Your PFAFF coverlock features the very latest in its features. It is certainly time ... is the best way to find out just what your machine can take the time to be of all its stride and will sew through thick and thin for you. Simple, up-to follow. Your new coverlock 4852 can do and make full use of service with any further questions...
Owner's Manual
Page 8
..., 45 Differential feed ...36, 37 Edge guide ...45 Electrical connection 7 Electrical power master switch 7 Foot control, connecting 7 Light bulb (sewing lamp), changing 60 Loopercover ...8 Lubricating the machine 58 Machine cover ...6 Maintenance ...58 - 60 Needle holder ...13 Needle inserting tool 13 Needle plate disengaging lever 38 Needle plate, removing 38 Needle position ...12 Needle...
..., 45 Differential feed ...36, 37 Edge guide ...45 Electrical connection 7 Electrical power master switch 7 Foot control, connecting 7 Light bulb (sewing lamp), changing 60 Loopercover ...8 Lubricating the machine 58 Machine cover ...6 Maintenance ...58 - 60 Needle holder ...13 Needle inserting tool 13 Needle plate disengaging lever 38 Needle plate, removing 38 Needle position ...12 Needle...
Owner's Manual
Page 10
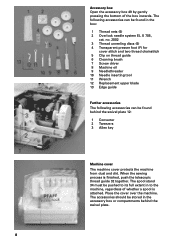
... The machine cover protects the machine from dust and dirt. Accessory box Open the accessory box 49 by gently pressing the bottom of whether a spool is finished, push the telescopic thread guide 32 together. When the sewing process is attached. The spool stand 34 must be found behind... the swivel plate. 8 The accessories should be found in the box: 1 Thread nets (5) 2 Overlock needle system EL X 705, cat. The following accessories can be pushed to the machine, regardless of the box...
... The machine cover protects the machine from dust and dirt. Accessory box Open the accessory box 49 by gently pressing the bottom of whether a spool is finished, push the telescopic thread guide 32 together. When the sewing process is attached. The spool stand 34 must be found behind... the swivel plate. 8 The accessories should be found in the box: 1 Thread nets (5) 2 Overlock needle system EL X 705, cat. The following accessories can be pushed to the machine, regardless of the box...
Owner's Manual
Page 11
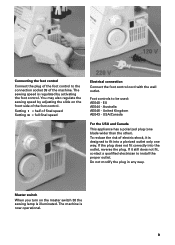
...AE044 - USA/Canada For the USA and Canada This appliance has a polarized plug (one way. Foot controls to the connection socket 39 of the machine. To reduce the risk of electric shock, it still does not fit, contact a qualified electrician to fit into the outlet, ... the foot control to be used: AE040 - United Kingdom AE043 - The machine is regulated by adjusting the slide on the master switch 38 the sewing lamp is designed to install the proper outlet. Australia AE046 - The sewing speed is now operational. 9 Master switch When you turn on the front...
...AE044 - USA/Canada For the USA and Canada This appliance has a polarized plug (one way. Foot controls to the connection socket 39 of the machine. To reduce the risk of electric shock, it still does not fit, contact a qualified electrician to fit into the outlet, ... the foot control to be used: AE040 - United Kingdom AE043 - The machine is regulated by adjusting the slide on the master switch 38 the sewing lamp is designed to install the proper outlet. Australia AE046 - The sewing speed is now operational. 9 Master switch When you turn on the front...

Owner's Manual
Page 12
sewing with the machine is opened, for safety reasons, i.e. Looper cover Push the looper cover 7 fully to the lower part of the looper cover. Waste container Insert the upper ... their threading paths are portrayed in color on the inside of the container until the lower latches flick into the upper slot of the machine is cut off as soon as the looper cover or swivel plate 12 is no longer possible.
sewing with the machine is opened, for safety reasons, i.e. Looper cover Push the looper cover 7 fully to the lower part of the looper cover. Waste container Insert the upper ... their threading paths are portrayed in color on the inside of the container until the lower latches flick into the upper slot of the machine is cut off as soon as the looper cover or swivel plate 12 is no longer possible.
Owner's Manual
Page 14
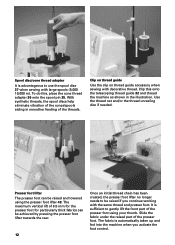
...raised and lowered using your thumb. The fabric is automatically taken up and fed into the machine when you continue working with the same thread and presser foot. To do this onto the telescoping thread... guide 32 and thread the machine as shown in smoother feeding of the presser foot using the presser foot lifter 43. Spool ...disc/cone thread adapter It is advantageous to use the spool dise 37 when sewing with decorative thread. Use the thread net and/or the thread unreeling disc if needed. It is ...
...raised and lowered using your thumb. The fabric is automatically taken up and fed into the machine when you continue working with the same thread and presser foot. To do this onto the telescoping thread... guide 32 and thread the machine as shown in smoother feeding of the presser foot using the presser foot lifter 43. Spool ...disc/cone thread adapter It is advantageous to use the spool dise 37 when sewing with decorative thread. Use the thread net and/or the thread unreeling disc if needed. It is ...
Owner's Manual
Page 16
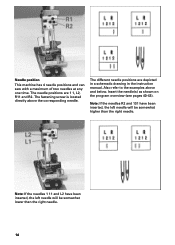
...: If the needles 1 11 and L2 have been inserted, the left needle will be somewhat lower than the right needle. Needle position This machine has 4 needle positions and can sew with a maximum of two needles at any one time. Insert the needle(s) as shown on the program overview (see pages 40-43).
...: If the needles 1 11 and L2 have been inserted, the left needle will be somewhat lower than the right needle. Needle position This machine has 4 needle positions and can sew with a maximum of two needles at any one time. Insert the needle(s) as shown on the program overview (see pages 40-43).

Owner's Manual
Page 39
... power table 50. Push the blade guard into the designated slot on the looper cover. Move the looper disengaging lever to its previous settings after sewing with the cover stitch or two thread chainstitch: Open the looper cover and remove the power table. Press the power table 50 downwards into the... looper cover and close the looper cover. 37 To return the machine to the right, thus re-engaging the upper overedge looper. Close looper cover. Bring the swiveling stitch width latch into the basic position (see page...
... power table 50. Push the blade guard into the designated slot on the looper cover. Move the looper disengaging lever to its previous settings after sewing with the cover stitch or two thread chainstitch: Open the looper cover and remove the power table. Press the power table 50 downwards into the... looper cover and close the looper cover. 37 To return the machine to the right, thus re-engaging the upper overedge looper. Close looper cover. Bring the swiveling stitch width latch into the basic position (see page...
Owner's Manual
Page 48
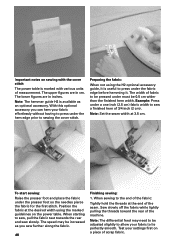
...you can hem your fabric to lie perfectly smooth. Example: Press under a one inch (2.5 cm) fabric width to sew a finished hem of the machine. When starting to sewing the cover stitch. Sew slowly off the fabric while lightly pulling the threads toward the rear of 3/4 inch (2 cm). The lower fi... adjusted slightly to allow your fabric effortlessly without having to press under the hem edge prior to sew, pull the fabric taut towards the rear and sew slowly. Important notes on sewing with the cover stitch The power table is marked with various units of fabric to be pressed ...
...you can hem your fabric to lie perfectly smooth. Example: Press under a one inch (2.5 cm) fabric width to sew a finished hem of the machine. When starting to sewing the cover stitch. Sew slowly off the fabric while lightly pulling the threads toward the rear of 3/4 inch (2 cm). The lower fi... adjusted slightly to allow your fabric effortlessly without having to press under the hem edge prior to sew, pull the fabric taut towards the rear and sew slowly. Important notes on sewing with the cover stitch The power table is marked with various units of fabric to be pressed ...
Owner's Manual
Page 49
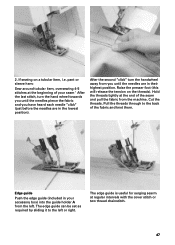
...(this will release the tension on a tubular item, i.e. Pull the threads through to the left . 2. After the second "click" tum the handwheel away from the machine. The edge guide is useful for serging searm at the end of the seam and pull the fabric from you have heard each needle "click..." (just before the needles are in the lowest position). pant or sleeve hem: Sew around tubular item, oversewing 4-5 stitches at the beginning of the fabric and knot them. Cut the threads. If sewing on the threads). The edge guide can be set as required by sliding it to the...
...(this will release the tension on a tubular item, i.e. Pull the threads through to the left . 2. After the second "click" tum the handwheel away from the machine. The edge guide is useful for serging searm at the end of the seam and pull the fabric from you have heard each needle "click..." (just before the needles are in the lowest position). pant or sleeve hem: Sew around tubular item, oversewing 4-5 stitches at the beginning of the fabric and knot them. Cut the threads. If sewing on the threads). The edge guide can be set as required by sliding it to the...

Owner's Manual
Page 62
...time with the oil provided (located in the accessory box) every time you clean the machine. Lubricate the points shown above with alcohol. All other parts are sufficient. Lubricating the machine Switch off the electrical power Remove the waste container and open the looper cover and ...good stability. Disengage the upper blade (see page 30) and remove the presser foot and the needle plate. One or two drops of PFAFF sewing machine oil are manufactured from special materials and do not require any lubrication. 60 Cleaning the rubber feet Clean the rubber feet from time to ...
...time with the oil provided (located in the accessory box) every time you clean the machine. Lubricate the points shown above with alcohol. All other parts are sufficient. Lubricating the machine Switch off the electrical power Remove the waste container and open the looper cover and ...good stability. Disengage the upper blade (see page 30) and remove the presser foot and the needle plate. One or two drops of PFAFF sewing machine oil are manufactured from special materials and do not require any lubrication. 60 Cleaning the rubber feet Clean the rubber feet from time to ...
Owner's Manual
Page 65
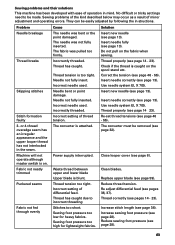
...system EL X 705. or 4-thread overedge seam has an irregular appearance and the upper looper thread has not interlocked in structions. Machine will not operate although master switch is too tight. Puckered seams Thread tension too tight. Fabric not fed through evenly Stitches too short. ... of the kind described below may occur as a result of operation in mind. Correct the tension (see page 38). Sewing problems and their solutions This machine has been developed with ease of minor adjustment and operating errors. No difficult or tricky set thread tensions (see page...
...system EL X 705. or 4-thread overedge seam has an irregular appearance and the upper looper thread has not interlocked in structions. Machine will not operate although master switch is too tight. Puckered seams Thread tension too tight. Fabric not fed through evenly Stitches too short. ... of the kind described below may occur as a result of operation in mind. Correct the tension (see page 38). Sewing problems and their solutions This machine has been developed with ease of minor adjustment and operating errors. No difficult or tricky set thread tensions (see page...
Owner's Manual
Page 66
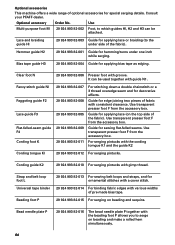
... 82-016 The bead needle plate P together with the beading foot P allows you to the under one inch while serging. Consult your PFAFF dealer. Guide for sewing flat-felled seams. Use transparent presser foot F from the accessory box. Guide for applying lace (on the top side of the...-002 Foot, to which guides Hl, H2 and H3 can be attached. Use transparent presser foot F from the accessory box. Optional accessories This machine offers a wide range of optional accessories for ornamental stitches with a cover stitch. 29 924 993 82-014 For binding fabric edges with various widths...
... 82-016 The bead needle plate P together with the beading foot P allows you to the under one inch while serging. Consult your PFAFF dealer. Guide for sewing flat-felled seams. Use transparent presser foot F from the accessory box. Guide for applying lace (on the top side of the...-002 Foot, to which guides Hl, H2 and H3 can be attached. Use transparent presser foot F from the accessory box. Optional accessories This machine offers a wide range of optional accessories for ornamental stitches with a cover stitch. 29 924 993 82-014 For binding fabric edges with various widths...
Owner's Manual
Page 67
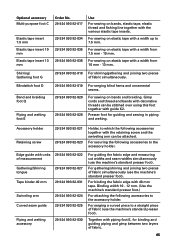
...welting accessory 29 924 993 82-030 For guiding the fabric edge and measuring cut widths and seam widths simultaneously (use the machine's standard presser foot). For sewing on elastic tape with a width from 7.5 mm - 10 mm. Presser foot for binding and guiding piping and gimp .... Together with a width from 10 mm - 13 mm. For sewing on elastic tape with a width up to 7.5 mm. For securing the following accessories to the accessory holder. Binding width 10 - 12 mm. (Use the machine's standard presser foot.) For attaching the following accessories together with 40 ...
...welting accessory 29 924 993 82-030 For guiding the fabric edge and measuring cut widths and seam widths simultaneously (use the machine's standard presser foot). For sewing on elastic tape with a width from 7.5 mm - 10 mm. Presser foot for binding and guiding piping and gimp .... Together with a width from 10 mm - 13 mm. For sewing on elastic tape with a width up to 7.5 mm. For securing the following accessories to the accessory holder. Binding width 10 - 12 mm. (Use the machine's standard presser foot.) For attaching the following accessories together with 40 ...
Owner's Manual
Page 68
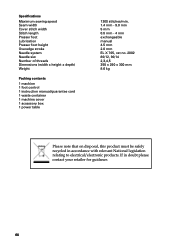
Specifications Maximum sewing speed Seam width Cover stitch width Stitch length Presser foot Lubrication Presser foot height Overedge stroke Needle system Needle siw Number of threads Dimensions (width x height x depth) Weight Packing contents 1 machine 1 foot control 1 instruction manual/guarantee card 1 waste container 1 machine cover 1 accessory box 1 power table 1300 stitches/min. 1.4 mm...
Specifications Maximum sewing speed Seam width Cover stitch width Stitch length Presser foot Lubrication Presser foot height Overedge stroke Needle system Needle siw Number of threads Dimensions (width x height x depth) Weight Packing contents 1 machine 1 foot control 1 instruction manual/guarantee card 1 waste container 1 machine cover 1 accessory box 1 power table 1300 stitches/min. 1.4 mm...

Owner's Manual
Page 69
Intellectual property Patents protecting this product are registered trademarks or trademarks of VSM Group AB. PFAFF and IDT (image) are listed on a label positioned underneath the sewing machine.
Intellectual property Patents protecting this product are registered trademarks or trademarks of VSM Group AB. PFAFF and IDT (image) are listed on a label positioned underneath the sewing machine.


