
Owner's Manual
Page 2
...;ect the needle causing it has been dropped or damaged, or dropped into any opening. • Do not use as threading needle, changing needle, threading bobbin, or changing presser foot, etc. • Always unplug the sewing machine from the electrical outlet when removing covers, lubricating, or when making any other user...
...;ect the needle causing it has been dropped or damaged, or dropped into any opening. • Do not use as threading needle, changing needle, threading bobbin, or changing presser foot, etc. • Always unplug the sewing machine from the electrical outlet when removing covers, lubricating, or when making any other user...

Owner's Manual
Page 4
... 2:3 Presser foot lift 2:3 Changing the presser foot 2:4 The IDT (Integrated Dual Feed) 2:5 Lowering the feed dog 2:6 Changing the needle 2:7 Bobbin winding 2:7 Inserting the bobbin and bobbin case 2:11 Threading your creative 2134 2:12 Bringing up the bobbin thread 2:14 Thread cutter 2:14 Threading the twin needle 2:15 Control Panel overview 2:16 Window indications 2:17 Correct thread...
... 2:3 Presser foot lift 2:3 Changing the presser foot 2:4 The IDT (Integrated Dual Feed) 2:5 Lowering the feed dog 2:6 Changing the needle 2:7 Bobbin winding 2:7 Inserting the bobbin and bobbin case 2:11 Threading your creative 2134 2:12 Bringing up the bobbin thread 2:14 Thread cutter 2:14 Threading the twin needle 2:15 Control Panel overview 2:16 Window indications 2:17 Correct thread...

Owner's Manual
Page 8
... linen. 10 Honeycomb stitch Elastic, decorative stitch for ornamental hem finishing on stretch fabric, decorative elastic application and sewing with elastic thread in the bobbin. 11 Foundation elastic stitch For joining overlapped seams on bulky fabrics such as leathers and terry cloth. 12 Cross-hem knit stitch Provides a highly elastic...
... linen. 10 Honeycomb stitch Elastic, decorative stitch for ornamental hem finishing on stretch fabric, decorative elastic application and sewing with elastic thread in the bobbin. 11 Foundation elastic stitch For joining overlapped seams on bulky fabrics such as leathers and terry cloth. 12 Cross-hem knit stitch Provides a highly elastic...

Owner's Manual
Page 10
To use the quilt stitches as normal application stitches you need to get a hand sewn look. Sew the stitches with a monofilament thread on top and colored thread in the bobbin. Quilt stitches The thread tension is preset high to lower the thread tension. 26 27 28 29 30 31 32 33 34 35 Cross stitches Hem stitches 36 37 38 39 Antique Hand Embroidery stitches 40 41 42 43 44 Scallop edges 45 46 47 48 49 50 51 52 53 54 55 56 Satin stitches 57 58 59 60 61 62 63 64 65 66 67 1:10
To use the quilt stitches as normal application stitches you need to get a hand sewn look. Sew the stitches with a monofilament thread on top and colored thread in the bobbin. Quilt stitches The thread tension is preset high to lower the thread tension. 26 27 28 29 30 31 32 33 34 35 Cross stitches Hem stitches 36 37 38 39 Antique Hand Embroidery stitches 40 41 42 43 44 Scallop edges 45 46 47 48 49 50 51 52 53 54 55 56 Satin stitches 57 58 59 60 61 62 63 64 65 66 67 1:10

Owner's Manual
Page 13
... 27. Needle holder with control buttons 5. Needle plate 32. Connection socket for bobbin winding 26. Carrying handle 3. Creative smart card slot 29. Parts of the sewing machine 1. Handwheel 4. Main switch 8. Base plate 10. Bobbin door 17. Lid with display and control buttons 2. Front panel with stitch chart 28. Connection socket, "lead cord" 6. Thread...
... 27. Needle holder with control buttons 5. Needle plate 32. Connection socket for bobbin winding 26. Carrying handle 3. Creative smart card slot 29. Parts of the sewing machine 1. Handwheel 4. Main switch 8. Base plate 10. Bobbin door 17. Lid with display and control buttons 2. Front panel with stitch chart 28. Connection socket, "lead cord" 6. Thread...

Owner's Manual
Page 17
... buttonhole guide, No. 10 Order No: 820294-096 13. 2 9 3 4 6 1 5 7 8 10 11 12 13 14 15 16 17 18 Introduction Standard presser feet and accessories for Pfaff creative 2134 1. Second spool holder Order No: 93-033 063-44/000 9. Fancy stitch foot with IDT, No. 0A Order No: 820244-096 14. Medium spool cap... 048-44/000 5. Seam ripper Order No: 99-053 016-91/000 11. Blindhem and overlock foot with IDT, No. 3 Order No: 820256-096 17. Bobbins Order No: 412 76 79-01 2. Buttonhole foot No. 5A Order No: 820299-096 19 20 1:17
... buttonhole guide, No. 10 Order No: 820294-096 13. 2 9 3 4 6 1 5 7 8 10 11 12 13 14 15 16 17 18 Introduction Standard presser feet and accessories for Pfaff creative 2134 1. Second spool holder Order No: 93-033 063-44/000 9. Fancy stitch foot with IDT, No. 0A Order No: 820244-096 14. Medium spool cap... 048-44/000 5. Seam ripper Order No: 99-053 016-91/000 11. Blindhem and overlock foot with IDT, No. 3 Order No: 820256-096 17. Bobbins Order No: 412 76 79-01 2. Buttonhole foot No. 5A Order No: 820299-096 19 20 1:17

Owner's Manual
Page 24
Push slide A or B to the right. B A A B 2:6 To bring the feed dog back up move the slide to the left. For either method: Raise the presser foot before lowering the feed dogsh. Lowering the feed dogs For certain sewing work such as free-motion quilting or darning or when embroidering, the feed dogs must be lowered. On your Pfaff creative 2134 there are two different methods for lowering the feed dogs, one on the outside of the machine and one inside the bobbin door.
Push slide A or B to the right. B A A B 2:6 To bring the feed dog back up move the slide to the left. For either method: Raise the presser foot before lowering the feed dogsh. Lowering the feed dogs For certain sewing work such as free-motion quilting or darning or when embroidering, the feed dogs must be lowered. On your Pfaff creative 2134 there are two different methods for lowering the feed dogs, one on the outside of the machine and one inside the bobbin door.

Owner's Manual
Page 25
...far as it up . Keep the presser foot down and insert the needle, pushing it will go. Bobbin winding Preparing the machine for bobbin winding Place an empty blue bobbin on the bobbin winder aligning the small rectangular hole on the bottom side of the needle must face to its highest ...position. Push the bobbin to the right. 2:7 Hold the needle and tighten the needle screw firmly. The Pfaff logo is moved...
...far as it up . Keep the presser foot down and insert the needle, pushing it will go. Bobbin winding Preparing the machine for bobbin winding Place an empty blue bobbin on the bobbin winder aligning the small rectangular hole on the bottom side of the needle must face to its highest ...position. Push the bobbin to the right. 2:7 Hold the needle and tighten the needle screw firmly. The Pfaff logo is moved...

Owner's Manual
Page 26
...the pre-tension device for embroidering, in diameter than the spool. Winding the bobbin from back to front). Hold the end of thread spool are included with your bobbin. Note: If you want to wind a bobbin before you start to embroider, you need to prepare the machine for correct ... the sewing thread on the spool pin. Three different spools caps to the left, cut the thread and remove the bobbin from the front and pull it counter clockwise around the bobbin several times in a clockwise direction. B A 2:8 Wind the thread tail around the pre-tension device B. Push the...
...the pre-tension device for embroidering, in diameter than the spool. Winding the bobbin from back to front). Hold the end of thread spool are included with your bobbin. Note: If you want to wind a bobbin before you start to embroider, you need to prepare the machine for correct ... the sewing thread on the spool pin. Three different spools caps to the left, cut the thread and remove the bobbin from the front and pull it counter clockwise around the bobbin several times in a clockwise direction. B A 2:8 Wind the thread tail around the pre-tension device B. Push the...

Owner's Manual
Page 27
... thread firmly and press the foot control. Note: If you want to wind a bobbin before you start to embroider, you need to prepare the machine for correct thread tension. B wise around the bobbin several times in a clockwise direction. Make sure the thread is full, the winding action will... stop automatically. As soon as the bobbin is pulled securely inside the pre-tension device for embroidering, in the hole provided. Preparations Winding from back to front). Pull the ...
... thread firmly and press the foot control. Note: If you want to wind a bobbin before you start to embroider, you need to prepare the machine for correct thread tension. B wise around the bobbin several times in a clockwise direction. Make sure the thread is full, the winding action will... stop automatically. As soon as the bobbin is pulled securely inside the pre-tension device for embroidering, in the hole provided. Preparations Winding from back to front). Pull the ...

Owner's Manual
Page 28
... left to right through the right-hand threader slot. Place an empty blue bobbin on the bobbin winder aligning the small rectangular hole on the machine. The Pfaff logo is fully threaded. Push the bobbin to the right under thread guide C. Raise the presser foot to the right. Wind the thread... tail clockwise several times around the bobbin. Hold the thread tail firmly and press the foot ...
... left to right through the right-hand threader slot. Place an empty blue bobbin on the bobbin winder aligning the small rectangular hole on the machine. The Pfaff logo is fully threaded. Push the bobbin to the right under thread guide C. Raise the presser foot to the right. Wind the thread... tail clockwise several times around the bobbin. Hold the thread tail firmly and press the foot ...

Owner's Manual
Page 29
... the hook. 2:11 Check: Hold the bobbin case with the Pfaff logo facing towards the bobbin case) in the opening (see arrow). Opening D of the bobbin case. Release the latch and take the empty bobbin out of the bobbin case must turn clockwise. Inserting the bobbin Insert the full bobbin (with the bobbin facing towards the front. Inserting the...
... the hook. 2:11 Check: Hold the bobbin case with the Pfaff logo facing towards the bobbin case) in the opening (see arrow). Opening D of the bobbin case. Release the latch and take the empty bobbin out of the bobbin case must turn clockwise. Inserting the bobbin Insert the full bobbin (with the bobbin facing towards the front. Inserting the...

Owner's Manual
Page 32
Thread cutter Pull the thread from the back to the front up the bobbin thread. Pull the needle thread to the left. Bringing up one time. Close the bobbin door and pull the top and bobbin threads under the presser foot to draw up over the thread cutter (19). 2:14 While holding the end of the needle thread, press the foot control so the needle moves down and up the bobbin thread Raise the presser foot.
Thread cutter Pull the thread from the back to the front up the bobbin thread. Pull the needle thread to the left. Bringing up one time. Close the bobbin door and pull the top and bobbin threads under the presser foot to draw up over the thread cutter (19). 2:14 While holding the end of the needle thread, press the foot control so the needle moves down and up the bobbin thread Raise the presser foot.

Owner's Manual
Page 35
... 31. Tie-off activated 35. Reverse sewing activated 3. Presser foot warning 8. Manual buttonhole activated 19. Stitch length/design height Buttonhole slit length/density/balance 30. Bobbin thread warning 6. Design rotation 16. Raise the feed dog 37 38 39 40 39. Twin needle warning 2. Park position 10. Sewing mode for sequencing 13...
... 31. Tie-off activated 35. Reverse sewing activated 3. Presser foot warning 8. Manual buttonhole activated 19. Stitch length/design height Buttonhole slit length/density/balance 30. Bobbin thread warning 6. Design rotation 16. Raise the feed dog 37 38 39 40 39. Twin needle warning 2. Park position 10. Sewing mode for sequencing 13...

Owner's Manual
Page 36
Your adjustments will automatically preset the tension for general sewing work: Bobbin thread is visible on the top side of stitches. The following is valid for different types of the fabric The needle thread tension is visible ..., you select a new stitch or design. The needle thread tension must be visible on what type of fabric and threads you find that the bobbin thread is visible on the top side of the fabric or that the top thread is too tight. Correct thread tension This machine will be...
Your adjustments will automatically preset the tension for general sewing work: Bobbin thread is visible on the top side of stitches. The following is valid for different types of the fabric The needle thread tension is visible ..., you select a new stitch or design. The needle thread tension must be visible on what type of fabric and threads you find that the bobbin thread is visible on the top side of the fabric or that the top thread is too tight. Correct thread tension This machine will be...
Owner's Manual
Page 44
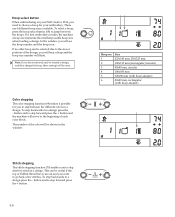
... . Color stepping The color stepping function (69) makes it possible for your Pfaff creative 2134, you will be reset. In the window you need to jump between the different colors in a design. This can be useful if the top or bobbin thread have mirrored and/or rotated a design, and then change the hoop, these...
... . Color stepping The color stepping function (69) makes it possible for your Pfaff creative 2134, you will be reset. In the window you need to jump between the different colors in a design. This can be useful if the top or bobbin thread have mirrored and/or rotated a design, and then change the hoop, these...

Owner's Manual
Page 51
Rethread the top thread and press the reverse/startstop button again to continue to embroider. 3:13 Embroidery Upper thread warning When the top thread is broken the machine stops and this icon is flashing in the bobbin case and the machine and then press the reverse/start-stop button again to continue to embroider. Bobbin thread warning When the bobbin thread is low the machine stops and this icon is flashing in the window. Wind the spool, insert it in the window.
Rethread the top thread and press the reverse/startstop button again to continue to embroider. 3:13 Embroidery Upper thread warning When the top thread is broken the machine stops and this icon is flashing in the bobbin case and the machine and then press the reverse/start-stop button again to continue to embroider. Bobbin thread warning When the bobbin thread is low the machine stops and this icon is flashing in the window. Wind the spool, insert it in the window.

Owner's Manual
Page 52
...Turn on the window does not match the hoop you to continue embroidering. 10. If the hoop on your machine will not embroider. Insert the bobbin. 8. Thread your machine with color no. 1. (Check your window. After a few seconds to start -stop in the packing position and remove...Attach the embroidery unit and put the presser foot in the window. Insert your embroidery. Touch the hoop selection button to embroider 1. start your embroidery creative smart card and choose a design. Change the top thread to no. 2 and continue to the beginning of the design and color no . 2...
...Turn on the window does not match the hoop you to continue embroidering. 10. If the hoop on your machine will not embroider. Insert the bobbin. 8. Thread your machine with color no. 1. (Check your window. After a few seconds to start -stop in the packing position and remove...Attach the embroidery unit and put the presser foot in the window. Insert your embroidery. Touch the hoop selection button to embroider 1. start your embroidery creative smart card and choose a design. Change the top thread to no. 2 and continue to the beginning of the design and color no . 2...

Owner's Manual
Page 62
The warning will flash on your window. 4:8 Rethread the top thread and continue to sew. Bobbin thread warning When the bobbin thread is low the machine stops and this icon (B) is flashing in the window. Wind the spool, insert it in the window. If you ... needle with 2.0 mm needle spacing. Upper thread warning When the top thread is broken the machine stops and this icon (A) is flashing in the bobbin case and the machine and continue to sew. This message will disappear when you have started to always control the stitch width by turning the...
The warning will flash on your window. 4:8 Rethread the top thread and continue to sew. Bobbin thread warning When the bobbin thread is low the machine stops and this icon (B) is flashing in the window. Wind the spool, insert it in the window. If you ... needle with 2.0 mm needle spacing. Upper thread warning When the top thread is broken the machine stops and this icon (A) is flashing in the bobbin case and the machine and continue to sew. This message will disappear when you have started to always control the stitch width by turning the...

Owner's Manual
Page 72
... lower the presser foot lift slowly and push it to be behind the needle clamp/needle set screw. Hoop your work. 4:18 Draw up the bobbin thread and sew a few stitches to the project and continue sewing. When you have covered the damaged area, turn the fabric 90 degrees and stitch...
... lower the presser foot lift slowly and push it to be behind the needle clamp/needle set screw. Hoop your work. 4:18 Draw up the bobbin thread and sew a few stitches to the project and continue sewing. When you have covered the damaged area, turn the fabric 90 degrees and stitch...

