Pfaff hobby 1022 Support and Manuals
Get Help and Manuals for this Pfaff item

View All Support Options Below
Free Pfaff hobby 1022 manuals!
Problems with Pfaff hobby 1022?
Ask a Question
Free Pfaff hobby 1022 manuals!
Problems with Pfaff hobby 1022?
Ask a Question
Popular Pfaff hobby 1022 Manual Pages
Owner's Manual - Page 1

hobby
1022 1032 1042
Instruction manual
Owner's Manual - Page 2

..., threading bobbin, or changing presser foot, etc. • Always unplug the sewing machine from the electrical outlet when removing covers, lubricating, or when making any other user servicing adjustments mentioned in . It may deÁect the needle causing it has been dropped or damaged, or dropped into any object into water. SAVE THESE INSTRUCTIONS Replace bulb...
Owner's Manual - Page 3

Your sewing machine is as simple to operate as this instruction manual is to assist you with help or advice. If you have bought a quality product made by Pfaff which will be happy to follow. Furthermore, it has numerous practical features which is the best way to read these instructions carefully. It is certainly time well spent...
Owner's Manual - Page 5

Parts of the sewing machine hobby 1042
1 Thread guide 2 Bobbin winder tension 3 Needle thread tension 4 Adjustment field 5 Spool holder 6 Bobbin winder 7 Handwheel 8 Stitch pattern chart with presser foot 9 Pattern adjustment button 10 Reverse key 11 Connection bushing 12 Master switch 13 Detachable work support with accessory box 14 Needle plate 15 Thread guide 16 Thread guide 17 Thread cutter 18...
Owner's Manual - Page 7

Parts of the sewing machine hobby 1022 and 1032
1 Thread guide 2 Bobbin winder tension 3 Needle thread tension 4 Adjustment field 5 Spool holder 6 Bobbin winder 7 Handwheel 8 Stitch pattern chart with presser foot 9 Pattern adjustment button 10 Reverse key 11 Connection bushing 12 Master switch 13 Detachable work support with accessory box 14 Needle plate 15 Thread guide 16 Thread guide 17 Thread ...
Owner's Manual - Page 8

... Gathering with the straight stitch
40
29 General sewing aids
25
C
Changing the needle
20
Changing the sewing lamp
63
Cleaning and oiling
62
Closed overlock stitch
32
Control panel
21
Cording foot
57
D
Darning
42
Detachable work support
11
Drawing up the bobbin thread
18
E
Edge guide
26
Elastic blind stitch
28
Elastic stitch...
Owner's Manual - Page 10

Also for fun
hobby 1022 - linen hobby - blouses and bed linen
For all straight stitch and lockstitch work up to 4 mm
For all sewing and topstitch work requiring a left
Application
Standard buttonhole for e.g.
G
...materials, e.g. Stitch chart
For these programs the stitch length can be set anywhere between 0 and 4 mm with the aid of the stitch length adjustment button (30).
Owner's Manual - Page 15

Removing the detachable work support /free arm
In order to be able to sew with the free arm of the sewing machine.
11 Organizing the accessories Place the enclosed accessories into the holes provided. Inserting the detachable work support Push the pins of the detachable work support (13) from the left and lift it is Áush with the...
Owner's Manual - Page 25

... depicted on the control panel of your sewing machine. With the adjustment button (32) on the right (model 1042) you can in the middle (hobby 1042) you can adjust the stitch length, the buttonhole density and the stretch stitches. With the adjustment button (30) on the right (hobby 1022, 1032) or in Ànitely vary the...
Owner's Manual - Page 26

... until the required letter appears in the adjustment Àeld (4). The lower value shows you can sew with your machine are illustrated in the adjustment Àeld (4).
Note: For embroidering use the clear view foot.
22 Setting fancy stitches (model 1042 only) Using the stitch pattern adjustment button (9) select the fancy stitches M-P. Operating the...
Owner's Manual - Page 27

This area is the optimum stitch density for stretch fabrics. Setting stretch stitches (models 1032, 1042) All of the stitches on the button to ...stitch length adjustment button (30) to 0, the denser the stitch becomes. they are stretch stitches, i.e. Operating the machine Stitch length adjustment button With the stitch length adjustment button (30) you can adjust the stitch length between 0 ...
Owner's Manual - Page 33
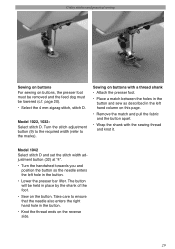
... button apart.
• Wrap the shank with a thread shank • Attach the presser foot.
• Place a match between the holes in the button and sew as described in the button.
• Lower the presser bar lifter. The button will be lowered (c.f. Model 1042 Select stitch D and set the stitch width adjustment button (32) at...
Owner's Manual - Page 54

...• Carefully cut away the stabilizer - A description of how to thread the twin needle is found on backing or other stabilizer under the area ...sewing machine.
• Transfer your machine.
• To make the embroidery more stable, sew all satin stitching is completed, tear away large areas of water-soluble stabilizer and dissolve remaining small areas in water.
Combined Borders (model...
Owner's Manual - Page 55

...8226; Baste the completed quilt top to the back layer of the quilt. with the sewing machine, i.e. Quilting is tacked onto the middle layer of polyester or cotton batting and connected to...quilt always consists of three layers of material remnants has become a very popular artistic hobby for many sewing enthusiasts. However, it into cushions, wearable art or other smaller projects.
51 When...
Owner's Manual - Page 71

...Data
Dimensions (w x h x d) Weight Nominal voltage Power consumption Sewing lamp Sewing speed Stitching width Stitching length Presser foot lift Max. If in ...contact your retailer for guidance presser foot height Needle system
Package contents
Sewing machine Carrying case Foot control Lead cord Accessories Instruction manual
392 x 149 x 296 mm 6,6 kg 120 V / 220...240 V 80 W 15 W max...
Pfaff hobby 1022 Reviews
We have not received any reviews for Pfaff yet.