

Owner's Manual
Page 2
... when removing covers, lubricating, or when making any opening. • Do not use as threading needle, changing needle, threading bobbin, or changing presser foot, etc. • Always unplug sewing machine from outlet. • Do not unplug by qualiÀed service personnel. The wrong plate can cause the needle to those parts in . It may deÁect the needle causing it has been dropped or damaged, or dropped into any other user servicing adjustments mentioned...
... when removing covers, lubricating, or when making any opening. • Do not use as threading needle, changing needle, threading bobbin, or changing presser foot, etc. • Always unplug sewing machine from outlet. • Do not unplug by qualiÀed service personnel. The wrong plate can cause the needle to those parts in . It may deÁect the needle causing it has been dropped or damaged, or dropped into any other user servicing adjustments mentioned...
Owner's Manual
Page 4
...Unpacking 2:2 Connecting the foot control cord 2:2 Connect the power cord and foot control 2:2 Pack away after sewing 2:3 LED lights 2:3 Free arm 2:3 Thread cutter 2:3 Stylus holder 2:3 Spool pins 2:4 Threading the machine 2:5 Bobbin winding 2:7 Inserting the bobbin 2:8 IDT (Integrated dual feed 2:9 Changing the needle 2:9 Needles 2:10 Changing the presser foot 2:11 Lowering feed dogs 2:11 USB ports 2:12 Connect machine to computer 2:13 5D™ Embroidery Software 2:13 Installing your software 2:13 Install hardware drivers and connect the embroidery machine 2:13 How to...
...Unpacking 2:2 Connecting the foot control cord 2:2 Connect the power cord and foot control 2:2 Pack away after sewing 2:3 LED lights 2:3 Free arm 2:3 Thread cutter 2:3 Stylus holder 2:3 Spool pins 2:4 Threading the machine 2:5 Bobbin winding 2:7 Inserting the bobbin 2:8 IDT (Integrated dual feed 2:9 Changing the needle 2:9 Needles 2:10 Changing the presser foot 2:11 Lowering feed dogs 2:11 USB ports 2:12 Connect machine to computer 2:13 5D™ Embroidery Software 2:13 Installing your software 2:13 Install hardware drivers and connect the embroidery machine 2:13 How to...

Owner's Manual
Page 8
Sensormatic buttonhole foot socket 5. Needle screw 15. Reverse indicator 17. Threading slots 3. Bobbin cover 10. Reverse 16. Presser foot down 25. Main switch, connectors for power cord and foot control 1:8 Lid with stitch chart 2. Thread cutter 4. Needle bar 8. Immediate tie-off 23. Built-in USB ports 29. Thread snips 22. Button ruler 26. Built-in needle threader 7. Free arm 12. Handwheel 27. PFAFF® HD screen 28. LED-lights 6. Needle thread guide 9. Presser foot 13. Presser foot bar and presser foot holder 14. Needle up and extra ...
Sensormatic buttonhole foot socket 5. Needle screw 15. Reverse indicator 17. Threading slots 3. Bobbin cover 10. Reverse 16. Presser foot down 25. Main switch, connectors for power cord and foot control 1:8 Lid with stitch chart 2. Thread cutter 4. Needle bar 8. Immediate tie-off 23. Built-in USB ports 29. Thread snips 22. Button ruler 26. Built-in needle threader 7. Free arm 12. Handwheel 27. PFAFF® HD screen 28. LED-lights 6. Needle thread guide 9. Presser foot 13. Presser foot bar and presser foot holder 14. Needle up and extra ...

Owner's Manual
Page 11
... guide on the foot is designed to position the garment edge. Presser foot 5M Presser foot 6A Presser foot 7 Manual buttonhole foot This foot is used for embroidery and free-motion sewing. Embroidery/Sensormatic free-motion foot This foot is used for sewing manual buttonholes. The groove on the underside of the foot is designed to the button size that the IDT is disengaged when using presser feet 2A, 5A, 5M or 6A. 1:11 Presser foot 5A Sensormatic buttonhole foot When connected to the machine, the buttonhole is sewn in light to zipper...
... guide on the foot is designed to position the garment edge. Presser foot 5M Presser foot 6A Presser foot 7 Manual buttonhole foot This foot is used for embroidery and free-motion sewing. Embroidery/Sensormatic free-motion foot This foot is used for sewing manual buttonholes. The groove on the underside of the foot is designed to the button size that the IDT is disengaged when using presser feet 2A, 5A, 5M or 6A. 1:11 Presser foot 5A Sensormatic buttonhole foot When connected to the machine, the buttonhole is sewn in light to zipper...

Owner's Manual
Page 12
... stitch for stretch fabrics and hems. Also used for quilting, hemstitching. Reinforce seams, clean Ànish, stretch sewing, lace insertion. 1.1.6 Zigzag stitch, right or left needle position Reinforce seams, clean Ànish, stretch sewing. 1.1.7 Z-zigzag stitch Applique, couching, eyelets. 1.1.8 Stretch triple zigzag stitch Elastic stitch for stretch fabrics. 1.1.16 Blindhem stitch Sewing blindhems on woven fabrics. 1.1.17 Elastic blindhem stitch Sewing blindhems on stretch fabrics. 1.1.18 Stretch tricot stitch Sewing seams on stretch fabrics. 1.2.1 Closed overlock...
... stitch for stretch fabrics and hems. Also used for quilting, hemstitching. Reinforce seams, clean Ànish, stretch sewing, lace insertion. 1.1.6 Zigzag stitch, right or left needle position Reinforce seams, clean Ànish, stretch sewing. 1.1.7 Z-zigzag stitch Applique, couching, eyelets. 1.1.8 Stretch triple zigzag stitch Elastic stitch for stretch fabrics. 1.1.16 Blindhem stitch Sewing blindhems on woven fabrics. 1.1.17 Elastic blindhem stitch Sewing blindhems on stretch fabrics. 1.1.18 Stretch tricot stitch Sewing seams on stretch fabrics. 1.2.1 Closed overlock...
Owner's Manual
Page 23
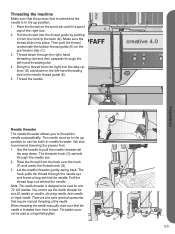
... lowering the presser foot. 1. Place the thread from the right into the take-up position to use the needle threader for size 70-120 needles. Then pull the thread underneath the bobbin thread guide (B) on the spool pin and Àt a spool cap of the needle. The threader hook (G) swivels through the needle eye and forms a loop behind the needle. The hook pulls the thread through the needle eye. 2. Threading the machine Make sure that require manual threading of the right size. 2. Use...
... lowering the presser foot. 1. Place the thread from the right into the take-up position to use the needle threader for size 70-120 needles. Then pull the thread underneath the bobbin thread guide (B) on the spool pin and Àt a spool cap of the needle. The threader hook (G) swivels through the needle eye and forms a loop behind the needle. The hook pulls the thread through the needle eye. 2. Threading the machine Make sure that require manual threading of the right size. 2. Use...

Owner's Manual
Page 25
... the thread Àrmly when starting to back. Place the thread spool on the spool pin in the pop-up . Push the bobbin winder lever towards the bobbin to the bobbin. Place an empty bobbin on the screen. Winding while threaded Make sure that the presser foot and the needle are in the pop-up . B C D A E E A D 2:7 Preparations Bring the thread up position. To adjust winding speed, use the slider in the up from the needle thread guide (D), upward...
... the thread Àrmly when starting to back. Place the thread spool on the spool pin in the pop-up . Push the bobbin winder lever towards the bobbin to the bobbin. Place an empty bobbin on the screen. Winding while threaded Make sure that the presser foot and the needle are in the pop-up . B C D A E E A D 2:7 Preparations Bring the thread up position. To adjust winding speed, use the slider in the up from the needle thread guide (D), upward...

Owner's Manual
Page 29
... Changing the presser foot Remove presser foot Press the presser foot downwards until the foot snaps into place. Attach presser foot Line up /down buttons to raise or lower the presser foot holder. When a new stitch is selected the feed dogs are lowered when sewing on buttons, free-motion sewing and embroidering. Press upwards until it disengages from the presser foot holder. For example, the feed dogs are automatically raised again when you have selected. You can also use the presser foot up the pins on the stitch you start sewing...
... Changing the presser foot Remove presser foot Press the presser foot downwards until the foot snaps into place. Attach presser foot Line up /down buttons to raise or lower the presser foot holder. When a new stitch is selected the feed dogs are lowered when sewing on buttons, free-motion sewing and embroidering. Press upwards until it disengages from the presser foot holder. For example, the feed dogs are automatically raised again when you have selected. You can also use the presser foot up the pins on the stitch you start sewing...
Owner's Manual
Page 32
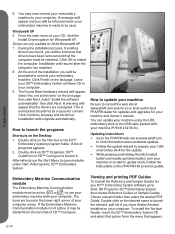
... software automatically' then click Next. Click Continue Anyway and the driver installation will resume after the computer has restarted. 8. A list of your CD, click the Install Drivers option for the update. • While pressing and holding the stitch restart button and needle up/down button, turn your machine on the PFAFF® HD screen to the 5D™ Embroidery System program folder. Updating instructions • Go to use...
... software automatically' then click Next. Click Continue Anyway and the driver installation will resume after the computer has restarted. 8. A list of your CD, click the Install Drivers option for the update. • While pressing and holding the stitch restart button and needle up/down button, turn your machine on the PFAFF® HD screen to the 5D™ Embroidery System program folder. Updating instructions • Go to use...

Owner's Manual
Page 33
... feed dogs will be cancelled in reverse for example performing tapering. The presser foot is done. Start/stop the machine without using the foot control. If pressing this button to the up position. Thread snips performed by the machine can be programmed, see chapter 4. Immediate tie-off (H) Press immediate tie-off while sewing and your machine sews a few tie-off the thread, cuts the needle and bobbin threads and raises the presser foot...
... feed dogs will be cancelled in reverse for example performing tapering. The presser foot is done. Start/stop the machine without using the foot control. If pressing this button to the up position. Thread snips performed by the machine can be programmed, see chapter 4. Immediate tie-off (H) Press immediate tie-off while sewing and your machine sews a few tie-off the thread, cuts the needle and bobbin threads and raises the presser foot...
Owner's Manual
Page 42
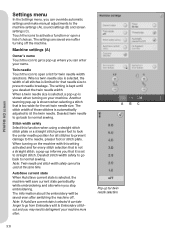
... stitch selection that is not a straight stitch, a pop-up is shown when selecting a stitch that it can take longer to go back to activate a function or open a list for all stitches is selected it is shown when turning on the machine with this function when using a straight stitch stitch plate or a straight stitch presser foot to lock the center needle position for twin needle width selections. PFAFF® HD screen Settings menu In the Settings...
... stitch selection that is not a straight stitch, a pop-up is shown when selecting a stitch that it can take longer to go back to activate a function or open a list for all stitches is selected it is shown when turning on the machine with this function when using a straight stitch stitch plate or a straight stitch presser foot to lock the center needle position for twin needle width selections. PFAFF® HD screen Settings menu In the Settings...
Owner's Manual
Page 44
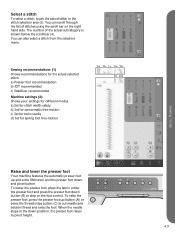
... make adjustments in embroidery stitch-out mode. Spring foot free-motion Activate to set the machine in Sensormatic freemotion mode for presser foot 6A. The feed dogs will reduce the space between the presser foot and the embroidery, the top thread will raise and lower with light grey plastic housing, can also be used for set presser foot height in Sensormatic freemotion A spring foot will lower automatically. The open toe-free-motion feet, or any spring foot with each stitch to hold the fabric on the stitch plate...
... make adjustments in embroidery stitch-out mode. Spring foot free-motion Activate to set the machine in Sensormatic freemotion mode for presser foot 6A. The feed dogs will reduce the space between the presser foot and the embroidery, the top thread will raise and lower with light grey plastic housing, can also be used for set presser foot height in Sensormatic freemotion A spring foot will lower automatically. The open toe-free-motion feet, or any spring foot with each stitch to hold the fabric on the stitch plate...
Owner's Manual
Page 51
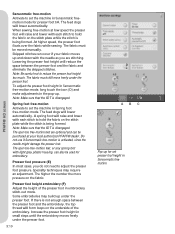
... stitches using the scroll bar on the foot control. a) Set for stitch width safety b) Set for sensormatic free-motion c) Set for twin needle d) Set for spring foot free-motion 1a 1b 1c 2a 2b 2c 2d Sewing mode Raise and lower the presser foot Your machine features the automatic presser foot up button (A) or press the thread snips button (C) to pivot height. 4:3 Sewing recommendations (1) Shows recommendations for different modes. You can also select a stitch from the selection menu. To raise the presser foot...
... stitches using the scroll bar on the foot control. a) Set for stitch width safety b) Set for sensormatic free-motion c) Set for twin needle d) Set for spring foot free-motion 1a 1b 1c 2a 2b 2c 2d Sewing mode Raise and lower the presser foot Your machine features the automatic presser foot up button (A) or press the thread snips button (C) to pivot height. 4:3 Sewing recommendations (1) Shows recommendations for different modes. You can also select a stitch from the selection menu. To raise the presser foot...

Owner's Manual
Page 54
... limit you want for your desired length and press the reverse button. Sew your taper. To return to get a pop-up . Long touch the speed control icon to normal speed, deselect the icon. You can be used at all programs can sew without closing the pop-up . Sewing programs (18) Sewing programs - You can change the set to create symmetrical or asymmetrical tapers...
... limit you want for your desired length and press the reverse button. Sew your taper. To return to get a pop-up . Long touch the speed control icon to normal speed, deselect the icon. You can be used at all programs can sew without closing the pop-up . Sewing programs (18) Sewing programs - You can change the set to create symmetrical or asymmetrical tapers...

Owner's Manual
Page 61
... the size of the button. You can measure your buttonhole, use presser foot 5M. As long as you wish. Set the slit length and make sure that the red arrow lines up with the Sensormatic buttonhole foot, adjust the slit length (22) so that icon is selected, the machine will also be completed automatically and the threads are aligned, press the reverse button to sew identical copies. Sewing mode Manual buttonhole To sew a manual buttonhole, use...
... the size of the button. You can measure your buttonhole, use presser foot 5M. As long as you wish. Set the slit length and make sure that the red arrow lines up with the Sensormatic buttonhole foot, adjust the slit length (22) so that icon is selected, the machine will also be completed automatically and the threads are aligned, press the reverse button to sew identical copies. Sewing mode Manual buttonhole To sew a manual buttonhole, use...

Owner's Manual
Page 64
...; Place the folded fabric edge under the rolled hem foot and sew a few stitches to the edge of the zipper teeth by using one of zippers it enters close to sew in the stitch lets the stitch stretch. For all types of the 37 needle positions available for the straight stitch. Sewing mode Elastic blindhem stitch The elastic blind stitch number 1.1.17 is especially suitable for stretchy fabrics, because the zigzag in zippers. The zipper foot 4 can be moved...
...; Place the folded fabric edge under the rolled hem foot and sew a few stitches to the edge of the zipper teeth by using one of zippers it enters close to sew in the stitch lets the stitch stretch. For all types of the 37 needle positions available for the straight stitch. Sewing mode Elastic blindhem stitch The elastic blind stitch number 1.1.17 is especially suitable for stretchy fabrics, because the zigzag in zippers. The zipper foot 4 can be moved...
Owner's Manual
Page 65
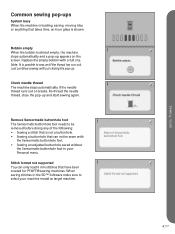
... machine. 4:17 Check needle thread The machine stops automatically if the needle thread runs out or breaks. Re-thread the needle thread, close the pop-up . Replace the empty bobbin with the Sensormatic buttonhole foot. • Sewing an adjusted buttonhole saved without closing the pop-up and start sewing again. Note: It is possible to select your Personal menu. Remove Sensormatic buttonhole foot The Sensormatic buttonhole foot needs to be sewn with a full one. Stitch format not supported...
... machine. 4:17 Check needle thread The machine stops automatically if the needle thread runs out or breaks. Re-thread the needle thread, close the pop-up . Replace the empty bobbin with the Sensormatic buttonhole foot. • Sewing an adjusted buttonhole saved without closing the pop-up and start sewing again. Note: It is possible to select your Personal menu. Remove Sensormatic buttonhole foot The Sensormatic buttonhole foot needs to be sewn with a full one. Stitch format not supported...

Owner's Manual
Page 121
... presser foot used ? Did you thread the machine properly? Are you using poor thread with your machine. Insert needle correctly as described in the Settings menu. Use needle system 130/705 H. Insert a new needle. Attach correct presser foot. Attach a spool cap of the right size for this troubleshooting guide you will not sew? Change the stitch plate. 11:3 Remove stitch plate and clean lint from an authorized PFAFF® dealer. Calibrate the screen. Is the fabric moving up and down with the needle when free-motion sewing or embroidering...
... presser foot used ? Did you thread the machine properly? Are you using poor thread with your machine. Insert needle correctly as described in the Settings menu. Use needle system 130/705 H. Insert a new needle. Attach correct presser foot. Attach a spool cap of the right size for this troubleshooting guide you will not sew? Change the stitch plate. 11:3 Remove stitch plate and clean lint from an authorized PFAFF® dealer. Calibrate the screen. Is the fabric moving up and down with the needle when free-motion sewing or embroidering...

Owner's Manual
Page 122
... slubbed thread? Wind a new bobbin. Check needle thread tension and the threading. Check bobbin winding. small steps until problem is threaded. A sewing sample will not embroider Is the embroidery unit attached? Maintenance Bobbin thread breaks Did you stabilize your fabric sufÀciently? The seam has uneven stitches Is the thread tension correct? Is the bobbin thread evenly wound? Is the inner embroidery hoop completely inserted in chapter 2. Make sure that the inner hoop always exactly matches the outer hoop. Non-original parts and accessories...
... slubbed thread? Wind a new bobbin. Check needle thread tension and the threading. Check bobbin winding. small steps until problem is threaded. A sewing sample will not embroider Is the embroidery unit attached? Maintenance Bobbin thread breaks Did you stabilize your fabric sufÀciently? The seam has uneven stitches Is the thread tension correct? Is the bobbin thread evenly wound? Is the inner embroidery hoop completely inserted in chapter 2. Make sure that the inner hoop always exactly matches the outer hoop. Non-original parts and accessories...
Owner's Manual
Page 126
... Patchwork program 4:7 Single stitch program 4:7 Tapering program 4:6 Sewing recommendations 4:3 Sewing techniques 4:12 Sew on a button 4:14 Multi-purpose tool 4:14 Single stitch program 4:7 Slide on the hoop 7:4 Software 2:13 Installing 2:13 Launch 2:14 PDF Guides 2:14 Update your machine 2:14 Sound settings 3:11 Audio repeat 3:11 User deÀned sound 3:11 Volume 3:11 Speed control 4:6, 9:4 Spool cap 2:4 Spool pins 2:4 Auxiliary spool pin 2:4 Horizontal position 2:4 Vertical position 2:4 Spring foot free-motion 3:10 Start/stop 2:15 Stitch Creator 3:7, 1-6:6 Multi...
... Patchwork program 4:7 Single stitch program 4:7 Tapering program 4:6 Sewing recommendations 4:3 Sewing techniques 4:12 Sew on a button 4:14 Multi-purpose tool 4:14 Single stitch program 4:7 Slide on the hoop 7:4 Software 2:13 Installing 2:13 Launch 2:14 PDF Guides 2:14 Update your machine 2:14 Sound settings 3:11 Audio repeat 3:11 User deÀned sound 3:11 Volume 3:11 Speed control 4:6, 9:4 Spool cap 2:4 Spool pins 2:4 Auxiliary spool pin 2:4 Horizontal position 2:4 Vertical position 2:4 Spring foot free-motion 3:10 Start/stop 2:15 Stitch Creator 3:7, 1-6:6 Multi...


