

Owner's Manual
Page 20
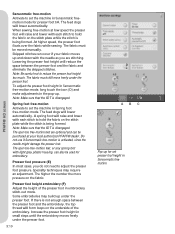
... socket. 3. If the plug does not Àt fully in the slot on the underside of the machine (2). Slide off the machine carrying case. 2. For the USA and Canada This sewing machine has a polarized plug (one way. If it is only neccessary the very Àrst time you will Ànd the foot... socket on power and light (3). Turn the foot control over. Connect the power cord and foot control Note: Before plugging in the accessory tray while sewing may affect stitch quality.
... socket. 3. If the plug does not Àt fully in the slot on the underside of the machine (2). Slide off the machine carrying case. 2. For the USA and Canada This sewing machine has a polarized plug (one way. If it is only neccessary the very Àrst time you will Ànd the foot... socket on power and light (3). Turn the foot control over. Connect the power cord and foot control Note: Before plugging in the accessory tray while sewing may affect stitch quality.

Owner's Manual
Page 26
... when you . 2. A C 2:8 Place an appropriate spool cap, felt pad and thread spool on the previous page. Place the bobbin in the bobbin case with the logotype facing up . Remove the bobbin cover by sliding it "clicks" into the thread guide (A) and underneath the bobbin winder thread guide (B).... the bobbin winder thread guide (B) and through the bobbin thread guides (C). Pull the thread to the left to cut. Winding while embroidering or sewing Swing the auxiliary spool pin up and the thread unreeling from turning as you pull the thread Àrmly to the 3 4 right and ...
... when you . 2. A C 2:8 Place an appropriate spool cap, felt pad and thread spool on the previous page. Place the bobbin in the bobbin case with the logotype facing up . Remove the bobbin cover by sliding it "clicks" into the thread guide (A) and underneath the bobbin winder thread guide (B).... the bobbin winder thread guide (B) and through the bobbin thread guides (C). Pull the thread to the left to cut. Winding while embroidering or sewing Swing the auxiliary spool pin up and the thread unreeling from turning as you pull the thread Àrmly to the 3 4 right and ...

Owner's Manual
Page 37
...actual process, touch cancel. move from embroidery edit to scroll down the Àeld. The most cases, the center icon has a function but when pan is activated, the icon will change depending ...The OK (B) and cancel (C) icons are frequently used to use; When you can make adjustments. PFAFF® HD screen Common icons There are some icons and functions that are used on the task bar... and enlarged. edit A BC E D FG HI 3:3 Use the task bar Toggle between the sewing mode and the embroidery mode by touching your stylus on which function is only visible if all items...
...actual process, touch cancel. move from embroidery edit to scroll down the Àeld. The most cases, the center icon has a function but when pan is activated, the icon will change depending ...The OK (B) and cancel (C) icons are frequently used to use; When you can make adjustments. PFAFF® HD screen Common icons There are some icons and functions that are used on the task bar... and enlarged. edit A BC E D FG HI 3:3 Use the task bar Toggle between the sewing mode and the embroidery mode by touching your stylus on which function is only visible if all items...
Owner's Manual
Page 44
...stitch to hold the fabric on the fabric. Do not use if Sensormatic free-motion is being formed. Presser foot pressure (E) In most cases, you are optional and can also be used for presser foot 6A. Increase the presser foot height in small steps until the embroidery ... fabric moves up . At higher speed, the presser foot Áoats over the fabric while sewing. Note: Make sure that the IDT is disengaged. Some embroideries may require an adjustment. PFAFF® HD screen Sensormatic free-motion Activate to set the machine in Sensormatic freemotion Lowering the presser...
...stitch to hold the fabric on the fabric. Do not use if Sensormatic free-motion is being formed. Presser foot pressure (E) In most cases, you are optional and can also be used for presser foot 6A. Increase the presser foot height in small steps until the embroidery ... fabric moves up . At higher speed, the presser foot Áoats over the fabric while sewing. Note: Make sure that the IDT is disengaged. Some embroideries may require an adjustment. PFAFF® HD screen Sensormatic free-motion Activate to set the machine in Sensormatic freemotion Lowering the presser...

Owner's Manual
Page 69
...then touch delete and insert the new stitch. Open the selection menu to duplicate. In the stitch selection area, select from upper or lower case letters, normal or special letters and special symbols. Between the arrows the number of the actual stitch will be shown next to the total ... sequence The active position is marked by a cursor and the selected stitch or letter will be adjusted. Only the selected stitch can be marked in sewing mode. Move the cursor through the sequence using the arrows (9). The adjustments work just like in red. Note: Make your adjustments on the stitch ...
...then touch delete and insert the new stitch. Open the selection menu to duplicate. In the stitch selection area, select from upper or lower case letters, normal or special letters and special symbols. Between the arrows the number of the actual stitch will be shown next to the total ... sequence The active position is marked by a cursor and the selected stitch or letter will be adjusted. Only the selected stitch can be marked in sewing mode. Move the cursor through the sequence using the arrows (9). The adjustments work just like in red. Note: Make your adjustments on the stitch ...
Owner's Manual
Page 120
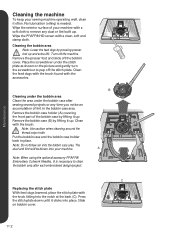
...area Note: Lower the feed dogs by lifting it up and extra lift. Remove the bobbin case holder (A) covering the front part of lint in place. Note: When using the optional accessory PFAFF® Embroidery Cutwork Needles, it often. No lubrication (oiling) is neccessary to clean the ...bobbin area after sewing several projects or any dust or lint built up . Wipe the PFAFF® HD screen with the brush. Place the screwdriver under the bobbin case after each embroidered design/project. Clean with a clean, soft and damp ...
...area Note: Lower the feed dogs by lifting it up and extra lift. Remove the bobbin case holder (A) covering the front part of lint in place. Note: When using the optional accessory PFAFF® Embroidery Cutwork Needles, it often. No lubrication (oiling) is neccessary to clean the ...bobbin area after sewing several projects or any dust or lint built up . Wipe the PFAFF® HD screen with the brush. Place the screwdriver under the bobbin case after each embroidered design/project. Clean with a clean, soft and damp ...


