

Owner's Manual
Page 5
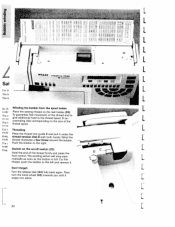
... function display (7) Numbered keys (8) "Display" key (9) "ciear>" key (10) key "dj" (11) "Clear"key (1 2) Key "0-9" for third reel holder (extra accessory) (42) Bobbin winder (43) Hand wheel (44) Hand wheel release disk (45) Connection socket "mains cord" (46) Connection socket "foot control" (47) Base plate (48) Hook cover (sewing hook behind) (49) Free-arm (50) Sewing lamp (51) Thread trimmer (52) Top cover (53) Dual feed/IDT-System (54) Needle plate
... function display (7) Numbered keys (8) "Display" key (9) "ciear>" key (10) key "dj" (11) "Clear"key (1 2) Key "0-9" for third reel holder (extra accessory) (42) Bobbin winder (43) Hand wheel (44) Hand wheel release disk (45) Connection socket "mains cord" (46) Connection socket "foot control" (47) Base plate (48) Hook cover (sewing hook behind) (49) Free-arm (50) Sewing lamp (51) Thread trimmer (52) Top cover (53) Dual feed/IDT-System (54) Needle plate

Owner's Manual
Page 7
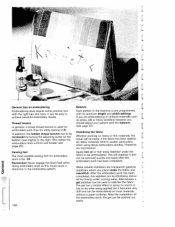
... up and down moving needle and constantly observe the sewing area while working. 2. It should be caused by a Pfaff mechanic. 5.The machine is a machine for supervised use in accordance with alcohol or paraffin. There are no parts inside the machine which could be oper ated in openings on the specification plate. 6. Treatment Always protect the machine against damage which the user can repair. with regard to...
... up and down moving needle and constantly observe the sewing area while working. 2. It should be caused by a Pfaff mechanic. 5.The machine is a machine for supervised use in accordance with alcohol or paraffin. There are no parts inside the machine which could be oper ated in openings on the specification plate. 6. Treatment Always protect the machine against damage which the user can repair. with regard to...

Owner's Manual
Page 8
... j Blind stitch Bobbin case Bobbin monitor Sal Bobbin thread tension Bobbin winding Borders For th Buttonhole balance The le Buttonhole guide The Buttonhole key Buttonholes 47, 100, 114 [ 100 96 171 38 1 68 99 24, 25 40 25 21-23 137, 1 38 11 4 109 42 108-119 Carrying case As th Changing the needle cod in the display Only; Cording foot must clear) key Code lock Contrast in Changing the needle plate The Changing the sewing foot or...
... j Blind stitch Bobbin case Bobbin monitor Sal Bobbin thread tension Bobbin winding Borders For th Buttonhole balance The le Buttonhole guide The Buttonhole key Buttonholes 47, 100, 114 [ 100 96 171 38 1 68 99 24, 25 40 25 21-23 137, 1 38 11 4 109 42 108-119 Carrying case As th Changing the needle cod in the display Only; Cording foot must clear) key Code lock Contrast in Changing the needle plate The Changing the sewing foot or...

Owner's Manual
Page 9
... stitch Fancy elastic stitch Felling foot Foot control Free-arm Fringe foot Gathering General sewing help General tips on embroidering Hems with the twin needle Hemstitching Honeycomb stitch Hook cover IDT-System Info Inserting stitches Joined patterns Keyhole buttonhole Knit-edge foot Lace Languages Light, sewing lamp Light-knit mending stitch Linen embroidery Lubricating and cleaning €key Maintenance and trouble shooting Monograms Multi-stitch gathering Needle chart Needle stop Needle thread tension Needle threader Notes on safety Number keys Oiling okkey On/off switch Operational help...
... stitch Fancy elastic stitch Felling foot Foot control Free-arm Fringe foot Gathering General sewing help General tips on embroidering Hems with the twin needle Hemstitching Honeycomb stitch Hook cover IDT-System Info Inserting stitches Joined patterns Keyhole buttonhole Knit-edge foot Lace Languages Light, sewing lamp Light-knit mending stitch Linen embroidery Lubricating and cleaning €key Maintenance and trouble shooting Monograms Multi-stitch gathering Needle chart Needle stop Needle thread tension Needle threader Notes on safety Number keys Oiling okkey On/off switch Operational help...
Owner's Manual
Page 10
... Special accessories chart sup Spool holder Plea Stabilizers Standard buttonhole Start-up the bobbin thread 65, Pullover stitch 42 126 79-81 46 45 42 43, 44 42, 44 53b9 42 45 93-131 73, 74 85 67, 71, 72 28 105 Quilting 154, 1 55 Sa For ti Reverse key Richelieu Roll hemming Round buttonhole Round hole needle plate The I The Saddle stitch Selecting a P-Memory Semi-automatic Sewing problems...
... Special accessories chart sup Spool holder Plea Stabilizers Standard buttonhole Start-up the bobbin thread 65, Pullover stitch 42 126 79-81 46 45 42 43, 44 42, 44 53b9 42 45 93-131 73, 74 85 67, 71, 72 28 105 Quilting 154, 1 55 Sa For ti Reverse key Richelieu Roll hemming Round buttonhole Round hole needle plate The I The Saddle stitch Selecting a P-Memory Semi-automatic Sewing problems...

Owner's Manual
Page 12
... stretch fabrics. Pleas 11 Saddle stitch with 19 needle positions For stitch combinations in pattern sequences and continuous sewing in reverse. For decorative hems on fine fabrics. Utility stitch programs L _- - 0001 I,' 'Ii 02 - --> < > LI03 04 > I ..-> . 06 07 r-i I For basting your sewing cuttings. - I For sewing and finishing seams with strength is needed, e.g. For sewing on elastic threads, covering terry-cloth seams and for decorative stitch length 1.5-6 mm stitching. - 10 02 Z.igzag sti. For sewing on elastic, darning tears and inserting...
... stretch fabrics. Pleas 11 Saddle stitch with 19 needle positions For stitch combinations in pattern sequences and continuous sewing in reverse. For decorative hems on fine fabrics. Utility stitch programs L _- - 0001 I,' 'Ii 02 - --> < > LI03 04 > I ..-> . 06 07 r-i I For basting your sewing cuttings. - I For sewing and finishing seams with strength is needed, e.g. For sewing on elastic threads, covering terry-cloth seams and for decorative stitch length 1.5-6 mm stitching. - 10 02 Z.igzag sti. For sewing on elastic, darning tears and inserting...
Owner's Manual
Page 26
... thread tension disk B with both hands. Then turn the hand wheel (43) towards you until it snaps into guide C and pull it . L .n' I I I I I 1 L 'S -C *- -"- Cut the thread, push the bobbin to the right. (_,i Sal For t The k The creative 7530 A5 th codir The or CO The or CC Cut InhJ3t Only must The S U j) Plea Winding the bobbin from the spool holder Place the sewing thread...
... thread tension disk B with both hands. Then turn the hand wheel (43) towards you until it snaps into guide C and pull it . L .n' I I I I I 1 L 'S -C *- -"- Cut the thread, push the bobbin to the right. (_,i Sal For t The k The creative 7530 A5 th codir The or CO The or CC Cut InhJ3t Only must The S U j) Plea Winding the bobbin from the spool holder Place the sewing thread...
Owner's Manual
Page 44
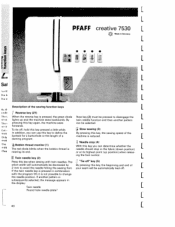
... the needle hitting the sewing foot. L 40 [ Twin needle key (2) or at its end. If another pattern I. The "Tie-off key (5) stitch width will be automatically tied-off , hold this key, the sewing speed of the bartack for a buttonhole or the length of a machine is reduced. L L PFAFF creative 7530 L Made in Germany L L I L I £ L Sai JL!1t L Description of the sewing function keys I Reverse key (27) When the reverse key...
... the needle hitting the sewing foot. L 40 [ Twin needle key (2) or at its end. If another pattern I. The "Tie-off key (5) stitch width will be automatically tied-off , hold this key, the sewing speed of the bartack for a buttonhole or the length of a machine is reduced. L L PFAFF creative 7530 L Made in Germany L L I L I £ L Sai JL!1t L Description of the sewing function keys I Reverse key (27) When the reverse key...

Owner's Manual
Page 101
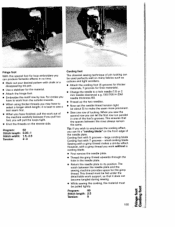
... to the basting position. TIP: To prevent the fabric layers from shifting, in sert dress pins crosswise to 6 mm as you need not be lowered. When the sewing help is selected with long straight stitches (6 mm). When doing so make one stitch, then pull the fabric the re quired amount to the rear. • Repeat this case the bottom feed need to finish the work. Light fabrics are reminded...
... to the basting position. TIP: To prevent the fabric layers from shifting, in sert dress pins crosswise to 6 mm as you need not be lowered. When the sewing help is selected with long straight stitches (6 mm). When doing so make one stitch, then pull the fabric the re quired amount to the rear. • Repeat this case the bottom feed need to finish the work. Light fabrics are reminded...
Owner's Manual
Page 107
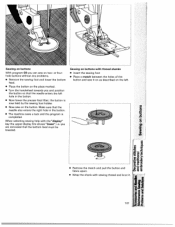
... feed. • Place the button on the button. the button is completed. Sewing on two- Make sure that the needle enters the left . you and position the button so that the needle also enters the right hole in the button. • Now lower the presser foot lifter; U) UI • Remove the match and pull the button and t fabric apart. Sewing on buttons With program 09 you can sew on buttons with thread shanks • Insert...
... feed. • Place the button on the button. the button is completed. Sewing on two- Make sure that the needle enters the left . you and position the button so that the needle also enters the right hole in the button. • Now lower the presser foot lifter; U) UI • Remove the match and pull the button and t fabric apart. Sewing on buttons With program 09 you can sew on buttons with thread shanks • Insert...

Owner's Manual
Page 126
Check the tension with set screw F. The adjustment of the bobbin thread tension is described on the upper side of the fabric. The guide rule is between the layers of fabric. The normal setting for utility stit ches is placed in such a way that the sewing foot be propped up to change the needle position with the numbered keys 5 and 6 in hole C and screwed tight with a wide zigzag stitch. If the needle thread tension is too...
Check the tension with set screw F. The adjustment of the bobbin thread tension is described on the upper side of the fabric. The guide rule is between the layers of fabric. The normal setting for utility stit ches is placed in such a way that the sewing foot be propped up to change the needle position with the numbered keys 5 and 6 in hole C and screwed tight with a wide zigzag stitch. If the needle thread tension is too...
Owner's Manual
Page 143
... its optimum length and width settings. In addition, the bobbin thread tension has to be embroidered on the bobbin case slightly to stabilize the fabric. Therefore, we recommend: [ Sewing feet The most materials without a paper underlay. It has to pucker, particularly when using dense embroidery stitches. Many materials tend to dry after the embroidery work has been completed, this could cause a distortion in the machine is No...
... its optimum length and width settings. In addition, the bobbin thread tension has to be embroidered on the bobbin case slightly to stabilize the fabric. Therefore, we recommend: [ Sewing feet The most materials without a paper underlay. It has to pucker, particularly when using dense embroidery stitches. Many materials tend to dry after the embroidery work has been completed, this could cause a distortion in the machine is No...

Owner's Manual
Page 144
They are particularly suitable here. You should how ever, always use threads of the same thickness when embroidering. • * You can create borders of variegated embroidery thread.This is available in many different colors at your Pfaff dealer. 4. 4i. Ii' I + •4 •II ::# A A r f 4) o 1$' 137 Borders Here are some examples of how you can also achieve additional effects through the use of any width by combining various em broidery programs. Machine embroidery-threads are available in many colors and thicknesses.
They are particularly suitable here. You should how ever, always use threads of the same thickness when embroidering. • * You can create borders of variegated embroidery thread.This is available in many different colors at your Pfaff dealer. 4. 4i. Ii' I + •4 •II ::# A A r f 4) o 1$' 137 Borders Here are some examples of how you can also achieve additional effects through the use of any width by combining various em broidery programs. Machine embroidery-threads are available in many colors and thicknesses.
Owner's Manual
Page 146
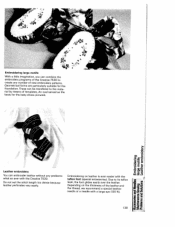
... problems what so ever with the Creative 7530. An oval served as the basis for the foundation.These can embroider leather without any number of templates. a), 0) - Embroidering on the thickness of the leather and the thread, we recommend a special leather needle or a needle with the teflon foot (special accessories). Leather embroidery You can be transfered to the mate rial by means of new embroidery patterns...
... problems what so ever with the Creative 7530. An oval served as the basis for the foundation.These can embroider leather without any number of templates. a), 0) - Embroidering on the thickness of the leather and the thread, we recommend a special leather needle or a needle with the teflon foot (special accessories). Leather embroidery You can be transfered to the mate rial by means of new embroidery patterns...
Owner's Manual
Page 149
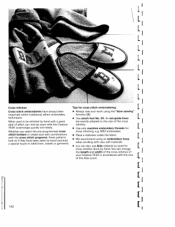
.... • Place a stabilizer under the fabric. • We recommend using the "slow sewing" important within traditional, ethnic embroidery function (3). You can now be stitched by hand. I [ I [ I What used for I I deal of effort can change the length and width of the cross stitches of your work using an embroidery hoop when working with a great • Use stitch foot No. 2A. Its red guide lines are exactly adapted to be...
.... • Place a stabilizer under the fabric. • We recommend using the "slow sewing" important within traditional, ethnic embroidery function (3). You can now be stitched by hand. I [ I [ I What used for I I deal of effort can change the length and width of the cross stitches of your work using an embroidery hoop when working with a great • Use stitch foot No. 2A. Its red guide lines are exactly adapted to be...

Owner's Manual
Page 170
... accessories. 163 Cl, 0 ,'Cl) '0-U, øm ewing feet (special accessories) he listed sewing feet are available at regular 98-999 650-00 intervals. Accessory Appliqué foot Open toe appliqué foot, 9 mm Cording foot, 5 grooves (twin needle with needle spacing 1.6-2.0) 130/705 H-ZWI Cording foot, 7 grooves (twin needle with needle spacing 1.6-2.0) 130/705 H-ZWI Cording blade (2) Finger guard Fringe foot Third spool holder Straight stitch foot with the triple needle 98-694 821-00 Caution! tch width up to 9 mm) Part...
... accessories. 163 Cl, 0 ,'Cl) '0-U, øm ewing feet (special accessories) he listed sewing feet are available at regular 98-999 650-00 intervals. Accessory Appliqué foot Open toe appliqué foot, 9 mm Cording foot, 5 grooves (twin needle with needle spacing 1.6-2.0) 130/705 H-ZWI Cording foot, 7 grooves (twin needle with needle spacing 1.6-2.0) 130/705 H-ZWI Cording blade (2) Finger guard Fringe foot Third spool holder Straight stitch foot with the triple needle 98-694 821-00 Caution! tch width up to 9 mm) Part...

Owner's Manual
Page 171
... (3/8 to help you guide the work more easily. When you can make a perfect, densely stitched seam with the appliqué foot which has a special cutout on the underside for the zigzag seam. • Attach the appliqué foot onto the sewing I . F 164 You can make sure that no fraying occurs later. [ Program: 00 Stitch length: 3 Tension: 3-5 Program: 02 or 16 Stitch length: 0.35 Stitch width: 1.5-2.0 [ Tension: 2-3 I I I I and heavy-weight fabrics). The hem is available...
... (3/8 to help you guide the work more easily. When you can make a perfect, densely stitched seam with the appliqué foot which has a special cutout on the underside for the zigzag seam. • Attach the appliqué foot onto the sewing I . F 164 You can make sure that no fraying occurs later. [ Program: 00 Stitch length: 3 Tension: 3-5 Program: 02 or 16 Stitch length: 0.35 Stitch width: 1.5-2.0 [ Tension: 2-3 I I I I and heavy-weight fabrics). The hem is available...
Owner's Manual
Page 172
... needle to a twin needle (1.6 or 2 mm needle clearance) e.g. 130/705 H-ZWI needle thickness 80. • Thread up the two needles. • Now set the needle thread tension tight (at about 5) to make the seam more prominent. • Sew one of the foot's grooves. large cording blade Cording foot with chalk or a disappearing ink pen. • Use a stabilizer for the gimp thread. Program: 02 Stitch length: 0.35-1 Stitch width: 1.5-2.5 Tension: 2-3 Cording foot The classical sewing technique of the needle plate...
... needle to a twin needle (1.6 or 2 mm needle clearance) e.g. 130/705 H-ZWI needle thickness 80. • Thread up the two needles. • Now set the needle thread tension tight (at about 5) to make the seam more prominent. • Sew one of the foot's grooves. large cording blade Cording foot with chalk or a disappearing ink pen. • Use a stabilizer for the gimp thread. Program: 02 Stitch length: 0.35-1 Stitch width: 1.5-2.5 Tension: 2-3 Cording foot The classical sewing technique of the needle plate...

Owner's Manual
Page 179
... of operation. Do not use a dry, soft, lint-free cloth. The machine is lying flat. a Changing the needle plate Switch off the on /off switch Removal • Raise the sewing foot and remove the detach able work support. • Pull the needle plate upwards at the front until you start sewing, check that the needle plate is otherwise maintenance free and must not be oiled in other places. • Clean and oil the sewing machine every...
... of operation. Do not use a dry, soft, lint-free cloth. The machine is lying flat. a Changing the needle plate Switch off the on /off switch Removal • Raise the sewing foot and remove the detach able work support. • Pull the needle plate upwards at the front until you start sewing, check that the needle plate is otherwise maintenance free and must not be oiled in other places. • Clean and oil the sewing machine every...

Owner's Manual
Page 182
... start the threaded machine without fabric in the hook race: Remove loose thread and apply one drop of oil to the hook. 7 Machine does not sew the entered program witch off the machine and back on /off the on again after about 10 seconds. E 0,2 175 COrn Thread up correctly. Enter desired program again. Do not wind free-hand. Remove needle plate, remove lint with brush. mportant notes: 3efore changing the sewing feet or needles, you...
... start the threaded machine without fabric in the hook race: Remove loose thread and apply one drop of oil to the hook. 7 Machine does not sew the entered program witch off the machine and back on /off the on again after about 10 seconds. E 0,2 175 COrn Thread up correctly. Enter desired program again. Do not wind free-hand. Remove needle plate, remove lint with brush. mportant notes: 3efore changing the sewing feet or needles, you...


