

Owner's Manual
Page 5
... with accessory compartment (30) Sewing foot holder with sewing foot (31) Needle threader (32) Thread guide (33) Threading slots (34) Needle thread tension (35) Take-up lever (36) Carrying handle (37) Thread guide for bobbin winding (38) Program table (39) Reel holder with unwinding disk (40) ...Base plate (48) Hook cover (sewing hook behind) (49) Free-arm (50) Sewing lamp (51) Thread trimmer (52) Top cover (53) Dual feed/IDT-System (54) Needle plate Parts of the creative 7530 (1) Bobbin thread monitor and sewing function light "reverse sewing" (2> "Twin needle" key (3) "Slow sewing" key (4) "...
... with accessory compartment (30) Sewing foot holder with sewing foot (31) Needle threader (32) Thread guide (33) Threading slots (34) Needle thread tension (35) Take-up lever (36) Carrying handle (37) Thread guide for bobbin winding (38) Program table (39) Reel holder with unwinding disk (40) ...Base plate (48) Hook cover (sewing hook behind) (49) Free-arm (50) Sewing lamp (51) Thread trimmer (52) Top cover (53) Dual feed/IDT-System (54) Needle plate Parts of the creative 7530 (1) Bobbin thread monitor and sewing function light "reverse sewing" (2> "Twin needle" key (3) "Slow sewing" key (4) "...

Owner's Manual
Page 8
...1 65 146 1 64 100 1 00 Balance Bartack Basting stitch Battery change Battery message j Bias tape binder j Blind stitch Bobbin case Bobbin monitor Sal Bobbin thread tension Bobbin winding Borders For th Buttonhole balance The le Buttonhole guide The Buttonhole key Buttonholes 47, 100, 114 [ 100 96 171 38 1 68 99... the sewing foot or col Changing the sewing lamp The Cleaning and lubricating or col Clear key u must Cording foot The p Covering seams suppl Creative Designer Pleas Cross stitch Cross stitch buttonhole 18 32 1 72 29 1 73 172 L 42 41 49-51 38 165 166 106 61-91 ...
...1 65 146 1 64 100 1 00 Balance Bartack Basting stitch Battery change Battery message j Bias tape binder j Blind stitch Bobbin case Bobbin monitor Sal Bobbin thread tension Bobbin winding Borders For th Buttonhole balance The le Buttonhole guide The Buttonhole key Buttonholes 47, 100, 114 [ 100 96 171 38 1 68 99... the sewing foot or col Changing the sewing lamp The Cleaning and lubricating or col Clear key u must Cording foot The p Covering seams suppl Creative Designer Pleas Cross stitch Cross stitch buttonhole 18 32 1 72 29 1 73 172 L 42 41 49-51 38 165 166 106 61-91 ...

Owner's Manual
Page 9
... lamp Light-knit mending stitch Linen embroidery Lubricating and cleaning €key Maintenance and trouble shooting Monograms Multi-stitch gathering Needle chart Needle stop Needle thread tension Needle threader Notes on safety Number keys Oiling okkey On/off switch Operational help Overlock stitches 18-19 35-59 139 1 39 1 1, 1 2 1 52, 153...
... lamp Light-knit mending stitch Linen embroidery Lubricating and cleaning €key Maintenance and trouble shooting Monograms Multi-stitch gathering Needle chart Needle stop Needle thread tension Needle threader Notes on safety Number keys Oiling okkey On/off switch Operational help Overlock stitches 18-19 35-59 139 1 39 1 1, 1 2 1 52, 153...
Owner's Manual
Page 10
... pattern mus Single stem stitch Only Slow sewing mus Smocking The Special accessories chart sup Spool holder Plea Stabilizers Standard buttonhole Start-up the bobbin thread 65, Pullover stitch 42 126 79-81 46 45 42 43, 44 42, 44 53b9 42 45 93-131 73, 74 85 67, 71, 72..., 1 28 131 42 104 40 1 24 1 63 j 22, 23 1L 1 36 111, 11 2 p 38 L 45 A 67 45 96 103-107 9 1 03 1 04 Tacking Technical section Thread tension Thread trimmer Threading the needle thread Threading the twin needle 6 40 1 533 24, 25, 33, 1 20 28 2 'f 1 3$ A Pattern alteration .
... pattern mus Single stem stitch Only Slow sewing mus Smocking The Special accessories chart sup Spool holder Plea Stabilizers Standard buttonhole Start-up the bobbin thread 65, Pullover stitch 42 126 79-81 46 45 42 43, 44 42, 44 53b9 42 45 93-131 73, 74 85 67, 71, 72..., 1 28 131 42 104 40 1 24 1 63 j 22, 23 1L 1 36 111, 11 2 p 38 L 45 A 67 45 96 103-107 9 1 03 1 04 Tacking Technical section Thread tension Thread trimmer Threading the needle thread Threading the twin needle 6 40 1 533 24, 25, 33, 1 20 28 2 'f 1 3$ A Pattern alteration .

Owner's Manual
Page 12
... patches. nd sti.tch uf'6 Closed overlock stitch 07 Basting stitch 08 Fully automatic eyelets 09 Program for sewing on buttons For sewing on elastic threads, covering terry-cloth seams and for decorative hems (smocking effect). I - 08 0 09 10 11 12 II ' < > < > r- 13 14 r...cuttings. - for shell-edging. 10 For sewing seams invisibly and serging an edge at the same time. I For sewing and finishing seams with an edge thread. L - 1 2 Shell edging stitch 1 3 Elastic shell-edging stitch 1 4 Honeycomb stitch 15 Elastic stitch b=1 stitch point 1 6 Purl stitch ...
... patches. nd sti.tch uf'6 Closed overlock stitch 07 Basting stitch 08 Fully automatic eyelets 09 Program for sewing on buttons For sewing on elastic threads, covering terry-cloth seams and for decorative hems (smocking effect). I - 08 0 09 10 11 12 II ' < > < > r- 13 14 r...cuttings. - for shell-edging. 10 For sewing seams invisibly and serging an edge at the same time. I For sewing and finishing seams with an edge thread. L - 1 2 Shell edging stitch 1 3 Elastic shell-edging stitch 1 4 Honeycomb stitch 15 Elastic stitch b=1 stitch point 1 6 Purl stitch ...
Owner's Manual
Page 21
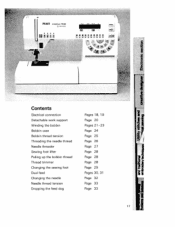
PFAFF creative 7530 - Jz II • 7 S I %1 I :1 ji 11, Ii 17 I / Contents Electrical connection Detachable work support Winding the bobbin Bobbin case Bobbin thread tension Threading the needle thread Needle threader Sewing foot lifter Pulling up the bobbin thread Thread trimmer Changing the sewing foot Dual feed Changing the needle Needle thread tension Dropping the feed dog Pages 18, 19 Page 20 Pages 21-23 Page 24 Page 25 Page 26 Page 27 Page 28 Page 28 Page 28 Page 29 Pages 30, 31 Page 32 Page 33 Page 33 Ca I I -
PFAFF creative 7530 - Jz II • 7 S I %1 I :1 ji 11, Ii 17 I / Contents Electrical connection Detachable work support Winding the bobbin Bobbin case Bobbin thread tension Threading the needle thread Needle threader Sewing foot lifter Pulling up the bobbin thread Thread trimmer Changing the sewing foot Dual feed Changing the needle Needle thread tension Dropping the feed dog Pages 18, 19 Page 20 Pages 21-23 Page 24 Page 25 Page 26 Page 27 Page 28 Page 28 Page 28 Page 29 Pages 30, 31 Page 32 Page 33 Page 33 Ca I I -
Owner's Manual
Page 26
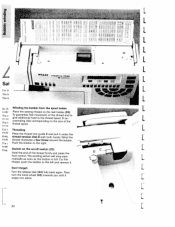
...an unwinding disk corresponding to the right. Ji •j ;; Threading Place the thread into place. 22 L • i!I F L L L C - Wind the thread clockwise a few times around the bobbin. Switch on the on the reel holder (39). (_,i Sal For t The k The creative 7530 A5 th codir The or CO The or CC Cut InhJ3t... Only must The S U j) Plea Winding the bobbin from the spool holder Place the sewing thread on /off switch (25) Hold the end of the thread firmly and press the foot control.The ...
...an unwinding disk corresponding to the right. Ji •j ;; Threading Place the thread into place. 22 L • i!I F L L L C - Wind the thread clockwise a few times around the bobbin. Switch on the on the reel holder (39). (_,i Sal For t The k The creative 7530 A5 th codir The or CO The or CC Cut InhJ3t... Only must The S U j) Plea Winding the bobbin from the spool holder Place the sewing thread on /off switch (25) Hold the end of the thread firmly and press the foot control.The ...
Owner's Manual
Page 27
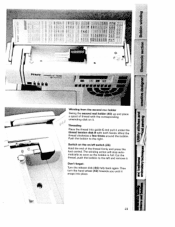
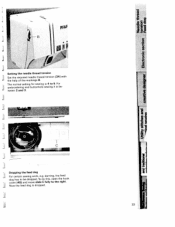
... winding action will stop auto matically as soon as the bobbin is full. Then turn the hand wheel (43) towards you until it . Threading Place the thread into place. 1I I I ii PFAFF CrOatjve 7530 a 11= LI) Winding from the second reei holder Swing the second reel holder (40) up and place a spool of the...
... winding action will stop auto matically as soon as the bobbin is full. Then turn the hand wheel (43) towards you until it . Threading Place the thread into place. 1I I I ii PFAFF CrOatjve 7530 a 11= LI) Winding from the second reei holder Swing the second reel holder (40) up and place a spool of the...
Owner's Manual
Page 28
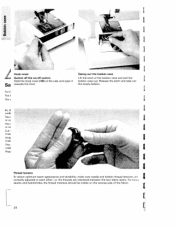
...or CC I Cut (1141$ Only I mus The supr I Plea I I Thread tension To obtain optimum seam appearance and durability, make sure needle and bobbin thread tensions ire I L 24 r For fancy seams and buttonholes, the thread interlace should be visible on /off switch. I correctly adjusted to each other;... the threads are interlaced between the two fabric layers. the empty...
...or CC I Cut (1141$ Only I mus The supr I Plea I I Thread tension To obtain optimum seam appearance and durability, make sure needle and bobbin thread tensions ire I L 24 r For fancy seams and buttonholes, the thread interlace should be visible on /off switch. I correctly adjusted to each other;... the threads are interlaced between the two fabric layers. the empty...
Owner's Manual
Page 29
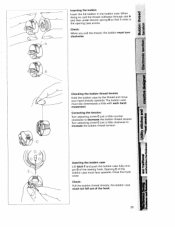
...downwards a little with each hand movement. I I ji I I25 Check: When you pull the thread, the bobbin must turn clockwise, '0 '-0 I I Checking the bobbin thread tension Hold the bobbin case by the thread and move your hand sharply upwards.The bobbin case must not fall out of the hook. I ... latch F and push the bobbin case fully onto pin D of the bobbin case must face upwards. Close the hook cover Check: Pull the bobbin thread sharply; 1 I / Inserting the bobbin Insert the full bobbin in the opening (see arrow). Correcting the tension: Turn adjusting screw C just a ...
...downwards a little with each hand movement. I I ji I I25 Check: When you pull the thread, the bobbin must turn clockwise, '0 '-0 I I Checking the bobbin thread tension Hold the bobbin case by the thread and move your hand sharply upwards.The bobbin case must not fall out of the hook. I ... latch F and push the bobbin case fully onto pin D of the bobbin case must face upwards. Close the hook cover Check: Pull the bobbin thread sharply; 1 I / Inserting the bobbin Insert the full bobbin in the opening (see arrow). Correcting the tension: Turn adjusting screw C just a ...
Owner's Manual
Page 30
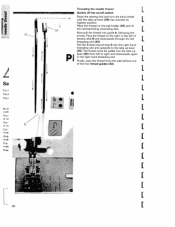
...the 1 arrows. I I I Sa For t The I The I Now pull the thread into the right hand threading slot and upwards to the take up lever (35) has reached its L highest position. I lb. Place the thread on /off switch Raise the sewing foot and turn the hand wheel until the take ...of tension disk B and downwards through the left to the right or the left of the two thread guides (32). a As Ii I I I [ mus Only [ mus 1 he sup [ Plea [ [ [ [ 26 [ Threading the needle thread L Switch off the on the reel holder (39) and fit the corresponding unwinding disk. codi The...
...the 1 arrows. I I I Sa For t The I The I Now pull the thread into the right hand threading slot and upwards to the take up lever (35) has reached its L highest position. I lb. Place the thread on /off switch Raise the sewing foot and turn the hand wheel until the take ...of tension disk B and downwards through the left to the right or the left of the two thread guides (32). a As Ii I I I [ mus Only [ mus 1 he sup [ Plea [ [ [ [ 26 [ Threading the needle thread L Switch off the on the reel holder (39) and fit the corresponding unwinding disk. codi The...
Owner's Manual
Page 31
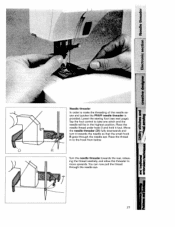
... and turn it taut. Tap the foot control to take one stitch and the needle will be in to the hook from below. Place the thread in the highest position. I I II Turn the needle threader towards the needle so that the small hook R goes through the needle eye. r * /rV... H Needle threader In order to move upwards. Place the needle thread under hook 0 and hold it towards the rear, releas ing the thread carefully, and allow the threader to make the threading of the needle ea sier and quicker the PFAFF needle threader is provided. I 27 - Lower the sewing foot (see next ...
... and turn it taut. Tap the foot control to take one stitch and the needle will be in to the hook from below. Place the thread in the highest position. I I II Turn the needle threader towards the needle so that the small hook R goes through the needle eye. r * /rV... H Needle threader In order to move upwards. Place the needle thread under hook 0 and hold it towards the rear, releas ing the thread carefully, and allow the threader to make the threading of the needle ea sier and quicker the PFAFF needle threader is provided. I 27 - Lower the sewing foot (see next ...
Owner's Manual
Page 32
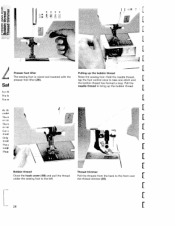
... sewing foot is raised and lowered with the presser foot lifter (26). Pull the needle thread to take one stitch and C Sal the bobbin thread has formed a loop. Raise the sewing foot. Pull the threads from the back to the left. Foi th ihe k Ihu As th [ cod in Thu... v or CO [ Thu v 01 CO [ Cut C must Only [ must 11w supp [ Pleat [ [ Bobbin thread Thread trimmer Close the hook cover (48) and pull the thread under the sewIng foot to the front over the thread trimmer (51). 1/ I f IE 28 I L 'C C C Presser foot lifter Pulling up the bobbin...
... sewing foot is raised and lowered with the presser foot lifter (26). Pull the needle thread to take one stitch and C Sal the bobbin thread has formed a loop. Raise the sewing foot. Pull the threads from the back to the left. Foi th ihe k Ihu As th [ cod in Thu... v or CO [ Thu v 01 CO [ Cut C must Only [ must 11w supp [ Pleat [ [ Bobbin thread Thread trimmer Close the hook cover (48) and pull the thread under the sewIng foot to the front over the thread trimmer (51). 1/ I f IE 28 I L 'C C C Presser foot lifter Pulling up the bobbin...
Owner's Manual
Page 37
For J embroidering and buttonhole sewing it is be dropped. Now the feed dog is 4 to the right. C Dropping the feed dog For certain sewing work, e.g. To do this, open the hook cover (48) and move slide C fully to 5. I 'U g I I I F" 33 darning, the feed dog has to be tween 2 and 3. PFAF 0 Setting the needle thread tension Set the required needle thread tension (34) with the help of the markings B. The normal setting for sewing is dropped.
For J embroidering and buttonhole sewing it is be dropped. Now the feed dog is 4 to the right. C Dropping the feed dog For certain sewing work, e.g. To do this, open the hook cover (48) and move slide C fully to 5. I 'U g I I I F" 33 darning, the feed dog has to be tween 2 and 3. PFAF 0 Setting the needle thread tension Set the required needle thread tension (34) with the help of the markings B. The normal setting for sewing is dropped.
Owner's Manual
Page 44
... blinks when the bobbin thread is [ Needle stop in the fabric (down position) I nearing its highest point (up and the machine sews backwards. L 40 [ By twin needle function and then another pattern is reduced. pressing this key pressed a little while. darning program. your seam will automatically be selected. L L PFAFF creative 7530 L Made in Germany...
... blinks when the bobbin thread is [ Needle stop in the fabric (down position) I nearing its highest point (up and the machine sews backwards. L 40 [ By twin needle function and then another pattern is reduced. pressing this key pressed a little while. darning program. your seam will automatically be selected. L L PFAFF creative 7530 L Made in Germany...
Owner's Manual
Page 45
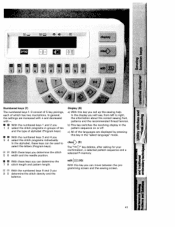
... the sewing help. edit(1O) With this key you can be used to right, the information about the correct sewing foot, patterns and the recommended thread tension. I JLI JH J ,J LH IL Numbered keys (7) The numbered keys 1-0 consist of 5 key pairings, each of the languages are increased with + and decreased with...
... the sewing help. edit(1O) With this key you can be used to right, the information about the correct sewing foot, patterns and the recommended thread tension. I JLI JH J ,J LH IL Numbered keys (7) The numbered keys 1-0 consist of 5 key pairings, each of the languages are increased with + and decreased with...

Owner's Manual
Page 53
... any time. Sewing foot (3) with the pattern selection keys "1 ' "A-z' " ' "rn)' "Y'and "O-9" you can be pressed again to right into: '4t Pattern inversion (x) (lateral mirror image) C Thread tension (3-5) I 1 2 31 4 5 6 7 8 9! I L dy I = ELi I I lhu Sewing foot (2A) without top feed 1--
... any time. Sewing foot (3) with the pattern selection keys "1 ' "A-z' " ' "rn)' "Y'and "O-9" you can be pressed again to right into: '4t Pattern inversion (x) (lateral mirror image) C Thread tension (3-5) I 1 2 31 4 5 6 7 8 9! I L dy I = ELi I I lhu Sewing foot (2A) without top feed 1--
Owner's Manual
Page 107
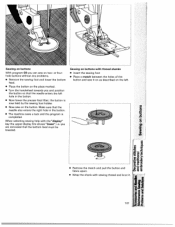
...sure that the needle also enters the right hole in the button. • Now lower the presser foot lifter; When selecting sewing help with sewing thread and knot it on as described on the left hole in the button. • The machine sews a tack and the program is now held... display line shows "lower' i.e. the button is completed. U) UI • Remove the match and pull the button and t fabric apart. Sewing on buttons with thread shanks • Insert the sewing foot • Place a match between the holes of the button and sew it . 101 or fourhole buttons without any problems...
...sure that the needle also enters the right hole in the button. • Now lower the presser foot lifter; When selecting sewing help with sewing thread and knot it on as described on the left hole in the button. • The machine sews a tack and the program is now held... display line shows "lower' i.e. the button is completed. U) UI • Remove the match and pull the button and t fabric apart. Sewing on buttons with thread shanks • Insert the sewing foot • Place a match between the holes of the button and sew it . 101 or fourhole buttons without any problems...
Owner's Manual
Page 111
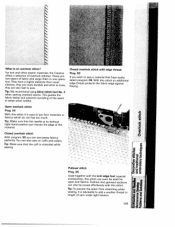
S S S S S S S S S What is advisable to add a woollen thread or length of yarn under light tension. 105 i0?.C0.E0 ii 11111 For knit and other stretch materials, the Creative offers a selection of the seam at its farthest right-hand position just misses the edge of fabric and serge ...while sewing. Tip: Make sure that frays easily, select program 06. _ S S. Open overlock stitch Prog. 34 With this stitch an additional edge thread protects the fabric edge against fraying. With this stitch it is an overlock stitch? Tip: Make sure that the needle at wider stitch widths. C...
S S S S S S S S S What is advisable to add a woollen thread or length of yarn under light tension. 105 i0?.C0.E0 ii 11111 For knit and other stretch materials, the Creative offers a selection of the seam at its farthest right-hand position just misses the edge of fabric and serge ...while sewing. Tip: Make sure that frays easily, select program 06. _ S S. Open overlock stitch Prog. 34 With this stitch an additional edge thread protects the fabric edge against fraying. With this stitch it is an overlock stitch? Tip: Make sure that the needle at wider stitch widths. C...
Owner's Manual
Page 121
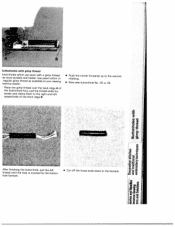
... the back ridge A of the buttonhole foot, pull the thread ends for wards and clamp them to the right and left thread until the loop is covered by the button hole bartack. • Cut off the loose ends close to the second marking. • Now sew buttonhole ...No. 35 or 36. 3uttonholes with gimp thread uttonholes which are sewn with a gimp thread ire more durable and neater. Use pearl cotton or regular gimp thread as available at your sewing nachine dealer. C..' 0 After finishing the buttonhole, pull the left respectively of...
... the back ridge A of the buttonhole foot, pull the thread ends for wards and clamp them to the right and left thread until the loop is covered by the button hole bartack. • Cut off the loose ends close to the second marking. • Now sew buttonhole ...No. 35 or 36. 3uttonholes with gimp thread uttonholes which are sewn with a gimp thread ire more durable and neater. Use pearl cotton or regular gimp thread as available at your sewing nachine dealer. C..' 0 After finishing the buttonhole, pull the left respectively of...


