
Owner's Manual
Page 2
... threading needle, changing needle, threading bobbin, or changing presser foot, etc. • Always unplug the sewing machine from outlet. • Do not unplug by or near children or infirm person. • Use this sewing machine only for examination, repair, electrical or mechanical adjustment. • Never operate the sewing machine with any adjustment in this sewing machine is required around the Sewing machine needle. • Always use bent needles. • Do not pull or push fabric while stitching...
... threading needle, changing needle, threading bobbin, or changing presser foot, etc. • Always unplug the sewing machine from outlet. • Do not unplug by or near children or infirm person. • Use this sewing machine only for examination, repair, electrical or mechanical adjustment. • Never operate the sewing machine with any adjustment in this sewing machine is required around the Sewing machine needle. • Always use bent needles. • Do not pull or push fabric while stitching...
Owner's Manual
Page 4
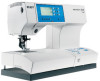
...selection button "Straight stitch" Direct selection button "Elastic stitch" Direct selection button "Closed overlock stitch" Slide for lowering the feed dog Base plate Removable accessory tray Presser foot holder with presser foot Integrated dual feed/IDT Integrated needle threader "Reverse sewing" button Threading slots Needle thread tension "Tie-off" button "Needle up/down" button "Slow sewing" button "Pattern mirror" button/ "Lock" button Take-up lever Thread guide Spool pin with spool cap Hole for second spool pin Lid with stitch program chart Bobbin winder Bobbin door Free arm Sewing bulb...
...selection button "Straight stitch" Direct selection button "Elastic stitch" Direct selection button "Closed overlock stitch" Slide for lowering the feed dog Base plate Removable accessory tray Presser foot holder with presser foot Integrated dual feed/IDT Integrated needle threader "Reverse sewing" button Threading slots Needle thread tension "Tie-off" button "Needle up/down" button "Slow sewing" button "Pattern mirror" button/ "Lock" button Take-up lever Thread guide Spool pin with spool cap Hole for second spool pin Lid with stitch program chart Bobbin winder Bobbin door Free arm Sewing bulb...
Owner's Manual
Page 5
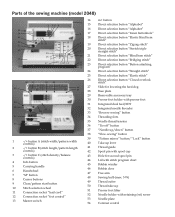
...selection button "Straight stitch" Direct selection button "Elastic stitch" Direct selection button "Closed overlock stitch" Slide for lowering the feed dog Base plate Removable accessory tray Presser foot holder with presser foot Integrated dual feed/IDT Integrated needle threader "Reverse sewing" button Threading slots Needle thread tension "Tie-off" button "Needle up/down" button "Slow sewing" button "Pattern mirror" button/ "Lock" button Take-up lever Thread guide Spool pin with spool cap Hole for second spool pin Lid with stitch program chart Bobbin winder Bobbin door Free arm Sewing bulb...
...selection button "Straight stitch" Direct selection button "Elastic stitch" Direct selection button "Closed overlock stitch" Slide for lowering the feed dog Base plate Removable accessory tray Presser foot holder with presser foot Integrated dual feed/IDT Integrated needle threader "Reverse sewing" button Threading slots Needle thread tension "Tie-off" button "Needle up/down" button "Slow sewing" button "Pattern mirror" button/ "Lock" button Take-up lever Thread guide Spool pin with spool cap Hole for second spool pin Lid with stitch program chart Bobbin winder Bobbin door Free arm Sewing bulb...

Owner's Manual
Page 8
... Non-elastic/elastic stitches Overlock stitches Darning Free Motion Sewing Gathering Bridging stitches Cross hem stitches Hemming Shell edging 3:11 3:11-12 3:13 3:14 3:14 3:15 3:16 3:16 3:16 3:16 Preparations Carrying case Lid with stitch chart Electrical connection Voltage switch Removable accessory tray Bobbin winding Bobbin case Threading the needle thread Integrated needle threader Drawing up the bobbin thread Presser foot lifter Thread cutter Changing the presser feet Winding a bobbin through the needle Changing needles Threading twin needle Integrated Dual Feed/IDT Lowering feed dog...
... Non-elastic/elastic stitches Overlock stitches Darning Free Motion Sewing Gathering Bridging stitches Cross hem stitches Hemming Shell edging 3:11 3:11-12 3:13 3:14 3:14 3:15 3:16 3:16 3:16 3:16 Preparations Carrying case Lid with stitch chart Electrical connection Voltage switch Removable accessory tray Bobbin winding Bobbin case Threading the needle thread Integrated needle threader Drawing up the bobbin thread Presser foot lifter Thread cutter Changing the presser feet Winding a bobbin through the needle Changing needles Threading twin needle Integrated Dual Feed/IDT Lowering feed dog...

Owner's Manual
Page 10
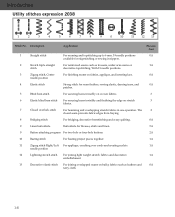
... linen. 5A 0 Button attaching For two-hole or four-hole buttons. 2A program 10 Basting stitch For basting project pieces together. 1A 11 Zigzag stitch Right/ For applique, couching over cords and creating eyelets. 1A Left needle position 12 Lightning stretch stitch For joining light weight stretch fabrics and decorative embellishment. 1A 13 Decorative elastic For joining overlapped seams on stretch fabrics. 3 stitch 7 Closed overlock stitch For hemming and overlapping stretch fabrics in zippers. 2 Stretch triple straight For reinforced seams such as leathers...
... linen. 5A 0 Button attaching For two-hole or four-hole buttons. 2A program 10 Basting stitch For basting project pieces together. 1A 11 Zigzag stitch Right/ For applique, couching over cords and creating eyelets. 1A Left needle position 12 Lightning stretch stitch For joining light weight stretch fabrics and decorative embellishment. 1A 13 Decorative elastic For joining overlapped seams on stretch fabrics. 3 stitch 7 Closed overlock stitch For hemming and overlapping stretch fabrics in zippers. 2 Stretch triple straight For reinforced seams such as leathers...

Owner's Manual
Page 11
... hem stitch 18 Closed overlock 19 Pullover stitch 20 Light-knit fabric patching stitch 21 Cross stitch buttonhole 22 Rounded buttonhole with elastic thread in the bobbin. For applying belt loops and reinforcing pockets. 0A Decorative bartack for decorative elastic application and sewing with lengthwise bartack 23 Eyelet buttonhole 24 Rounded buttonhole 25 Eyelet 26 Bartack 27 Denim bartack Application Presserfoot For joining and overcasting stretch fabrics in one operation. 3 Elastic...
... hem stitch 18 Closed overlock 19 Pullover stitch 20 Light-knit fabric patching stitch 21 Cross stitch buttonhole 22 Rounded buttonhole with elastic thread in the bobbin. For applying belt loops and reinforcing pockets. 0A Decorative bartack for decorative elastic application and sewing with lengthwise bartack 23 Eyelet buttonhole 24 Rounded buttonhole 25 Eyelet 26 Bartack 27 Denim bartack Application Presserfoot For joining and overcasting stretch fabrics in one operation. 3 Elastic...
Owner's Manual
Page 12
... on fabrics, applique, and inserting lace. 0A needle position 4 Elastic stitch Strong stitch for blouses, shirts and linen. 5A 0 Button attaching program For two-hole or four-hole buttons. 2A 10 Basting stitch For basting project pieces together. 1A 11 Zigzag stitch Right/Left For applique, couching over cords and creating eyelets. 1A needle position 12 Lightning stretch stitch For joining light weight stretch fabrics and decorative 1A embellishment 13 Decorative elastic stitch For joining overlapped seams on stretch 3 fabrics. 7 Closed overlock stitch For hemming...
... on fabrics, applique, and inserting lace. 0A needle position 4 Elastic stitch Strong stitch for blouses, shirts and linen. 5A 0 Button attaching program For two-hole or four-hole buttons. 2A 10 Basting stitch For basting project pieces together. 1A 11 Zigzag stitch Right/Left For applique, couching over cords and creating eyelets. 1A needle position 12 Lightning stretch stitch For joining light weight stretch fabrics and decorative 1A embellishment 13 Decorative elastic stitch For joining overlapped seams on stretch 3 fabrics. 7 Closed overlock stitch For hemming...

Owner's Manual
Page 33
... direct selection buttons for instant selection of the most commonly used stitches (0 - 9) and for the selection of selecting your desired stitch: 1. With the direct selection buttons to sew again. 3:1 Sewing Stitch selection on model 2048 Stitch selection on model 2038 Sewing Adjusting the contrast on the bobbin, the bobbin symbol appears in the stitches. The symbol disappears after a full bobbin is no thread on the expression window The contrast setting in the case of model 2038...
... direct selection buttons for instant selection of the most commonly used stitches (0 - 9) and for the selection of selecting your desired stitch: 1. With the direct selection buttons to sew again. 3:1 Sewing Stitch selection on model 2048 Stitch selection on model 2038 Sewing Adjusting the contrast on the bobbin, the bobbin symbol appears in the stitches. The symbol disappears after a full bobbin is no thread on the expression window The contrast setting in the case of model 2038...

Owner's Manual
Page 36
... button Touch the info button to engage or disengage the IDT, lower the feed dogs, page number of the darning program (model 2048) (see page 3:14) • engages automatic tapering. 3:4 Reverse sewing This button has several functions: • when pressed, will reverse sew • for permanent reverse press this button before starting to sew, the machine sews in reverse until you the following information: needle size/type recommendation, needle thread tension setting, to receive information about the selected stitch...
... button Touch the info button to engage or disengage the IDT, lower the feed dogs, page number of the darning program (model 2048) (see page 3:14) • engages automatic tapering. 3:4 Reverse sewing This button has several functions: • when pressed, will reverse sew • for permanent reverse press this button before starting to sew, the machine sews in reverse until you the following information: needle size/type recommendation, needle thread tension setting, to receive information about the selected stitch...

Owner's Manual
Page 43
... straight stitches (6 mm). Press the foot control again for best results. If the presser foot is important to sew close to the edge of the zipper teeth by using one of the straight stitch to sew in center needle position. Then press the cl/pattern start the stitch sequence again, position the cursor as possible, until you will sew one stitch at a time. The zipper foot can be moved to baste with the -/+ button "A". Tip: Light fabrics...
... straight stitches (6 mm). Press the foot control again for best results. If the presser foot is important to sew close to the edge of the zipper teeth by using one of the straight stitch to sew in center needle position. Then press the cl/pattern start the stitch sequence again, position the cursor as possible, until you will sew one stitch at a time. The zipper foot can be moved to baste with the -/+ button "A". Tip: Light fabrics...

Owner's Manual
Page 45
... of overlock stitches. When you wish to ensure that the right swing of the needle clears the raw edge of the fabric and the pin of fabric and overcast them in one operation. With this stitch an additional edge thread protects the fabric edge against further fraying. 3:13 These stitches join multiple layers of the presser foot. Tip: Use blind stitch foot No. 3 when sewing overcast seams. This guides the fabric...
... of overlock stitches. When you wish to ensure that the right swing of the needle clears the raw edge of the fabric and the pin of fabric and overcast them in one operation. With this stitch an additional edge thread protects the fabric edge against further fraying. 3:13 These stitches join multiple layers of the presser foot. Tip: Use blind stitch foot No. 3 when sewing overcast seams. This guides the fabric...

Owner's Manual
Page 47
... the needle plate. To obtain neat and even gathers you should sew two or three rows of gathering stitches. • Set your stitch length to gather sleeves, cuffs, skirts or valances. It is available in the small hole at the beginning and end of the seam. • Sew 1 or 2 more rows of stitching, using the edge of the presser foot as a guide. • Gather the fabric by pulling the bobbin (bottom) threads...
... the needle plate. To obtain neat and even gathers you should sew two or three rows of gathering stitches. • Set your stitch length to gather sleeves, cuffs, skirts or valances. It is available in the small hole at the beginning and end of the seam. • Sew 1 or 2 more rows of stitching, using the edge of the presser foot as a guide. • Gather the fabric by pulling the bobbin (bottom) threads...

Owner's Manual
Page 52
... not stretch. After the machine sews the first few stitches of the curved end pull the gimp thread down from the clamp with gimp thread Place the center of a length of gimp thread over the metal bar extending from the center, front of the needle. Warning: The presser foot must not be sewn. Pull the gimp thread on the left guides on the clamp at...
... not stretch. After the machine sews the first few stitches of the curved end pull the gimp thread down from the clamp with gimp thread Place the center of a length of gimp thread over the metal bar extending from the center, front of the needle. Warning: The presser foot must not be sewn. Pull the gimp thread on the left guides on the clamp at...
Owner's Manual
Page 54
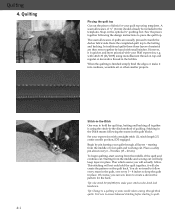
... then sewn together by pin basting your expression with small stitches. Stitch-in-the-Ditch One way to hold the quilt together, it will actually follow every seam in the quilt, sew every 3 - 4 inches to create a decorative pattern for your Pfaff expression, e.g. starting to make it is using templates. Plan which seams you can sew more practical with stitch 30 (26/2038) using monofilament thread on top and regular...
... then sewn together by pin basting your expression with small stitches. Stitch-in-the-Ditch One way to hold the quilt together, it will actually follow every seam in the quilt, sew every 3 - 4 inches to create a decorative pattern for your Pfaff expression, e.g. starting to make it is using templates. Plan which seams you can sew more practical with stitch 30 (26/2038) using monofilament thread on top and regular...

Owner's Manual
Page 55
... pattern on the three layers of the quilt. Take one another way to secure a quilt. Now move the quilt in the needle. Tip: Use the Free-motion guide grip to the top of your machine in the bobbin. • Set the needle thread tension to secure the threads. Lower the feed dog and set up your quilt, you control the stitch length. Use a contrast or matching polyester or cotton thread in the darning position. Tying the Quilt Tying a quilt is lowered...
... pattern on the three layers of the quilt. Take one another way to secure a quilt. Now move the quilt in the needle. Tip: Use the Free-motion guide grip to the top of your machine in the bobbin. • Set the needle thread tension to secure the threads. Lower the feed dog and set up your quilt, you control the stitch length. Use a contrast or matching polyester or cotton thread in the darning position. Tying the Quilt Tying a quilt is lowered...

Owner's Manual
Page 58
... the fabric. Decorative sewing/Specialty techniques Free-motion monograms Use stitch 3 (adjust stitch width and stitch length) to create wonderful monogram initials of your fabric. Place a tear-away stabilizer under your own design. A dense zigzag stitch appears in the expression window and beside it into the darning position. Continue to sew to the length you would like to stitch them. Attach the darning foot and bring it the word "tapering" with the needle in the fabric so...
... the fabric. Decorative sewing/Specialty techniques Free-motion monograms Use stitch 3 (adjust stitch width and stitch length) to create wonderful monogram initials of your fabric. Place a tear-away stabilizer under your own design. A dense zigzag stitch appears in the expression window and beside it into the darning position. Continue to sew to the length you would like to stitch them. Attach the darning foot and bring it the word "tapering" with the needle in the fabric so...
Owner's Manual
Page 61
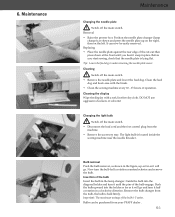
... from your PFAFF dealer . 6:1 Before you start sewing, check that the needle plate is 5 watts. Changing the light bulb Switch off the main switch. • Disconnect the lead cord and the foot control plug from the bulb, the bulb is located inside the sewing machine near the needle threader. Insertion of operation. It can be easily removed. Push the bulb upward into the diagonal holder and turn it until the pins of the...
... from your PFAFF dealer . 6:1 Before you start sewing, check that the needle plate is 5 watts. Changing the light bulb Switch off the main switch. • Disconnect the lead cord and the foot control plug from the bulb, the bulb is located inside the sewing machine near the needle threader. Insertion of operation. It can be easily removed. Push the bulb upward into the diagonal holder and turn it until the pins of the...

Owner's Manual
Page 62
... needle plate because you insert the bobbin case, push it , or has become dry after overlong storage. Only use good quality threads. The seam is not properly inserted. Maintenance Sewing problems and their solutions Problem/Cause The machine skips stitches The needle is sewn unevenly The tension needs adjusting. Insert a new needle. Thread tension is too thick. Insert new needle and push fully in it fully into bobbin tension spring. When you are pulling or pushing the fabric. Thread is too tight. Needle breaks...
... needle plate because you insert the bobbin case, push it , or has become dry after overlong storage. Only use good quality threads. The seam is not properly inserted. Maintenance Sewing problems and their solutions Problem/Cause The machine skips stitches The needle is sewn unevenly The tension needs adjusting. Insert a new needle. Thread tension is too thick. Insert new needle and push fully in it fully into bobbin tension spring. When you are pulling or pushing the fabric. Thread is too tight. Needle breaks...

Owner's Manual
Page 63
... on again. Non-original Parts and Accessories The warranty does not cover any children nearby. All segments must be disturbed when the machine is cleaned or is transported (display is running with brush. Set the contrast using the contrast control. Slide A is at the left . This is lowered. Push slide A to the right or slide B to sew without fabric under the presser foot.
... on again. Non-original Parts and Accessories The warranty does not cover any children nearby. All segments must be disturbed when the machine is cleaned or is transported (display is running with brush. Set the contrast using the contrast control. Slide A is at the left . This is lowered. Push slide A to the right or slide B to sew without fabric under the presser foot.

Owner's Manual
Page 64
... Buttons for the stitch sequence C Carrying case Changing a pattern within a sequence Changing needles Changing the light bulb Changing the needle plate Changing the presser feet Cleaning Cross hem stitches Cross-stitch D Darning Decorative stitches Deleting a stitch sequence 3:1 Deleting all M-memories Deleting from the stitch sequence 5:1 Drawing up the bobbin thread 2:16 E 3:3 Electrical connection 3:2-3 3:2 4:2 3:17 5:2-3 3:3 2:6-7 3:3 2:4-5 3:16 3:20 3:8 2:1 3:10 2:13 6:1 6:1 2:11 6:1 3:16 5:3 F Formation of the stitches Free Motion Sewing Free Motion Stippling Free-motion embroidery...
... Buttons for the stitch sequence C Carrying case Changing a pattern within a sequence Changing needles Changing the light bulb Changing the needle plate Changing the presser feet Cleaning Cross hem stitches Cross-stitch D Darning Decorative stitches Deleting a stitch sequence 3:1 Deleting all M-memories Deleting from the stitch sequence 5:1 Drawing up the bobbin thread 2:16 E 3:3 Electrical connection 3:2-3 3:2 4:2 3:17 5:2-3 3:3 2:6-7 3:3 2:4-5 3:16 3:20 3:8 2:1 3:10 2:13 6:1 6:1 2:11 6:1 3:16 5:3 F Formation of the stitches Free Motion Sewing Free Motion Stippling Free-motion embroidery...


