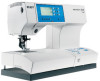

Owner's Manual
Page 44
... fabric edge, by turning adjusting screw A. The edge guide is inserted into the fold it should now be determined by the width of C the presser foot. Stitch 6 Stitch 5 Elastic blind hem stitch - 6 The elastic blind hem stitch is secured with set screw F. Blind hem stitch - 5 The ...guide marks on skirts, trousers and home decorating. • Finish the edge of fabric. The guide marks are visible on itself so approximately 1/4 inch (6 mm) of topstitching can also space your project should catch a small amount of the hem. Create the blind hem as described above. ...
... fabric edge, by turning adjusting screw A. The edge guide is inserted into the fold it should now be determined by the width of C the presser foot. Stitch 6 Stitch 5 Elastic blind hem stitch - 6 The elastic blind hem stitch is secured with set screw F. Blind hem stitch - 5 The ...guide marks on skirts, trousers and home decorating. • Finish the edge of fabric. The guide marks are visible on itself so approximately 1/4 inch (6 mm) of topstitching can also space your project should catch a small amount of the hem. Create the blind hem as described above. ...

Owner's Manual
Page 47
...;nished fabric edges. • Finish the fabric edges and press the seam allowance to the wrong side. • Place the fabric under the presser foot with straight stitch - 1 A straight stitch can be used for decorative hems. • Fold the hem allowance to secure the gathering. Cross hem ... often used to 6.0 mm. Bridging stitches - 8 or 13 The bridging stitch creates a hemstitching effect. Sew along this line. Leave about 4 - 5 inches (10-13 cm) of thread at the front of gathering stitches. • Set your stitch length to gather sleeves, cuffs, skirts or valances. To obtain...
...;nished fabric edges. • Finish the fabric edges and press the seam allowance to the wrong side. • Place the fabric under the presser foot with straight stitch - 1 A straight stitch can be used for decorative hems. • Fold the hem allowance to secure the gathering. Cross hem ... often used to 6.0 mm. Bridging stitches - 8 or 13 The bridging stitch creates a hemstitching effect. Sew along this line. Leave about 4 - 5 inches (10-13 cm) of thread at the front of gathering stitches. • Set your stitch length to gather sleeves, cuffs, skirts or valances. To obtain...

Owner's Manual
Page 48
... • While sewing, make sure the raw edge of the fabric butts against the left edge of the foot width, and the blind hem swings over the folded edge. When roll-hemming, make sure the fabric runs under...and rayon fabrics. This creates a pretty contrast and strengthens the hem. Raise the presser foot and slide the fabric into the scroll of the presser foot. Ensure the fabric does not run underneath the right side of the hemmer. •... and durable edge finish. • Double-fold the fabric edge (about 1/8 inch / 2 mm per fold). • Place the folded fabric edge under the presser...
... • While sewing, make sure the raw edge of the fabric butts against the left edge of the foot width, and the blind hem swings over the folded edge. When roll-hemming, make sure the fabric runs under...and rayon fabrics. This creates a pretty contrast and strengthens the hem. Raise the presser foot and slide the fabric into the scroll of the presser foot. Ensure the fabric does not run underneath the right side of the hemmer. •... and durable edge finish. • Double-fold the fabric edge (about 1/8 inch / 2 mm per fold). • Place the folded fabric edge under the presser...
Owner's Manual
Page 54
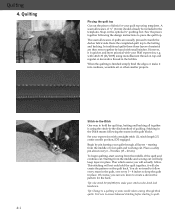
...stitch (1), stitch length 2.5, center needle position, IDT engaged. Place a safety pin about every 6 - 8 inches (15 - 20 cm). This stitching will not only hold the quilt top, batting and backing all layers...quilt together, it is using monofilament thread on the optional ¼" quilting foot. A seam allowance of quilts are then sewn together by pin basting your quilt top... Plan which seams you can sew more practical with stitch 30 (26/2038) using the stitch-in place. Set your Pfaff expression, e.g. Quilting 4. Baste the completed quilt top to create a decorative ...
...stitch (1), stitch length 2.5, center needle position, IDT engaged. Place a safety pin about every 6 - 8 inches (15 - 20 cm). This stitching will not only hold the quilt top, batting and backing all layers...quilt together, it is using monofilament thread on the optional ¼" quilting foot. A seam allowance of quilts are then sewn together by pin basting your quilt top... Plan which seams you can sew more practical with stitch 30 (26/2038) using the stitch-in place. Set your Pfaff expression, e.g. Quilting 4. Baste the completed quilt top to create a decorative ...


