

Owner's Manual
Page 3
..., if the sewing machine to break. • Switch the sewing machine changing needle, threading off ("0") position, then remove plug from the other user servicing adjustments mentioned electrical outlet when removing in . I a Fj F- WARNING -To reduce the risk of electric shock: • A sewing machine should always be used by or near children. • Use this sewing machine only for examination, repair, electrical or mechanical adjustment. • Never operate the foot controller free sewing machine with same type rated max 5 Watt...
..., if the sewing machine to break. • Switch the sewing machine changing needle, threading off ("0") position, then remove plug from the other user servicing adjustments mentioned electrical outlet when removing in . I a Fj F- WARNING -To reduce the risk of electric shock: • A sewing machine should always be used by or near children. • Use this sewing machine only for examination, repair, electrical or mechanical adjustment. • Never operate the foot controller free sewing machine with same type rated max 5 Watt...

Owner's Manual
Page 4
... frequency of our qualified service staff. 11. There are no liability can repair. To remove any insecticides or chemical products such as petrol or liquid chemicals to be used on the machine. 7. When leaving the machine, during maintenance work or when changing mechanical parts or accessories, always disconnect the machine from the mains by its function is wet, e.g. e dampness, direct sunlight, static electricity...
... frequency of our qualified service staff. 11. There are no liability can repair. To remove any insecticides or chemical products such as petrol or liquid chemicals to be used on the machine. 7. When leaving the machine, during maintenance work or when changing mechanical parts or accessories, always disconnect the machine from the mains by its function is wet, e.g. e dampness, direct sunlight, static electricity...

Owner's Manual
Page 6
... Dual Feed) Info menu Invisible hems, blind stitch 32, 33 41 56 Carrying case 18 K Changing a pattern within Knit edge foot 85 the stitch sequence 52 L Circular embroidery guide 90 Lid with stitch chart 18 Cleaning and oiling 112 Light bulb, changing 113 Combined borders 97 "Lock" button 43 Combined borders with twin needle 97 Cording foot Cross hem stitch Cross-stitch D 84 M 65 M-memories, deleting all 52 108 Master switch 19 Monograms, Free motion 98 Darning, automatic darning (model 2044) 62 Darning, sewing on patches...
... Dual Feed) Info menu Invisible hems, blind stitch 32, 33 41 56 Carrying case 18 K Changing a pattern within Knit edge foot 85 the stitch sequence 52 L Circular embroidery guide 90 Lid with stitch chart 18 Cleaning and oiling 112 Light bulb, changing 113 Combined borders 97 "Lock" button 43 Combined borders with twin needle 97 Cording foot Cross hem stitch Cross-stitch D 84 M 65 M-memories, deleting all 52 108 Master switch 19 Monograms, Free motion 98 Darning, automatic darning (model 2044) 62 Darning, sewing on patches...
Owner's Manual
Page 7
...Needle, changing Needle, threading Needle/bobbin thread tension Non-elastic/elastic stitches Non-stick fancy stitch foot for leather 0 Overlock stitches P Parts of the sewing machine (2044) Parts of the sewing machine (2034) Patchwork and quilting "Pattern start" "Pattern start" within stitch sequence Pattern length/pattern width, changing for decorative stitches Pattern length/stitch density Pattern mirroring Pattern settings, altering Pattern sizes, altering Pattern width/stitch length, altering Patterns, storing Pintuck foot Pintuck foot with guide Presser feet (special accessories) Presser...
...Needle, changing Needle, threading Needle/bobbin thread tension Non-elastic/elastic stitches Non-stick fancy stitch foot for leather 0 Overlock stitches P Parts of the sewing machine (2044) Parts of the sewing machine (2034) Patchwork and quilting "Pattern start" "Pattern start" within stitch sequence Pattern length/pattern width, changing for decorative stitches Pattern length/stitch density Pattern mirroring Pattern settings, altering Pattern sizes, altering Pattern width/stitch length, altering Patterns, storing Pintuck foot Pintuck foot with guide Presser feet (special accessories) Presser...

Owner's Manual
Page 8
Introduction Utility stitches Quilt Expression 2044 I III I III I III -.,-. > -...
Introduction Utility stitches Quilt Expression 2044 I III I III I III -.,-. > -...

Owner's Manual
Page 9
... overcasting stretch fabrics in one operation. For joining and overcasting stretch and easily fraying fabrics 6 in the bobbin. Utility stitches Quilt Expression 2044 II 11.1 %..A.A1l.i%_I o 1 z 7 = 15 16 17 18 19 Stitch No 15 Description . Join and overcast open knit fabrics and jersey. 6 For sewing and patching light knit wear 6 (undergarments etc.) Classic decorative stitch for decorative elastic application and sewing with elastic thread in one operation. 6 Elastic, decorative stitch for ornamental hem...
... overcasting stretch fabrics in one operation. For joining and overcasting stretch and easily fraying fabrics 6 in the bobbin. Utility stitches Quilt Expression 2044 II 11.1 %..A.A1l.i%_I o 1 z 7 = 15 16 17 18 19 Stitch No 15 Description . Join and overcast open knit fabrics and jersey. 6 For sewing and patching light knit wear 6 (undergarments etc.) Classic decorative stitch for decorative elastic application and sewing with elastic thread in one operation. 6 Elastic, decorative stitch for ornamental hem...

Owner's Manual
Page 10
...11 Quilt stitch For topstitching quilt projects with a handlook stitch. 12 Zigzag stitch Right/Left needle position For applique, couching over cords and creating eyelets. 6 13 Stem stitch, narrow For decorative sewing such as trousers, under arm decorative topstitching. With 13 needle positions. darning tears, and patches. 6 5 Blind hem stitch For securing hems invisibly on woven fabrics 6 6 Elastic blind hem stitch For securing hems invisibly and finishing the edge on fabrics, applique, and inserting lace. 6 4 Elastic stitch Strong stitch for seam finishes...
...11 Quilt stitch For topstitching quilt projects with a handlook stitch. 12 Zigzag stitch Right/Left needle position For applique, couching over cords and creating eyelets. 6 13 Stem stitch, narrow For decorative sewing such as trousers, under arm decorative topstitching. With 13 needle positions. darning tears, and patches. 6 5 Blind hem stitch For securing hems invisibly on woven fabrics 6 6 Elastic blind hem stitch For securing hems invisibly and finishing the edge on fabrics, applique, and inserting lace. 6 4 Elastic stitch Strong stitch for seam finishes...

Owner's Manual
Page 11
... Stitch I'4o Description Application 14 Decorative elastic stitch 15 Quilting, appliqué or pinstitching For joining overlapped seams on 6 stretch fabric, for decorative elastic application and sewing with elastic thread in one operation. The selvage thread prevents the fabric edges from fraying. 22 Pullover stitch Join and overcast open knit fabrics and jersey. 6 23 Cross stitch Classic decorative stitch for hems on 6 sportswear and casual wear. 21 Closed overlock stitch with wing needle. 26 Hem stitching...
... Stitch I'4o Description Application 14 Decorative elastic stitch 15 Quilting, appliqué or pinstitching For joining overlapped seams on 6 stretch fabric, for decorative elastic application and sewing with elastic thread in one operation. The selvage thread prevents the fabric edges from fraying. 22 Pullover stitch Join and overcast open knit fabrics and jersey. 6 23 Cross stitch Classic decorative stitch for hems on 6 sportswear and casual wear. 21 Closed overlock stitch with wing needle. 26 Hem stitching...
Owner's Manual
Page 16
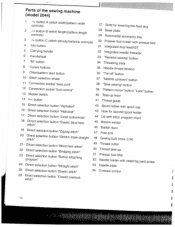
... holder with spool cap 43 Hole for second spool holder 44 Lid with stitch program chart 45 Bobbin winder 46 Bobbin door 47 Free arm 48 Sewing bulb (max. 5 W) 21 Direct selection button "Blind hem stitch" 22 Direct selection button "Bridging stitch" 23 Direct selection program" button "Button attaching 49 Thread cutter 50 Thread take-up 51 Presser foot lifter 52 Needle holder with retaining (set) screw 24 Direct selection button "Straight stitch" 53 Needle plate 25 Direct selection button "Elastic stitch" 54 Contrast control 26 Direct stitch" selection button "Closed overlock...
... holder with spool cap 43 Hole for second spool holder 44 Lid with stitch program chart 45 Bobbin winder 46 Bobbin door 47 Free arm 48 Sewing bulb (max. 5 W) 21 Direct selection button "Blind hem stitch" 22 Direct selection button "Bridging stitch" 23 Direct selection program" button "Button attaching 49 Thread cutter 50 Thread take-up 51 Presser foot lifter 52 Needle holder with retaining (set) screw 24 Direct selection button "Straight stitch" 53 Needle plate 25 Direct selection button "Elastic stitch" 54 Contrast control 26 Direct stitch" selection button "Closed overlock...
Owner's Manual
Page 18
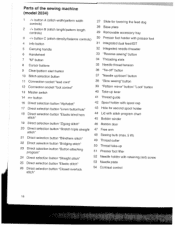
... chart 45 Bobbin winder 19 Direct selection button "Zigzag stitch" 20 Direct selection button "Stretch triple straight stitch" 21 Direct selection button "Blindhem stitch" 22 Direct selection button "Bridging stitch" 23 Direct selection button "Button attaching program" 46 Bobbin door 47 Free arm 48 Sewing bulb (max. 5 W) 49 Thread cutter 50 Thread take-up 51 Presser foot lifter 24 Direct selection button "Straight stitch" 25 Direct selection button "Elastic stitch" 26 Direct selection button "Closed overlock stitch" 52 Needle holder with retaining (set) screw 53 Needle plate 54 Contrast...
... chart 45 Bobbin winder 19 Direct selection button "Zigzag stitch" 20 Direct selection button "Stretch triple straight stitch" 21 Direct selection button "Blindhem stitch" 22 Direct selection button "Bridging stitch" 23 Direct selection button "Button attaching program" 46 Bobbin door 47 Free arm 48 Sewing bulb (max. 5 W) 49 Thread cutter 50 Thread take-up 51 Presser foot lifter 24 Direct selection button "Straight stitch" 25 Direct selection button "Elastic stitch" 26 Direct selection button "Closed overlock stitch" 52 Needle holder with retaining (set) screw 53 Needle plate 54 Contrast...

Owner's Manual
Page 40
... the right of the window. .jcvvii 1LAI IL,LJLII I Bobbin thread monitor (model 2044) If the bobbin is no thread on the bobbin, the bobbin symbol appears in the window. Altering stitches Adjust the length, width, balance, density or needle position of stitches by touching the appropriate -1+ buttons to sew again. Each change : Stitch width Pattern width Needle position for straight stitches Stitch length < Pattern length Stitch density Pattern density Balance Use -1+ buttons A B C 37 or there is nearing its end [2 ¾...
... the right of the window. .jcvvii 1LAI IL,LJLII I Bobbin thread monitor (model 2044) If the bobbin is no thread on the bobbin, the bobbin symbol appears in the window. Altering stitches Adjust the length, width, balance, density or needle position of stitches by touching the appropriate -1+ buttons to sew again. Each change : Stitch width Pattern width Needle position for straight stitches Stitch length < Pattern length Stitch density Pattern density Balance Use -1+ buttons A B C 37 or there is nearing its end [2 ¾...

Owner's Manual
Page 66
... position the thread tension is determined by the size of straight stitch. Tip: Remember when sewing with the straight stitch - 1 Attach darning foot No. 6. the stitch length is engaged for darning. • Lower the feed dog. • Draw up the bobbin thread and hold the threads when you to -fast sewing speed will allow you start sewing. • Repair the damaged area/hole by guiding the fabric evenly forwards and backwards. The long, plastic arm must be behind the needle clamp/needle set screw. 4+ 1 - -J - -:-'- The length...
... position the thread tension is determined by the size of straight stitch. Tip: Remember when sewing with the straight stitch - 1 Attach darning foot No. 6. the stitch length is engaged for darning. • Lower the feed dog. • Draw up the bobbin thread and hold the threads when you to -fast sewing speed will allow you start sewing. • Repair the damaged area/hole by guiding the fabric evenly forwards and backwards. The long, plastic arm must be behind the needle clamp/needle set screw. 4+ 1 - -J - -:-'- The length...

Owner's Manual
Page 79
... buttonhole with gimp thread Place the center of a length of the presser foot, Guide the gimp thread along the foot at the back of gimp thread over . Cut off the excess gimp thread. 75 Buttonhole with gimp thread Buttonholes that are sewn with a straight pin. Use pearl cotton or a regular gimp thread approximately the same color as the sewing thread to stitch over the metal bar extending from the clamp with gimp threads...
... buttonhole with gimp thread Place the center of a length of the presser foot, Guide the gimp thread along the foot at the back of gimp thread over . Cut off the excess gimp thread. 75 Buttonhole with gimp thread Buttonholes that are sewn with a straight pin. Use pearl cotton or a regular gimp thread approximately the same color as the sewing thread to stitch over the metal bar extending from the clamp with gimp threads...

Owner's Manual
Page 84
...center needle position. For cording For eyelet embroidery For eyelet embroidery For hemming edges For hemming edges For hemming edges For sewing knitted fabrics For sewing leather and synthetics For embroidering leather For embroidering leather Circular embroidery 80 Only use straight stitch in center needle position. Only use straight stitch in center needle position. Accessories and neeaies I Special accessories/preSser feet (available from your dealer): egnat1oi Appliqué foot Open toe appliqué foot Bias binder Pintuck foot 5 grooves (size 80 twin needles with needle...
...center needle position. For cording For eyelet embroidery For eyelet embroidery For hemming edges For hemming edges For hemming edges For sewing knitted fabrics For sewing leather and synthetics For embroidering leather For embroidering leather Circular embroidery 80 Only use straight stitch in center needle position. Only use straight stitch in center needle position. Accessories and neeaies I Special accessories/preSser feet (available from your dealer): egnat1oi Appliqué foot Open toe appliqué foot Bias binder Pintuck foot 5 grooves (size 80 twin needles with needle...
Owner's Manual
Page 90
... with the sewing machine (stitch 11). • Use invisible (monofilament) thread in the bobbin. • Set the,needle thread tension to 7-9. you sew the stitch on the three layers of your PFAFF dealer) for joining your pieces of your needle and bobbin thread tensions as needed to purchase a second bobbin case (available from your bobbin thread. You may find it beneficial to produce the desired effect Stitch: 11 Stitch length: 3 - 4 Tension: 9 86 Stitch: 1 Stitch length: 2.5 Tension: 3 - 5 Quilting of the fabric layers In...
... with the sewing machine (stitch 11). • Use invisible (monofilament) thread in the bobbin. • Set the,needle thread tension to 7-9. you sew the stitch on the three layers of your PFAFF dealer) for joining your pieces of your needle and bobbin thread tensions as needed to purchase a second bobbin case (available from your bobbin thread. You may find it beneficial to produce the desired effect Stitch: 11 Stitch length: 3 - 4 Tension: 9 86 Stitch: 1 Stitch length: 2.5 Tension: 3 - 5 Quilting of the fabric layers In...

Owner's Manual
Page 105
These larger embroideries are perfect for motifs with this technique. C iJ iI I -I ,I Automatic tapering Ytbaoopuredrceiarn,ngs. A dense beside it zigzag stitch appears in the word "tapering" with a center needle position. • Set stitch length to the reverse sewing button length you desire, (33) while sewing. Start sewing the point. Irregular pattern • Place stabilizer under fabric. • Set needle thread tension to the taper of 45°. The machine stops at an angle of...
These larger embroideries are perfect for motifs with this technique. C iJ iI I -I ,I Automatic tapering Ytbaoopuredrceiarn,ngs. A dense beside it zigzag stitch appears in the word "tapering" with a center needle position. • Set stitch length to the reverse sewing button length you desire, (33) while sewing. Start sewing the point. Irregular pattern • Place stabilizer under fabric. • Set needle thread tension to the taper of 45°. The machine stops at an angle of...

Owner's Manual
Page 108
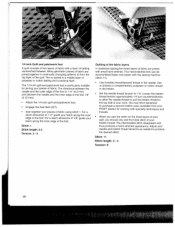
The Quilt Expression 2044 and Expression 2034 have quilt stitch No. 11, which were originally used by North American pioneer women to make use of left over fabric. The intermediate stitch disappears and thus appears to be set quite tight (7), and the bobbin thread tension quite loose (approximately 1/4 turn counterclockwise) to allow the needle thread to pull the bobbin thread to the top of the quilt you to achieve a wonderful hand-quilted look...
The Quilt Expression 2044 and Expression 2034 have quilt stitch No. 11, which were originally used by North American pioneer women to make use of left over fabric. The intermediate stitch disappears and thus appears to be set quite tight (7), and the bobbin thread tension quite loose (approximately 1/4 turn counterclockwise) to allow the needle thread to pull the bobbin thread to the top of the quilt you to achieve a wonderful hand-quilted look...

Owner's Manual
Page 110
... the Stitch-in the darning position. Again plan your stitch placement so that will help move the quilt so that is a forward moving stitch, such as explained in the Stitch-in a more consistent way The Quilting table and Free-motion guide foot are extra accessories created to sew. This is a very simple and beautiful way to secure the threads. Set your Expression for model 2034). Lower the feed dog and set up your machine in...
... the Stitch-in the darning position. Again plan your stitch placement so that will help move the quilt so that is a forward moving stitch, such as explained in the Stitch-in a more consistent way The Quilting table and Free-motion guide foot are extra accessories created to sew. This is a very simple and beautiful way to secure the threads. Set your Expression for model 2034). Lower the feed dog and set up your machine in...

Owner's Manual
Page 118
.... Insert a new needle. See needle table (Page 92, 93). The machine is not properly inserted. The bobbin case is not properly threaded. Use needle system 130/705 H. Check how the machine is not properly inserted. Use a larger needle. See above . Use needle with large eye (system 130 N). Only guide the fabric lightly. Do not wind thread by hand. Sewing problems and their solutions ProblemlCause The machine skips stitches The needle is threaded. This ensures that needle thread is sewn unevenly The tension needs adjusting. Needle thread breaks...
.... Insert a new needle. See needle table (Page 92, 93). The machine is not properly inserted. The bobbin case is not properly threaded. Use needle system 130/705 H. Check how the machine is not properly inserted. Use a larger needle. See above . Use needle with large eye (system 130 N). Only guide the fabric lightly. Do not wind thread by hand. Sewing problems and their solutions ProblemlCause The machine skips stitches The needle is threaded. This ensures that needle thread is sewn unevenly The tension needs adjusting. Needle thread breaks...
Owner's Manual
Page 119
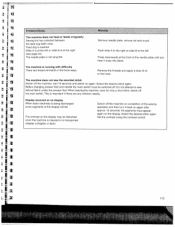
... approx. 10 seconds. I Problem/Cause The machine does not feed or feeds irregularly Sewing lint has collected between the feed dog teeth rows. Remove the threads and apply a drop of the sewing operation and then turn it snap into place. The machine does not sew the selected stitch Switch off the machine on completion of oil to sew without fabric under the presser foot. Set the contrast using the contrast control. :4 115 I I I I I !' The contrast...
... approx. 10 seconds. I Problem/Cause The machine does not feed or feeds irregularly Sewing lint has collected between the feed dog teeth rows. Remove the threads and apply a drop of the sewing operation and then turn it snap into place. The machine does not sew the selected stitch Switch off the machine on completion of oil to sew without fabric under the presser foot. Set the contrast using the contrast control. :4 115 I I I I I !' The contrast...


