
Owner's Manual
Page 3
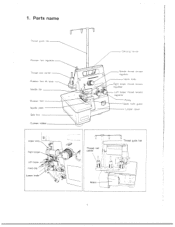
Neule trad tsion reguatDr ktiif Right oocer thread tension regulator Loft ooper rhread tension egulator Puley Upper Knife guard Looper cover Upper kni e I,, Right looper Lower knife %\ \N Thread reel center Motor Thread guide bar ,1 _______ 1. Parts name Thread gu je car Presser foot Thread ree' Denter Presser toot itt ever Needle bar 0 Presser foot Needle plate Sidebox = N Cushion rutber Carr g a / ri N -.
Neule trad tsion reguatDr ktiif Right oocer thread tension regulator Loft ooper rhread tension egulator Puley Upper Knife guard Looper cover Upper kni e I,, Right looper Lower knife %\ \N Thread reel center Motor Thread guide bar ,1 _______ 1. Parts name Thread gu je car Presser foot Thread ree' Denter Presser toot itt ever Needle bar 0 Presser foot Needle plate Sidebox = N Cushion rutber Carr g a / ri N -.
Owner's Manual
Page 4
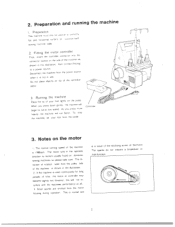
... illustration. 2. Controller 3. Preparation and running speed of the machine as srrown in the illustration, then connect the plug to motors usually found on the side of the machine is used continuously for long periods of time, the motor or controller may become slightly hot, however, this will run at all. 3 Small sparks are emtted from the motor housing during operation. Preparation...
... illustration. 2. Controller 3. Preparation and running speed of the machine as srrown in the illustration, then connect the plug to motors usually found on the side of the machine is used continuously for long periods of time, the motor or controller may become slightly hot, however, this will run at all. 3 Small sparks are emtted from the motor housing during operation. Preparation...
Owner's Manual
Page 5
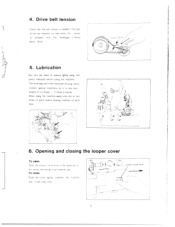
... to oil these - 2 times a month. 1 When oiling the machine apply cmv one or tso oroos of always hghtly oiling the points ndicated before using the machine. Opening and closing the looper cover To open S t- 4. The bushings and other important moving parts contain special... materials, so it is only nec - rh '''r ir dir up p rr) i To close u t 1.war vu.. Drive belt tension nat the net 'nsicr s correct. TO bt oin te Si] ust-] s ma nei •h r' 5 Omssed w tb the forennger, hexs 300ut 0mm 5 Lubrication Get nto the habit of good quality sewing macnne oil...
... to oil these - 2 times a month. 1 When oiling the machine apply cmv one or tso oroos of always hghtly oiling the points ndicated before using the machine. Opening and closing the looper cover To open S t- 4. The bushings and other important moving parts contain special... materials, so it is only nec - rh '''r ir dir up p rr) i To close u t 1.war vu.. Drive belt tension nat the net 'nsicr s correct. TO bt oin te Si] ust-] s ma nei •h r' 5 Omssed w tb the forennger, hexs 300ut 0mm 5 Lubrication Get nto the habit of good quality sewing macnne oil...
Owner's Manual
Page 6
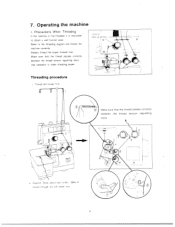
... between the thread tension regulating discs. \f_ \)K) / / / \ \L v_, . - * Ca.it is mis threaded it 'on Draw aoujt two r' he 50mm of thread trough rh. Always thread the looper threads first. Ott ocuer ye. 4 7. Precautions When Threading if the machine is impossible to obtain a well formed seam. Make sure that the thread passes correctly between the thread tension regulating discs. Operating the machine I. Refer to make threading easier.
... between the thread tension regulating discs. \f_ \)K) / / / \ \L v_, . - * Ca.it is mis threaded it 'on Draw aoujt two r' he 50mm of thread trough rh. Always thread the looper threads first. Ott ocuer ye. 4 7. Precautions When Threading if the machine is impossible to obtain a well formed seam. Make sure that the thread passes correctly between the thread tension regulating discs. Operating the machine I. Refer to make threading easier.

Owner's Manual
Page 7
Draw about two ,nches 50mm of thread through the needle eye Draw about two nches 50mm) of thread through the right ooier eye. 3 Thread need!e ast I ,,,,, 6 8 - 9_ * Caution! I H II / 7 4 5 6 ; 1 'i ii 3 k - -2 * Caution! 2 Thread rght ooper secona. m '4 -c;
Draw about two ,nches 50mm of thread through the needle eye Draw about two nches 50mm) of thread through the right ooier eye. 3 Thread need!e ast I ,,,,, 6 8 - 9_ * Caution! I H II / 7 4 5 6 ; 1 'i ii 3 k - -2 * Caution! 2 Thread rght ooper secona. m '4 -c;

Owner's Manual
Page 8
... stitch formation pave-se 5: e / Right ioooer thread mat-raF hv - Cr 2. Regulating thread tension Toe correct thread tension varies depending on of thread. e s_r- Correct thread tension Sktcb shows a proijer St tch formation. The correct setting shouLd always be obtained Dy cxaiin ig the seam and makng the appronriate adfustrrents. Check tnat toe threads nave nterioceed cor rectFy and then start to sew slowFy...
... stitch formation pave-se 5: e / Right ioooer thread mat-raF hv - Cr 2. Regulating thread tension Toe correct thread tension varies depending on of thread. e s_r- Correct thread tension Sktcb shows a proijer St tch formation. The correct setting shouLd always be obtained Dy cxaiin ig the seam and makng the appronriate adfustrrents. Check tnat toe threads nave nterioceed cor rectFy and then start to sew slowFy...

Owner's Manual
Page 9
.... increase the needle thread tension, or decrease the right and left 'oooer thread tensions are too tight. Toe sketch shows the needle thread tension s cc oose, or oght and left looper threac tensions. 2 The sketcn shows the right ooper thread tension is adjusted by means of the dial, the greater toe thread tension. lncrease the right looper thread tension. 2. Adjusting thread tension Thread tension is too loose, or the elf ooper thread tension s too tignt...
.... increase the needle thread tension, or decrease the right and left 'oooer thread tensions are too tight. Toe sketch shows the needle thread tension s cc oose, or oght and left looper threac tensions. 2 The sketcn shows the right ooper thread tension is adjusted by means of the dial, the greater toe thread tension. lncrease the right looper thread tension. 2. Adjusting thread tension Thread tension is too loose, or the elf ooper thread tension s too tignt...
Owner's Manual
Page 10
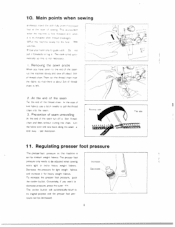
... the machine slowly and sew off about 3cm of knit fabrics use a latch needle to pull the thread chain into the seam. 3. 10. At the end of the seam Tie the end of the thread chain, In the case of thread chain is set for te drst few stt hes. Regulating presser foot pressure The presser foot pressure on this machine is left. 2. To increase the presser foot pressure, push the center button...
... the machine slowly and sew off about 3cm of knit fabrics use a latch needle to pull the thread chain into the seam. 3. 10. At the end of the seam Tie the end of the thread chain, In the case of thread chain is set for te drst few stt hes. Regulating presser foot pressure The presser foot pressure on this machine is left. 2. To increase the presser foot pressure, push the center button...
Owner's Manual
Page 11
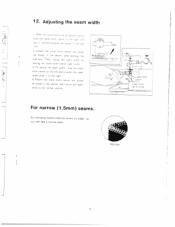
Adjusting the seam width r Kt f i at a' ort-r, o, I 1 2.
Adjusting the seam width r Kt f i at a' ort-r, o, I 1 2.

Owner's Manual
Page 12
13. Ho the puly firmly w th your right hand to a highur nun n&r. To make the stitch length shorter select a siT aller number. 3 . After making the a 1 ustmd ents, tighten the feed regu'ator nut and close the side box. ator - 10 To make the stitch ngth longer move the nut to prevent it from moving and loosen the feed regu'ator nut with the screwdriver. 2 Align the feed regutor nut anul the number on the feed regutor. Eee 'eg. I ed 'cpu ator 'Ut - Adjusting stitch length To change he sutch length. open the svi bo and.
13. Ho the puly firmly w th your right hand to a highur nun n&r. To make the stitch length shorter select a siT aller number. 3 . After making the a 1 ustmd ents, tighten the feed regu'ator nut and close the side box. ator - 10 To make the stitch ngth longer move the nut to prevent it from moving and loosen the feed regu'ator nut with the screwdriver. 2 Align the feed regutor nut anul the number on the feed regutor. Eee 'eg. I ed 'cpu ator 'Ut - Adjusting stitch length To change he sutch length. open the svi bo and.
Owner's Manual
Page 13
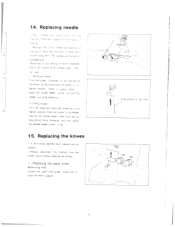
... the machine from the power source before repacing the knives. Replacing the knives If toe knives become hiunt rePace them as 'oflows. u t i -- - Pusn the shank f the needkll Wily into the rreedle holdr. mace 5ure that th ong groove faces forwards, and then tghterr the need'e honer screw hrmiy - -- / / Long groove to the 1 ront 15. p ''' - oosen the needle...
... the machine from the power source before repacing the knives. Replacing the knives If toe knives become hiunt rePace them as 'oflows. u t i -- - Pusn the shank f the needkll Wily into the rreedle holdr. mace 5ure that th ong groove faces forwards, and then tghterr the need'e honer screw hrmiy - -- / / Long groove to the 1 ront 15. p ''' - oosen the needle...

Owner's Manual
Page 14
Replacing the lower knife *Removing knife Loosen the lower knife clamp screw and re move the lower knife downward. * Replacing knife Insert the lower knife into t from below with the surface of the needle plate and tighten the clamp screw securely so that the Knife toes not move the knife to ts lowest position and adiust the upper knife so that the cutting edge faces to the...
Replacing the lower knife *Removing knife Loosen the lower knife clamp screw and re move the lower knife downward. * Replacing knife Insert the lower knife into t from below with the surface of the needle plate and tighten the clamp screw securely so that the Knife toes not move the knife to ts lowest position and adiust the upper knife so that the cutting edge faces to the...
Owner's Manual
Page 15
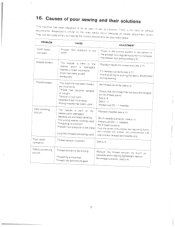
...) Always use DC I needles i The needle is bent or the needle point damaged Needles are being used Tnreading is being used Re-thread correctly (see o 81 Use correct threads and needle size. Causes of poor sewing and their so'utions TaTdnhe,jysstcm maaencnrbtusenecRurhreeadasKsodimeoewpni"ysdbeyssmmgiaulakerdngtofotnmeceecoaorsrneecastsvaode(ituoowstumsoeecnctasusraspbodesecssiaoculrseebeTdohfoeerseliomwos lenoa 1 unsetemdd efnort difficult errors PROBLEM Cloth does not feed Needle breaks Thread breaks Skip stitching occurs Poor seam formation CAUSE Presser foot pressure s 100...
...) Always use DC I needles i The needle is bent or the needle point damaged Needles are being used Tnreading is being used Re-thread correctly (see o 81 Use correct threads and needle size. Causes of poor sewing and their so'utions TaTdnhe,jysstcm maaencnrbtusenecRurhreeadasKsodimeoewpni"ysdbeyssmmgiaulakerdngtofotnmeceecoaorsrneecastsvaode(ituoowstumsoeecnctasusraspbodesecssiaoculrseebeTdohfoeerseliomwos lenoa 1 unsetemdd efnort difficult errors PROBLEM Cloth does not feed Needle breaks Thread breaks Skip stitching occurs Poor seam formation CAUSE Presser foot pressure s 100...
Owner's Manual
Page 16
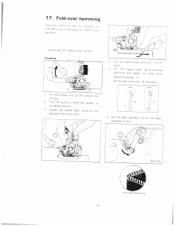
Fold-over hemming 14 L1t -he presser toot by the presser ioot ft ever : Turn te puSey c move 1he neeole its nighest position 3 Loosen tne needle plate screw on the teed regulator to No I See 1Q Fold over hemming F DO r nrnr r j re 'atD c. ag as snon nan o 1 Excnange the neeo e olaa or iB Procedure \\ -- A * E dover hemming B ncuded) : it L - 2 Set the teed regulator nut on this side with the screw dr ver 0 re need e c ac anct pui t c tor v cr0 F t he neeoe p ate B ro tOiD nerming and fasten Os screw * Normal sewing - 17. C!
Fold-over hemming 14 L1t -he presser toot by the presser ioot ft ever : Turn te puSey c move 1he neeole its nighest position 3 Loosen tne needle plate screw on the teed regulator to No I See 1Q Fold over hemming F DO r nrnr r j re 'atD c. ag as snon nan o 1 Excnange the neeo e olaa or iB Procedure \\ -- A * E dover hemming B ncuded) : it L - 2 Set the teed regulator nut on this side with the screw dr ver 0 re need e c ac anct pui t c tor v cr0 F t he neeoe p ate B ro tOiD nerming and fasten Os screw * Normal sewing - 17. C!
Owner's Manual
Page 17
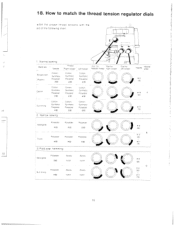
... ny on 15 18. or Needle rread ngn.i ocoe / Den m Codon Synthet c Polyester :80 Cotton Syronetic P0 yeste :80 Cotto-' S ,nthehc Po yester :80 nng Cotton Syntt7etc Po!yester :80 2 Narrow sewIng otton. How to match the thread tension regulator dials * Set :be orooer :bread 1enstcs N... the of ala the toHowlng chart ZL 1 Norma' seNing Mse a s Need e Broad cob Pool n) Syn!netc Polyester 80 Rn ocoe oert coDer O...
... ny on 15 18. or Needle rread ngn.i ocoe / Den m Codon Synthet c Polyester :80 Cotton Syronetic P0 yeste :80 Cotto-' S ,nthehc Po yester :80 nng Cotton Syntt7etc Po!yester :80 2 Narrow sewIng otton. How to match the thread tension regulator dials * Set :be orooer :bread 1enstcs N... the of ala the toHowlng chart ZL 1 Norma' seNing Mse a s Need e Broad cob Pool n) Syn!netc Polyester 80 Rn ocoe oert coDer O...

Owner's Manual
Page 18
... 1 .5mm 9 -11 55- 5 20. Specifications Maximum speed Overlock seam width Stitch length Presser foot • Presser foot lift Needle.. set Iset I size 11 (75 standard. 9 (65)- 16(100' also available 3 Manual 263mm 263mm275mm 8 kg (complete set with motor I 2. Tricot, Linen, Genera dress mater ais Heavy weight materials Tweed, Coat cloth, Denim, Heavy Neight cloth Knit fabrics Knit faorics Georgette Tricots Suit lining Thread Stitch length Cotton Sntheic Silk 80 100...
... 1 .5mm 9 -11 55- 5 20. Specifications Maximum speed Overlock seam width Stitch length Presser foot • Presser foot lift Needle.. set Iset I size 11 (75 standard. 9 (65)- 16(100' also available 3 Manual 263mm 263mm275mm 8 kg (complete set with motor I 2. Tricot, Linen, Genera dress mater ais Heavy weight materials Tweed, Coat cloth, Denim, Heavy Neight cloth Knit fabrics Knit faorics Georgette Tricots Suit lining Thread Stitch length Cotton Sntheic Silk 80 100...


