

Owner's Manual
Page 2
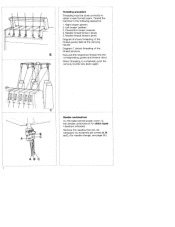
B) When leaving the machine, changing parts or accessories, the machine must be adjusted by anyone but an authorized Pfatf agent, C) The maximum approved wattage of the needle, the user must never be disconnected from the power source. D) The drive belt must take sufficient care to the up and down movement of the light bulb is 15 watts. Notes on safety A) Owing to avoid injury and observe the sewing area continuously while sewing.
B) When leaving the machine, changing parts or accessories, the machine must be adjusted by anyone but an authorized Pfatf agent, C) The maximum approved wattage of the needle, the user must never be disconnected from the power source. D) The drive belt must take sufficient care to the up and down movement of the light bulb is 15 watts. Notes on safety A) Owing to avoid injury and observe the sewing area continuously while sewing.

Owner's Manual
Page 3
... two-thread chainstitch seam Inserting the workpiece guide plate Adjusting the seam width Changing the sewing foot Sewing rolled hems Changing the needles Changing the lower knife Changing the upper knife Changing the light bulb Cleaning the thread tensions Oiling the machine Sewing problems and... Foot control Installing the thread spool stand Threading diagram on the lint box Needle combinations Threading the right looper Threading the left looper Threading the two-thread chainstitch looper Threading the needles Inserting the lint box Setting the standard thread tension Sewing test Points to ...
... two-thread chainstitch seam Inserting the workpiece guide plate Adjusting the seam width Changing the sewing foot Sewing rolled hems Changing the needles Changing the lower knife Changing the upper knife Changing the light bulb Cleaning the thread tensions Oiling the machine Sewing problems and... Foot control Installing the thread spool stand Threading diagram on the lint box Needle combinations Threading the right looper Threading the left looper Threading the two-thread chainstitch looper Threading the needles Inserting the lint box Setting the standard thread tension Sewing test Points to ...

Owner's Manual
Page 5
Controls of the sewing machine 1 Foot pressure regulating dial 2 Thread guide 3 Carrying handle 4 Left needle thread tension dial 5 Right needle thread tension dial 6 Right looper thread tension dial 7 Left looper thread tension dial 8 Looper thread tension dial for two- thread chainstitch 9 Thread tension ...and feed regulator 12 Looper cover 13 Looper cover recess 14 Upper knife 15 Work support 16 Differential feed adjustment knob 17 Needle plate 18 Sewing foot 19 Needle bar 20 Sewing foot lifting lever 21 Thread spool stand 22 Thread spool holder 23 Machine socket 24 Master switch 25 Lint...
Controls of the sewing machine 1 Foot pressure regulating dial 2 Thread guide 3 Carrying handle 4 Left needle thread tension dial 5 Right needle thread tension dial 6 Right looper thread tension dial 7 Left looper thread tension dial 8 Looper thread tension dial for two- thread chainstitch 9 Thread tension ...and feed regulator 12 Looper cover 13 Looper cover recess 14 Upper knife 15 Work support 16 Differential feed adjustment knob 17 Needle plate 18 Sewing foot 19 Needle bar 20 Sewing foot lifting lever 21 Thread spool stand 22 Thread spool holder 23 Machine socket 24 Master switch 25 Lint...

Owner's Manual
Page 9
Below this, a needle diagram with the respective set screws is filled out orange. Each threading path has its own color. Position the slide so that the adjustment point ... work support, push it to the left. To open the work support Push looper cover to the right and swing it down. The respectively necessary needle combinations (A, B. Threading paths of the stitch types on the back of the threading paths required are shown.
Below this, a needle diagram with the respective set screws is filled out orange. Each threading path has its own color. Position the slide so that the adjustment point ... work support, push it to the left. To open the work support Push looper cover to the right and swing it down. The respectively necessary needle combinations (A, B. Threading paths of the stitch types on the back of the threading paths required are shown.
Owner's Manual
Page 10
...B shows threading of the thread tensions. B Now pull the respective thread into the corresponding guides and tension discs. AS Needle combinations On the table behind the carrying handle. When threading is completed, push the carrying handle fully down again. Right looper... ito 6 are not necessary by loosening set screws A, B, or C (For needle change, see page 35.) - Left looper (yellow) 3. Needle thread tension (blue) 5. Chainstitch looper (mauve) 4. Remove the needles that are indicated. Threading procedure Threading must be done correctly to obtain a well-formed...
...B shows threading of the thread tensions. B Now pull the respective thread into the corresponding guides and tension discs. AS Needle combinations On the table behind the carrying handle. When threading is completed, push the carrying handle fully down again. Right looper... ito 6 are not necessary by loosening set screws A, B, or C (For needle change, see page 35.) - Left looper (yellow) 3. Needle thread tension (blue) 5. Chainstitch looper (mauve) 4. Remove the needles that are indicated. Threading procedure Threading must be done correctly to obtain a well-formed...

Owner's Manual
Page 14
... without needle A). pink. Threading overedge needles B and C (without needle A). The thread path for needle C is marked blue (point symbol), the one or two needles (depending on stitch type). Thread the overedge needle in sequence 1 to 6. Thread overedge needles B and C in sequence 1 to 6. Threading needle B or C (with either one for needle B is marked pink (point symbol). Threading the needles The needles must...
... without needle A). pink. Threading overedge needles B and C (without needle A). The thread path for needle C is marked blue (point symbol), the one or two needles (depending on stitch type). Thread the overedge needle in sequence 1 to 6. Thread overedge needles B and C in sequence 1 to 6. Threading needle B or C (with either one for needle B is marked pink (point symbol). Threading the needles The needles must...

Owner's Manual
Page 16
... be set opposite the blue point symbol. Only for the blue thread tension there are two standard settings: When using needle A (only for two-thread chainstitch. -j Setting the standard thread tension The thread tension to 22). Make the correct adjustment after examination of the interlocking of ...
... be set opposite the blue point symbol. Only for the blue thread tension there are two standard settings: When using needle A (only for two-thread chainstitch. -j Setting the standard thread tension The thread tension to 22). Make the correct adjustment after examination of the interlocking of ...

Owner's Manual
Page 19
... pull the thread chain into the seam. When sewing extremely thick fabrics or workpieces with different thicknesses, the screw of seam. For knit fabrics, a crochet needle can be tightened, as shown in the illustration. Or: Sew about 2 turns. Securing the seam: Knot the thread chain.
... pull the thread chain into the seam. When sewing extremely thick fabrics or workpieces with different thicknesses, the screw of seam. For knit fabrics, a crochet needle can be tightened, as shown in the illustration. Or: Sew about 2 turns. Securing the seam: Knot the thread chain.

Owner's Manual
Page 20
... stitch (narrow) Stitch type 2, sewn with overedge stitch (wide> Stitch type 3. chainstitch u ndersde 5-thread safety seam Two-thread chainstitch with needles A and C Thread tensions: blue = triangular symbol pink = point symbol green = point symbol yellow = point symbol mauve = triangular symbol ...side -- _______ Face side I Two-thread chainstitch Stitch type 1. Joining seams on linen goods, jeans, without serging seam. sewn with needle A Thread tensions: blue = triangular symbol mauve = triangular symbol Application examples: Joining seams on blouses, shirts, jeans and bed linen ...
... stitch (narrow) Stitch type 2, sewn with overedge stitch (wide> Stitch type 3. chainstitch u ndersde 5-thread safety seam Two-thread chainstitch with needles A and C Thread tensions: blue = triangular symbol pink = point symbol green = point symbol yellow = point symbol mauve = triangular symbol ...side -- _______ Face side I Two-thread chainstitch Stitch type 1. Joining seams on linen goods, jeans, without serging seam. sewn with needle A Thread tensions: blue = triangular symbol mauve = triangular symbol Application examples: Joining seams on blouses, shirts, jeans and bed linen ...

Owner's Manual
Page 21
J top side 4-thread overedge seam Stitch type 6, sewn with needle B (wide) Thread tensions: pink = point symbol green = point symbol yellow = point symbol Application example: For serging all kinds of fabric. Especially suitable for...• underside Reverse side 10 Overedge stitch underside -jz: - Face side Overedge stitch top side 3-thread overedge seam Stitch type 4, sewn with needle C (narrow) Stitch type 5, sewn with needles B and C Thread tensions: blue = point symbol pink = point symbol green point symbol yellow = point symbol Application examples: For sewing and ...
J top side 4-thread overedge seam Stitch type 6, sewn with needle B (wide) Thread tensions: pink = point symbol green = point symbol yellow = point symbol Application example: For serging all kinds of fabric. Especially suitable for...• underside Reverse side 10 Overedge stitch underside -jz: - Face side Overedge stitch top side 3-thread overedge seam Stitch type 4, sewn with needle C (narrow) Stitch type 5, sewn with needles B and C Thread tensions: blue = point symbol pink = point symbol green point symbol yellow = point symbol Application examples: For sewing and ...

Owner's Manual
Page 22
...+. 3-thread overedge seam (wide) The thread tension of the seam, the thread tension must be turned in the - Adjust tensions accordingly! Needle thread B or C Left looper thread Right looper thread 3-thread overedge seam (narrow) The right looper thread is too tight (green thread... = decreased tension Two-thread chainstitch The thread tension of the thread tensions lies between -5 and +5. Depending on the appearance of needle B is too weak. I I I I I Needle thread A Incorrect thread tensions: The tension range of needle A is too weak. It is too loose (yellow thread tension).
...+. 3-thread overedge seam (wide) The thread tension of the seam, the thread tension must be turned in the - Adjust tensions accordingly! Needle thread B or C Left looper thread Right looper thread 3-thread overedge seam (narrow) The right looper thread is too tight (green thread... = decreased tension Two-thread chainstitch The thread tension of the thread tensions lies between -5 and +5. Depending on the appearance of needle B is too weak. I I I I I Needle thread A Incorrect thread tensions: The tension range of needle A is too weak. It is too loose (yellow thread tension).
Owner's Manual
Page 24
For very thin fabrics, set the regulating dial at 1. thread B Sewing foot pressure Position N on the regulating dial is too weak. For processing very thick fabrics, set the dial at 4. The pink thread tension must be turned in direction +. 4-thread overedge seam The thread tension of needle B is too weak The blue thread tension must be turned in direction +. Needle thread C 4-thread overedge seam The thread tension of needle C is the standard sewing toot pressure.
For very thin fabrics, set the regulating dial at 1. thread B Sewing foot pressure Position N on the regulating dial is too weak. For processing very thick fabrics, set the dial at 4. The pink thread tension must be turned in direction +. 4-thread overedge seam The thread tension of needle B is too weak The blue thread tension must be turned in direction +. Needle thread C 4-thread overedge seam The thread tension of needle C is the standard sewing toot pressure.

Owner's Manual
Page 25
I l Standard seam width Maximum . Needle Thread tension 3thread overedge seam Needle B Marked pink Needle C Marked pink Pull thread behind thread retainer and thread guide wire. seam width 72mm 5mm 3-thread overedge seam Threethread sewing is possible by using either needle B or C (see page 12). Remove either only needle B or needle C (see page 35).
I l Standard seam width Maximum . Needle Thread tension 3thread overedge seam Needle B Marked pink Needle C Marked pink Pull thread behind thread retainer and thread guide wire. seam width 72mm 5mm 3-thread overedge seam Threethread sewing is possible by using either needle B or C (see page 12). Remove either only needle B or needle C (see page 35).
Owner's Manual
Page 31
... dnoncs3nng evr n stuated I . T te k oper acerq 1ev r i only fe actuated r c. ton Eli h u pcr Jisen 01 Iv ';v i.iw torn the 0 01 tne Jrr1 -Otn 0 to Insert needle A. t the ci e t ts lowest postion ru C oh • I c mcnr cer. Puit ne 10 forward to o o :oos I vOO "C cre0o looper 00 ostnq ttw marh!ne for...
... dnoncs3nng evr n stuated I . T te k oper acerq 1ev r i only fe actuated r c. ton Eli h u pcr Jisen 01 Iv ';v i.iw torn the 0 01 tne Jrr1 -Otn 0 to Insert needle A. t the ci e t ts lowest postion ru C oh • I c mcnr cer. Puit ne 10 forward to o o :oos I vOO "C cre0o looper 00 ostnq ttw marh!ne for...
Owner's Manual
Page 32
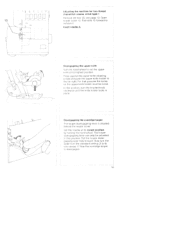
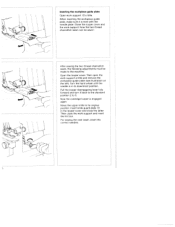
... I After sewing the two-thread chainstitch seam, the following adjustments must be made to 6. For sewing the next seam, insert the correct needles Inserting the workpiece guide plate Open work support. Pull the looper disengageing lever fully forward and turn it is level with the... latter Then close the work support a little and remove the workpiece guide plate (see illustration on the left). Turn the hand wheel until the needle is engaged again. When inserting the workpiece guide plate, make sure it back to the standard position 2 to the machine: Open the looper cover...
... I After sewing the two-thread chainstitch seam, the following adjustments must be made to 6. For sewing the next seam, insert the correct needles Inserting the workpiece guide plate Open work support. Pull the looper disengageing lever fully forward and turn it is level with the... latter Then close the work support a little and remove the workpiece guide plate (see illustration on the left). Turn the hand wheel until the needle is engaged again. When inserting the workpiece guide plate, make sure it back to the standard position 2 to the machine: Open the looper cover...

Owner's Manual
Page 36
...thread tension must then be set higher or lower. Rolled hem, sem with polyester thread (ill. 1 and 2, page 33) Preparation of needle and loopers, see pages 7 to -3 Depending on material and thread, the respective thread tension must be sewn with two bulk threads and ...Tension setting: round edge, Fig. 1 flat edge, Fig. 2 Green thread fensiun, right looper Yellow thread tension, left looper Pink thread tension, needle thread approx. Tension setting: round edge, Fig. 1 fIat edge, Fig. 2 Green thread tension, right looper Yellow thread tension, left looper Pink thread ...
...thread tension must then be set higher or lower. Rolled hem, sem with polyester thread (ill. 1 and 2, page 33) Preparation of needle and loopers, see pages 7 to -3 Depending on material and thread, the respective thread tension must be sewn with two bulk threads and ...Tension setting: round edge, Fig. 1 flat edge, Fig. 2 Green thread fensiun, right looper Yellow thread tension, left looper Pink thread tension, needle thread approx. Tension setting: round edge, Fig. 1 fIat edge, Fig. 2 Green thread tension, right looper Yellow thread tension, left looper Pink thread ...

Owner's Manual
Page 37
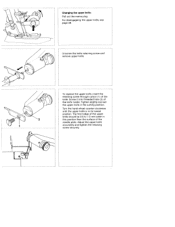
... Pull out the mains plug Disengage the upper knife, see page 29. -J Notes: The following needles are available as it downwards. Loosen the set screw. Remove the needle from the needle holder by pulling it will cause thread breakage and skipped stitches. 'i Changing the knives Knives are... size used, we recommend needle size 14. Using the tweezers, push the needle up into the needle holder as far as spare parts Changing the lower knife. Inserting the needle Set the needle bar at its highest position. Tighten the needle set screw of the needle with the tweezers. Flat ...
... Pull out the mains plug Disengage the upper knife, see page 29. -J Notes: The following needles are available as it downwards. Loosen the set screw. Remove the needle from the needle holder by pulling it will cause thread breakage and skipped stitches. 'i Changing the knives Knives are... size used, we recommend needle size 14. Using the tweezers, push the needle up into the needle holder as far as spare parts Changing the lower knife. Inserting the needle Set the needle bar at its highest position. Tighten the needle set screw of the needle with the tweezers. Flat ...

Owner's Manual
Page 38
In this position, turn the knife holder back to the right. Loosen the knife clamp screw and pull the lower knife down. 1 Inserting tower knife: Insert a new knife into the groove of the lower knife holder with the surface of the lower knife, firmly tighten the clamp screw. Set the knife so that the cutting edge aligns with the cutting edge facing right. j - After accurate adjustment of the needle plate. -j - Push the upper knife fully to operative position.
In this position, turn the knife holder back to the right. Loosen the knife clamp screw and pull the lower knife down. 1 Inserting tower knife: Insert a new knife into the groove of the lower knife holder with the surface of the lower knife, firmly tighten the clamp screw. Set the knife so that the cutting edge aligns with the cutting edge facing right. j - After accurate adjustment of the needle plate. -j - Push the upper knife fully to operative position.
Owner's Manual
Page 39
... into threaded hole (2) of the knife. Turn the hand wheel counter-clockwise until the upper knife is in this position than the surface of the needle plate. For disengageing the upper knife, see page 29, L Unscrew the knife retaining screw and remove upper knife, To replace the upper knife, insert the...
... into threaded hole (2) of the knife. Turn the hand wheel counter-clockwise until the upper knife is in this position than the surface of the needle plate. For disengageing the upper knife, see page 29, L Unscrew the knife retaining screw and remove upper knife, To replace the upper knife, insert the...

Owner's Manual
Page 42
...machines have been iiade. Sewing problems developed for light materials) (pages 14, 20, 21, 22). Material pulled. Needle not fully inserted. Skipped stitches Needle bent or point damaged. Sewing foot pressure too weak. Thread correctly (pages 7-il). Incorrect stitch formation trect setting ...there of threadj Set thread tensions correctly tensions. (pages 14, 20, 21, 22). Re-adjust differential feed. Needle not fully inserted. Insert new needle correctly (see pages 7-12). and ration errors. They can easily be corrected by following the instructions below may...
...machines have been iiade. Sewing problems developed for light materials) (pages 14, 20, 21, 22). Material pulled. Needle not fully inserted. Skipped stitches Needle bent or point damaged. Sewing foot pressure too weak. Thread correctly (pages 7-il). Incorrect stitch formation trect setting ...there of threadj Set thread tensions correctly tensions. (pages 14, 20, 21, 22). Re-adjust differential feed. Needle not fully inserted. Insert new needle correctly (see pages 7-12). and ration errors. They can easily be corrected by following the instructions below may...


