

Owner's Manual
Page 7
... Top-stitching Trouble-shooting Twin needle 49-51 15 12 10 14 23 70 11, 35 Utility stitch table Introduction Selecting needle position 16 Selecting stitch width 16 Winding from the second spool holder 6 Serging with blindstitch and overlock stitch 25, 28-29 Winding the... Sewing table Introduction Shirring foot 79 Shell-edging 44 Smocking 35 Special accessories table 58 Stabilizing edges 42 Standard buttonhole 33 Standard buttonhole with gimp thread 33 Stitch density 17 Stitch length adjustment dial 17 Stitch selection dial 19 Straight stitch 24 Stretch triple ...
... Top-stitching Trouble-shooting Twin needle 49-51 15 12 10 14 23 70 11, 35 Utility stitch table Introduction Selecting needle position 16 Selecting stitch width 16 Winding from the second spool holder 6 Serging with blindstitch and overlock stitch 25, 28-29 Winding the... Sewing table Introduction Shirring foot 79 Shell-edging 44 Smocking 35 Special accessories table 58 Stabilizing edges 42 Standard buttonhole 33 Standard buttonhole with gimp thread 33 Stitch density 17 Stitch length adjustment dial 17 Stitch selection dial 19 Straight stitch 24 Stretch triple ...
Owner's Manual
Page 8
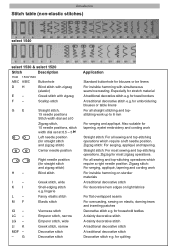
...cording work Straight stitch: For all straight stitching and topstitching work For invisible hemming on sturdier materials A traditional decorative stitch For decorative hem edges on light fabrics For flat 0.5 - 5 Left needle position (for household textiles A dainty decorative stitch A dainty decorative stitch A... and top-stitching operations which require a right needle position. Introduction Stitch table (non-elastic stitches) select 1540 select 1530 & select 1520 Stitch Description 1540 1530/1520 A/B/C A/B/C Buttonhole D H Blind stitch with zigzag (elastic) E -
...cording work Straight stitch: For all straight stitching and topstitching work For invisible hemming on sturdier materials A traditional decorative stitch For decorative hem edges on light fabrics For flat 0.5 - 5 Left needle position (for household textiles A dainty decorative stitch A dainty decorative stitch A... and top-stitching operations which require a right needle position. Introduction Stitch table (non-elastic stitches) select 1540 select 1530 & select 1520 Stitch Description 1540 1530/1520 A/B/C A/B/C Buttonhole D H Blind stitch with zigzag (elastic) E -
Owner's Manual
Page 9
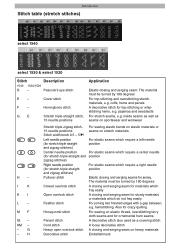
...easily Open overlock stitch A closing and serging seam on sportswear and workwear H - KM - - Introduction Stitch table (stretch stitches) select 1540 select 1530 & select 1520 Stitch Description 1540 1530/1520 D - The material must be turned by 180 degrees Closed overlock stitch A closing and serging seam for sturdy materials or materials ... triple straight and zigzag stitches) For elastic seams which do not fray easily Feather stitch For joining two finished edges with a gap between, e.g. I K K I L - G - hemstitching. Peacock's eye stitch E -
...easily Open overlock stitch A closing and serging seam on sportswear and workwear H - KM - - Introduction Stitch table (stretch stitches) select 1540 select 1530 & select 1520 Stitch Description 1540 1530/1520 D - The material must be turned by 180 degrees Closed overlock stitch A closing and serging seam for sturdy materials or materials ... triple straight and zigzag stitches) For elastic seams which do not fray easily Feather stitch For joining two finished edges with a gap between, e.g. I K K I L - G - hemstitching. Peacock's eye stitch E -

Owner's Manual
Page 31
Utility stitches and practical sewing Utility stitches and practical sewing Sewing chart General sewing aids Non-elastic stitches Elastic stitches Overlock stitches Covering stitches Buttonhole Button sewing Hemming with the twin needle Smocking Gathering Darning Sewing on zippers Stabilizing edges Sewing lace Shell edging 22 23 24-25 26-27 28-29 30-31 32-33 34 35 35 36 37-38 39-41 42 43 44 21
Utility stitches and practical sewing Utility stitches and practical sewing Sewing chart General sewing aids Non-elastic stitches Elastic stitches Overlock stitches Covering stitches Buttonhole Button sewing Hemming with the twin needle Smocking Gathering Darning Sewing on zippers Stabilizing edges Sewing lace Shell edging 22 23 24-25 26-27 28-29 30-31 32-33 34 35 35 36 37-38 39-41 42 43 44 21
Owner's Manual
Page 33
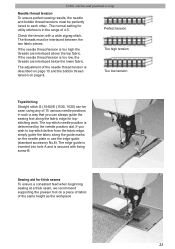
... stitch. Perfect tension Too high tension Too low tension Topstitching Straight stitch G (1540)/E (1530, 1520) can always guide the sewing foot along the guide marks on the needle plate or use the edge guide (standard accessory No.8). Check the tension with fixing screw B. The normal setting for ... supporting the presser foot on page 8. The threads must be perfectly tuned to top-stitch farther from the fabric edge, simply guide the fabric along the fabric edge for utility stitches is in the range of 4-5. The adjustment of the same height as the workpiece 23 If the...
... stitch. Perfect tension Too high tension Too low tension Topstitching Straight stitch G (1540)/E (1530, 1520) can always guide the sewing foot along the guide marks on the needle plate or use the edge guide (standard accessory No.8). Check the tension with fixing screw B. The normal setting for ... supporting the presser foot on page 8. The threads must be perfectly tuned to top-stitch farther from the fabric edge, simply guide the fabric along the fabric edge for utility stitches is in the range of 4-5. The adjustment of the same height as the workpiece 23 If the...

Owner's Manual
Page 34
... top-stitching a collar or sewing in the range of the fabric edge. In this way you can be increased up to 2 mm. Utility stitches and practical sewing stitch stitch 1540 G 1530 E 1520 E 0 2,5 0 2,5 0 2,5 3-5 0/1 1540 G 2- 1-2 3-5 0/1 1530 E 2- 1-2 3-5 0/1 1520 E 2- 1-2 3-5 0/1 3-5 0/1 3-5 0/1 Straight stitch Stitch G/E...sewing jobs by changing the needle position, e.g. When sewing, the thread lies over the edge alternately. Choose a stitch width in a zipper. The stitch length can select up to 6 mm if required. It is very useful. For overcasting difficult...
... top-stitching a collar or sewing in the range of the fabric edge. In this way you can be increased up to 2 mm. Utility stitches and practical sewing stitch stitch 1540 G 1530 E 1520 E 0 2,5 0 2,5 0 2,5 3-5 0/1 1540 G 2- 1-2 3-5 0/1 1530 E 2- 1-2 3-5 0/1 1520 E 2- 1-2 3-5 0/1 3-5 0/1 3-5 0/1 Straight stitch Stitch G/E...sewing jobs by changing the needle position, e.g. When sewing, the thread lies over the edge alternately. Choose a stitch width in a zipper. The stitch length can select up to 6 mm if required. It is very useful. For overcasting difficult...
Owner's Manual
Page 35
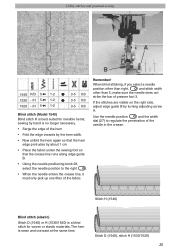
... B by about 1 cm • Place the fabric under the sewing foot so that the hem edge protrudes by turning adjusting screw A. Stitch D (1540), stitch H (1530/1520) 25 When blind stitching, if you select a needle position other than right, and stitch width other than 5, make sure the needle does not... by the hem width. • Now unfold the hem again so that the crease line runs along edge guide B. • Using the needle positioning knob 28, select the needle position to regulate the penetration of presser foot 3. Use the needle position and the width dial (27) to the right ...
... B by about 1 cm • Place the fabric under the sewing foot so that the hem edge protrudes by turning adjusting screw A. Stitch D (1540), stitch H (1530/1520) 25 When blind stitching, if you select a needle position other than right, and stitch width other than 5, make sure the needle does not... by the hem width. • Now unfold the hem again so that the crease line runs along edge guide B. • Using the needle positioning knob 28, select the needle position to regulate the penetration of presser foot 3. Use the needle position and the width dial (27) to the right ...

Owner's Manual
Page 36
... select select 1540 G 1530 E 1520 E 0 Stretch 0 Stretch 0 Stretch 3-5 0/1 3-5 0/1 3-5 0/1 Stretch triple straight stitch This stitch is needed, e.g. inside trouser seams. Turn the stitch length dial away from you as far as it will go for the longest stitch length. 1540 G 3-5 Stretch 1530 E 3-5 Stretch 1520 ...E 3-5 Stretch 3-5 0/1 3-5 0/1 3-5 0/1 Stretch triple zigzag stitch The stretch triple zigzag stitch is a highly elastic and decorative seam which is very suitable for sewing all seams where great strength is used for hems on T-shirts and underwear. • Serge the edge...
... select select 1540 G 1530 E 1520 E 0 Stretch 0 Stretch 0 Stretch 3-5 0/1 3-5 0/1 3-5 0/1 Stretch triple straight stitch This stitch is needed, e.g. inside trouser seams. Turn the stitch length dial away from you as far as it will go for the longest stitch length. 1540 G 3-5 Stretch 1530 E 3-5 Stretch 1520 ...E 3-5 Stretch 3-5 0/1 3-5 0/1 3-5 0/1 Stretch triple zigzag stitch The stretch triple zigzag stitch is a highly elastic and decorative seam which is very suitable for sewing all seams where great strength is used for hems on T-shirts and underwear. • Serge the edge...
Owner's Manual
Page 38
... is an overlock stitch? TIP: Make sure that the needle sews to the right of the material just over the edge and not in it. 28 For elastic materials and knits, the select models offer overlock stitches which do not fray too much can be sewn together perfectly. Tip: We recommend using... and prevents the seam from puckering even on wide seams. stitch 1540 K 5- They are more elastic than normal seams, very durable and quickly sewn. Stretch 1520 I 5-
... is an overlock stitch? TIP: Make sure that the needle sews to the right of the material just over the edge and not in it. 28 For elastic materials and knits, the select models offer overlock stitches which do not fray too much can be sewn together perfectly. Tip: We recommend using... and prevents the seam from puckering even on wide seams. stitch 1540 K 5- They are more elastic than normal seams, very durable and quickly sewn. Stretch 1520 I 5-
Owner's Manual
Page 40
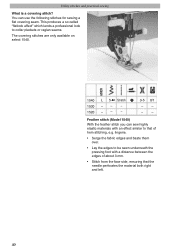
...to that the needle perforates the material both right and left. 30 Stretch 1530 - - - 1520 - - - 3-5 0/1 -- -- lingerie. • Serge the fabric edges and baste them over. • Lay the edges to be sewn underneath the pressing foot with an effect similar to collar plackets or raglan seams. ...The covering stitches are only available on select 1540. You can sew highly elastic materials with a distance between the edges of ...
...to that the needle perforates the material both right and left. 30 Stretch 1530 - - - 1520 - - - 3-5 0/1 -- -- lingerie. • Serge the fabric edges and baste them over. • Lay the edges to be sewn underneath the pressing foot with an effect similar to collar plackets or raglan seams. ...The covering stitches are only available on select 1540. You can sew highly elastic materials with a distance between the edges of ...

Owner's Manual
Page 41
... and fleece. • Place the two fabric edges so that they overlap by about 2 cm and overstitch each edge with an overlock stitch (see pgs 28,29) • The seam allowance can be overstitched from the right side of the fabric. Stretch 1530 - - - 1520 - - - 3-5 0/1 -- -- Fancy elastic stitch (Model 1540) The fancy elastic... stitch is particularly suitable for materials that the needle enters in the shadow of covering stitches. Utility stitches and practical sewing stitch stitch 1540 L 5- 1-2 1530 - - - 1520 - - - 3-5 0/1 -- --
... and fleece. • Place the two fabric edges so that they overlap by about 2 cm and overstitch each edge with an overlock stitch (see pgs 28,29) • The seam allowance can be overstitched from the right side of the fabric. Stretch 1530 - - - 1520 - - - 3-5 0/1 -- -- Fancy elastic stitch (Model 1540) The fancy elastic... stitch is particularly suitable for materials that the needle enters in the shadow of covering stitches. Utility stitches and practical sewing stitch stitch 1540 L 5- 1-2 1530 - - - 1520 - - - 3-5 0/1 -- --

Owner's Manual
Page 45
Utility stitches and practical sewing stitch stitch 1540 G 0 3 1530 E 0 3 1520 E 0 3 3-5 0/1 3-5 0/1 3-5 0/1 1540 G 1530 E 1520 E 0 3-4 0 3-4 0 3-4 3-5 0/1 3-5 0/1 3-5 0/1 Hemming with the twin needle ...• Then topstitch the hem from the right side. • Finally, cut the protruding hem edge back to its original length when sewing the subsequent seams. Otherwise, the gather will be sewn at ...a presser foot's width from striking the needle plate, you select the center needle position . • First fold and iron the width of the seam on stretch...
Utility stitches and practical sewing stitch stitch 1540 G 0 3 1530 E 0 3 1520 E 0 3 3-5 0/1 3-5 0/1 3-5 0/1 1540 G 1530 E 1520 E 0 3-4 0 3-4 0 3-4 3-5 0/1 3-5 0/1 3-5 0/1 Hemming with the twin needle ...• Then topstitch the hem from the right side. • Finally, cut the protruding hem edge back to its original length when sewing the subsequent seams. Otherwise, the gather will be sewn at ...a presser foot's width from striking the needle plate, you select the center needle position . • First fold and iron the width of the seam on stretch...

Owner's Manual
Page 48
Utility stitches and practical sewing stitch 1540 M 5- 0,2-1,5 1530 F 5- 0,2-1,5 1520 F 5- 0,2-1,5 3-5 0/1 3-5 0/1 3-5 0/1 Darning with the elastic stitch Darning with the elastic stitch. • Now cut the damaged area back to the seam from the reverse side of ... care to the seam. The underlayed fabric reinforces the workpiece and ensures perfect repair. • Lay a piece of the fabric. • Sew over the fabric edges with the elastic stitch is especially suitable for repairing damaged areas. • Sew over the damaged area. • Cut the under the reverse side of...
Utility stitches and practical sewing stitch 1540 M 5- 0,2-1,5 1530 F 5- 0,2-1,5 1520 F 5- 0,2-1,5 3-5 0/1 3-5 0/1 3-5 0/1 Darning with the elastic stitch Darning with the elastic stitch. • Now cut the damaged area back to the seam from the reverse side of ... care to the seam. The underlayed fabric reinforces the workpiece and ensures perfect repair. • Lay a piece of the fabric. • Sew over the fabric edges with the elastic stitch is especially suitable for repairing damaged areas. • Sew over the damaged area. • Cut the under the reverse side of...

Owner's Manual
Page 49
...to insert the zipper foot either on the right or the left . Various zippers are various methods of the presser foot holder. stitch 1540 G 0 3 1530 E 0 3 1520 E 0 3 3-5 4 3-5 4 3-5 4 Left presser foot position Right presser foot position 39 For skirts, we recommend the fully concealed zipper, for all other materials we ... the left of sewing on zippers There are available. This is engaged to the right, the needle must only be moved to the edge of the teeth of the 15 available needle positions. If the foot is why it enters close to the right. Utility stitches and...
...to insert the zipper foot either on the right or the left . Various zippers are various methods of the presser foot holder. stitch 1540 G 0 3 1530 E 0 3 1520 E 0 3 3-5 4 3-5 4 3-5 4 Left presser foot position Right presser foot position 39 For skirts, we recommend the fully concealed zipper, for all other materials we ... the left of sewing on zippers There are available. This is engaged to the right, the needle must only be moved to the edge of the teeth of the 15 available needle positions. If the foot is why it enters close to the right. Utility stitches and...

Owner's Manual
Page 51
Tip: To achieve a perfect seam, we recommend using the edge guide. 41 Utility stitches and practical sewing The trouser zipper • Iron the seam allowances, taking care to ensure that the underlap extends by about 4 ... teeth are visible. • Insert the zipper foot on the right side and move the needle to the right needle position . • Stitch along the edge of the zipper. • Just before the end of the seam, open the zipper and finish sewing the seam. • Close the zipper and...
Tip: To achieve a perfect seam, we recommend using the edge guide. 41 Utility stitches and practical sewing The trouser zipper • Iron the seam allowances, taking care to ensure that the underlap extends by about 4 ... teeth are visible. • Insert the zipper foot on the right side and move the needle to the right needle position . • Stitch along the edge of the zipper. • Just before the end of the seam, open the zipper and finish sewing the seam. • Close the zipper and...

Owner's Manual
Page 52
Utility stitches and practical sewing stitch 1540 G 0 3 1530 E 0 3 1520 E 0 3 3-5 7 3-5 Optional 3-5 Optional Stabilizing edges With the hemmer you can hem blouses, silk scarves and valances with a zigzag stitch 42 Tip: On silk, viscose and chiffon fabrics, the roll hem ...is the result. • Fold the beginning of the presser foot. The hemming prevents the edges from fraying and a clean, durable edge is particularly attractive with ease, without having to ensure that the fabric does not run under the right half of the fabric...
Utility stitches and practical sewing stitch 1540 G 0 3 1530 E 0 3 1520 E 0 3 3-5 7 3-5 Optional 3-5 Optional Stabilizing edges With the hemmer you can hem blouses, silk scarves and valances with a zigzag stitch 42 Tip: On silk, viscose and chiffon fabrics, the roll hem ...is the result. • Fold the beginning of the presser foot. The hemming prevents the edges from fraying and a clean, durable edge is particularly attractive with ease, without having to ensure that the fabric does not run under the right half of the fabric...

Owner's Manual
Page 53
on babywear and children's clothing. • First the lace is cut edges. • Sew the lace onto the face side of the lace with the desired suitable lace as often as you like. Utility stitches and practical sewing stitch 1540 G 1530 E 1520 E 0 2,5 0 2,5 0 2,5 3-5 0/1 3-5 0/1 3-5 0/1 Inserting lace You can beautify and ...at a narrow margin. • The fabric underneath the lace is basted onto the right side of the fabric. • Sew on both edges of the fabric up to the side. • Sew over it diagonally. • Sew the following sides in the same way. 43 Attaching...
on babywear and children's clothing. • First the lace is cut edges. • Sew the lace onto the face side of the lace with the desired suitable lace as often as you like. Utility stitches and practical sewing stitch 1540 G 1530 E 1520 E 0 2,5 0 2,5 0 2,5 3-5 0/1 3-5 0/1 3-5 0/1 Inserting lace You can beautify and ...at a narrow margin. • The fabric underneath the lace is basted onto the right side of the fabric. • Sew on both edges of the fabric up to the side. • Sew over it diagonally. • Sew the following sides in the same way. 43 Attaching...

Owner's Manual
Page 54
... and practical sewing select 1540 K 1530 I 1520 I 4,5 1,5 4,5 1,5 4,5 1,5 4-5 0/1 4-5 0/1 4-5 0/1 Shell-edging Shell-edging is often used instead of a woollen thread. 44 Tip: By sewing a colored woollen thread into the seam you strengthen the shell-edge while also creating an attractive contrast in the seam. The higher the needle thread tension, the deeper the shell edge feed. • Serge...
... and practical sewing select 1540 K 1530 I 1520 I 4,5 1,5 4,5 1,5 4,5 1,5 4-5 0/1 4-5 0/1 4-5 0/1 Shell-edging Shell-edging is often used instead of a woollen thread. 44 Tip: By sewing a colored woollen thread into the seam you strengthen the shell-edge while also creating an attractive contrast in the seam. The higher the needle thread tension, the deeper the shell edge feed. • Serge...

Owner's Manual
Page 61
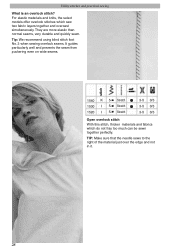
...easier for the buttonhole seam. By using a dense zigzag stitch (stitch G (1540), E (1530/1520), stitch width 3-5 mm). Remember that the ends are quickly made and always produce a beautiful fancy effect.... The needle thread tension is set to "buttonhole". • Select the right needle position and sew over both buttonhole seams. Appliqué Appliqués ...it has a special cutout on the base material. • Sew over the outer edge so that no fraying occurs later. Decorative sewing and embroidery techniques Decorative buttonhole This buttonhole ...
...easier for the buttonhole seam. By using a dense zigzag stitch (stitch G (1540), E (1530/1520), stitch width 3-5 mm). Remember that the ends are quickly made and always produce a beautiful fancy effect.... The needle thread tension is set to "buttonhole". • Select the right needle position and sew over both buttonhole seams. Appliqué Appliqués ...it has a special cutout on the base material. • Sew over the outer edge so that no fraying occurs later. Decorative sewing and embroidery techniques Decorative buttonhole This buttonhole ...
Owner's Manual
Page 63
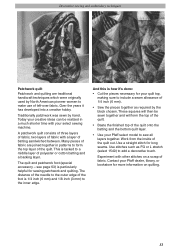
... used by hand. This is tacked to a middle layer of the quilt onto the batting and the bottom quilt layer. • Use your Pfaff select model to the outer edge of fabric. Experiment with a layer of the quilt out. Decorative sewing and embroidery techniques Patchwork quilt Patchwork and quilting are joined together in...
... used by hand. This is tacked to a middle layer of the quilt onto the batting and the bottom quilt layer. • Use your Pfaff select model to the outer edge of fabric. Experiment with a layer of the quilt out. Decorative sewing and embroidery techniques Patchwork quilt Patchwork and quilting are joined together in...

