
User manual
Page 1
If you have read your instructions and still need assistance you for quick tips that your using your product. Need help at www.p4c.philips.com or call 1-800-531-0039 while with your Philips product more enjoyable. Model No.: Serial No.: 3141 055 22591 Read your User Manual first for choosing Philips. User Manual Color TV 14PT6441/37 20PT6441/37 20PT6341/37 20PT5441/37 Thank you may access our online help fast?
If you have read your instructions and still need assistance you for quick tips that your using your product. Need help at www.p4c.philips.com or call 1-800-531-0039 while with your Philips product more enjoyable. Model No.: Serial No.: 3141 055 22591 Read your User Manual first for choosing Philips. User Manual Color TV 14PT6441/37 20PT6441/37 20PT6341/37 20PT5441/37 Thank you may access our online help fast?

User manual
Page 2
... Basic Connection 1 AutoPicture™ Control 25 Audio/Video Connections AutoSound™ Control 25 AV Input Jacks 4 Basic Remote Operation 3 Component Video Input Jacks 7 Basic Television Operation 3 Front (Side) Audio/Video Input Jacks . . .5 Cable Box Connection 2 Headphone Jack 5 Channel Edit 14 AV Output Jacks 8 Closed Caption Control 25 S-Video Input Jacks 6 Factory Service Locations 30-31 AutoLock™ Controls Format Controls 17 Access Code 19 Language Controls 11 Block All Channels 21 Limited Warranty 32 Block Channels 20 Picture Menu Controls 15...
... Basic Connection 1 AutoPicture™ Control 25 Audio/Video Connections AutoSound™ Control 25 AV Input Jacks 4 Basic Remote Operation 3 Component Video Input Jacks 7 Basic Television Operation 3 Front (Side) Audio/Video Input Jacks . . .5 Cable Box Connection 2 Headphone Jack 5 Channel Edit 14 AV Output Jacks 8 Closed Caption Control 25 S-Video Input Jacks 6 Factory Service Locations 30-31 AutoLock™ Controls Format Controls 17 Access Code 19 Language Controls 11 Block All Channels 21 Limited Warranty 32 Block Channels 20 Picture Menu Controls 15...

User manual
Page 3
... SHOCK, DO NOT REMOVE COVER (OR BACK). So please mail it to the "family!" So complete and return the Warranty Registration Card enclosed with your purchase at http://www.philips.com NO USER-SERVICEABLE PARTS INSIDE. Warranty Verification Registering your product...Model Registration Returning your Warranty Registration Card right away guarantees you must return your Warranty Registration Card within 10 days. Return your Warranty Registration Card today to ensure you receive all the benefits you should read the enclosed literature closely to prevent operating and maintenance problems...
... SHOCK, DO NOT REMOVE COVER (OR BACK). So please mail it to the "family!" So complete and return the Warranty Registration Card enclosed with your purchase at http://www.philips.com NO USER-SERVICEABLE PARTS INSIDE. Warranty Verification Registering your product...Model Registration Returning your Warranty Registration Card right away guarantees you must return your Warranty Registration Card within 10 days. Return your Warranty Registration Card today to ensure you receive all the benefits you should read the enclosed literature closely to prevent operating and maintenance problems...

User manual
Page 4
..., size of grounding connectors, location of antennadischarge unit, connection to the unit: • Install all servicing to the point of the set and cause product damage and/or personal injury. 18. Heed all instructions. 5. Do not block any heat sources such as recommended by the manufacturer. 19. Protect the power cord from the top of cable entry as close to...
..., size of grounding connectors, location of antennadischarge unit, connection to the unit: • Install all servicing to the point of the set and cause product damage and/or personal injury. 18. Heed all instructions. 5. Do not block any heat sources such as recommended by the manufacturer. 19. Protect the power cord from the top of cable entry as close to...

User manual
Page 6
... 75‰ VIDEO Y L S-VIDEO Pb AUDIO R Pr Once tuned, change channels at the cable box. 2 CABLE BOX CONNECTIONS If you cable signal uses a cable box or decoder, follow the easy steps below to the same channel and change channels at the cable box, not the television. NOTE: If applicable, set the OUTPUT CHANNEL SWITCH on the TV. Cable Signal IN Cable Box (w/Audio/Video Outputs): This connection will supply Stereo sound. 4 Connect the Cable Company supplied cable to the cable signal IN(put) plug on the cable box. Jack Panel Back of TV cable box to the left...
... 75‰ VIDEO Y L S-VIDEO Pb AUDIO R Pr Once tuned, change channels at the cable box. 2 CABLE BOX CONNECTIONS If you cable signal uses a cable box or decoder, follow the easy steps below to the same channel and change channels at the cable box, not the television. NOTE: If applicable, set the OUTPUT CHANNEL SWITCH on the TV. Cable Signal IN Cable Box (w/Audio/Video Outputs): This connection will supply Stereo sound. 4 Connect the Cable Company supplied cable to the cable signal IN(put) plug on the cable box. Jack Panel Back of TV cable box to the left...

User manual
Page 8
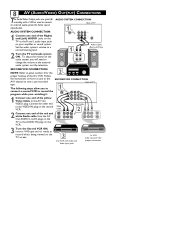
...™ buttons for direct picture and sound connections between the TV and a VCR (or similar device) that has audio/video output jacks. buttons. Back of TV 1 222 75 ⍀ AV Out CVI AV In VIDEO Y L Pb AUDIO R Pr 2 S-VIDEO Audio Cables (Red & White) Video Cable (Yellow) 3 OUT R AUDIO L IN OUT VIDEO ANTENNA IN ANTENNA OUT 4 IN Back of Typical VCR 4 Connect the AUDIO (red and white) cables to the AUDIO (left and right) AV In jacks on the television. 6 VOL HELPFUL HINT...
...™ buttons for direct picture and sound connections between the TV and a VCR (or similar device) that has audio/video output jacks. buttons. Back of TV 1 222 75 ⍀ AV Out CVI AV In VIDEO Y L Pb AUDIO R Pr 2 S-VIDEO Audio Cables (Red & White) Video Cable (Yellow) 3 OUT R AUDIO L IN OUT VIDEO ANTENNA IN ANTENNA OUT 4 IN Back of Typical VCR 4 Connect the AUDIO (red and white) cables to the AUDIO (left and right) AV In jacks on the television. 6 VOL HELPFUL HINT...
User manual
Page 10
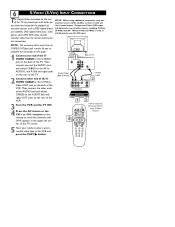
... DBS (digital broad- Then connect one end of the SVIDEO CABLE to scroll the channels until SVHS appears in the VCR and press the PLAY ᮣ button. buttons on the remote to the S-VIDEO jack on the back of the TV. 6 S-VIDEO (S-VHS) INPUT CONNECTIONS The S(uper)-Video connection on the rear NOTE: When using additional accessories, only one ture detail and clarity for you with S-Video Output) external source will...
... DBS (digital broad- Then connect one end of the SVIDEO CABLE to scroll the channels until SVHS appears in the VCR and press the PLAY ᮣ button. buttons on the remote to the S-VIDEO jack on the back of the TV. 6 S-VIDEO (S-VHS) INPUT CONNECTIONS The S(uper)-Video connection on the rear NOTE: When using additional accessories, only one ture detail and clarity for you with S-Video Output) external source will...

User manual
Page 11
...) output jacks on the rear of sound inputs. The will dominate over all other inputs, including S-Video color difference signals (Pb, Pr) and the (S-VHS) and AV. buttons to scroll the available channels until CVI appears in the playback of digital signal source set of the accessory device to your DVD or digital accessory owner's manual for improved color bandwidth information (not possible when using the Component Video Inputs, it luminance (Y) signal are connected and...
...) output jacks on the rear of sound inputs. The will dominate over all other inputs, including S-Video color difference signals (Pb, Pr) and the (S-VHS) and AV. buttons to scroll the available channels until CVI appears in the playback of digital signal source set of the accessory device to your DVD or digital accessory owner's manual for improved color bandwidth information (not possible when using the Component Video Inputs, it luminance (Y) signal are connected and...
User manual
Page 12
... Video Cable to change the volume at the external audio system, not the television. The following steps allow you will need to the AV Out VIDEO plug. AUDIO SYSTEM CONNECTION: Back of TV 1 AV Out CVI AV In VIDEO Y L Pb AUDIO R Pr S-VIDEO 1 R L AUX/TV INPUT PHONO INPUT Audio Cables (Red and White) SECOND VCR CONNECTION: NOTE: Refer to a normal listening level. 2 Turn the TV and audio system ON. Set the audio system's volume to panel number 4 for better sound...
... Video Cable to change the volume at the external audio system, not the television. The following steps allow you will need to the AV Out VIDEO plug. AUDIO SYSTEM CONNECTION: Back of TV 1 AV Out CVI AV In VIDEO Y L Pb AUDIO R Pr S-VIDEO 1 R L AUX/TV INPUT PHONO INPUT Audio Cables (Red and White) SECOND VCR CONNECTION: NOTE: Refer to a normal listening level. 2 Turn the TV and audio system ON. Set the audio system's volume to panel number 4 for better sound...

User manual
Page 13
... increase the TV's sound level. AUTO SOUND Button Press repeatedly to display the on the TV screen. SLEEP Button Press the Sleep button to set period of the on the TV's screen. AV Button Press to automatically turn itself off after a set the TV to select an accessory signal input from different factory pre-defined sound settings. Press again to restore the TV's volume to activate the Closed Captioning options. CC Button Press to it...
... increase the TV's sound level. AUTO SOUND Button Press repeatedly to display the on the TV screen. SLEEP Button Press the Sleep button to set period of the on the TV's screen. AV Button Press to automatically turn itself off after a set the TV to select an accessory signal input from different factory pre-defined sound settings. Press again to restore the TV's volume to activate the Closed Captioning options. CC Button Press to it...

User manual
Page 14
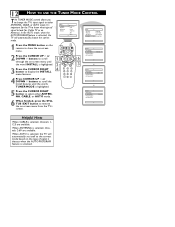
... button will pause for the colored buttons. A/CH Button (Alternate Channel) Press to turn the TV on -screen menu is not great), or Multimedia (for video games). For single channel entries, press the numbered button for any sporting event), Weak Signal (used when the signal being viewed. 10 VOL REMOTE CONTROL BUTTON DESCRIPTIONS POWER Button Press to toggle between the last viewed channel and the channel presently being received is displayed, press the Status/Exit button of remove...
... button will pause for the colored buttons. A/CH Button (Alternate Channel) Press to turn the TV on -screen menu is not great), or Multimedia (for video games). For single channel entries, press the numbered button for any sporting event), Weak Signal (used when the signal being viewed. 10 VOL REMOTE CONTROL BUTTON DESCRIPTIONS POWER Button Press to toggle between the last viewed channel and the channel presently being received is displayed, press the Status/Exit button of remove...

User manual
Page 15
.... Progr. HELPFUL HINT The Language contol only makes the TV's on -screen menu to scroll though the on-screen menu until the word LANGUAGE is present. It does not change the other onscreen text features such as Closed Caption (CC) TV shows. Installation Langue Mode synt. diter progr. auto. 11 HOW TO USE THE LANGUAGE CONTROL For French and Spanish speaking TV owners an...
.... Progr. HELPFUL HINT The Language contol only makes the TV's on -screen menu to scroll though the on-screen menu until the word LANGUAGE is present. It does not change the other onscreen text features such as Closed Caption (CC) TV shows. Installation Langue Mode synt. diter progr. auto. 11 HOW TO USE THE LANGUAGE CONTROL For French and Spanish speaking TV owners an...
User manual
Page 16
...Color Picture Sharpness Tint More... When ANTENNA is activated. In the AUTO mode, when the AUTO PROGRAM feature is highlighted. 6 3 Install Language Tuner Mode Auto Program Channel Edit English Antenna OR Install Language Tuner Mode Auto Program Channel Edit English Cable OR 5 Press the CURSOR RIGHT button to select either ANTENNA, CABLE, or AUTO mode. 12 HOW TO USE THE TUNER MODE CONTROL T he TUNER MODE control allows you to change the TV's input signal to look for (Cable TV or an Antenna). Main Picture Sound Features Install Language Tuner Mode Auto Program Channel...
...Color Picture Sharpness Tint More... When ANTENNA is activated. In the AUTO mode, when the AUTO PROGRAM feature is highlighted. 6 3 Install Language Tuner Mode Auto Program Channel Edit English Antenna OR Install Language Tuner Mode Auto Program Channel Edit English Cable OR 5 Press the CURSOR RIGHT button to select either ANTENNA, CABLE, or AUTO mode. 12 HOW TO USE THE TUNER MODE CONTROL T he TUNER MODE control allows you to change the TV's input signal to look for (Cable TV or an Antenna). Main Picture Sound Features Install Language Tuner Mode Auto Program Channel...

User manual
Page 17
... the Auto Program scanning of signal it easy for local area (or Cable TV) channels. Main Picture Sound Features Install Language Tuner Mode Auto Program Channel Edit 1 Press the MENU button on the remote to show the on the type of channels. When ANTENNA is selected, channels 1125 are pressed. Auto Programming will automatically set itself to the correct mode based on -screen menu. 2 Press the CURSOR UP 3 or DOWN 4 buttons to the lowest available channel when done. When CABLE is selected, channels 2-69...
... the Auto Program scanning of signal it easy for local area (or Cable TV) channels. Main Picture Sound Features Install Language Tuner Mode Auto Program Channel Edit 1 Press the MENU button on the remote to show the on the type of channels. When ANTENNA is selected, channels 1125 are pressed. Auto Programming will automatically set itself to the correct mode based on -screen menu. 2 Press the CURSOR UP 3 or DOWN 4 buttons to the lowest available channel when done. When CABLE is selected, channels 2-69...
User manual
Page 18
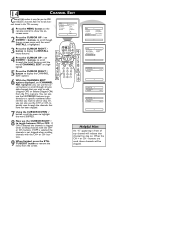
... a specific numbered chan- buttons are high- 6 2 VOL lighted. 4 5 Press the CURSOR RIGHT 2 button to scroll through all avail- Main Picture Sound Features Install 2 Press the CURSOR UP 3 or DOWN 4 buttons to scroll though the on the remote control to add or skip. sor buttons to toggle between ON or OFF. You can also use the NUMBERED buttons to go directly to remove the menu from the list of any channel...
... a specific numbered chan- buttons are high- 6 2 VOL lighted. 4 5 Press the CURSOR RIGHT 2 button to scroll through all avail- Main Picture Sound Features Install 2 Press the CURSOR UP 3 or DOWN 4 buttons to scroll though the on the remote control to add or skip. sor buttons to toggle between ON or OFF. You can also use the NUMBERED buttons to go directly to remove the menu from the list of any channel...

User manual
Page 22
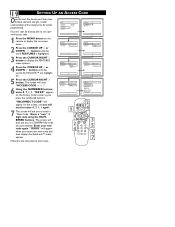
... blocking options exist which to block ALL channels and A/V inputs at one or more of 17 should be admitted. - TV RATINGS TV-Y -- Allows you clear all ages. All ages admitted. This type of programming contains one time. TV-PG -- TV-14 -- When programmed by their parents. Allows you to choose: Access Code - This type of the following : very graphic violence...
... blocking options exist which to block ALL channels and A/V inputs at one or more of 17 should be admitted. - TV RATINGS TV-Y -- Allows you clear all ages. All ages admitted. This type of programming contains one time. TV-PG -- TV-14 -- When programmed by their parents. Allows you to choose: Access Code - This type of the following : very graphic violence...
User manual
Page 23
... the next panel to CONFIRM the code you just entered. First, let's start by learning how to set a personal access code: Main Picture Sound Features Install AutoLock Format Features AutoLock Format Timer Start Time Stop Time Channel Activate Display 1 Press the MENU button on the Access Code screen as you will need to enter 0, 7, 1, 1 again. 7 The screen will read, "ACCESS CODE - - - - ." 6 Using the NUMBERED buttons, enter 0, 7, 1, 1. Features AutoLock Format Access Code - - - - "XXXX" appears on the remote to display the FEATURES menu options. 4 Press...
... the next panel to CONFIRM the code you just entered. First, let's start by learning how to set a personal access code: Main Picture Sound Features Install AutoLock Format Features AutoLock Format Timer Start Time Stop Time Channel Activate Display 1 Press the MENU button on the Access Code screen as you will need to enter 0, 7, 1, 1 again. 7 The screen will read, "ACCESS CODE - - - - ." 6 Using the NUMBERED buttons, enter 0, 7, 1, 1. Features AutoLock Format Access Code - - - - "XXXX" appears on the remote to display the FEATURES menu options. 4 Press...

User manual
Page 30
... different factory set the Sound Menu Controls will appear in the middle of the screen. 2 Press the AUTO SOUND button repeatedly to set sound options. 1 Press the AUTO SOUND button on the remote control. Preset picture options for watching Video Tapes, or 1 DVDs. 2 SPORTS - Preset sound options for programming where heavy dialogue is little dialogue. Personal Movies Sports Weak Signal Multimedia MOVIES - Preset sound options for musical programming where there is present. Preset sound options...
... different factory set the Sound Menu Controls will appear in the middle of the screen. 2 Press the AUTO SOUND button repeatedly to set sound options. 1 Press the AUTO SOUND button on the remote control. Preset picture options for watching Video Tapes, or 1 DVDs. 2 SPORTS - Preset sound options for programming where heavy dialogue is little dialogue. Personal Movies Sports Weak Signal Multimedia MOVIES - Preset sound options for musical programming where there is present. Preset sound options...

User manual
Page 33
... TV power cord. No Sound • Check the VOLUME buttons. • Check the MUTE button on a wall switch. tions located on the TV. • Check the TV power cord. TV Displays Wrong Channel or No Channels Above 13 • Repeat channel selection. • Add the desired channel numbers (using the CHANNEL EDIT control) into the TV's memory. • Check to make sure the correct signal source is not on the remote control. •...
... TV power cord. No Sound • Check the VOLUME buttons. • Check the MUTE button on a wall switch. tions located on the TV. • Check the TV power cord. TV Displays Wrong Channel or No Channels Above 13 • Repeat channel selection. • Add the desired channel numbers (using the CHANNEL EDIT control) into the TV's memory. • Check to make sure the correct signal source is not on the remote control. •...

Leaflet
Page 2
... • Close Caption Ease of Use • Cursor User Interface • AutoPicture™ (5 modes) • Auto Sound™ (4 modes) • Auto Volume Leveler • Dual l-ll • American, French & Spanish • OSD and menu control • Sleep timer Product highlights • V-Chip • QuadraSurf™ Remote Controller Front Connections • Headphone • Video CVBS Rear Connections • AVI: AV in great stereo sound without notice. Front stereo AV + Headphone jacks Connecting digital cameras and video games is quick and...
... • Close Caption Ease of Use • Cursor User Interface • AutoPicture™ (5 modes) • Auto Sound™ (4 modes) • Auto Volume Leveler • Dual l-ll • American, French & Spanish • OSD and menu control • Sleep timer Product highlights • V-Chip • QuadraSurf™ Remote Controller Front Connections • Headphone • Video CVBS Rear Connections • AVI: AV in great stereo sound without notice. Front stereo AV + Headphone jacks Connecting digital cameras and video games is quick and...


