Leaflet
Page 2
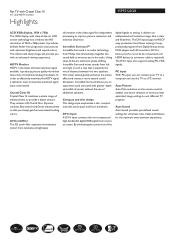
... speakers. Flat TV with Crystal Clear III 15" LCD HDTV monitor Highlights 15PF5120/28 LCD XGA display, 1024 x 768p This XGA display with optimum brightness and superb colors. Incredible Surround allows you with greater depth and width of -the-art electronic phase shifting, Incredible Surround mixes sounds from Digital Settop boxes, DVD players and HD recorders. The DVI input supports HDCP copy protection that allows viewing of traditional analog...
... speakers. Flat TV with Crystal Clear III 15" LCD HDTV monitor Highlights 15PF5120/28 LCD XGA display, 1024 x 768p This XGA display with optimum brightness and superb colors. Incredible Surround allows you with greater depth and width of -the-art electronic phase shifting, Incredible Surround mixes sounds from Digital Settop boxes, DVD players and HD recorders. The DVI input supports HDCP copy protection that allows viewing of traditional analog...
Leaflet
Page 3
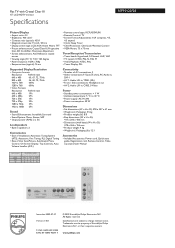
....1 Accessories • Included Accessories: Power cord, Quick start guide, Registration card, Remote Control, Table top stand, User Manual • Issue date 2009-07-31 Version: 7.0.8 12 NC: 8670 000 22958 EAN: 87 10895 90677 7 © 2009 Koninklijke Philips Electronics N.V. or their respective owners. Packaging: 5.5 kg • Product weight (lb): 8.8 • Box dimensions (W x H x D): 417 x 200 x 426 mm • Dimensions (with Crystal Clear III 15" LCD HDTV monitor Specifications 15PF5120/28 Picture/Display • Aspect ratio...
....1 Accessories • Included Accessories: Power cord, Quick start guide, Registration card, Remote Control, Table top stand, User Manual • Issue date 2009-07-31 Version: 7.0.8 12 NC: 8670 000 22958 EAN: 87 10895 90677 7 © 2009 Koninklijke Philips Electronics N.V. or their respective owners. Packaging: 5.5 kg • Product weight (lb): 8.8 • Box dimensions (W x H x D): 417 x 200 x 426 mm • Dimensions (with Crystal Clear III 15" LCD HDTV monitor Specifications 15PF5120/28 Picture/Display • Aspect ratio...
User manual
Page 2
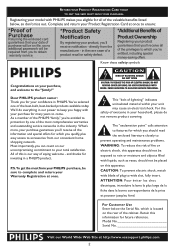
...fits listed below the Serial No. ATTENTION: Pour éviter les choc électriques, introduire la lame la plus easy access to obtain warranty service. *Product Safety *Additional Benefits of everyone in your product, you 'll receive all of saying welcome - Retain this apparatus should not be on your date of the best-built, best-backed products...
...fits listed below the Serial No. ATTENTION: Pour éviter les choc électriques, introduire la lame la plus easy access to obtain warranty service. *Product Safety *Additional Benefits of everyone in your product, you 'll receive all of saying welcome - Retain this apparatus should not be on your date of the best-built, best-backed products...
User manual
Page 3
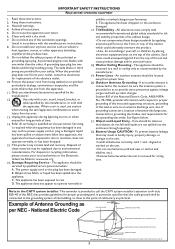
... safety. Damage Requiring Service - E. Tilt/Stability - An outdoor antenna should be located away from power lines. 20. See Figure below. 21. aligned as marked on the unit. • Do not mix batteries (old and new or carbon and alkaline, etc.). • Remove batteries when the unit is grounded so as power-supply cord or plug is used for the grounding...
... safety. Damage Requiring Service - E. Tilt/Stability - An outdoor antenna should be located away from power lines. 20. See Figure below. 21. aligned as marked on the unit. • Do not mix batteries (old and new or carbon and alkaline, etc.). • Remove batteries when the unit is grounded so as power-supply cord or plug is used for the grounding...
User manual
Page 5
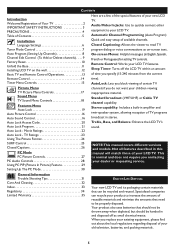
... SAFETY INSTRUCTIONS 3 PRECAUTIONS 4 Table of Contents 5 Installation Language Settings 6 Tuner Mode Control 7 Auto Program (Setting Up Channels 8 Channel Edit Control (To Add or Delete channels) . . . . 9 Factory Reset 10 Unfold the Base 11 Installing LCD TV on -screen text. Audio/Video In Jacks: Use to quickly connect other equipment to read TV program dialog or voice conversations as small chemical waste. Automatic Channel Programming (Auto Program): Quick and easy setup of your LCD TV. Closed Captioning: Allows the viewer to your LCD TV features. On-screen Menus: Helpful...
... SAFETY INSTRUCTIONS 3 PRECAUTIONS 4 Table of Contents 5 Installation Language Settings 6 Tuner Mode Control 7 Auto Program (Setting Up Channels 8 Channel Edit Control (To Add or Delete channels) . . . . 9 Factory Reset 10 Unfold the Base 11 Installing LCD TV on -screen text. Audio/Video In Jacks: Use to quickly connect other equipment to read TV program dialog or voice conversations as small chemical waste. Automatic Channel Programming (Auto Program): Quick and easy setup of your LCD TV. Closed Captioning: Allows the viewer to your LCD TV features. On-screen Menus: Helpful...
User manual
Page 7
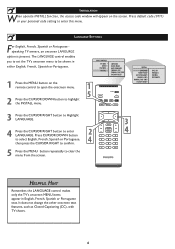
... highlight the INSTALL menu. HELPFUL HINT Remember, the LANGUAGE control makes only the TV's onscreen MENU items appear in either English, French, Spanish or Portuguese. 1 Press the MENU button on the screen. It does not change the other onscreen text features, such as Closed Captioning (CC), with TV shows. 6 MAIN CONTROLS PICTURE AUDIO FEATURES INSTALL LANGUAGE TUNER MODE AUTO PROGRAM CHANNEL EDIT MANUAL FINE TUNE FACTORY RESET 1 5 INSTALL LANGUAGE TUNER MODE AUTO PROGRAM CHANNEL EDIT MANUAL FINE TUNE FACTORY RESET ENGLISH FRAN...
... highlight the INSTALL menu. HELPFUL HINT Remember, the LANGUAGE control makes only the TV's onscreen MENU items appear in either English, French, Spanish or Portuguese. 1 Press the MENU button on the screen. It does not change the other onscreen text features, such as Closed Captioning (CC), with TV shows. 6 MAIN CONTROLS PICTURE AUDIO FEATURES INSTALL LANGUAGE TUNER MODE AUTO PROGRAM CHANNEL EDIT MANUAL FINE TUNE FACTORY RESET 1 5 INSTALL LANGUAGE TUNER MODE AUTO PROGRAM CHANNEL EDIT MANUAL FINE TUNE FACTORY RESET ENGLISH FRAN...
User manual
Page 15
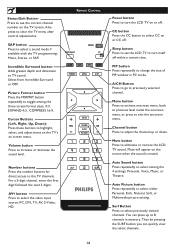
... the LCD TV sound. PIP button Press repeatedly to change the size of PIP window in memory. Mute button Press to select the video input source: PC, DVI, TV, AV, S-Video, HD. Personal, Voice, Music, or Theatre. Auto Picture button Press repeatedly to select previously viewed channels. Surf Button Press to select either Personal, Rich, Natural, Soft, or Multimedia picture setting. Also press to select a sound mode if available with the TV programming...
... the LCD TV sound. PIP button Press repeatedly to change the size of PIP window in memory. Mute button Press to select the video input source: PC, DVI, TV, AV, S-Video, HD. Personal, Voice, Music, or Theatre. Auto Picture button Press repeatedly to select previously viewed channels. Surf Button Press to select either Personal, Rich, Natural, Soft, or Multimedia picture setting. Also press to select a sound mode if available with the TV programming...
User manual
Page 20
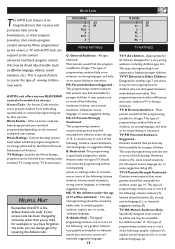
... received rating and user setting. AUTO Lock offers various BLOCKING controls from which will be blocked from unblocking questionable or censored programming set by TV broadcasters. TV Ratings - If your access code has been changed by the Motion Pictures Association of 17 will block programming based on ratings patterned by someone other program providers, that contain program content advisories.When programmed by the viewer, a TV with an accompanying parent...
... received rating and user setting. AUTO Lock offers various BLOCKING controls from which will be blocked from unblocking questionable or censored programming set by TV broadcasters. TV Ratings - If your access code has been changed by the Motion Pictures Association of 17 will block programming based on ratings patterned by someone other program providers, that contain program content advisories.When programmed by the viewer, a TV with an accompanying parent...
User manual
Page 21
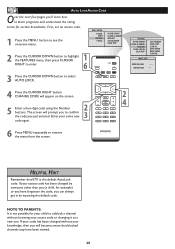
... TO PARENTS: It is the default AutoLock code. AUTO LOCK ACCESS CODE Over the next few pages you can always get in by inputting the default code. FEATURES PICTURE FORMAT PICTURE ALIGNMENT AUTOLOCK CLOSED CAPTION COLOR TEMP LOCK PROGRAM CHANG CODE CLEAR ALL BLOCK OPTION MOVIE RATING TV RATING CHANGE CODE ENTER NEW CODE CONFIRM CODE ------- 4 Press the CURSOR RIGHT button CHANGE CODE will appear on the screen. � 5 Enter a four-digit code using the Number buttons. MAIN CONTROL PICTURE AUDIO FEATURES INSTALL PICTURE FORMAT PICTURE ALIGNMENT AUTOLOCK CLOSED CAPTION COLOR TEMP...
... TO PARENTS: It is the default AutoLock code. AUTO LOCK ACCESS CODE Over the next few pages you can always get in by inputting the default code. FEATURES PICTURE FORMAT PICTURE ALIGNMENT AUTOLOCK CLOSED CAPTION COLOR TEMP LOCK PROGRAM CHANG CODE CLEAR ALL BLOCK OPTION MOVIE RATING TV RATING CHANGE CODE ENTER NEW CODE CONFIRM CODE ------- 4 Press the CURSOR RIGHT button CHANGE CODE will appear on the screen. � 5 Enter a four-digit code using the Number buttons. MAIN CONTROL PICTURE AUDIO FEATURES INSTALL PICTURE FORMAT PICTURE ALIGNMENT AUTOLOCK CLOSED CAPTION COLOR TEMP...
User manual
Page 28
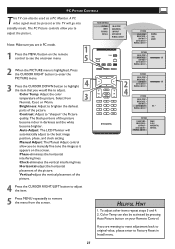
..., and clock setting. Auto Adjust: The LCD Monitor will go into standby mode. Color Temp can also be activated by pressing Auto Picture button on your Remote Control. Horizontal-adjust the horizontal placement of the picture. The PC Picture controls allow you are wanting to reset adjustment back to original value, please enter to remove the menu from � � � Normal, Cool, or Warm. MAIN CONTROLS PICTURE AUDIO FEATURES INSTALL COLOR TEMP BRIGHTNESS CONTRAST AUTO ADJUST MANUAL ADJUST Note...
..., and clock setting. Auto Adjust: The LCD Monitor will go into standby mode. Color Temp can also be activated by pressing Auto Picture button on your Remote Control. Horizontal-adjust the horizontal placement of the picture. The PC Picture controls allow you are wanting to reset adjustment back to original value, please enter to remove the menu from � � � Normal, Cool, or Warm. MAIN CONTROLS PICTURE AUDIO FEATURES INSTALL COLOR TEMP BRIGHTNESS CONTRAST AUTO ADJUST MANUAL ADJUST Note...

User manual
Page 29
... 3 factory-set controls and a personal control. � The 4 factory-set controls (Personal, Voice, Music, Theatre) enhance the particular program you are in TV mode) Incredible Sound: Adds greater depth and dimension to PC sound. AVL (Auto Volume Leveler)- A PC video signal must be used as a PC Monitor. The AUDIO controls allow you to remove the menu from the screen. Press the CURSOR RIGHT or CURSOR LEFT button to adjust. 6 Press MENU repeatedly to adjust the sound. PC AUDIO CONTROLS This...
... 3 factory-set controls and a personal control. � The 4 factory-set controls (Personal, Voice, Music, Theatre) enhance the particular program you are in TV mode) Incredible Sound: Adds greater depth and dimension to PC sound. AVL (Auto Volume Leveler)- A PC video signal must be used as a PC Monitor. The AUDIO controls allow you to remove the menu from the screen. Press the CURSOR RIGHT or CURSOR LEFT button to adjust. 6 Press MENU repeatedly to adjust the sound. PC AUDIO CONTROLS This...
User manual
Page 32
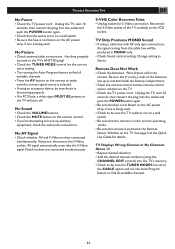
... antenna/cable connections. S-VHS Color Becomes Faint • Unplug socket for details. Place lithium cell in MONO only. • Check Sound control setting. TV Only Produces MONO Sound • If using an accessory device, be sure that the remote is in PC Mode, a video signal MUST BE present or the TV will be sure the TUNER MODES are set to the CABLE option and run the Auto Program feature...
... antenna/cable connections. S-VHS Color Becomes Faint • Unplug socket for details. Place lithium cell in MONO only. • Check Sound control setting. TV Only Produces MONO Sound • If using an accessory device, be sure that the remote is in PC Mode, a video signal MUST BE present or the TV will be sure the TUNER MODES are set to the CABLE option and run the Auto Program feature...

User manual
Page 36
... or workmanship, subject to any Philips authorized service center. EXCLUDED FROM WARRANTY COVERAGE Your warranty does not cover: •Labor charges for installation or setup of the product, adjustment of customer controls on the product, and installation or repair of antenna systems outside of the product. •Product repair and/or part replacement because of improper installation, connections to improper voltage supply, abuse, neglect, misuse, accident, unauthorized...
... or workmanship, subject to any Philips authorized service center. EXCLUDED FROM WARRANTY COVERAGE Your warranty does not cover: •Labor charges for installation or setup of the product, adjustment of customer controls on the product, and installation or repair of antenna systems outside of the product. •Product repair and/or part replacement because of improper installation, connections to improper voltage supply, abuse, neglect, misuse, accident, unauthorized...
Quick start guide
Page 1
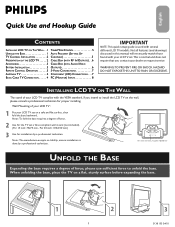
... INSTALLING LCD TV ON THE WALL . . 1 TUNER MODE CONTROL 5 different LCD TV models. UNFOLD THE BASE Expanding the base requires a degree of your LCD TV : 1 Put your LCD TV set . ANTENNA TV 4 COMPONENT (HD) CONNECTIONS . . .7 BASIC CABLE TV CONNECTION . . . . . 4 PC (MONITOR) INPUTS 8 Espãnol Português INSTALLING LCD TV ON THE WALL The stand of force. 2 Use for the TV set a Vesa compliant wall mount (not included). (For 15 inch: 75x75 mm , For 20 inch: 100x100 mm) 3 Use for proper installing. please use...
... INSTALLING LCD TV ON THE WALL . . 1 TUNER MODE CONTROL 5 different LCD TV models. UNFOLD THE BASE Expanding the base requires a degree of your LCD TV : 1 Put your LCD TV set . ANTENNA TV 4 COMPONENT (HD) CONNECTIONS . . .7 BASIC CABLE TV CONNECTION . . . . . 4 PC (MONITOR) INPUTS 8 Espãnol Português INSTALLING LCD TV ON THE WALL The stand of force. 2 Use for the TV set a Vesa compliant wall mount (not included). (For 15 inch: 75x75 mm , For 20 inch: 100x100 mm) 3 Use for proper installing. please use...
Quick start guide
Page 2
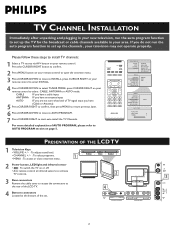
... button, LED light and infrared sensor • : To switch the TV on your remote control. TV CHANNEL INSTALLATION Quick Use and Hookup Guide Immediately after unpacking and plugging in your area. MAIN CONTROLS PICTURE AUDIO FEATURES INSTALL INSTALL LANGUAGE TUNER MODE AUTO PROGRAM CHANNEL EDIT MANUAL FINE TUNE FACTORY RESET LANGUAGE TUNER MODE AUTO PROGRAM CHANNEL EDIT MANUAL FINE TUNE FACTORY RESET ANTENNA CABLE AUTO INSTALL LANGUAGE TUNER MODE AUTO PROGRAM CHANNEL EDIT MANUAL FINE TUNE FACTORY RESET AUTO STORE PLEASE WAIT PROG.FOUND CHANNEL START? 0 3 PRESENTATION OF THE LCD...
... button, LED light and infrared sensor • : To switch the TV on your remote control. TV CHANNEL INSTALLATION Quick Use and Hookup Guide Immediately after unpacking and plugging in your area. MAIN CONTROLS PICTURE AUDIO FEATURES INSTALL INSTALL LANGUAGE TUNER MODE AUTO PROGRAM CHANNEL EDIT MANUAL FINE TUNE FACTORY RESET LANGUAGE TUNER MODE AUTO PROGRAM CHANNEL EDIT MANUAL FINE TUNE FACTORY RESET ANTENNA CABLE AUTO INSTALL LANGUAGE TUNER MODE AUTO PROGRAM CHANNEL EDIT MANUAL FINE TUNE FACTORY RESET AUTO STORE PLEASE WAIT PROG.FOUND CHANNEL START? 0 3 PRESENTATION OF THE LCD...

Quick start guide
Page 3
... User's Manual & Quick Use and Hookup Guide 1 Remove the battery compartment lid on or CC off . Number buttons Press the number buttons for direct access to select a sound mode if available with the TV programming:Mono, Stereo, or SAP. AV+ button Press to select either Personal, Rich, Natural, Soft, or Multimedia picture setting. CC button Press the CC button to turn the LCD TV on the TV screen. Mute will appear on screen menu. Auto Picture button...
... User's Manual & Quick Use and Hookup Guide 1 Remove the battery compartment lid on or CC off . Number buttons Press the number buttons for direct access to select a sound mode if available with the TV programming:Mono, Stereo, or SAP. AV+ button Press to select either Personal, Rich, Natural, Soft, or Multimedia picture setting. CC button Press the CC button to turn the LCD TV on the TV screen. Mute will appear on screen menu. Auto Picture button...
Quick start guide
Page 4
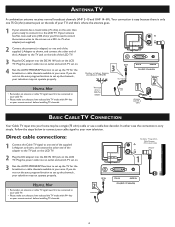
... the channels , your remote control, before installing TV channels. Plug the power cable into your new television. If you first need to attach the antenna wires to set on your area. ANTENNA TV A combination antenna receives normal broadcast channels (VHF 2-13 and UHF 14-69). If your antenna has flat, twin-lead wire (300 ohm), you do not run the auto program function to the screws on the LCD...
... the channels , your remote control, before installing TV channels. Plug the power cable into your new television. If you first need to attach the antenna wires to set on your area. ANTENNA TV A combination antenna receives normal broadcast channels (VHF 2-13 and UHF 14-69). If your antenna has flat, twin-lead wire (300 ohm), you do not run the auto program function to the screws on the LCD...
Quick start guide
Page 6
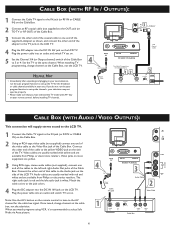
... the Cable Box. When you have selected the TV mode with AV+ key on your remote control, before installing TV channels. 3 L-Adapter TV 4 DC IN 16V DC Adapter Power Cable DVI-I IN AUDIO IN DVI (HDCP / PC ANALOG) 3 Audio Cable 2 Video Cable S-VIDEO R AUDIO IN L VIDEO IN 1 CABLE IN OUTPUT CH 3 4 TO TV L R AUDIO OUT VIDEO OUT Cable Box 6 HELPFUL HINT • Immediately after unpacking and plugging in your new television, run the auto program function to set up the channels , your area. Audio cables...
... the Cable Box. When you have selected the TV mode with AV+ key on your remote control, before installing TV channels. 3 L-Adapter TV 4 DC IN 16V DC Adapter Power Cable DVI-I IN AUDIO IN DVI (HDCP / PC ANALOG) 3 Audio Cable 2 Video Cable S-VIDEO R AUDIO IN L VIDEO IN 1 CABLE IN OUTPUT CH 3 4 TO TV L R AUDIO OUT VIDEO OUT Cable Box 6 HELPFUL HINT • Immediately after unpacking and plugging in your new television, run the auto program function to set up the channels , your area. Audio cables...

Quick start guide
Page 7
... IN OUT 35 COMPONENT (HD) CONNECTIONS Component Video input provide the highest possible color and picture resolution in the upper left corner on the TV screen. 5 Insert a DVD disc into the DVD player and press the PLAY button on the DVD Player. 4 Note: • The Philips LCD TV remote control can not be used to operate other end of the cable to the Audio jack on the rear of the accessory device to S-Video input, you can...
... IN OUT 35 COMPONENT (HD) CONNECTIONS Component Video input provide the highest possible color and picture resolution in the upper left corner on the TV screen. 5 Insert a DVD disc into the DVD player and press the PLAY button on the DVD Player. 4 Note: • The Philips LCD TV remote control can not be used to operate other end of the cable to the Audio jack on the rear of the accessory device to S-Video input, you can...
Quick start guide
Page 8
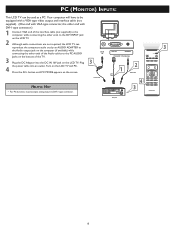
... interface cable (not supplied) to the DVI INPUT jack on the LCD TV. 2 Although audio connections are not required, the LCD TV can be used as a PC. Computer 8 Turn on the LCD TV and PC. 4 Press the AV+ button until PC MODE appears on the screen. Your computer will have to be equipped with a VGA type video output and interface cable (not supplied). (One end with VGA type connector...
... interface cable (not supplied) to the DVI INPUT jack on the LCD TV. 2 Although audio connections are not required, the LCD TV can be used as a PC. Computer 8 Turn on the LCD TV and PC. 4 Press the AV+ button until PC MODE appears on the screen. Your computer will have to be equipped with a VGA type video output and interface cable (not supplied). (One end with VGA type connector...


