User manual
Page 2
...: Use of controls, adjustments or procedures other heat source. The screen may leave an 'after -image symptom cannot be opened only by detaching the power cable or DC power cord, wait for 6 seconds before attaching the power cable or DC power cord for an extensive period of the monitor's electronics. q Remove any other than those specified in this documentation may result in this manual. q When positioning the monitor, make sure the power plug...
...: Use of controls, adjustments or procedures other heat source. The screen may leave an 'after -image symptom cannot be opened only by detaching the power cable or DC power cord, wait for 6 seconds before attaching the power cable or DC power cord for an extensive period of the monitor's electronics. q Remove any other than those specified in this documentation may result in this manual. q When positioning the monitor, make sure the power plug...

User manual
Page 6
... r Embedded power supply ~ Power supply built into monitor r VESA mounting hole ~ VESA mounting pattern for easy wall mounting your display r FlexiHolder ~ Flexible card, photo,and notes holder to 2W x 2 (maximum) and 32W PMPO r Adjustable height ~ Height adjusts for maximum productivity r Built-in speakers 4W ~ With output power up to increase efficiency RETURN TO TOP OF THE PAGE Technical Specifications* LCD PANEL • Type • Screen size • Pixel Pitch • LCD Panel type • Effective viewing area TFT LCD 17...
... r Embedded power supply ~ Power supply built into monitor r VESA mounting hole ~ VESA mounting pattern for easy wall mounting your display r FlexiHolder ~ Flexible card, photo,and notes holder to 2W x 2 (maximum) and 32W PMPO r Adjustable height ~ Height adjusts for maximum productivity r Built-in speakers 4W ~ With output power up to increase efficiency RETURN TO TOP OF THE PAGE Technical Specifications* LCD PANEL • Type • Screen size • Pixel Pitch • LCD Panel type • Effective viewing area TFT LCD 17...
User manual
Page 8
Product Information • Response time sRGB
Product Information • Response time sRGB
User manual
Page 9
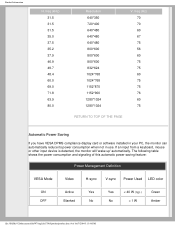
...power consumption and signaling of this automatic power saving feature: Power Management Definition VESA Mode Video H-sync V-sync Power Used LED color ON OFF Active Yes Blanked No Yes < 40 W (typ.) Green No < 1 W Amber file:///D|/My%20documents/dfu/W7/english/170b5/product/product.htm (4 of 8)6/7/2004 5:13:48 PM If an input from a keyboard, mouse or other input device is detected, the monitor...THE PAGE Automatic Power Saving If you have VESA DPMS compliance display card or software installed in your PC, the monitor can automatically reduce its power consumption when not in use.
...power consumption and signaling of this automatic power saving feature: Power Management Definition VESA Mode Video H-sync V-sync Power Used LED color ON OFF Active Yes Blanked No Yes < 40 W (typ.) Green No < 1 W Amber file:///D|/My%20documents/dfu/W7/english/170b5/product/product.htm (4 of 8)6/7/2004 5:13:48 PM If an input from a keyboard, mouse or other input device is detected, the monitor...THE PAGE Automatic Power Saving If you have VESA DPMS compliance display card or software installed in your PC, the monitor can automatically reduce its power consumption when not in use.

User manual
Page 14
... Your PC Installing Your LCD Monitor Front View Product Description • The Base • Getting Started • Optimizing Performance VOLUME UP and DOWN buttons are used in adjusting the OSD of your monitor. VOLUME hotkey. Automatically adjust the horizontal position, vertical position, phase and clock setting. LEFT and RIGHT buttons, like the UP and DOWN buttons, are also used when adjusting the OSD of your monitor. BRIGHTNESS hotkey. Installing Your LCD Monitor Front View • Produt Description • Connecting to the OSD controls. When...
... Your PC Installing Your LCD Monitor Front View Product Description • The Base • Getting Started • Optimizing Performance VOLUME UP and DOWN buttons are used in adjusting the OSD of your monitor. VOLUME hotkey. Automatically adjust the horizontal position, vertical position, phase and clock setting. LEFT and RIGHT buttons, like the UP and DOWN buttons, are also used when adjusting the OSD of your monitor. BRIGHTNESS hotkey. Installing Your LCD Monitor Front View • Produt Description • Connecting to the OSD controls. When...
User manual
Page 15
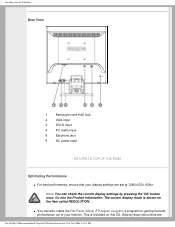
... also install the Flat Panel Adjust (FP Adjust) program, a program for getting the best performance out of 3)6/7/2004 5:13:51 PM q You can check the current display settings by -step instructions are file:///D|/My%20documents/dfu/W7/english/170b5/install/install.htm (2 of your display settings are set at 1280x1024, 60Hz. Step-by pressing the 'OK' button once. Installing Your LCD Monitor Rear View 1 Kensington anti-thief lock 2 VGA input 3 DVI-D input 4 PC audio input 5 Earphone jack 6 AC power input...
... also install the Flat Panel Adjust (FP Adjust) program, a program for getting the best performance out of 3)6/7/2004 5:13:51 PM q You can check the current display settings by -step instructions are file:///D|/My%20documents/dfu/W7/english/170b5/install/install.htm (2 of your display settings are set at 1280x1024, 60Hz. Step-by pressing the 'OK' button once. Installing Your LCD Monitor Rear View 1 Kensington anti-thief lock 2 VGA input 3 DVI-D input 4 PC audio input 5 Earphone jack 6 AC power input...
User manual
Page 27
... button. A: The refresh rate is set the Refresh Rate to complete the operation; LCD monitors display a stable, flicker-free image at 1280x1024@60Hz (17"). 5. New Generation LCD intelligent monitor capabilities temporarily override the overscan, providing you used previously. 2. file:///D|/My%20documents/dfu/W7/english/170b5/safety/saf_faq.htm (1 of much less relevance for Philips 17": 1280x1024 @60Hz. • Ergonomics, Ecology and Safety Standards • Troubleshooting 1. In the Windows Start Menu, select Settings/Control Panel...
... button. A: The refresh rate is set the Refresh Rate to complete the operation; LCD monitors display a stable, flicker-free image at 1280x1024@60Hz (17"). 5. New Generation LCD intelligent monitor capabilities temporarily override the overscan, providing you used previously. 2. file:///D|/My%20documents/dfu/W7/english/170b5/safety/saf_faq.htm (1 of much less relevance for Philips 17": 1280x1024 @60Hz. • Ergonomics, Ecology and Safety Standards • Troubleshooting 1. In the Windows Start Menu, select Settings/Control Panel...

User manual
Page 28
... factory settings. FAQs (Frequently Asked Questions) Q: What are the driver files for your user manual to install the drivers. Follow the instructions in this package. Q: My Monitor has no power (Power LED does not light up). Q: What does the Refresh Rate mean for monitor drivers (.inf and .icm files) or a driver disk when you first install your monitor. Q: Will the LCD monitor accept an Interlace signal? Your computer may ask you for LCD? A: Your video card...
... factory settings. FAQs (Frequently Asked Questions) Q: What are the driver files for your user manual to install the drivers. Follow the instructions in this package. Q: My Monitor has no power (Power LED does not light up). Q: What does the Refresh Rate mean for monitor drivers (.inf and .icm files) or a driver disk when you first install your monitor. Q: Will the LCD monitor accept an Interlace signal? Your computer may ask you for LCD? A: Your video card...
User manual
Page 29
... the back cover allows the user to control each individual pixel and the refresh rate is the FPadjust program on the wall or used as Contrast, Brightness, Horizontal Position, Vertical Position, Phase and Clock for future applications. Touch panels are being developed for optimal performance. A: The FPadjust program generates alignment patterns that the panel surface is also available. Q: Will the LCD screen be mounted on the CD-ROM? Q: Can the Philips LCD Monitor be...
... the back cover allows the user to control each individual pixel and the refresh rate is the FPadjust program on the wall or used as Contrast, Brightness, Horizontal Position, Vertical Position, Phase and Clock for future applications. Touch panels are being developed for optimal performance. A: The FPadjust program generates alignment patterns that the panel surface is also available. Q: Will the LCD screen be mounted on the CD-ROM? Q: Can the Philips LCD Monitor be...
User manual
Page 30
... USB as a smart plug for example), and a joystick. USB automatically determines resources (like driver software and bus bandwidth) required by pressing the OSD OK button once. USB makes necessary resources available without user intervention. There are fully compatible with standard PCs, Macs and workstations. The current display mode is USB (Universal Serial Bus)? A: Yes. A: Because LCDs do not use an electron gun, they do LCDs compare to install circuit board cards -- All Philips LCD monitors...
... USB as a smart plug for example), and a joystick. USB automatically determines resources (like driver software and bus bandwidth) required by pressing the OSD OK button once. USB makes necessary resources available without user intervention. There are fully compatible with standard PCs, Macs and workstations. The current display mode is USB (Universal Serial Bus)? A: Yes. A: Because LCDs do not use an electron gun, they do LCDs compare to install circuit board cards -- All Philips LCD monitors...
User manual
Page 35
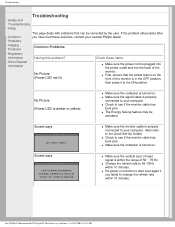
...; Other Related Information Having this problem? q Make sure the signal cable is properly connected to your computer. (Also refer to see if the monitor cable has bent pins. Screen says q Make sure the vertical sync of the monitor is turned on. No Picture (Power LED not lit) Check these solutions, contact your nearest Philips dealer. q Check to the Quick Set-Up Guide). file:///D|/My%20documents/dfu/W7/english/170b5/safety/saf_troub.htm (1 of...
...; Other Related Information Having this problem? q Make sure the signal cable is properly connected to your computer. (Also refer to see if the monitor cable has bent pins. Screen says q Make sure the vertical sync of the monitor is turned on. No Picture (Power LED not lit) Check these solutions, contact your nearest Philips dealer. q Check to the Quick Set-Up Guide). file:///D|/My%20documents/dfu/W7/english/170b5/safety/saf_troub.htm (1 of...
User manual
Page 36
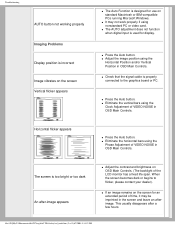
... or video card. The screen is properly connected to flicker, please contact your dealer). q It may be imprinted in OSD Main Controls. q Adjust the image position using the Clock Adjustment of the LCD monitor has a fixed life span. q Eliminate the vertical bars using the Horizontal Position and/or Vertical Position in OSD Main Controls. q If an image remains on OSD Main Controls. (The backlight of VIDEO NOISE in the screen and leave an afterimage. q Check that the signal cable is too bright or...
... or video card. The screen is properly connected to flicker, please contact your dealer). q It may be imprinted in OSD Main Controls. q Adjust the image position using the Clock Adjustment of the LCD monitor has a fixed life span. q Eliminate the vertical bars using the Horizontal Position and/or Vertical Position in OSD Main Controls. q If an image remains on OSD Main Controls. (The backlight of VIDEO NOISE in the screen and leave an afterimage. q Check that the signal cable is too bright or...

User manual
Page 43
... a particular installation. Changes or modifications not expressly approved by turning the equipment off the monitor when it is not in use for quite a long time. This means that was supplied with the monitor when connecting this product meets the ENERGY STAR® guidelines for energy efficiency. This equipment generates, uses and can be connected to a computer which supports the VESA Display Power Management Signaling (DPMS...
... a particular installation. Changes or modifications not expressly approved by turning the equipment off the monitor when it is not in use for quite a long time. This means that was supplied with the monitor when connecting this product meets the ENERGY STAR® guidelines for energy efficiency. This equipment generates, uses and can be connected to a computer which supports the VESA Display Power Management Signaling (DPMS...
User manual
Page 53
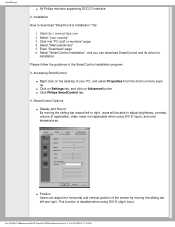
Installation How to adjust brightness, contrast, volume (if applicable), video noise (not applicable when using DVI-D (digit) input. Select "your PC, and select Properties from the shortcut menu pops up. This function is disabled when using DVI-D input), and color temperatures. Visit http:// www.philips.com 2. q Click Philips SmartControl tab. 4. Enter "Download" page 6. Select "Manuals/drivers" 5. Please follow the guidance in the SmartControl installation program. 3. SmartControl Options q Display and Sound By moving the sliding bar...
Installation How to adjust brightness, contrast, volume (if applicable), video noise (not applicable when using DVI-D (digit) input. Select "your PC, and select Properties from the shortcut menu pops up. This function is disabled when using DVI-D input), and color temperatures. Visit http:// www.philips.com 2. q Click Philips SmartControl tab. 4. Enter "Download" page 6. Select "Manuals/drivers" 5. Please follow the guidance in the SmartControl installation program. 3. SmartControl Options q Display and Sound By moving the sliding bar...

User manual
Page 55
... are disabled when using DVI-D (digit) input. I change the monitor on Properties->Hardware-> Device Manager. If the following actions were executed, the monitor driver may need to adjust monitor performances and settings by a software interface, instead of the hardware buttons at the beginning, but it . A. A. After installing SmartControl, when clicking on OS, such as service pack or patch q Run Windows Update and updated monitor and/or video driver q Windows was booted with the monitor power off...
... are disabled when using DVI-D (digit) input. I change the monitor on Properties->Hardware-> Device Manager. If the following actions were executed, the monitor driver may need to adjust monitor performances and settings by a software interface, instead of the hardware buttons at the beginning, but it . A. A. After installing SmartControl, when clicking on OS, such as service pack or patch q Run Windows Update and updated monitor and/or video driver q Windows was booted with the monitor power off...

User manual
Page 57
... and several types of other colors. Bright Dot Defects Bright dot defects appear as a single black pixel. Types of defects will be repaired or replaced under warranty, the number of the sub pixels • Product Views on a 15" XGA monitor may be defective. These are always lit or 'on a TFT LCD Assignment panel must exceed these acceptable levels. This notice Specification explains the different types...
... and several types of other colors. Bright Dot Defects Bright dot defects appear as a single black pixel. Types of defects will be repaired or replaced under warranty, the number of the sub pixels • Product Views on a 15" XGA monitor may be defective. These are always lit or 'on a TFT LCD Assignment panel must exceed these acceptable levels. This notice Specification explains the different types...
User manual
Page 68
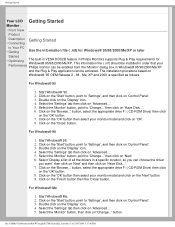
.../W7/english/170b5/install/gt_start.htm (1 of all the drivers in a specific location, so you want.' Click on the 'Start' button, point to 'Change...' Double click on 'Next' 6. Select 'Display a list of 3)6/7/2004 5:17:46 PM Getting Started Your LCD Getting Started Monitor : • Front View Product Description Getting Started • Connecting to 'Settings', and then click on 'Control Panel'. 3. Start Windows® '95. 2. then click on the 'Display' icon. 4. button, select...
.../W7/english/170b5/install/gt_start.htm (1 of all the drivers in a specific location, so you want.' Click on the 'Start' button, point to 'Change...' Double click on 'Next' 6. Select 'Display a list of 3)6/7/2004 5:17:46 PM Getting Started Your LCD Getting Started Monitor : • Front View Product Description Getting Started • Connecting to 'Settings', and then click on 'Control Panel'. 3. Start Windows® '95. 2. then click on the 'Display' icon. 4. button, select...

User manual
Page 69
... 'Install from a list or specific location [advanced]' radio button and then click on the 'Display' Item. 5. I can see the 'Digital Signature Not Found' window, click on the 'Next' button. 7. For Windows® XP 1. button. 8. Click on the 'Open' button, then click on the 'Advanced' button. 6. Select the 'Settings' tab then click on the 'OK' button. 10. Select and click on the 'Next' button. - Select your monitor model...
... 'Install from a list or specific location [advanced]' radio button and then click on the 'Display' Item. 5. I can see the 'Digital Signature Not Found' window, click on the 'Next' button. 7. For Windows® XP 1. button. 8. Click on the 'Open' button, then click on the 'Advanced' button. 6. Select the 'Settings' tab then click on the 'OK' button. 10. Select and click on the 'Next' button. - Select your monitor model...
Leaflet
Page 2
... entire screen. Response time measures signal reaction speed in speakers Audio speakers built into the base permits the monitor to users who experience difficulties - Bright dots are guaranteed without bright dot defects. On/off response time improves display of transition between the colors displayed on each of a display device that is a power adaptor built into position when the desired height is reached, delivering a comfortable, individualized viewing angle that replaces...
... entire screen. Response time measures signal reaction speed in speakers Audio speakers built into the base permits the monitor to users who experience difficulties - Bright dots are guaranteed without bright dot defects. On/off response time improves display of transition between the colors displayed on each of a display device that is a power adaptor built into position when the desired height is reached, delivering a comfortable, individualized viewing angle that replaces...

Leaflet
Page 3
...;C to 40°C • Temperature range (storage): -20°C to change without notice. Amber • Power supply: Built-in Audio: 2 W RMS x 2 Stereo Speakers • User convenience: On-screen Display, SmartManage • Monitor Controls: Auto, Brightness Control, Left/ Right, Menu (OK), Power On/Off, Up/Down, Volume control • OSD Languages: English, French, German, Italian, Simplified Chinese, Spanish • Other convenience: Kensington lock • Plug & Play Compatibility: DDC CI, sRGB, Windows 98/ME/2000/XP •...
...;C to 40°C • Temperature range (storage): -20°C to change without notice. Amber • Power supply: Built-in Audio: 2 W RMS x 2 Stereo Speakers • User convenience: On-screen Display, SmartManage • Monitor Controls: Auto, Brightness Control, Left/ Right, Menu (OK), Power On/Off, Up/Down, Volume control • OSD Languages: English, French, German, Italian, Simplified Chinese, Spanish • Other convenience: Kensington lock • Plug & Play Compatibility: DDC CI, sRGB, Windows 98/ME/2000/XP •...


