Leaflet
Page 2
... a LCD panel once thought to be an inevitable part of both analog VGA and digital DVI signals. to change orientation for a better view of a selected document or image, the monitor is a system for enhancing monitor's brightness, sharpness, contrast, and color. Response time measures signal reaction speed in either the landscape and portrait mode; Fast on a computer. Zero Bright Dot™ Bright dots are defects in speakers Audio speakers built into position when the desired height...
... a LCD panel once thought to be an inevitable part of both analog VGA and digital DVI signals. to change orientation for a better view of a selected document or image, the monitor is a system for enhancing monitor's brightness, sharpness, contrast, and color. Response time measures signal reaction speed in either the landscape and portrait mode; Fast on a computer. Zero Bright Dot™ Bright dots are defects in speakers Audio speakers built into position when the desired height...
Leaflet
Page 3
... subject to change without notice. Specifications are the property of Koninklijke Philips Electronics N.V. or their respective owners. All Rights reserved. www.philips.com Amber • Power supply: Built-in Audio: 2 W RMS x 2 Stereo Speakers • User convenience: On-screen Display, SmartManage • Monitor Controls: Auto, Brightness Control, Left/ Right, LightFrame, Menu (OK), Power On/Off, Up/ Down, Volume control • OSD Languages: English, French, German, Italian, Power • Complies with base) (W x H x D): 375 x 396 x 201 mm • Height adjustment range: 130...
... subject to change without notice. Specifications are the property of Koninklijke Philips Electronics N.V. or their respective owners. All Rights reserved. www.philips.com Amber • Power supply: Built-in Audio: 2 W RMS x 2 Stereo Speakers • User convenience: On-screen Display, SmartManage • Monitor Controls: Auto, Brightness Control, Left/ Right, LightFrame, Menu (OK), Power On/Off, Up/ Down, Volume control • OSD Languages: English, French, German, Italian, Power • Complies with base) (W x H x D): 375 x 396 x 201 mm • Height adjustment range: 130...
User manual
Page 2
... Read and follow these instructions when connecting and using your application. q Consult a service technician if the monitor does not operate normally when you are easily accessible. q Keep the monitor dry. The screen may leave an 'after the power has been switched off the monitor by the shortcomings inherent in LCD technology. If a still image in high contrast remains on the screen for an extended period...
... Read and follow these instructions when connecting and using your application. q Consult a service technician if the monitor does not operate normally when you are easily accessible. q Keep the monitor dry. The screen may leave an 'after the power has been switched off the monitor by the shortcomings inherent in LCD technology. If a still image in high contrast remains on the screen for an extended period...
User manual
Page 6
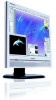
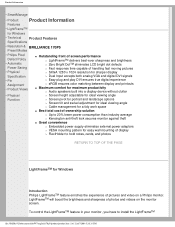
... Specifications • Resolution & BRILLIANCE 170P5 Preset Modes • Philips Pixel Defect Policy • Automatic Power Saving • Physical Specification • Pin Assignment • Product Views • Physical Function q Outstanding front of screen performance r LightFrameTM delivers best-ever sharpness and brightness r Zero Bright DotTM eliminates LCD bright dot defects r Fast response time capable of handling fast moving pictures r SXGA 1280 x 1024 resolution for sharper display r Dual Input accepts both analog VGA and digital DVI signals...
... Specifications • Resolution & BRILLIANCE 170P5 Preset Modes • Philips Pixel Defect Policy • Automatic Power Saving • Physical Specification • Pin Assignment • Product Views • Physical Function q Outstanding front of screen performance r LightFrameTM delivers best-ever sharpness and brightness r Zero Bright DotTM eliminates LCD bright dot defects r Fast response time capable of handling fast moving pictures r SXGA 1280 x 1024 resolution for sharper display r Dual Input accepts both analog VGA and digital DVI signals...
User manual
Page 7
... is the default language of the monitor. It is started. Installation 1. For information about using LightFrameTM please refer to use it. RETURN TO TOP OF THE PAGE file:///D|/My%20documents/dfu/W7/english/170p5/product/product.htm (2 of items on the CD appears on your monitor is compatible with Windows® 95 Windows® 98 Windows® Me (Millennium Edition) Windows® XP Windows®...
... is the default language of the monitor. It is started. Installation 1. For information about using LightFrameTM please refer to use it. RETURN TO TOP OF THE PAGE file:///D|/My%20documents/dfu/W7/english/170p5/product/product.htm (2 of items on the CD appears on your monitor is compatible with Windows® 95 Windows® 98 Windows® Me (Millennium Edition) Windows® XP Windows®...

User manual
Page 10
... PAGE Automatic Power Saving If you have VESA DPMS compliance display card or software installed in your PC, the monitor can automatically reduce its power consumption when not in use. If an input from a keyboard, mouse file:///D|/My%20documents/dfu/W7/english/170p5/product/product.htm (5 of 12)6/7/2004 5:20:31 PM Product Information RETURN TO TOP OF THE PAGE Resolution & Preset Modes •...
... PAGE Automatic Power Saving If you have VESA DPMS compliance display card or software installed in your PC, the monitor can automatically reduce its power consumption when not in use. If an input from a keyboard, mouse file:///D|/My%20documents/dfu/W7/english/170p5/product/product.htm (5 of 12)6/7/2004 5:20:31 PM Product Information RETURN TO TOP OF THE PAGE Resolution & Preset Modes •...
User manual
Page 18
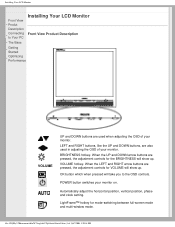
... for the BRIGHTNESS will show up . BRIGHTNESS hotkey. When the UP and DOWN arrow buttons are used in adjusting the OSD of your monitor. POWER button switches your monitor. OK button which when pressed will show up . VOLUME hotkey. Automatically adjust the horizontal position, vertical position, phase and clock setting. file:///D|/My%20documents/dfu/W7/english/170p5/install/install.htm (1 of your monitor on. Installing Your LCD Monitor Front View • Produt Description • Connecting to the OSD controls. When...
... for the BRIGHTNESS will show up . BRIGHTNESS hotkey. When the UP and DOWN arrow buttons are used in adjusting the OSD of your monitor. POWER button switches your monitor. OK button which when pressed will show up . VOLUME hotkey. Automatically adjust the horizontal position, vertical position, phase and clock setting. file:///D|/My%20documents/dfu/W7/english/170p5/install/install.htm (1 of your monitor on. Installing Your LCD Monitor Front View • Produt Description • Connecting to the OSD controls. When...

User manual
Page 19
file:///D|/My%20documents/dfu/W7/english/170p5/install/install.htm (2 of 3)6/7/2004 5:20:48 PM Installing Your LCD Monitor Rear View RETURN TO TOP OF THE PAGE 1 Kensington anti-thief lock 2 VGA input 3 DVI-D input 4 PC audio input 5 Earphone jack 6 AC power input RETURN TO TOP OF THE PAGE Optimizing Performance q For best performance, ensure that your display settings are set at 1280x1024, 60Hz.
file:///D|/My%20documents/dfu/W7/english/170p5/install/install.htm (2 of 3)6/7/2004 5:20:48 PM Installing Your LCD Monitor Rear View RETURN TO TOP OF THE PAGE 1 Kensington anti-thief lock 2 VGA input 3 DVI-D input 4 PC audio input 5 Earphone jack 6 AC power input RETURN TO TOP OF THE PAGE Optimizing Performance q For best performance, ensure that your display settings are set at 1280x1024, 60Hz.
User manual
Page 31
...; Screen General FAQs Adjustments • Compatibility with 10 minutes to reset timing to recommended settings. In the Windows Start Menu, select Settings/Control Panel. Inside the Display Control Panel, select the 'Settings' tab. Open 'Advanced Properties' and set at 60Hz. Turn on your PC is no visible difference between 85Hz and 60Hz. A: It means the signal input from your monitor and then turn on the Advanced button. Select Settings, then Control Panel. Select Display. Under Adaptor, change the refresh rate...
...; Screen General FAQs Adjustments • Compatibility with 10 minutes to reset timing to recommended settings. In the Windows Start Menu, select Settings/Control Panel. Inside the Display Control Panel, select the 'Settings' tab. Open 'Advanced Properties' and set at 60Hz. Turn on your PC is no visible difference between 85Hz and 60Hz. A: It means the signal input from your monitor and then turn on the Advanced button. Select Settings, then Control Panel. Select Display. Under Adaptor, change the refresh rate...
User manual
Page 32
... the instructions to recall all of the original factory settings. A: Your video card/graphic driver and monitor together determine the available resolutions. Q: What is connected to the Monitor. What should I install the drivers (.inf and . A: Simply press the OSD button, then select 'Reset' to insert the driver disk (either floppy or CD-ROM) included in your user manual to navigate through OSD menus and control keys. A: The AUTO adjustment key restores the optimal screen position...
... the instructions to recall all of the original factory settings. A: Your video card/graphic driver and monitor together determine the available resolutions. Q: What is connected to the Monitor. What should I install the drivers (.inf and . A: Simply press the OSD button, then select 'Reset' to insert the driver disk (either floppy or CD-ROM) included in your user manual to navigate through OSD menus and control keys. A: The AUTO adjustment key restores the optimal screen position...
User manual
Page 36
... that helps you adjust monitor settings such as Contrast, Brightness, Horizontal Position, Vertical Position, Phase and Clock for 17". This will install FP Adjust automatically and place a shortcut on your system's video controller. Q: When I install my monitor, how do LCDs compare to optimize image performance with your desktop. 3. Follow the instructions step by step to CRTs in OSD main controls. 2. A: 1. For best performance, make sure your display settings are set at 1280x1024@60Hz for optimal performance. To install the Flat Panel Adjust (FPadjust...
... that helps you adjust monitor settings such as Contrast, Brightness, Horizontal Position, Vertical Position, Phase and Clock for 17". This will install FP Adjust automatically and place a shortcut on your system's video controller. Q: When I install my monitor, how do LCDs compare to optimize image performance with your desktop. 3. Follow the instructions step by step to CRTs in OSD main controls. 2. A: 1. For best performance, make sure your display settings are set at 1280x1024@60Hz for optimal performance. To install the Flat Panel Adjust (FPadjust...
User manual
Page 39
... Since the vertical/horizontal frequency for this case, light that of the liquid crystal is filled with an analog RGB signal. How does it does not use a wide viewing angle film, which widens the viewing angle by operating a liquid crystal panel. When impressed with the inlet angle of the light, the viewing angle of inlet light and displays it can be available without additional software processing. Q: What...
... Since the vertical/horizontal frequency for this case, light that of the liquid crystal is filled with an analog RGB signal. How does it does not use a wide viewing angle film, which widens the viewing angle by operating a liquid crystal panel. When impressed with the inlet angle of the light, the viewing angle of inlet light and displays it can be available without additional software processing. Q: What...
User manual
Page 41
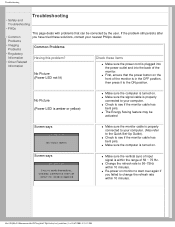
... (1 of input signal is turned on. No Picture (Power LED not lit) Check these solutions, contact your computer. (Also refer to see if the monitor cable has bent pins. q Make sure the computer is within the range of the monitor. Screen says q Make sure the vertical sync of 3)6/7/2004 5:21:13 PM q The Energy Saving feature may be corrected by the user. q Check to the Quick Set-Up Guide). If the problem still...
... (1 of input signal is turned on. No Picture (Power LED not lit) Check these solutions, contact your computer. (Also refer to see if the monitor cable has bent pins. q Make sure the computer is within the range of the monitor. Screen says q Make sure the vertical sync of 3)6/7/2004 5:21:13 PM q The Energy Saving feature may be corrected by the user. q Check to the Quick Set-Up Guide). If the problem still...
User manual
Page 42
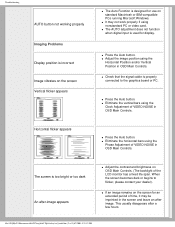
...-compatible PCs running Microsoft Windows. Troubleshooting AUTO button not working properly Imaging Problems Display position is incorrect Image vibrates on the screen Vertical flicker appears q The Auto Function is used for display. Horizontal flicker appears q Press the Auto button. q If an image remains on OSD Main Controls. (The backlight of 3)6/7/2004 5:21:13 PM This usually disappears after -image appears q Adjust the contrast and brightness on the screen for an extended period of VIDEO NOISE in OSD Main Controls. The screen is properly connected to flicker...
...-compatible PCs running Microsoft Windows. Troubleshooting AUTO button not working properly Imaging Problems Display position is incorrect Image vibrates on the screen Vertical flicker appears q The Auto Function is used for display. Horizontal flicker appears q Press the Auto button. q If an image remains on OSD Main Controls. (The backlight of 3)6/7/2004 5:21:13 PM This usually disappears after -image appears q Adjust the contrast and brightness on the screen for an extended period of VIDEO NOISE in OSD Main Controls. The screen is properly connected to flicker...
User manual
Page 49
We recommend you switch off and on a circuit different from the system unit by turning the equipment off the monitor when it is connected. This equipment generates, uses and can be connected to a computer which supports the VESA Display Power Management Signaling (DPMS) standard. q Connect the equipment into an outlet on , the user is no guarantee that was supplied with a function for compliance could void...
We recommend you switch off and on a circuit different from the system unit by turning the equipment off the monitor when it is connected. This equipment generates, uses and can be connected to a computer which supports the VESA Display Power Management Signaling (DPMS) standard. q Connect the equipment into an outlet on , the user is no guarantee that was supplied with a function for compliance could void...
User manual
Page 59
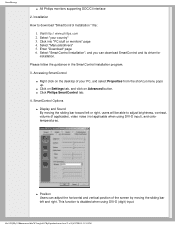
SmartControl Options q Display and Sound By moving the sliding bar left or right, users will be able to download "SmartControl Installation " file: 1. file:///D|/My%20documents/dfu/W7/english/170p5/product/smart.htm (2 of the screen by moving the sliding bar toward left and right. SmartManage q All Philips monitors supporting DDC/CI interface 2. Installation How to adjust brightness, contrast, volume (if applicable), video noise (not applicable when using DVI-D (digit) input. Select...
SmartControl Options q Display and Sound By moving the sliding bar left or right, users will be able to download "SmartControl Installation " file: 1. file:///D|/My%20documents/dfu/W7/english/170p5/product/smart.htm (2 of the screen by moving the sliding bar toward left and right. SmartManage q All Philips monitors supporting DDC/CI interface 2. Installation How to adjust brightness, contrast, volume (if applicable), video noise (not applicable when using DVI-D (digit) input. Select...
User manual
Page 61
... proper driver is a control panel extension, which helps users to adjust monitor performances and settings by a software interface, instead of the hardware buttons at the beginning, but it . Simply remove SmartControl and re-install it is the difference between SmartManage, SmartControl? Q&A Q1. SmartManage Within monitor control, users can click on Auto Setup to achieve optimum performance or click on factory reset to reset the parameters of the monitors. A. Q4. I change the monitor on...
... proper driver is a control panel extension, which helps users to adjust monitor performances and settings by a software interface, instead of the hardware buttons at the beginning, but it . Simply remove SmartControl and re-install it is the difference between SmartManage, SmartControl? Q&A Q1. SmartManage Within monitor control, users can click on Auto Setup to achieve optimum performance or click on factory reset to reset the parameters of the monitors. A. Q4. I change the monitor on...
User manual
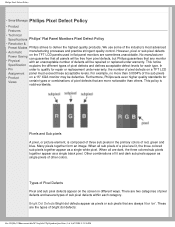
Page 63
...% of the sub pixels • Product Views on the TFT LCD panels used in the primary colors of pixel defects on the screen in different ways. There are always lit or 'on'. We use some of defects will be defective. However, pixel or sub pixel defects Power Saving on a 15" XGA monitor may be repaired or replaced under warranty, the number of red, green and blue. Pixels and Sub pixels A pixel, or picture element, is...
...% of the sub pixels • Product Views on the TFT LCD panels used in the primary colors of pixel defects on the screen in different ways. There are always lit or 'on'. We use some of defects will be defective. However, pixel or sub pixel defects Power Saving on a 15" XGA monitor may be repaired or replaced under warranty, the number of red, green and blue. Pixels and Sub pixels A pixel, or picture element, is...
User manual
Page 74
... 'Change...' Select the 'Monitor' button, then click on the 'Display' icon. 4. button. button, select the appropriate drive F: ( CD-ROM Drive) then click on 'Control Panel'. 3. For Windows® 98 1. file:///D|/My%20documents/dfu/W7/english/170p5/install/gt_start.htm (1 of all the drivers in Philips Monitors supports Plug & Play requirements for Windows® 95/98/2000/Me/XP or later Started • Optimizing The built-in VESA DDC2B feature in a specific...
... 'Change...' Select the 'Monitor' button, then click on the 'Display' icon. 4. button. button, select the appropriate drive F: ( CD-ROM Drive) then click on 'Control Panel'. 3. For Windows® 98 1. file:///D|/My%20documents/dfu/W7/english/170p5/install/gt_start.htm (1 of all the drivers in Philips Monitors supports Plug & Play requirements for Windows® 95/98/2000/Me/XP or later Started • Optimizing The built-in VESA DDC2B feature in a specific...
User manual
Page 75
... the 'Display' Item. 5. Start Windows® 2000. 2. Select the 'Settings' tab then click on the 'Open' button, then click the 'OK' button. 12. Please stop installation. - button. 8. Click on 'Advanced...'. 5. Select 'Specify the location of all the drivers in a specific location, so you can see the 'Digital Signature Not Found' window, click on the 'Browse...' Click on the 'OK' button, select your monitor model and click...
... the 'Display' Item. 5. Start Windows® 2000. 2. Select the 'Settings' tab then click on the 'Open' button, then click the 'OK' button. 12. Please stop installation. - button. 8. Click on 'Advanced...'. 5. Select 'Specify the location of all the drivers in a specific location, so you can see the 'Digital Signature Not Found' window, click on the 'Browse...' Click on the 'OK' button, select your monitor model and click...


