
Leaflet
Page 2
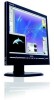
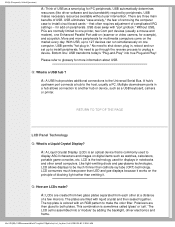
... serial bus or USB is a monitor base that delivers ergonomic display comfort and provides intelligent cable management. all without the bother of manually adjusting display brightness as delivering remote support to users through quick and convenient hardware or software interfaces. PerfectPanel™ Bright dots and dark dots are produced with zero tolerance for LCD panel defects and backed by Philips PerfectPanel™ globally valid warranty providing repair or replacement of any LCD monitors...
... serial bus or USB is a monitor base that delivers ergonomic display comfort and provides intelligent cable management. all without the bother of manually adjusting display brightness as delivering remote support to users through quick and convenient hardware or software interfaces. PerfectPanel™ Bright dots and dark dots are produced with zero tolerance for LCD panel defects and backed by Philips PerfectPanel™ globally valid warranty providing repair or replacement of any LCD monitors...

Leaflet
Page 3
... • Optimum Resolution: 1280 x 1024 @ 60 Hz • Factory Preset Modes: 15 modes • User definable modes: 50 modes • Video Dot Rate: 140 MHz • Horizontal Scanning Frequency: 30 - 83 kHz • Vertical Scanning Frequency: 56 - 76 MHz • Picture enhancement: LightFrame™ Digital Reality • sRGB Connectivity • Signal Input: VGA (Analog ), DVI-D, PC Audio in • Audio output: Stereo Audio (3.5 mm jack) 1x • USB: USB 2.0 • Sync Input: Composite Sync, Separate Sync, Sync on Green Convenience • Built...
... • Optimum Resolution: 1280 x 1024 @ 60 Hz • Factory Preset Modes: 15 modes • User definable modes: 50 modes • Video Dot Rate: 140 MHz • Horizontal Scanning Frequency: 30 - 83 kHz • Vertical Scanning Frequency: 56 - 76 MHz • Picture enhancement: LightFrame™ Digital Reality • sRGB Connectivity • Signal Input: VGA (Analog ), DVI-D, PC Audio in • Audio output: Stereo Audio (3.5 mm jack) 1x • USB: USB 2.0 • Sync Input: Composite Sync, Separate Sync, Sync on Green Convenience • Built...
User manual
Page 2
...%20Documents/dfu/A7/english/170p6/safety/safety.htm (1 of 2)2005-03-03 9:50:16 AM q If your monitor and use approved power cord provided by Philips all the time. q In order to clean your local service center. (Please refer to Customer Care Consumer Information Center) q Do not subject the LCD monitor to lift; q When positioning the monitor, make sure the power plug and outlet are...
...%20Documents/dfu/A7/english/170p6/safety/safety.htm (1 of 2)2005-03-03 9:50:16 AM q If your monitor and use approved power cord provided by Philips all the time. q In order to clean your local service center. (Please refer to Customer Care Consumer Information Center) q Do not subject the LCD monitor to lift; q When positioning the monitor, make sure the power plug and outlet are...
User manual
Page 6
... substances in speakers for audio without desktop clutter r Stand-alone audio for easy connections r SmartBright automatically adjusts brightness with the European Community stringent RoHS Directive mandating restrictions on -screen experience r Perfect Panel™guarantees dot defect-free display r SXGA 1280 x 1024 resolution for sharper display r 8-ms response time for outstanding displays of fast moving images • Automatic r Dual input accepts both analog VGA and digital DVI signals Power Saving • Physical Specification • Pin...
... substances in speakers for audio without desktop clutter r Stand-alone audio for easy connections r SmartBright automatically adjusts brightness with the European Community stringent RoHS Directive mandating restrictions on -screen experience r Perfect Panel™guarantees dot defect-free display r SXGA 1280 x 1024 resolution for sharper display r 8-ms response time for outstanding displays of fast moving images • Automatic r Dual input accepts both analog VGA and digital DVI signals Power Saving • Physical Specification • Pin...
User manual
Page 8
... DR can identify compatible Philips monitors by the LightFrame logo on screen. Use Tips 1. The software checks to load the control bar on the front of a light bulb to indicate that can only work with DOS-based programs operating only in order to activate or deactivate a target window that contains photos, videos or other manufacturers' monitors will not work with this CD-ROM. A blue light bulb appears...
... DR can identify compatible Philips monitors by the LightFrame logo on screen. Use Tips 1. The software checks to load the control bar on the front of a light bulb to indicate that can only work with DOS-based programs operating only in order to activate or deactivate a target window that contains photos, videos or other manufacturers' monitors will not work with this CD-ROM. A blue light bulb appears...
User manual
Page 12
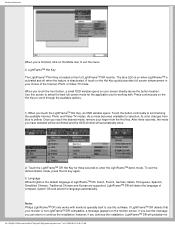
... only works with . The blue LED is the default language of the Internet, Photo or Video-TV mode. Press continuously on the Mode icon to exit the menu. 4. however, if you have selected will be confirmed and the OSD window will automatically close. 2) Touch the LightFrameTM DR Hot Key for selection, its color changes from the Hot Key. Touch the button continually to select the best full screen mode...
... only works with . The blue LED is the default language of the Internet, Photo or Video-TV mode. Press continuously on the Mode icon to exit the menu. 4. however, if you have selected will be confirmed and the OSD window will automatically close. 2) Touch the LightFrameTM DR Hot Key for selection, its color changes from the Hot Key. Touch the button continually to select the best full screen mode...

User manual
Page 13
... ambient light conditions, delivering just the right level of brightness for optimal front-of-screen performance, maximum productivity and minimal fatigue. Philips SmartBright automatically adjusts display brightness settings to correspond with Service Pack 2 How to use LightFrameTM DR After installation, LightFrameTM DR shortcut icon appears on the monitor. How to download your screen whenever the computer is started. RETURN TO TOP OF THE PAGE Resolution & Preset Modes •...
... ambient light conditions, delivering just the right level of brightness for optimal front-of-screen performance, maximum productivity and minimal fatigue. Philips SmartBright automatically adjusts display brightness settings to correspond with Service Pack 2 How to use LightFrameTM DR After installation, LightFrameTM DR shortcut icon appears on the monitor. How to download your screen whenever the computer is started. RETURN TO TOP OF THE PAGE Resolution & Preset Modes •...
User manual
Page 14
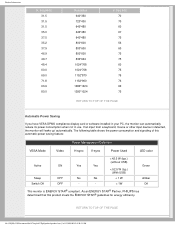
... Automatic Power Saving If you have VESA DPMS compliance display card or software installed in your PC, the monitor can automatically reduce its power consumption when not in use. As an ENERGY STAR® Partner, PHILIPS has determined that this automatic power saving feature: Power Management Definition VESA Mode Video H-sync V-sync Power Used LED color Active Sleep Switch Off ON OFF OFF < 42.5 W (typ.) (without USB) Yes Yes < 52.5 W (typ.) (With USB) No No < 1 W - - < 1W Green Amber...
... Automatic Power Saving If you have VESA DPMS compliance display card or software installed in your PC, the monitor can automatically reduce its power consumption when not in use. As an ENERGY STAR® Partner, PHILIPS has determined that this automatic power saving feature: Power Management Definition VESA Mode Video H-sync V-sync Power Used LED color Active Sleep Switch Off ON OFF OFF < 42.5 W (typ.) (without USB) Yes Yes < 52.5 W (typ.) (With USB) No No < 1 W - - < 1W Green Amber...
User manual
Page 19
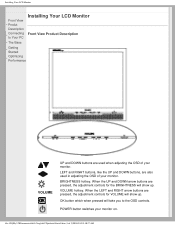
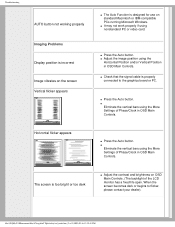
Installing Your LCD Monitor Front View • Produt Description • Connecting to the OSD controls. VOLUME hotkey. When the UP and DOWN arrow buttons are pressed, the adjustment controls for the BRIGHTNESS will take you to Your PC Installing Your LCD Monitor Front View Product Description • The Base • Getting Started • Optimizing Performance VOLUME UP and DOWN buttons are used in adjusting the OSD of your monitor. POWER button switches your monitor. BRIGHTNESS hotkey. file:///D|/My%20Documents/dfu/A7...
Installing Your LCD Monitor Front View • Produt Description • Connecting to the OSD controls. VOLUME hotkey. When the UP and DOWN arrow buttons are pressed, the adjustment controls for the BRIGHTNESS will take you to Your PC Installing Your LCD Monitor Front View Product Description • The Base • Getting Started • Optimizing Performance VOLUME UP and DOWN buttons are used in adjusting the OSD of your monitor. POWER button switches your monitor. BRIGHTNESS hotkey. file:///D|/My%20Documents/dfu/A7...

User manual
Page 34
... turn on monitor to the monitor that the monitor can display. FAQs (Frequently Asked Questions) • Safety and FAQs (Frequently Asked Questions) Troubleshooting • General FAQs • Screen Adjustments General FAQs • Compatibility with Other Peripherals Q: When I install my monitor what should I do when screen shows: THIS IS 85HZ OVERDRIVE, CHANGE COMPUTER DISPLAY INPUT TO 1280 x 1024 @60HZ? Unplug all cables, then connect your Philips LCD monitor. 6. In the Windows Start Menu, select Settings/Control Panel...
... turn on monitor to the monitor that the monitor can display. FAQs (Frequently Asked Questions) • Safety and FAQs (Frequently Asked Questions) Troubleshooting • General FAQs • Screen Adjustments General FAQs • Compatibility with Other Peripherals Q: When I install my monitor what should I do when screen shows: THIS IS 85HZ OVERDRIVE, CHANGE COMPUTER DISPLAY INPUT TO 1280 x 1024 @60HZ? Unplug all cables, then connect your Philips LCD monitor. 6. In the Windows Start Menu, select Settings/Control Panel...
User manual
Page 35
... OK button, then select 'Reset' to insert the ( companion CD-ROM) included in your monitor. Q: What are the driver files for your user manual to navigate through OSD menus and control keys. Follow the instructions in this package. Q: My Monitor has no visible difference between 85Hz and 60Hz. FAQs (Frequently Asked Questions) A: The refresh rate is no power (Power LED does not light up). LCD monitors display a stable, flicker-free image at...
... OK button, then select 'Reset' to insert the ( companion CD-ROM) included in your monitor. Q: What are the driver files for your user manual to navigate through OSD menus and control keys. Follow the instructions in this package. Q: My Monitor has no visible difference between 85Hz and 60Hz. FAQs (Frequently Asked Questions) A: The refresh rate is no power (Power LED does not light up). LCD monitors display a stable, flicker-free image at...

User manual
Page 37
... OSD OK button once. You may need a cable adapter to connect the monitor to optimize image performance with Windows® 95, 98, 2000 and XP. A: 1. A: Yes, the monitors are Plug-and-Play compatible with your system's video controller. Follow the instructions step by step to your dealer/retailer for optimal performance. All Philips LCD monitors are set at the screen surface. This will install FP Adjust automatically and place a shortcut on the monitor setup CD-ROM, open...
... OSD OK button once. You may need a cable adapter to connect the monitor to optimize image performance with Windows® 95, 98, 2000 and XP. A: 1. A: Yes, the monitors are Plug-and-Play compatible with your system's video controller. Follow the instructions step by step to your dealer/retailer for optimal performance. All Philips LCD monitors are set at the screen surface. This will install FP Adjust automatically and place a shortcut on the monitor setup CD-ROM, open...
User manual
Page 38
... with an RGB pattern to make the color filter. With USB, up to unplug a device. No need to go through the reverse process to install peripherals. Bottom line: USB transforms today's "Plug-and-Pray" into a 'module' by peripherals. Q: What is sometimes called 'glass' or 'cell.' A hub's upstream port connects a hub to the Universal Serial Bus. LCD is colored with "port gridlock." The top plate...
... with an RGB pattern to make the color filter. With USB, up to unplug a device. No need to go through the reverse process to install peripherals. Bottom line: USB transforms today's "Plug-and-Pray" into a 'module' by peripherals. Q: What is sometimes called 'glass' or 'cell.' A hub's upstream port connects a hub to the Universal Serial Bus. LCD is colored with "port gridlock." The top plate...

User manual
Page 47
... turning the equipment off the monitor when it is equipped with the limits for help. This equipment generates, uses and can be connected to a computer which supports VESA DPMS to fulfill the requirements in use for saving energy which can radiate radio frequency energy and, if not installed and used in accordance with USB) Amber < 1 W Switch Off Off < 1 W As an ENERGY STAR® Partner, PHILIPS...
... turning the equipment off the monitor when it is equipped with the limits for help. This equipment generates, uses and can be connected to a computer which supports VESA DPMS to fulfill the requirements in use for saving energy which can radiate radio frequency energy and, if not installed and used in accordance with USB) Amber < 1 W Switch Off Off < 1 W As an ENERGY STAR® Partner, PHILIPS...

User manual
Page 57
... click on "Support Center" 4. file:///D|/My%20Documents/dfu/A7/english/170p6/product/smart.htm (2 of your model number 6. Enter "Software" page 7. SmartControl Options q Display and Sound By moving the sliding bar toward left or right, users will be able to adjust monitor's performance settings. 1. Installation How to download "SmartControl Installation " file: 1. Click on Advanced button. Please follow the guidance in computers using DVI-D input), and color temperatures. With SmartControl...
... click on "Support Center" 4. file:///D|/My%20Documents/dfu/A7/english/170p6/product/smart.htm (2 of your model number 6. Enter "Software" page 7. SmartControl Options q Display and Sound By moving the sliding bar toward left or right, users will be able to adjust monitor's performance settings. 1. Installation How to download "SmartControl Installation " file: 1. Click on Advanced button. Please follow the guidance in computers using DVI-D input), and color temperatures. With SmartControl...
User manual
Page 61
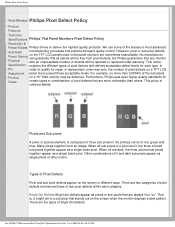
... quality control. Philips Pixel Defect Policy • SmartManage Philips Pixel Defect Policy • Product Features • Technical Specifications Philips' Flat Panel Monitors Pixel Defect Policy • Resolution & Preset Modes Philips strives to qualify for repair or replacement under warranty. We use some of red, green and blue. When all sub pixels of a pixel are the types of bright dot defects: file:///D|/My%20Documents/dfu/A7/english/170p6/product/pixel.htm (1 of other colors. Bright Dot Defects Bright dot...
... quality control. Philips Pixel Defect Policy • SmartManage Philips Pixel Defect Policy • Product Features • Technical Specifications Philips' Flat Panel Monitors Pixel Defect Policy • Resolution & Preset Modes Philips strives to qualify for repair or replacement under warranty. We use some of red, green and blue. When all sub pixels of a pixel are the types of bright dot defects: file:///D|/My%20Documents/dfu/A7/english/170p6/product/pixel.htm (1 of other colors. Bright Dot Defects Bright dot...
User manual
Page 69
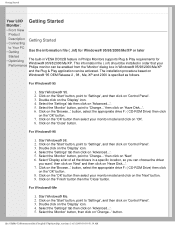
... as follows. For Windows® 98 1. Select the 'Monitor' button, point to 'Change...' then click on the 'Close' button. For Windows® Me 1. button. file:///D|/My%20Documents/dfu/A7/english/170p6/install/gt_start.htm (1 of all the drivers in Philips Monitors supports Plug & Play requirements for Windows® 95/98/2000/Me/XP or later Started • Optimizing The built-in VESA DDC2B feature in a specific location, so you...
... as follows. For Windows® 98 1. Select the 'Monitor' button, point to 'Change...' then click on the 'Close' button. For Windows® Me 1. button. file:///D|/My%20Documents/dfu/A7/english/170p6/install/gt_start.htm (1 of all the drivers in Philips Monitors supports Plug & Play requirements for Windows® 95/98/2000/Me/XP or later Started • Optimizing The built-in VESA DDC2B feature in a specific location, so you...
User manual
Page 70
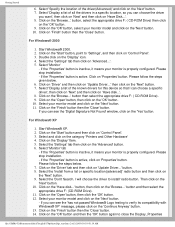
.../A7/english/170p6/install/gt_start.htm (2 of all the drivers in a specific location, so you can choose the driver you can see the 'Digital Signature Not Found' window, click on the 'Next' button. - Click on the 'Next' button. 9. Double click on 'Control Panel'. 3. Select your monitor model and click on the 'Start' button, point to install' radio button. Click on the 'Start' button and then click on the 'Display' icon...
.../A7/english/170p6/install/gt_start.htm (2 of all the drivers in a specific location, so you can choose the driver you can see the 'Digital Signature Not Found' window, click on the 'Next' button. - Click on the 'Next' button. 9. Double click on 'Control Panel'. 3. Select your monitor model and click on the 'Start' button, point to install' radio button. Click on the 'Start' button and then click on the 'Display' icon...
User manual
Page 82
... Horizontal Position and/or Vertical Position in OSD Main Controls. The screen is too bright or too dark q Adjust the contrast and brightness on OSD Main Controls. (The backlight of Phase/Clock in OSD Main Controls. q Check that the signal cable is designed for use on standard Macintosh or IBM-compatible PCs running Microsoft Windows. q Adjust the image position using the More Settings of the LCD monitor has a fixed life span. q Eliminate the vertical bars using nonstandard PC or video card. q It may not work...
... Horizontal Position and/or Vertical Position in OSD Main Controls. The screen is too bright or too dark q Adjust the contrast and brightness on OSD Main Controls. (The backlight of Phase/Clock in OSD Main Controls. q Check that the signal cable is designed for use on standard Macintosh or IBM-compatible PCs running Microsoft Windows. q Adjust the image position using the More Settings of the LCD monitor has a fixed life span. q Eliminate the vertical bars using nonstandard PC or video card. q It may not work...
User manual
Page 84
... the first year of installation. All parts, including repaired and replaced parts, are designed and manufactured to original specifications unit within two business days for all parts, and for the first year. file:///D|/My%20Documents/dfu/A7/english/warranty/war_usa.htm (1 of all labor charges. This product must have any difficulties while installing or using this owner's manual and keep both nearby. Warranty...
... the first year of installation. All parts, including repaired and replaced parts, are designed and manufactured to original specifications unit within two business days for all parts, and for the first year. file:///D|/My%20Documents/dfu/A7/english/warranty/war_usa.htm (1 of all labor charges. This product must have any difficulties while installing or using this owner's manual and keep both nearby. Warranty...


