Philips 17B2302Q99 Support and Manuals
Get Help and Manuals for this Phillips item

View All Support Options Below
Free Philips 17B2302Q99 manuals!
Problems with Philips 17B2302Q99?
Ask a Question
Free Philips 17B2302Q99 manuals!
Problems with Philips 17B2302Q99?
Ask a Question
Popular Philips 17B2302Q99 Manual Pages
Leaflet (English) - Page 1

...monitors on the market, backed by one of 3 years parts and labor to make quick and easy screen adjustments
•... of the screen with built-in "less than ideal" lighting conditions
• Screen adjustments made easy.
High contrast, ...at 85Hz.
• Multimedia audio system. Tight
convergence and geometry specifications ensure image sharpness even at smaller point sizes and the screen ...
Leaflet (English) - Page 2

...are registered trademarks of any product or service. Windows is a registered trademark of ...Manual, and Warranty Card. Mac is a registered trademark of Apple Computer, Inc. Printed in Power Off mode
LOW-EMISSION CHARACTERISTICS Complies with EPA Energy Star, NUTEK, and TCO '95 Specifications Philips 107MB consumes less than 5 Watts in the U.S.A. ©1998 Philips Consumer Electronics...
User manual - Page 1

...
17B2302Q
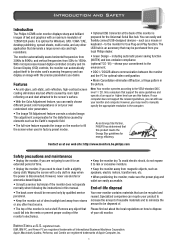
GETTING STARTED INTRODUCTION 1 SAFETY 1 DESCRIPTION OF CONTROLS 2-3 SETTING UP GUIDE Foldout
HOW TO USE THE ON SCREEN DISPLAY
FRONT PANEL CONTROLS ... OSD & RESET 15
ADDITIONAL INFORMATION AUDIO & USB SET UPS 16 POWER SAVING FEATURE 17 GLOSSARY 17 PIN ASSIGNMENT 18 SPECIFICATIONS 18 INDEX 18 TROUBLESHOOTING 19 WARRANTY (APPENDIX 60
Other language versions
FRENCH (FRANCAIS...
User manual - Page 2
...'s electronics.
• Keep the monitor dry. This adjustment compensates for the distortions caused by elements such as a mouse or keyboard - If your computer does not support the relevant guidelines, you can still use alcohol or ammonia-based liquids.
• Consult a service technician if the monitor does not operate normally when following the instructions in...
User manual - Page 3

...and helps you through the On Screen Display and also adjusts settings such as Volume, Brightness, and Contrast. See page 16....Off.
Light Emitting Diode turns green when the monitor is already connected here. Plug in VIDEO IN Jack -
Helps guide you ...the back of Controls
POWER Button - Slot for plugging in the manual are shown without the cover on.)
REAR VIEW
LEFT VIEW
SPEAKERS ...
User manual - Page 5
... follow steps 2 - 3 under VOLUME. Smart Help
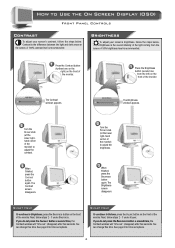
To continue to Volume, press the VOLUME button on the front of the light coming from the left) on the front of the monitor. Next, follow steps 2 - 3 under BRIGHTNESS. The Brightness screen disappears... below .
Contrast is recommended. A 100% contrast level is the difference between the light and dark areas on the front of the monitor.
User manual - Page 8

Language
The On Screen Display shows its settings in the ADVANCED CONTROLS window after you have exited completely, press the OSD button and... highlighted. Smart Help
To make other changes in one of five languages. for example, DDC1 / 2B - is the default setting. How to Use the On Screen Display (OSD)
Advanced Controls window
Power Saving
POWER SAVING helps save your selection.
5
Press...
User manual - Page 9
...again to save your monitor.
Then, turn the ROTARY knob until OSD TIMER is the default setting. How to Use the On Screen Display (OSD)
Advanced Controls window
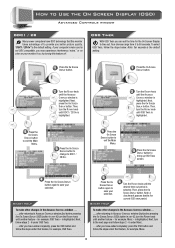
DDC1 / 2B
Many newer...Note: a checkmark appears beside the current OSD TIMER period. for example, MOIRE - after you can set the time for example, OSD TIMER.
5
Press the ON SCREEN DISPLAY button again to
exit the Main...
User manual - Page 11

... to Use the On Screen Display (OSD)
Color Temperature window
9300˚ K / 6500˚ K
Your monitor has two preset options you scroll between these two settings. Note: a checkmark appears beside the current selection.
4 Press the ON SCREEN DISPLAY button. Smart Help
After returning to Main Menu to continue to save your...
User manual - Page 12
... (OSD)
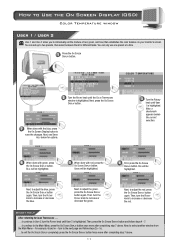
Color Temperature window
User 1 / User 2
USER 1 and USER 2 allow you to individually set up to two presets, then select between them for different tasks. Note: a checkmark appears beside the current... page and follow steps 4 - 7. . . . Then, turn to save the changes. You can set the mixture of red, green, and blue that establishes the color balance on your monitor's screen. BLUE ...
User manual - Page 16

...checkmark appears beside that window.
You can now make changes to each window and change the setting.
2 In some windows (ADVANCED CONTROLS AND COLOR TEMPERATURE),
only individual saves are possible. ... to the Main Menu and EXIT OSD will replace the Main Menu.
You can , however, use the ROTARY knob and scroll to their original settings. Each method saves the changes you have a ...
User manual - Page 17
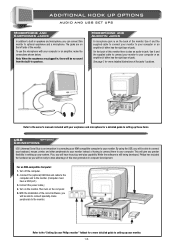
...to your earphones and microphone for more detailed guide to setting up your monitor. 16 Connect the (optional...installation of the jacks' locations. By using the USB, you will give you greater flexibility in jacks
A microphone jack is on the monitor.
For an IBM-compatible Computer:
1. To use the microphone with your monitor. Refer to the "Setting Up your Philips...
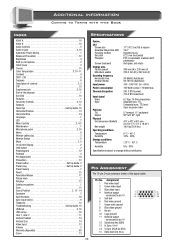
User manual - Page 18
..., PHILIPS HAS... to the color balance, uniformity, and saturation settings on the screen and the ability to easily ...Degauss DDC
Geometry
Moire Noise USB
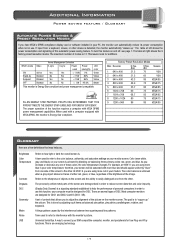
Refers to how light or dark the overall screen is achieved when a... have VESA's DPMS compliance display card or software installed in your PC, the monitor can automatically reduce ... parts of the screen are a few definitions that allows ...
User manual - Page 19
... Saving 7 Reset 15 Resolution Modes 17 Rotary knob 2 Rotation 12 Safety precautions 1 Save 15 Size & Position 3, 13 - 14 Speakers 2 Specifications 18 Sync Input Select 9 Trapezoid 12 Troubleshooting Set Up Guide, 19 USB hub 2, 16 USB set up 16 User 1, User 2 11 Vertical Position 14 Vertical Size 14 Video Input 13 Volume 5 Warranty (Appendix 60 Zoom...
User manual - Page 20

...PROBLEM... video card and the manual instructions for details Make sure the ... for details. For further assistance, contact Philips at (800) 835-3506 or (423... Feature may need degaussing. See Setting Up Guide. Remove any nearby magnetic objects.... the power outlet for the right drivers. It may be activated.
Edges of... Working
Troubleshooting
Having trouble? Make sure the computer is...
Philips 17B2302Q99 Reviews
We have not received any reviews for Philips yet.