

Leaflet
Page 1
... VGA Analog Input Provides supports for traditional analog signals. · Integrated AC Power Supply Conveniently adapts to a variety of mounting configurations using a built-in power supply that eliminates the hassle of a single button. · Philips First Choice Program One-call support includes a comprehensive 3-year warranty with a 1-year 48-hour advance swap guarantee. 180B22 Philips LCD Business Series Monitors POWERSUPPLY Mist White Model 180B2S Optional USB Hub attached to standard base PCUH411 (Mist White Only) Philips auto adjustment provides optimal screen position...
... VGA Analog Input Provides supports for traditional analog signals. · Integrated AC Power Supply Conveniently adapts to a variety of mounting configurations using a built-in power supply that eliminates the hassle of a single button. · Philips First Choice Program One-call support includes a comprehensive 3-year warranty with a 1-year 48-hour advance swap guarantee. 180B22 Philips LCD Business Series Monitors POWERSUPPLY Mist White Model 180B2S Optional USB Hub attached to standard base PCUH411 (Mist White Only) Philips auto adjustment provides optimal screen position...

Leaflet
Page 2
... change without Audio/USB. 1244 - 07/02 Product Number 180B2W (Stealth Black) 180B2S (Mist White) Technical Specifications LCD • Panel • Screen Size (inch/cm) • Pixel Pitch • Display Format • Display Area • Display Colors TFT LCD 18.1 inch / 46.0 cm 0.280 x 0.280 mm 1280 x 1024 pixels, RGB Vertical Stripe, Anti-glare Polarizer, Hard Coated 359 x 287.2 mm 8 bits Interface (16M colors) Scanning • Vertical Refresh Rate • Horizontal Frequency 56 - 76 Hz 30 - 82 kHz Video • Video...
... change without Audio/USB. 1244 - 07/02 Product Number 180B2W (Stealth Black) 180B2S (Mist White) Technical Specifications LCD • Panel • Screen Size (inch/cm) • Pixel Pitch • Display Format • Display Area • Display Colors TFT LCD 18.1 inch / 46.0 cm 0.280 x 0.280 mm 1280 x 1024 pixels, RGB Vertical Stripe, Anti-glare Polarizer, Hard Coated 359 x 287.2 mm 8 bits Interface (16M colors) Scanning • Vertical Refresh Rate • Horizontal Frequency 56 - 76 Hz 30 - 82 kHz Video • Video...

User manual
Page 2
... may leave a so called "after-image" or "ghost image" in high contrast remains on the cabinet. To avoid electric shock, do not expose the monitor to the set, do not expose it with a dry cloth is possible when the power is caused by qualified service personnel. q Keep the monitor dry. q When positioning the monitor, make sure the power plug and outlet are easily accessible...
... may leave a so called "after-image" or "ghost image" in high contrast remains on the cabinet. To avoid electric shock, do not expose the monitor to the set, do not expose it with a dry cloth is possible when the power is caused by qualified service personnel. q Keep the monitor dry. q When positioning the monitor, make sure the power plug and outlet are easily accessible...
User manual
Page 6
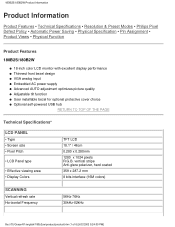
... Function Product Features 180B2S/180B2W q 18-inch color LCD monitor with excellent display performance q Thinnest front bezel design q VGA analog input q Embedded AC power supply q Advanced AUTO adjustment optimizes picture quality q Adjustable tilt function q User installable bezel for optional protective cover choice q Optional self-powered USB hub RETURN TO TOP OF THE PAGE Technical Specifications* LCD PANEL • Type • Screen size • Pixel Pitch • LCD Panel type • Effective viewing area • Display Colors TFT LCD 18.1" / 46cm 0.280 x 0.280mm 1280 x 1024...
... Function Product Features 180B2S/180B2W q 18-inch color LCD monitor with excellent display performance q Thinnest front bezel design q VGA analog input q Embedded AC power supply q Advanced AUTO adjustment optimizes picture quality q Adjustable tilt function q User installable bezel for optional protective cover choice q Optional self-powered USB hub RETURN TO TOP OF THE PAGE Technical Specifications* LCD PANEL • Type • Screen size • Pixel Pitch • LCD Panel type • Effective viewing area • Display Colors TFT LCD 18.1" / 46cm 0.280 x 0.280mm 1280 x 1024...
User manual
Page 7
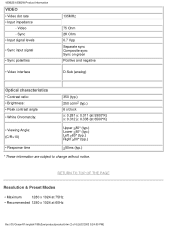
...; Video dot rate • Input impedance - Video - Sync • Input signal levels • Sync input signal • Sync polarities • Video interface 135MHz 75 Ohm 2K Ohm 0.7 Vpp Separate sync Composite sync Sync on green Positive and negative D-Sub (analog) Optical characteristics • Contrast ratio: • Brightness: • Peak contrast angle • White Chromatcity: 350 (typ.) 250 cd/m2 (typ.) 6 o'clock x: 0.281 y: 0.311 (at 9300°K) x: 0.312 y: 0.338 (at 6500°K) • Viewing...
...; Video dot rate • Input impedance - Video - Sync • Input signal levels • Sync input signal • Sync polarities • Video interface 135MHz 75 Ohm 2K Ohm 0.7 Vpp Separate sync Composite sync Sync on green Positive and negative D-Sub (analog) Optical characteristics • Contrast ratio: • Brightness: • Peak contrast angle • White Chromatcity: 350 (typ.) 250 cd/m2 (typ.) 6 o'clock x: 0.281 y: 0.311 (at 9300°K) x: 0.312 y: 0.338 (at 6500°K) • Viewing...
User manual
Page 8
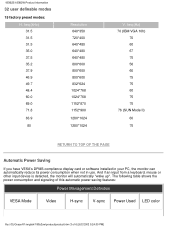
The following table shows the power consumption and signaling of this automatic power saving features: Power Management Definition VESA Mode Video H-sync V-sync Power Used LED color file:///D|/Grace/K1/english/180b2sw/product/product.htm (3 of 6) [6/2/2002 5:24:00 PM] freq (kHz) 31.5 31.5 31.5 35.0 37.5 35.2 37.9 46.9 49.7 48.4 60.0 69.0 71.8 63.9 80 Resolution 640*350 720*400 640*480 640*480 640...
The following table shows the power consumption and signaling of this automatic power saving features: Power Management Definition VESA Mode Video H-sync V-sync Power Used LED color file:///D|/Grace/K1/english/180b2sw/product/product.htm (3 of 6) [6/2/2002 5:24:00 PM] freq (kHz) 31.5 31.5 31.5 35.0 37.5 35.2 37.9 46.9 49.7 48.4 60.0 69.0 71.8 63.9 80 Resolution 640*350 720*400 640*480 640*480 640...

User manual
Page 12
BRIGHTNESS hotkey. Installing your LCD Monitor Installing your LCD Monitor Your LCD Monitor : Front View Product Description • Connecting to the OSD controls file:///D|/Grace/K1/english/180b2sw/install/install.htm (1 of 3) [6/2/2002 5:24:02 PM] When the UP and DOWN arrow buttons are also used when adjusting the OSD of your monitor. OK button which when pressed will take you to Your PC • Remove and re-install the base • Getting Started • Optimizing Performance •...
BRIGHTNESS hotkey. Installing your LCD Monitor Installing your LCD Monitor Your LCD Monitor : Front View Product Description • Connecting to the OSD controls file:///D|/Grace/K1/english/180b2sw/install/install.htm (1 of 3) [6/2/2002 5:24:02 PM] When the UP and DOWN arrow buttons are also used when adjusting the OSD of your monitor. OK button which when pressed will take you to Your PC • Remove and re-install the base • Getting Started • Optimizing Performance •...

User manual
Page 15
... overall view of the structure of the On Screen Display What is a feature in all Philips LCD monitors which allows an end-user to make your monitor's various features. Basic and simple instruction on -screen instruction window. On the front controls of monitors directly though an on the control keys. Use the or the keys to adjust screen performance of your monitor, once you press the button, the On Screen Display (OSD) Main Controls window will...
... overall view of the structure of the On Screen Display What is a feature in all Philips LCD monitors which allows an end-user to make your monitor's various features. Basic and simple instruction on -screen instruction window. On the front controls of monitors directly though an on the control keys. Use the or the keys to adjust screen performance of your monitor, once you press the button, the On Screen Display (OSD) Main Controls window will...
User manual
Page 23
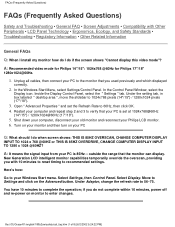
.... file:///D|/Grace/K1/english/180b2sw/safety/saf_faq.htm (1 of 8) [6/2/2002 5:24:22 PM] In the Windows Start Menu, select Settings/Control Panel. Inside the Display Control Panel, select the " Settings " tab. Restart your PC is set the Refresh Rate to 60Hz, then click OK. 4. outside the range that your Windows Start menu. Under Adaptor, change the refresh rate to your PC is 85Hz -- Unplug all cables, then connect your Philips LCD monitor. 6. Under the setting tab, in...
.... file:///D|/Grace/K1/english/180b2sw/safety/saf_faq.htm (1 of 8) [6/2/2002 5:24:22 PM] In the Windows Start Menu, select Settings/Control Panel. Inside the Display Control Panel, select the " Settings " tab. Restart your PC is set the Refresh Rate to 60Hz, then click OK. 4. outside the range that your Windows Start menu. Under Adaptor, change the refresh rate to your PC is 85Hz -- Unplug all cables, then connect your Philips LCD monitor. 6. Under the setting tab, in...

User manual
Page 24
... control keys. A: These are the .inf and .icm files on the setup disk & CD-ROM? A: Your video card/graphic driver and monitor together determine the available resolutions. A: The AUTO adjustment key restores optimal screen position, phase and clock settings with the "Display properties/Settings" control panel Q: What if I install the drivers (.inf and .icm)? Follow the instructions in your monitor. How do I do? A: For LCD monitors, the refresh rate is much less relevant. What should I adjust resolution...
... control keys. A: These are the .inf and .icm files on the setup disk & CD-ROM? A: Your video card/graphic driver and monitor together determine the available resolutions. A: The AUTO adjustment key restores optimal screen position, phase and clock settings with the "Display properties/Settings" control panel Q: What if I install the drivers (.inf and .icm)? Follow the instructions in your monitor. How do I do? A: For LCD monitors, the refresh rate is much less relevant. What should I adjust resolution...
User manual
Page 25
... applicable to LCD? Q: How should I clean the LCD surface? A: The FPadjust program generates alignment patterns that allows user to mount the Philips monitor on back cover that help you adjust monitor settings such as touch panel? file:///D|/Grace/K1/english/180b2sw/safety/saf_faq.htm (3 of a 2H pencil). An optional protective cover with your Philips sales representative for more information. Touch panels are being developed for optimal performance. A: Unlike CRT display technology in...
... applicable to LCD? Q: How should I clean the LCD surface? A: The FPadjust program generates alignment patterns that allows user to mount the Philips monitor on back cover that help you adjust monitor settings such as touch panel? file:///D|/Grace/K1/english/180b2sw/safety/saf_faq.htm (3 of a 2H pencil). An optional protective cover with your Philips sales representative for more information. Touch panels are being developed for optimal performance. A: Unlike CRT display technology in...
User manual
Page 26
...-click the FP_setup02.exe icon. FAQs (Frequently Asked Questions) Q: When I install my monitor, how do I connect my LCD monitor to any PC, workstation or Mac? A: 1. Note: You can check the current display settings by step to optimize image performance with standard PC, Mac and workstation. Q: How do LCDs compare to install circuit board cards -- You may need a cable adapter to connect the monitor to your desktop. 3. There are set at the screen surface.
...-click the FP_setup02.exe icon. FAQs (Frequently Asked Questions) Q: When I install my monitor, how do I connect my LCD monitor to any PC, workstation or Mac? A: 1. Note: You can check the current display settings by step to optimize image performance with standard PC, Mac and workstation. Q: How do LCDs compare to install circuit board cards -- You may need a cable adapter to connect the monitor to your desktop. 3. There are set at the screen surface.

User manual
Page 27
..., plug in one direction. A: LCDs are filled with "port gridlock." Q: What is called "glass" or "cell." The direction of blocking light rather than cathode ray tube (CRT) technology. file:///D|/Grace/K1/english/180b2sw/safety/saf_faq.htm (5 of a few microns. No need to be much less power than LED and gas-display displays because they work on the market every day. Without USB, PCs...
..., plug in one direction. A: LCDs are filled with "port gridlock." Q: What is called "glass" or "cell." The direction of blocking light rather than cathode ray tube (CRT) technology. file:///D|/Grace/K1/english/180b2sw/safety/saf_faq.htm (5 of a few microns. No need to be much less power than LED and gas-display displays because they work on the market every day. Without USB, PCs...
User manual
Page 28
... a TFT LCD Panel work? The molecular arrangement of the light is impressed with voltage or not. When impressed with spiral structure of a pixel. Q: What are the advantages of TFT LCD compared to control the luminance of the liquid crystal molecules, and goes through the polarized filter at each pixel intersection, requiring less current to CRT? A: Unlike a CDT monitor, the TFT LCD panel has a fixed resolution. Since the vertical/horizontal frequency for...
... a TFT LCD Panel work? The molecular arrangement of the light is impressed with voltage or not. When impressed with spiral structure of a pixel. Q: What are the advantages of TFT LCD compared to control the luminance of the liquid crystal molecules, and goes through the polarized filter at each pixel intersection, requiring less current to CRT? A: Unlike a CDT monitor, the TFT LCD panel has a fixed resolution. Since the vertical/horizontal frequency for...

User manual
Page 31
.... Screen says AUTO button not working properly Imaging Problems Display position is incorrect Image vibrates on the screen Vertical flicker appears q Make sure the vertical sync of input signal is within 10 minutes. q Eliminate the horizontal bars using nonstandard PCs or video card. Common Problems Having this problem? q Make sure the signal cable is properly connected to your nearest Philips dealer. q Check to see if the monitor cable has bent pins. q It may be corrected by the user. q Adjust the image position using the Clock Adjustment of...
.... Screen says AUTO button not working properly Imaging Problems Display position is incorrect Image vibrates on the screen Vertical flicker appears q Make sure the vertical sync of input signal is within 10 minutes. q Eliminate the horizontal bars using nonstandard PCs or video card. Common Problems Having this problem? q Make sure the signal cable is properly connected to your nearest Philips dealer. q Check to see if the monitor cable has bent pins. q It may be corrected by the user. q Adjust the image position using the Clock Adjustment of...

User manual
Page 32
... today's technology. The after-image will disappear after a set amount of time Green, red, blue, dark, and white dots remains q The remaining dots are normal characteristic of the liquid crystal used in the screen and leave an after the power has been turned off. This usually disappears after a few hours An after-image remains after -image. Troubleshooting The screen is not caused by a malfunction...
... today's technology. The after-image will disappear after a set amount of time Green, red, blue, dark, and white dots remains q The remaining dots are normal characteristic of the liquid crystal used in the screen and leave an after the power has been turned off. This usually disappears after a few hours An after-image remains after -image. Troubleshooting The screen is not caused by a malfunction...
User manual
Page 45
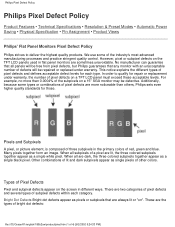
... are dark, the three colored subpixels together appear as pixels or subpixels that any monitor with an unacceptable number of defects will be defective. Philips Pixel Defect Policy Philips Pixel Defect Policy Product Features • Technical Specifications • Resolution & Preset Modes • Automatic Power Saving • Physical Specification • Pin Assignment • Product Views Philips' Flat Panel Monitors Pixel Defect Policy Philips strives to qualify for repair or replacement under warranty. In order...
... are dark, the three colored subpixels together appear as pixels or subpixels that any monitor with an unacceptable number of defects will be defective. Philips Pixel Defect Policy Philips Pixel Defect Policy Product Features • Technical Specifications • Resolution & Preset Modes • Automatic Power Saving • Physical Specification • Pin Assignment • Product Views Philips' Flat Panel Monitors Pixel Defect Policy Philips strives to qualify for repair or replacement under warranty. In order...

User manual
Page 56
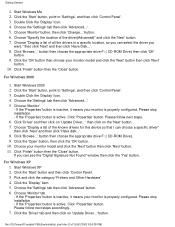
... 'Settings', and then click 'Control Panel'. 3. then click 'Next' 6. Choose "Display a list of 3) [6/2/2002 5:24:39 PM] Click the 'OK' button then choose your monitor model and click the 'OK'. 8. Getting Started Getting Started Your LCD Monitor : Front View Product Description • Connecting to Your PC • Remove and Re-install the Base • Getting Started • Optimizing Performance • Accessories (optional) Getting Started Use the information file ( .inf) for Windows...
... 'Settings', and then click 'Control Panel'. 3. then click 'Next' 6. Choose "Display a list of 3) [6/2/2002 5:24:39 PM] Click the 'OK' button then choose your monitor model and click the 'OK'. 8. Getting Started Getting Started Your LCD Monitor : Front View Product Description • Connecting to Your PC • Remove and Re-install the Base • Getting Started • Optimizing Performance • Accessories (optional) Getting Started Use the information file ( .inf) for Windows...
User manual
Page 57
.../K1/english/180b2sw/install/gt_start.htm (2 of the known drivers for this device so that I can choose a specific driver" then click 'Next' and then click 'Have disk...'. 8. Click the 'Start' button, point to 'Settings', and then click 'Control Panel'. 3. Choose 'Monitor' button, then click 'Change...' Click 'Driver' and then click on 'Update Driver...' Click the 'Start' button and then click 'Control Panel'. 3. Click the 'Driver' tab and then click on 'Update Driver...' button. 6. Choose "Display...
.../K1/english/180b2sw/install/gt_start.htm (2 of the known drivers for this device so that I can choose a specific driver" then click 'Next' and then click 'Have disk...'. 8. Click the 'Start' button, point to 'Settings', and then click 'Control Panel'. 3. Choose 'Monitor' button, then click 'Change...' Click 'Driver' and then click on 'Update Driver...' Click the 'Start' button and then click 'Control Panel'. 3. Click the 'Driver' tab and then click on 'Update Driver...' button. 6. Choose "Display...

User manual
Page 71
...-quality performance, ease of use and ease of the toll-free numbers. O. You can solve your call away Philips' customer help speed up the process: q Your proof of purchase indicating: date of purchase, dealer name, model and product serial number. Or you encounter any problems with your monitor within five working days, free of purchase, we can contact Philips Monday - For more details...
...-quality performance, ease of use and ease of the toll-free numbers. O. You can solve your call away Philips' customer help speed up the process: q Your proof of purchase indicating: date of purchase, dealer name, model and product serial number. Or you encounter any problems with your monitor within five working days, free of purchase, we can contact Philips Monday - For more details...


