

Leaflet
Page 1
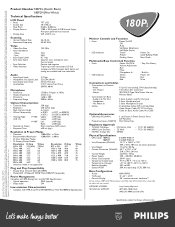
... external power supplies. · DVI/Dual Input (Triple Inputs) Experience the superior display quality of a true digital monitor with bright, sharp images and truer color representation while maintaining support for a wide variety of applications and environments. · Philips First Choice Program One-call support includes a comprehensive 3-year warranty with a 1-year 48-hour advance swap guarantee. 180P22 Philips LCD Professional Series Monitors ™ Optional Protective Cover Rotate into Portrait Mode Mist White Model Philips auto adjustment provides optimal screen position...
... external power supplies. · DVI/Dual Input (Triple Inputs) Experience the superior display quality of a true digital monitor with bright, sharp images and truer color representation while maintaining support for a wide variety of applications and environments. · Philips First Choice Program One-call support includes a comprehensive 3-year warranty with a 1-year 48-hour advance swap guarantee. 180P22 Philips LCD Professional Series Monitors ™ Optional Protective Cover Rotate into Portrait Mode Mist White Model Philips auto adjustment provides optimal screen position...
Leaflet
Page 2
... Cables • Connections on green Positive and negative Triple input (two connectors): D-Sub (analog) and DVI-I (digital/analog) - DVI-I (accepts both digital and analog are registered trademarks of Philips Electronics North America Corp. A Division of Microsoft Corporation Macintosh is Iicensed from Portrait Displays, Inc. © 1993-2000 Portrait Displays, Inc. US Patent #5,973,664 1191 - 02/02 Product Number 180P2G (Stealth Black) 180P2M (Mist White) Technical Specifications LCD Panel • Panel • Screen Size • Pixel...
... Cables • Connections on green Positive and negative Triple input (two connectors): D-Sub (analog) and DVI-I (digital/analog) - DVI-I (accepts both digital and analog are registered trademarks of Philips Electronics North America Corp. A Division of Microsoft Corporation Macintosh is Iicensed from Portrait Displays, Inc. © 1993-2000 Portrait Displays, Inc. US Patent #5,973,664 1191 - 02/02 Product Number 180P2G (Stealth Black) 180P2M (Mist White) Technical Specifications LCD Panel • Panel • Screen Size • Pixel...

User manual
Page 2
... in high contrast remains on the cabinet. q When positioning the monitor, make sure the power plug and outlet are followed. q Keep the monitor dry. q To avoid the risk of shock or permanent damage to rain or excessive moisture. If a still image in exposure to rain or excessive moisture. Read and follow these instructions when connecting and using your application . Consult a service technician if...
... in high contrast remains on the cabinet. q When positioning the monitor, make sure the power plug and outlet are followed. q Keep the monitor dry. q To avoid the risk of shock or permanent damage to rain or excessive moisture. If a still image in exposure to rain or excessive moisture. Read and follow these instructions when connecting and using your application . Consult a service technician if...
User manual
Page 6
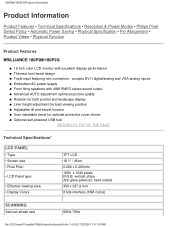
... monitor with 48W PMPO stereo sound output q Advanced AUTO adjustment optimizes picture quality q Rotation for both portrait and landscape display q Liner height adjustment for best viewing position q Adjustable tilt and swivel function q User installable bezel for optional protective cover choice q Optional self-powered USB hub RETURN TO TOP OF THE PAGE Technical Specifications* LCD PANEL • Type • Screen size • Pixel Pitch • LCD Panel type • Effective viewing area • Display Colors TFT LCD 18.1" / 46cm 0.280 x 0.280mm 1280 x 1024 pixels R.G.B. vertical...
... monitor with 48W PMPO stereo sound output q Advanced AUTO adjustment optimizes picture quality q Rotation for both portrait and landscape display q Liner height adjustment for best viewing position q Adjustable tilt and swivel function q User installable bezel for optional protective cover choice q Optional self-powered USB hub RETURN TO TOP OF THE PAGE Technical Specifications* LCD PANEL • Type • Screen size • Pixel Pitch • LCD Panel type • Effective viewing area • Display Colors TFT LCD 18.1" / 46cm 0.280 x 0.280mm 1280 x 1024 pixels R.G.B. vertical...

User manual
Page 7
...; Sync input signal • Sync polarities • Video interface 30KHz-82KHz 135MHz 75 Ohm 2K Ohm 0.7 Vpp Separate sync Composite sync Sync on green Positive and negative Triple input (two connectors): D-Sub (analog) and DVI-I (accepts both digital and analog) are available and user selectable AUDIO • Input signal level • Headphone out signal level • Input signal connector • Loudspeaker MICROPHONE • Sensitivity • Output impedance • Directivity • Frequency range Optical characteristics • Contrast ratio...
...; Sync input signal • Sync polarities • Video interface 30KHz-82KHz 135MHz 75 Ohm 2K Ohm 0.7 Vpp Separate sync Composite sync Sync on green Positive and negative Triple input (two connectors): D-Sub (analog) and DVI-I (accepts both digital and analog) are available and user selectable AUDIO • Input signal level • Headphone out signal level • Input signal connector • Loudspeaker MICROPHONE • Sensitivity • Output impedance • Directivity • Frequency range Optical characteristics • Contrast ratio...

User manual
Page 9
... (incl. The following table shows the power consumption and signaling of 9) [11/22/2001 1:47:16 PM] And if an input from a keyboard, mouse or other input device is ENERGY STAR® compliant. As an ENERGY STAR® Partner, PHILIPS has determined that this automatic power saving features: Power Management Definition VESA Mode Video H-sync V-sync Power Used LED color ON Stand-by Suspend OFF Active Yes Yes...
... (incl. The following table shows the power consumption and signaling of 9) [11/22/2001 1:47:16 PM] And if an input from a keyboard, mouse or other input device is ENERGY STAR® compliant. As an ENERGY STAR® Partner, PHILIPS has determined that this automatic power saving features: Power Management Definition VESA Mode Video H-sync V-sync Power Used LED color ON Stand-by Suspend OFF Active Yes Yes...
User manual
Page 15
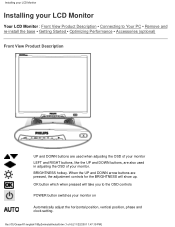
.../english/180p2m/install/install.htm (1 of your monitor on Automatically adjust the horizontal position, vertical position, phase and clock setting. BRIGHTNESS hotkey. OK button which when pressed will show up. Installing your LCD Monitor Installing your LCD Monitor Your LCD Monitor : Front View Product Description • Connecting to Your PC • Remove and re-install the base • Getting Started • Optimizing Performance • Accessories (optional) Front View Product Description UP and DOWN buttons are used when adjusting the OSD of your monitor...
.../english/180p2m/install/install.htm (1 of your monitor on Automatically adjust the horizontal position, vertical position, phase and clock setting. BRIGHTNESS hotkey. OK button which when pressed will show up. Installing your LCD Monitor Installing your LCD Monitor Your LCD Monitor : Front View Product Description • Connecting to Your PC • Remove and re-install the base • Getting Started • Optimizing Performance • Accessories (optional) Front View Product Description UP and DOWN buttons are used when adjusting the OSD of your monitor...

User manual
Page 16
D-Sub DVI-D digital inputs or D-Sub DVI-A analog inputs. 1. Audio power LED 3. Mute on /off 4. Allows user to switch between two video connectors (D-Sub & DVI-I), e.g. BASS on /off and volulme adjustment 2. Installing your LCD Monitor Signal inputs selective hotkeys. Audio power on/off Side View RETURN TO TOP OF THE PAGE file:///D|/Grace/K1/english/180p2m/install/install.htm (2 of 6) [11/22/2001 1:47:19 PM] Built-in Mic 5.
D-Sub DVI-D digital inputs or D-Sub DVI-A analog inputs. 1. Audio power LED 3. Mute on /off 4. Allows user to switch between two video connectors (D-Sub & DVI-I), e.g. BASS on /off and volulme adjustment 2. Installing your LCD Monitor Signal inputs selective hotkeys. Audio power on/off Side View RETURN TO TOP OF THE PAGE file:///D|/Grace/K1/english/180p2m/install/install.htm (2 of 6) [11/22/2001 1:47:19 PM] Built-in Mic 5.
User manual
Page 21
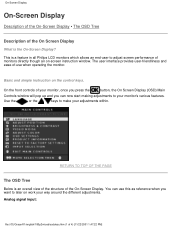
... instruction on -screen instruction window. RETURN TO TOP OF THE PAGE The OSD Tree Below is a feature in all Philips LCD monitors which allows an end-user to later on work your adjustments within. On the front controls of -use this as reference when you can now start making adjustments to make your way around the different adjustments. Use the or the keys to your monitor, once you press the button...
... instruction on -screen instruction window. RETURN TO TOP OF THE PAGE The OSD Tree Below is a feature in all Philips LCD monitors which allows an end-user to later on work your adjustments within. On the front controls of -use this as reference when you can now start making adjustments to make your way around the different adjustments. Use the or the keys to your monitor, once you press the button...

User manual
Page 33
... Display Control Panel, select the " Settings " tab. Turn on your Windows Start menu. Here's how: Go to complete the operation; Select Settings, then Control Panel. You have 10 minutes to your monitor and then turn on the Advanced button. In the Windows Start Menu, select Settings/Control Panel. file:///D|/Grace/K1/english/180p2m/safety/saf_faq.htm (1 of 8) [11/22/2001 1:47:36 PM] Select Display. Unplug all cables, then connect your PC is set the Refresh Rate...
... Display Control Panel, select the " Settings " tab. Turn on your Windows Start menu. Here's how: Go to complete the operation; Select Settings, then Control Panel. You have 10 minutes to your monitor and then turn on the Advanced button. In the Windows Start Menu, select Settings/Control Panel. file:///D|/Grace/K1/english/180p2m/safety/saf_faq.htm (1 of 8) [11/22/2001 1:47:36 PM] Select Display. Unplug all cables, then connect your PC is set the Refresh Rate...

User manual
Page 34
... first install your user manual to install the drivers. Follow the instructions in your monitor. A: Make sure the AC power cord is connected to recall all original factory settings. Q: Will the LCD monitor accept an Interlaced signal? file:///D|/Grace/K1/english/180p2m/safety/saf_faq.htm (2 of a single button - A: For LCD monitors, the refresh rate is the Auto function? Monitor drivers (.inf and .icm files) will be installed automatically. A: Your video card/graphic driver and monitor together determine the available resolutions. Q: My Monitor...
... first install your user manual to install the drivers. Follow the instructions in your monitor. A: Make sure the AC power cord is connected to recall all original factory settings. Q: Will the LCD monitor accept an Interlaced signal? file:///D|/Grace/K1/english/180p2m/safety/saf_faq.htm (2 of a single button - A: For LCD monitors, the refresh rate is the Auto function? Monitor drivers (.inf and .icm files) will be installed automatically. A: Your video card/graphic driver and monitor together determine the available resolutions. Q: My Monitor...

User manual
Page 35
... as touch panel? A: Unlike CRT display technology in which is the FPadjust program on back cover that help you adjust monitor settings such as Contrast, Brightness, Horizontal Position, Vertical Position, Phase, and Clock for optimal performance. A: For normal cleaning, use Isopropyl alcohol. Check with greater scratch resistance is not really applicable to control each individual pixel and thus refresh rate is also available. For extensive cleaning, please use the clean, soft and fine. Q: Can the Philips LCD Monitor be...
... as touch panel? A: Unlike CRT display technology in which is the FPadjust program on back cover that help you adjust monitor settings such as Contrast, Brightness, Horizontal Position, Vertical Position, Phase, and Clock for optimal performance. A: For normal cleaning, use Isopropyl alcohol. Check with greater scratch resistance is not really applicable to control each individual pixel and thus refresh rate is also available. For extensive cleaning, please use the clean, soft and fine. Q: Can the Philips LCD Monitor be...

User manual
Page 36
.... USB makes necessary resources available without user intervention. that often require file:///D|/Grace/K1/english/180p2m/safety/saf_faq.htm (4 of removing the computer case to install circuit board cards -- You may need a cable adapter to connect the monitor to your dealer/reseller for 17"/18". There are fully compatible with other Peripherals Q: Can I connect my LCD monitor to any PC, workstation or Mac? Note: You can check the current display settings...
.... USB makes necessary resources available without user intervention. that often require file:///D|/Grace/K1/english/180p2m/safety/saf_faq.htm (4 of removing the computer case to install circuit board cards -- You may need a cable adapter to connect the monitor to your dealer/reseller for 17"/18". There are fully compatible with other Peripherals Q: Can I connect my LCD monitor to any PC, workstation or Mac? Note: You can check the current display settings...

User manual
Page 37
... assembled into true Plug-and-Play! No need to go through the reverse process to be much less power than LED and gas-display displays because they work on the market every day. LCD is basically directing light to the propagation of blocking light rather than cathode ray tube (CRT) technology. FAQs (Frequently Asked Questions) adjustment of 8) [11/22/2001 1:47:36 PM] USB...
... assembled into true Plug-and-Play! No need to go through the reverse process to be much less power than LED and gas-display displays because they work on the market every day. LCD is basically directing light to the propagation of blocking light rather than cathode ray tube (CRT) technology. FAQs (Frequently Asked Questions) adjustment of 8) [11/22/2001 1:47:36 PM] USB...

User manual
Page 41
... the user. q It may be activated q Make sure the monitor cable is properly connected to your computer. (Also refer to the Quick Set Up Guide). q Adjust the image position using the Phase Adjustment of the monitor. Horizontal flicker appears q Push the Auto button. file:///D|/Grace/K1/english/180p2m/safety/saf_troub.htm (1 of VIDEO NOISE in OSD Main Controls. Check these possible solutions, contact your computer. q Make sure the signal cable is plugged to your nearest Philips dealer. q The Auto...
... the user. q It may be activated q Make sure the monitor cable is properly connected to your computer. (Also refer to the Quick Set Up Guide). q Adjust the image position using the Phase Adjustment of the monitor. Horizontal flicker appears q Push the Auto button. file:///D|/Grace/K1/english/180p2m/safety/saf_troub.htm (1 of VIDEO NOISE in OSD Main Controls. Check these possible solutions, contact your computer. q Make sure the signal cable is plugged to your nearest Philips dealer. q The Auto...
User manual
Page 42
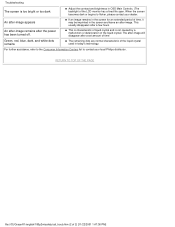
... q Adjust the contrast and brightness in today's technology. This usually disappears after a few hours An after-image remains after -image. When the screen becomes dark or begins to contact your dealer. The after-image will disappear after a set amount of time Green, red, blue, dark, and white dots remains q The remaining dots are normal characteristic of the liquid crystal used in OSD Main Controls. (The backlight...
... q Adjust the contrast and brightness in today's technology. This usually disappears after a few hours An after-image remains after -image. When the screen becomes dark or begins to contact your dealer. The after-image will disappear after a set amount of time Green, red, blue, dark, and white dots remains q The remaining dots are normal characteristic of the liquid crystal used in OSD Main Controls. (The backlight...
User manual
Page 55
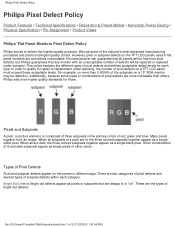
... repaired or replaced under warranty, the number of pixel defects are two categories of pixel defects and several types of pixel defects and defines acceptable defect levels for each category. Philips Pixel Defect Policy Philips Pixel Defect Policy Product Features • Technical Specifications • Resolution & Preset Modes • Automatic Power Saving • Physical Specification • Pin Assignment • Product Views Philips' Flat Panel Monitors Pixel Defect Policy Philips strives to qualify for repair or replacement...
... repaired or replaced under warranty, the number of pixel defects are two categories of pixel defects and several types of pixel defects and defines acceptable defect levels for each category. Philips Pixel Defect Policy Philips Pixel Defect Policy Product Features • Technical Specifications • Resolution & Preset Modes • Automatic Power Saving • Physical Specification • Pin Assignment • Product Views Philips' Flat Panel Monitors Pixel Defect Policy Philips strives to qualify for repair or replacement...

User manual
Page 66
... click 'OK' button. 7. Double Click the 'Display' Icon. 4. For Windows Me file:///D|/Grace/K1/english/180p2m/install/gt_start.htm (1 of all the drivers in a specific location, so you can select the driver you want." Getting Started Getting Started Your LCD Monitor : Front View Product Description • Connecting to Your PC • Remove and Re-install the Base • Getting Started • Optimizing Performance • Accessories (optional) Getting Started Use the information...
... click 'OK' button. 7. Double Click the 'Display' Icon. 4. For Windows Me file:///D|/Grace/K1/english/180p2m/install/gt_start.htm (1 of all the drivers in a specific location, so you can select the driver you want." Getting Started Getting Started Your LCD Monitor : Front View Product Description • Connecting to Your PC • Remove and Re-install the Base • Getting Started • Optimizing Performance • Accessories (optional) Getting Started Use the information...

User manual
Page 67
... then click on 'Update Driver...' Start Windows Me 2. Click the 'Start' button, point to 'Settings', and then click 'Control Panel'. 3. Double Click the 'Display' Icon. 4. Choose the 'Settings' tab then click 'Advanced...'. 5. Choose "Display a list of the known drivers for this device so that I can see the "Digital Signature Not Found" window then click the 'Yes' button. Click the 'OK' button then choose your monitor model and click the...
... then click on 'Update Driver...' Start Windows Me 2. Click the 'Start' button, point to 'Settings', and then click 'Control Panel'. 3. Double Click the 'Display' Icon. 4. Choose the 'Settings' tab then click 'Advanced...'. 5. Choose "Display a list of the known drivers for this device so that I can see the "Digital Signature Not Found" window then click the 'Yes' button. Click the 'OK' button then choose your monitor model and click the...

User manual
Page 81
... you encounter any problems with your problem quickly. q The full address to 18.00 hrs CET by using this Philips monitor. Should you have any difficulties while installing or using one of purchase, dealer name, model and product serial number. Or you within the second or third year of installation. O. q Other cards installed Having the following details so we will also help desks are designed...
... you encounter any problems with your problem quickly. q The full address to 18.00 hrs CET by using this Philips monitor. Should you have any difficulties while installing or using one of purchase, dealer name, model and product serial number. Or you within the second or third year of installation. O. q Other cards installed Having the following details so we will also help desks are designed...


