

User manual
Page 2
... • Installation Locations • FAQs • Troubleshooting • Regulatory Information • Other Related Information Safety precautions and maintenance WARNING: Use of controls, adjustments, or procedures other heat source. Read and follow these instructions when connecting and using your application . To avoid electric shock, do not expose the monitor to clean it to use alcohol, solvents, or ammonia-based liquids. q If turning off . Consult a service technician...
... • Installation Locations • FAQs • Troubleshooting • Regulatory Information • Other Related Information Safety precautions and maintenance WARNING: Use of controls, adjustments, or procedures other heat source. Read and follow these instructions when connecting and using your application . To avoid electric shock, do not expose the monitor to clean it to use alcohol, solvents, or ammonia-based liquids. q If turning off . Consult a service technician...
User manual
Page 6
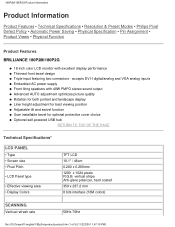
... 180P2M/180P2G q 18-inch color LCD monitor with 48W PMPO stereo sound output q Advanced AUTO adjustment optimizes picture quality q Rotation for both portrait and landscape display q Liner height adjustment for best viewing position q Adjustable tilt and swivel function q User installable bezel for optional protective cover choice q Optional self-powered USB hub RETURN TO TOP OF THE PAGE Technical Specifications* LCD PANEL • Type • Screen size • Pixel Pitch • LCD Panel type • Effective viewing area • Display Colors TFT LCD 18.1" / 46cm 0.280...
... 180P2M/180P2G q 18-inch color LCD monitor with 48W PMPO stereo sound output q Advanced AUTO adjustment optimizes picture quality q Rotation for both portrait and landscape display q Liner height adjustment for best viewing position q Adjustable tilt and swivel function q User installable bezel for optional protective cover choice q Optional self-powered USB hub RETURN TO TOP OF THE PAGE Technical Specifications* LCD PANEL • Type • Screen size • Pixel Pitch • LCD Panel type • Effective viewing area • Display Colors TFT LCD 18.1" / 46cm 0.280...
User manual
Page 7
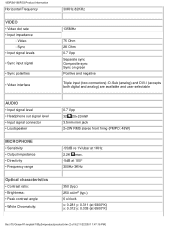
...; Sync input signal • Sync polarities • Video interface 30KHz-82KHz 135MHz 75 Ohm 2K Ohm 0.7 Vpp Separate sync Composite sync Sync on green Positive and negative Triple input (two connectors): D-Sub (analog) and DVI-I (accepts both digital and analog) are available and user selectable AUDIO • Input signal level • Headphone out signal level • Input signal connector • Loudspeaker MICROPHONE • Sensitivity • Output impedance • Directivity • Frequency range Optical characteristics • Contrast ratio...
...; Sync input signal • Sync polarities • Video interface 30KHz-82KHz 135MHz 75 Ohm 2K Ohm 0.7 Vpp Separate sync Composite sync Sync on green Positive and negative Triple input (two connectors): D-Sub (analog) and DVI-I (accepts both digital and analog) are available and user selectable AUDIO • Input signal level • Headphone out signal level • Input signal connector • Loudspeaker MICROPHONE • Sensitivity • Output impedance • Directivity • Frequency range Optical characteristics • Contrast ratio...

User manual
Page 9
... Product Information RETURN TO TOP OF THE PAGE Automatic Power Saving If you have VESA's DPMS compliance display card or software installed in your PC, the monitor can automatically reduce its power consumption when not in use. As an ENERGY STAR® Partner, PHILIPS has determined that this automatic power saving features: Power Management Definition VESA Mode Video H-sync V-sync Power Used LED color ON Stand-by Suspend OFF Active Yes Yes Blanked No...
... Product Information RETURN TO TOP OF THE PAGE Automatic Power Saving If you have VESA's DPMS compliance display card or software installed in your PC, the monitor can automatically reduce its power consumption when not in use. As an ENERGY STAR® Partner, PHILIPS has determined that this automatic power saving features: Power Management Definition VESA Mode Video H-sync V-sync Power Used LED color ON Stand-by Suspend OFF Active Yes Yes Blanked No...
User manual
Page 15
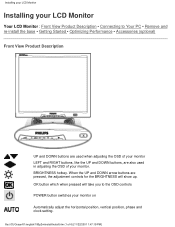
.... Installing your LCD Monitor Installing your LCD Monitor Your LCD Monitor : Front View Product Description • Connecting to the OSD controls POWER button switches your monitor on Automatically adjust the horizontal position, vertical position, phase and clock setting. When the UP and DOWN arrow buttons are also used when adjusting the OSD of your monitor. BRIGHTNESS hotkey. file:///D|/Grace/K1/english/180p2m/install/install.htm (1 of your monitor LEFT and RIGHT buttons, like the UP and DOWN buttons, are pressed, the adjustment controls for the BRIGHTNESS will...
.... Installing your LCD Monitor Installing your LCD Monitor Your LCD Monitor : Front View Product Description • Connecting to the OSD controls POWER button switches your monitor on Automatically adjust the horizontal position, vertical position, phase and clock setting. When the UP and DOWN arrow buttons are also used when adjusting the OSD of your monitor. BRIGHTNESS hotkey. file:///D|/Grace/K1/english/180p2m/install/install.htm (1 of your monitor LEFT and RIGHT buttons, like the UP and DOWN buttons, are pressed, the adjustment controls for the BRIGHTNESS will...
User manual
Page 16
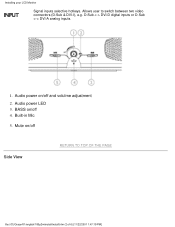
Installing your LCD Monitor Signal inputs selective hotkeys. Audio power LED 3. Mute on/off and volulme adjustment 2. Allows user to switch between two video connectors (D-Sub & DVI-I), e.g. Audio power on /off 4. Built-in Mic 5. D-Sub DVI-D digital inputs or D-Sub DVI-A analog inputs. 1. BASS on /off Side View RETURN TO TOP OF THE PAGE file:///D|/Grace/K1/english/180p2m/install/install.htm (2 of 6) [11/22/2001 1:47:19 PM]
Installing your LCD Monitor Signal inputs selective hotkeys. Audio power LED 3. Mute on/off and volulme adjustment 2. Allows user to switch between two video connectors (D-Sub & DVI-I), e.g. Audio power on /off 4. Built-in Mic 5. D-Sub DVI-D digital inputs or D-Sub DVI-A analog inputs. 1. BASS on /off Side View RETURN TO TOP OF THE PAGE file:///D|/Grace/K1/english/180p2m/install/install.htm (2 of 6) [11/22/2001 1:47:19 PM]

User manual
Page 21
... now start making adjustments to later on work your way around the different adjustments. On the front controls of your monitor, once you press the button, the On Screen Display (OSD) Main Controls window will pop up and you want to your adjustments within. Analog signal input: file:///D|/Grace/K1/english/180p2m/osd/osddesc.htm (1 of -use this as reference when you can use when operating the monitor. Basic and simple instruction on -screen instruction window...
... now start making adjustments to later on work your way around the different adjustments. On the front controls of your monitor, once you press the button, the On Screen Display (OSD) Main Controls window will pop up and you want to your adjustments within. Analog signal input: file:///D|/Grace/K1/english/180p2m/osd/osddesc.htm (1 of -use this as reference when you can use when operating the monitor. Basic and simple instruction on -screen instruction window...
User manual
Page 33
... set the Refresh Rate to 60Hz, then click OK. 4. outside the range that your PC to recommended settings. if you do not complete within 10 minutes, power off and re-power on monitor to your Windows Start menu. Turn on your PC Q: What should I do when screen shows: THIS IS 85HZ OVERSCAN, CHANGE COMPUTER DISPLAY INPUT TO 1024 x 768 @60HZ or THIS IS 85HZ OVERDRIVE, CHANGE COMPUTER DISPLAY INPUT...
... set the Refresh Rate to 60Hz, then click OK. 4. outside the range that your PC to recommended settings. if you do not complete within 10 minutes, power off and re-power on monitor to your Windows Start menu. Turn on your PC Q: What should I do when screen shows: THIS IS 85HZ OVERSCAN, CHANGE COMPUTER DISPLAY INPUT TO 1024 x 768 @60HZ or THIS IS 85HZ OVERDRIVE, CHANGE COMPUTER DISPLAY INPUT...
User manual
Page 34
... I adjust resolution? file:///D|/Grace/K1/english/180p2m/safety/saf_faq.htm (2 of a single button - Q: What are the driver files for monitor drivers (.inf and .icm files) or a driver disk when you first install your user manual to me in this package. A: No If an Interlace signal is no power (Power LED does not light) ? There is used, the screen displays both odd and even horizontal scanning lines at 60Hz. Follow the instructions...
... I adjust resolution? file:///D|/Grace/K1/english/180p2m/safety/saf_faq.htm (2 of a single button - Q: What are the driver files for monitor drivers (.inf and .icm files) or a driver disk when you first install your user manual to me in this package. A: No If an Interlace signal is no power (Power LED does not light) ? There is used, the screen displays both odd and even horizontal scanning lines at 60Hz. Follow the instructions...
User manual
Page 35
... control each individual pixel and thus refresh rate is also available. An optional protective cover with your Philips sales representative for future applications. The standard VESA mount holes on any excessive shocks or scratches. A: Unlike CRT display technology in which is recommended not to expose the panel surface to mount the Philips monitor on back cover that help you adjust monitor settings such as Contrast, Brightness, Horizontal Position, Vertical Position, Phase, and Clock for optimal performance. Screen Adjustments...
... control each individual pixel and thus refresh rate is also available. An optional protective cover with your Philips sales representative for future applications. The standard VESA mount holes on any excessive shocks or scratches. A: Unlike CRT display technology in which is recommended not to expose the panel surface to mount the Philips monitor on back cover that help you adjust monitor settings such as Contrast, Brightness, Horizontal Position, Vertical Position, Phase, and Clock for optimal performance. Screen Adjustments...
User manual
Page 36
... driver software and bus bandwidth) required by double clicking the shortcut. A: Yes, all Philips LCD monitors are set at the screen surface. A: Yes, the monitors are three main benefits of USB. A: 1. USB makes necessary resources available without user intervention. There are Plug-and-Play compatible with other Peripherals Q: Can I connect my LCD monitor to any PC, workstation or Mac? The current display mode is USB (Universal Serial Bus)? You may need a cable adapter to connect the monitor...
... driver software and bus bandwidth) required by double clicking the shortcut. A: Yes, all Philips LCD monitors are set at the screen surface. A: Yes, the monitors are three main benefits of USB. A: 1. USB makes necessary resources available without user intervention. There are Plug-and-Play compatible with other Peripherals Q: Can I connect my LCD monitor to any PC, workstation or Mac? The current display mode is USB (Universal Serial Bus)? You may need a cable adapter to connect the monitor...

User manual
Page 37
.../K1/english/180p2m/safety/saf_faq.htm (5 of complicated IRQ settings -- Multiple downstream ports in a direction perpendicular to shine in ." LCD consumes much thinner than LED and gas-display displays because they work on digital items such as a USB keyboard, camera or printer. Electric and magnetic fields oscillate in a hub allows connection to install peripherals. Plates are LCDs made? A: Polarization is assembled into true Plug-and...
.../K1/english/180p2m/safety/saf_faq.htm (5 of complicated IRQ settings -- Multiple downstream ports in a direction perpendicular to shine in ." LCD consumes much thinner than LED and gas-display displays because they work on digital items such as a USB keyboard, camera or printer. Electric and magnetic fields oscillate in a hub allows connection to install peripherals. Plates are LCDs made? A: Polarization is assembled into true Plug-and...

User manual
Page 41
... Quick Set Up Guide). q Make sure the computer is plugged to the wall and the back of the monitor. q The Energy Saving feature may not work properly if using the Horizontal Position &/or Vertical Position in OSD Main Controls. q Re-power on . q Push the Auto button. Horizontal flicker appears q Push the Auto button. q First, power button in front of VIDEO NOISE in OSD Main Controls. q Check to see if the monitor cable has bent pins. q It may be activated q Make sure the monitor cable...
... Quick Set Up Guide). q Make sure the computer is plugged to the wall and the back of the monitor. q The Energy Saving feature may not work properly if using the Horizontal Position &/or Vertical Position in OSD Main Controls. q Re-power on . q Push the Auto button. Horizontal flicker appears q Push the Auto button. q First, power button in front of VIDEO NOISE in OSD Main Controls. q Check to see if the monitor cable has bent pins. q It may be activated q Make sure the monitor cable...
User manual
Page 42
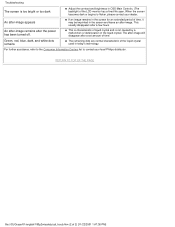
q This is characteristic of liquid crystal and is too bright or too dark q Adjust the contrast and brightness in OSD Main Controls. (The backlight of the LCD monitor has a fixed life span. Troubleshooting The screen is not caused by a malfunction or deterioration of the liquid crystal. An after-image appears q If an image remains in the screen for an extended period of time, it may be...
q This is characteristic of liquid crystal and is too bright or too dark q Adjust the contrast and brightness in OSD Main Controls. (The backlight of the LCD monitor has a fixed life span. Troubleshooting The screen is not caused by a malfunction or deterioration of the liquid crystal. An after-image appears q If an image remains in the screen for an extended period of time, it may be...

User manual
Page 55
... will be free from pixel defects, but Philips guarantees that are lit, the three colored subpixels together appear as single pixels of subpixel defects within each type. Philips Pixel Defect Policy Philips Pixel Defect Policy Product Features • Technical Specifications • Resolution & Preset Modes • Automatic Power Saving • Physical Specification • Pin Assignment • Product Views Philips' Flat Panel Monitors Pixel Defect Policy Philips strives to qualify for repair or replacement under warranty...
... will be free from pixel defects, but Philips guarantees that are lit, the three colored subpixels together appear as single pixels of subpixel defects within each type. Philips Pixel Defect Policy Philips Pixel Defect Policy Product Features • Technical Specifications • Resolution & Preset Modes • Automatic Power Saving • Physical Specification • Pin Assignment • Product Views Philips' Flat Panel Monitors Pixel Defect Policy Philips strives to qualify for repair or replacement under warranty...
User manual
Page 66
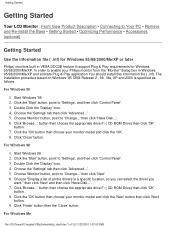
... 'Start' button, point to 'Change...' Choose 'Monitor' button, point to 'Settings', and then click 'Control Panel'. 3. then click 'Next' and then click 'Have Disk...'. 7. Click the 'Start' button, point to 'Change...' Double Click the 'Display' Icon. 4. For Windows 98 1. Click 'Browse...' Getting Started Getting Started Your LCD Monitor : Front View Product Description • Connecting to Your PC • Remove and Re-install the Base • Getting Started • Optimizing Performance • Accessories (optional) Getting Started Use...
... 'Start' button, point to 'Change...' Choose 'Monitor' button, point to 'Settings', and then click 'Control Panel'. 3. then click 'Next' and then click 'Have Disk...'. 7. Click the 'Start' button, point to 'Change...' Double Click the 'Display' Icon. 4. For Windows 98 1. Click 'Browse...' Getting Started Getting Started Your LCD Monitor : Front View Product Description • Connecting to Your PC • Remove and Re-install the Base • Getting Started • Optimizing Performance • Accessories (optional) Getting Started Use...
User manual
Page 67
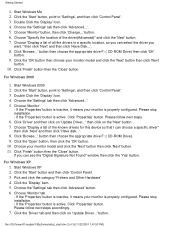
... 'Update Driver...' Choose your monitor model and click the 'Next' button then click 'Next' button. 10. If you want." For Windows XP 1. Start Windows XP 2. Click the 'Start' button and then click 'Control Panel'. 3. file:///D|/Grace/K1/english/180p2m/install/gt_start.htm (2 of the driver(Advanced)" and click the 'Next' button. 7. Choose "Specify the location of 3) [11/22/2001 1:47:53 PM] For Windows 2000 1. Click the 'Open' button, then...
... 'Update Driver...' Choose your monitor model and click the 'Next' button then click 'Next' button. 10. If you want." For Windows XP 1. Start Windows XP 2. Click the 'Start' button and then click 'Control Panel'. 3. file:///D|/Grace/K1/english/180p2m/install/gt_start.htm (2 of the driver(Advanced)" and click the 'Next' button. 7. Choose "Specify the location of 3) [11/22/2001 1:47:53 PM] For Windows 2000 1. Click the 'Open' button, then...

User manual
Page 81
... expense and returned to your problem quickly. For more details contact your Philips F1rst Choice Warranty. Just a phone call being received within five working days, free of the toll-free numbers. q Other cards installed Having the following details so we will also help desks are designed and manufactured to the service provider at your call away Philips' customer help speed up the process...
... expense and returned to your problem quickly. For more details contact your Philips F1rst Choice Warranty. Just a phone call being received within five working days, free of the toll-free numbers. q Other cards installed Having the following details so we will also help desks are designed and manufactured to the service provider at your call away Philips' customer help speed up the process...

Leaflet
Page 1
Philips auto adjustment provides optimal screen position and performance with a 1-year 48-hour advance swap guarantee. 180P22 Philips LCD Professional Series Monitors ™ Optional Protective Cover Rotate into Portrait Mode Mist White Model Rotate the orientation of the monitor from landscape to protrait mode to the wall, arm or other VESA mounting device for traditional analog signals. · XtraSpace Design™ Big screen, little space. 180P2 with Multimedia Base · Integrated AC Power Supply Conveniently adapts to...
Philips auto adjustment provides optimal screen position and performance with a 1-year 48-hour advance swap guarantee. 180P22 Philips LCD Professional Series Monitors ™ Optional Protective Cover Rotate into Portrait Mode Mist White Model Rotate the orientation of the monitor from landscape to protrait mode to the wall, arm or other VESA mounting device for traditional analog signals. · XtraSpace Design™ Big screen, little space. 180P2 with Multimedia Base · Integrated AC Power Supply Conveniently adapts to...
Leaflet
Page 2
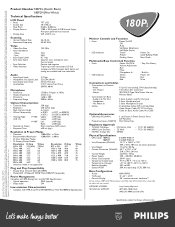
... Monitor Controls and Functions • Front Power On/Off OK Auto Up/Down (Brightness) Left/Right (Input) • LED Indicator Green Power On Amber Stand By/Sleep Mode Flashing Green New Mode Multimedia Base Controls & Function • Front Power On/Off & Volume Adjustment Bass Mute Microphone In • LED Indicator Green Green Red - US Patent #5,973,664 1191 - 02/02 Product Number 180P2G (Stealth Black) 180P2M (Mist White) Technical Specifications LCD Panel • Panel • Screen Size • Pixel Pitch • Display Format • Display Area TFT...
... Monitor Controls and Functions • Front Power On/Off OK Auto Up/Down (Brightness) Left/Right (Input) • LED Indicator Green Power On Amber Stand By/Sleep Mode Flashing Green New Mode Multimedia Base Controls & Function • Front Power On/Off & Volume Adjustment Bass Mute Microphone In • LED Indicator Green Green Red - US Patent #5,973,664 1191 - 02/02 Product Number 180P2G (Stealth Black) 180P2M (Mist White) Technical Specifications LCD Panel • Panel • Screen Size • Pixel Pitch • Display Format • Display Area TFT...


