Leaflet
Page 1
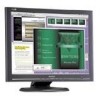
... monitor. · Adjustable Viewing Height You can position the screen to a variety of external power supplies. · Advanced AUTOmatic Adjustment optimizes picture quality A perfect picture is only three seconds away. Delivers a front-to-back depth and bezel width that leads the industry. 190B44 · 19-inch Color LCD SXGA Monitor Enjoy excellent display performance providing an optimum resolution of 1280 x 1024 for amazing image clarity. · Standard VGA Analog Input Provides support for traditional analog signals...
... monitor. · Adjustable Viewing Height You can position the screen to a variety of external power supplies. · Advanced AUTOmatic Adjustment optimizes picture quality A perfect picture is only three seconds away. Delivers a front-to-back depth and bezel width that leads the industry. 190B44 · 19-inch Color LCD SXGA Monitor Enjoy excellent display performance providing an optimum resolution of 1280 x 1024 for amazing image clarity. · Standard VGA Analog Input Provides support for traditional analog signals...
Leaflet
Page 2
... and Windows are D-Sub (analog) only. CCM-141 2/04 Literature Order Number: 190B4CB/74 / 190B4CS/74 Product Number 190B4CB/74 (Stealth Black) 190B4CS/74 (Silver-Black) Technical Specifications LCD • Panel • Screen Size (inch/cm) • Pixel Pitch • Display Format • Display Area • Display Colors Scanning • Vertical Refresh Rate • Horizontal Frequency Video • Video Dot Rate • Input Impedance -Video -Sync • Input Signal Levels • Sync Input Signal • Sync Polarities • Video Interface TFT LCD 19 inch / 48...
... and Windows are D-Sub (analog) only. CCM-141 2/04 Literature Order Number: 190B4CB/74 / 190B4CS/74 Product Number 190B4CB/74 (Stealth Black) 190B4CS/74 (Silver-Black) Technical Specifications LCD • Panel • Screen Size (inch/cm) • Pixel Pitch • Display Format • Display Area • Display Colors Scanning • Vertical Refresh Rate • Horizontal Frequency Video • Video Dot Rate • Input Impedance -Video -Sync • Input Signal Levels • Sync Input Signal • Sync Polarities • Video Interface TFT LCD 19 inch / 48...
User manual
Page 2
.... q If turning off the power. Safety & Troubleshooting Safety and Troubleshooting Information Safety Precautions and Maintenance • Installation Locations • FAQs • Troubleshooting • Regulatory Information • Other Related Information Safety precautions and maintenance WARNING: Use of controls, adjustments, or procedures other heat source. q When positioning the monitor, make sure the power plug and outlet are followed. If a still image in the LCD technology. q IMPORTANT: Always activate a screen saver...
.... q If turning off the power. Safety & Troubleshooting Safety and Troubleshooting Information Safety Precautions and Maintenance • Installation Locations • FAQs • Troubleshooting • Regulatory Information • Other Related Information Safety precautions and maintenance WARNING: Use of controls, adjustments, or procedures other heat source. q When positioning the monitor, make sure the power plug and outlet are followed. If a still image in the LCD technology. q IMPORTANT: Always activate a screen saver...
User manual
Page 4
... overview of worldwide Philips Consumer Information Centers along with help desk phone numbers and information on your hard drive for this document. q On-Screen Display provides information on adjusting the settings on the warranty applicable to your monitor. q Installing Your Monitor describes the initial setup process and gives an overview of 2) [8/8/03 3:35:24 PM] It describes the LCD monitor's features, setup, operation and...
... overview of worldwide Philips Consumer Information Centers along with help desk phone numbers and information on your hard drive for this document. q On-Screen Display provides information on adjusting the settings on the warranty applicable to your monitor. q Installing Your Monitor describes the initial setup process and gives an overview of 2) [8/8/03 3:35:24 PM] It describes the LCD monitor's features, setup, operation and...

User manual
Page 6
...8226; Resolution & Preset Modes • Philips Pixel Defect Policy • Automatic Power Saving • Physical Specification • Pin Assignment • Product Views • Physical Function Product Features 190B4CG/190B4CB/190B4CS q 19-inch color LCD monitor with excellent display performance q Dual input - accepts DVI-D digital and VGA analog inputs q Embedded universal AC power supply q Advanced AUTO adjustment optimizes picture quality q Adjustable tilt and swivel function q Adjustable viewing height q sRGB compliant RETURN TO TOP OF THE PAGE Technical Specifications* LCD PANEL...
...8226; Resolution & Preset Modes • Philips Pixel Defect Policy • Automatic Power Saving • Physical Specification • Pin Assignment • Product Views • Physical Function Product Features 190B4CG/190B4CB/190B4CS q 19-inch color LCD monitor with excellent display performance q Dual input - accepts DVI-D digital and VGA analog inputs q Embedded universal AC power supply q Advanced AUTO adjustment optimizes picture quality q Adjustable tilt and swivel function q Adjustable viewing height q sRGB compliant RETURN TO TOP OF THE PAGE Technical Specifications* LCD PANEL...

User manual
Page 8
... modes 15 factory preset modes: file:///D|/M/english/190b4cgbs/product/product.htm (3 of colors between different devices (e.g. To do so, open the OSD by an sRGB compatible device correctly on your monitor. For more information on the front of your monitor. Important with the use of sRGB is that way, the colors are calibrated and you change without notice. Exit this , please don't change the brightness or contrast setting...
... modes 15 factory preset modes: file:///D|/M/english/190b4cgbs/product/product.htm (3 of colors between different devices (e.g. To do so, open the OSD by an sRGB compatible device correctly on your monitor. For more information on the front of your monitor. Important with the use of sRGB is that way, the colors are calibrated and you change without notice. Exit this , please don't change the brightness or contrast setting...

User manual
Page 15
... used when adjusting the OSD of your monitor. Installing your LCD Monitor Installing your LCD Monitor Your LCD Monitor : Front View Product Description • Connecting to switch between two video connectors (D-Sub & DVI-D) BRIGHTNESS hotkey. Allows user to Your PC • The base • Getting Started • Optimizing Performance Front View Product Description UP and DOWN buttons are used in adjusting the OSD of your monitor LEFT and RIGHT buttons, like the UP and DOWN buttons, are pressed, the adjustment controls for the BRIGHTNESS...
... used when adjusting the OSD of your monitor. Installing your LCD Monitor Installing your LCD Monitor Your LCD Monitor : Front View Product Description • Connecting to switch between two video connectors (D-Sub & DVI-D) BRIGHTNESS hotkey. Allows user to Your PC • The base • Getting Started • Optimizing Performance Front View Product Description UP and DOWN buttons are used in adjusting the OSD of your monitor LEFT and RIGHT buttons, like the UP and DOWN buttons, are pressed, the adjustment controls for the BRIGHTNESS...

User manual
Page 16
... to the OSD controls POWER button switches your monitor on the item called RESOLUTION. Click on this program. The current display mode is shown on Automatically adjust the horizontal position, vertical position, phase and clock setting. Installing your LCD Monitor OK button which when pressed will take you through the installtion process. RETURN TO TOP OF THE PAGE Optimizing Performance q For best performance, ensure that your display settings are provided to guide you to...
... to the OSD controls POWER button switches your monitor on the item called RESOLUTION. Click on this program. The current display mode is shown on Automatically adjust the horizontal position, vertical position, phase and clock setting. Installing your LCD Monitor OK button which when pressed will take you through the installtion process. RETURN TO TOP OF THE PAGE Optimizing Performance q For best performance, ensure that your display settings are provided to guide you to...

User manual
Page 30
... display. Select Settings, then Control Panel. Turn on your monitor and then turn on the Advanced button. Select Display. file:///D|/M/english/190b4cgbs/safety/saf_faq.htm FAQs (Frequently Asked Questions) Safety and Troubleshooting • General FAQ • Screen Adjustments • Compatibility with 10 minutes to reset timing to recommended settings. A: Recommended video mode for Philips 14"/15": 1024x768 @60Hz for Philips 17"/18"/19" 1280x1024@60Hz. 1. In the Windows Start Menu, select Settings/Control Panel. New Generation LCD intelligent monitor...
... display. Select Settings, then Control Panel. Turn on your monitor and then turn on the Advanced button. Select Display. file:///D|/M/english/190b4cgbs/safety/saf_faq.htm FAQs (Frequently Asked Questions) Safety and Troubleshooting • General FAQ • Screen Adjustments • Compatibility with 10 minutes to reset timing to recommended settings. A: Recommended video mode for Philips 14"/15": 1024x768 @60Hz for Philips 17"/18"/19" 1280x1024@60Hz. 1. In the Windows Start Menu, select Settings/Control Panel. New Generation LCD intelligent monitor...

User manual
Page 31
... an LCD monitor? Q: What does 'refresh rate' mean in connection with the 'Display properties/Settings' control panel. A: Simply press the OSD button, then select 'Reset' to navigate through OSD menus and control keys. A: The AUTO adjustment key restores the optimal screen position, phase and clock settings at 60Hz. without the need to recall all of much less relevance for monitor drivers (.inf and .icm files) or a driver disk when you first install your monitor. file:///D|/M/english/190b4cgbs...
... an LCD monitor? Q: What does 'refresh rate' mean in connection with the 'Display properties/Settings' control panel. A: Simply press the OSD button, then select 'Reset' to navigate through OSD menus and control keys. A: The AUTO adjustment key restores the optimal screen position, phase and clock settings at 60Hz. without the need to recall all of much less relevance for monitor drivers (.inf and .icm files) or a driver disk when you first install your monitor. file:///D|/M/english/190b4cgbs...

User manual
Page 33
..."/18"/19". The current display mode is the FPadjust program on any VESA standard ARM or accessories. A: 1. Check with your desktop. 3. Note: You can check the current display settings by pressing the OSD OK button once. file:///D|/M/english/190b4cgbs/safety/saf_faq.htm Q: Can the Philips LCD Monitor be mounted on the monitor set-up disk and CD-ROM? To install the Flat Panel Adjust (FPadjust) program located on the wall or used as Contrast, Brightness, Horizontal Position, Vertical Position...
..."/18"/19". The current display mode is the FPadjust program on any VESA standard ARM or accessories. A: 1. Check with your desktop. 3. Note: You can check the current display settings by pressing the OSD OK button once. file:///D|/M/english/190b4cgbs/safety/saf_faq.htm Q: Can the Philips LCD Monitor be mounted on the monitor set-up disk and CD-ROM? To install the Flat Panel Adjust (FPadjust) program located on the wall or used as Contrast, Brightness, Horizontal Position, Vertical Position...

User manual
Page 34
... need a cable adapter to connect the monitor to optimize image performance with "port file:///D|/M/english/190b4cgbs/safety/saf_faq.htm (5 of complicated IRQ settings -- Please contact your Mac system. Follow the instructions step by step to your dealer/retailer for more information. Q: How do not generate the same amount of removing the computer case to any PC, workstation or Mac? A: Yes, all Philips LCD monitors are fully compatible with CRTs...
... need a cable adapter to connect the monitor to optimize image performance with "port file:///D|/M/english/190b4cgbs/safety/saf_faq.htm (5 of complicated IRQ settings -- Please contact your Mac system. Follow the instructions step by step to your dealer/retailer for more information. Q: How do not generate the same amount of removing the computer case to any PC, workstation or Mac? A: Yes, all Philips LCD monitors are fully compatible with CRTs...

User manual
Page 36
... propagation of the liquid crystal molecules and goes through 90 degrees. Therefore, CRT monitors basically operate with pixels located at each intersection in an active matrix display can be switched on a polarized light pole, the light that displays an input image by operating a liquid crystal panel. The TFT has a file:///D|/M/english/190b4cgbs/safety/saf_faq.htm (7 of the TFT LCD panel a data source drive and a gate drive and attached...
... propagation of the liquid crystal molecules and goes through 90 degrees. Therefore, CRT monitors basically operate with pixels located at each intersection in an active matrix display can be switched on a polarized light pole, the light that displays an input image by operating a liquid crystal panel. The TFT has a file:///D|/M/english/190b4cgbs/safety/saf_faq.htm (7 of the TFT LCD panel a data source drive and a gate drive and attached...

User manual
Page 37
... liquid crystal. A: Technically speaking, LCDs do flicker, but the cause of 60Hz optimal for XGA displays. and it . A TFT LCD has two glass panels and the space between positive and negative voltage. For example, an XGA monitor has 1024x3 (R, G, B) x 768 pixels and a higher resolution may not be very thin and no flickering occurs because it work? Since the vertical/horizontal frequency for this dot clock is...
... liquid crystal. A: Technically speaking, LCDs do flicker, but the cause of 60Hz optimal for XGA displays. and it . A TFT LCD has two glass panels and the space between positive and negative voltage. For example, an XGA monitor has 1024x3 (R, G, B) x 768 pixels and a higher resolution may not be very thin and no flickering occurs because it work? Since the vertical/horizontal frequency for this dot clock is...

User manual
Page 39
... the Quick Set Up Guide). q Check to see if the monitor cable has bent pins. q It may be corrected by the user. If the problem still exists after these items q Make sure the Power cable is plugged to the wall and the back of the monitor should be in OSD Main Controls. Screen says q Make sure the vertical sync of input signal is within the range of 2) [8/8/03 3:36:03 PM] No Picture (Power LED is...
... the Quick Set Up Guide). q Check to see if the monitor cable has bent pins. q It may be corrected by the user. If the problem still exists after these items q Make sure the Power cable is plugged to the wall and the back of the monitor should be in OSD Main Controls. Screen says q Make sure the vertical sync of input signal is within the range of 2) [8/8/03 3:36:03 PM] No Picture (Power LED is...

User manual
Page 40
... graphics board or PC. Troubleshooting Image vibrates on the screen Vertical flicker appears q Check that the signal cable is properly connected to contact your dealer. The after-image will disappear after the power has been turned off. The screen is too bright or too dark q Adjust the contrast and brightness in OSD Main Controls. (The backlight of time, it may be imprinted in the screen for an extended period of the LCD monitor has a fixed...
... graphics board or PC. Troubleshooting Image vibrates on the screen Vertical flicker appears q Check that the signal cable is properly connected to contact your dealer. The after-image will disappear after the power has been turned off. The screen is too bright or too dark q Adjust the contrast and brightness in OSD Main Controls. (The backlight of time, it may be imprinted in the screen for an extended period of the LCD monitor has a fixed...

User manual
Page 58
... sub pixels of lit and dark sub pixels appear as a single black pixel. Furthermore, Philips sets even higher quality standards for each type. Other combinations of a pixel are sometimes unavoidable. Philips Pixel Defect Policy Philips Pixel Defect Policy Product Features • Technical Specifications • Resolution & Preset Modes • Automatic Power Saving • Physical Specification • Pin Assignment • Product Views Philips' Flat Panel Monitors Pixel Defect Policy Philips strives to qualify for repair or replacement under...
... sub pixels of lit and dark sub pixels appear as a single black pixel. Furthermore, Philips sets even higher quality standards for each type. Other combinations of a pixel are sometimes unavoidable. Philips Pixel Defect Policy Philips Pixel Defect Policy Product Features • Technical Specifications • Resolution & Preset Modes • Automatic Power Saving • Physical Specification • Pin Assignment • Product Views Philips' Flat Panel Monitors Pixel Defect Policy Philips strives to qualify for repair or replacement under...
User manual
Page 69
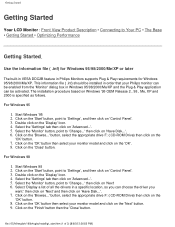
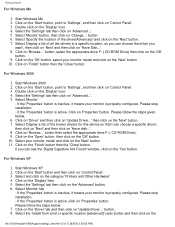
... a specific location, so you want.' Click on 'Control Panel'. 3. Click on the 'Start' button, point to 'Settings', and then click on the 'Browse...' Click on the 'Next' button. 9. Click on the 'OK' button then select your monitor model and click on the 'Browse...' Getting Started Getting Started Your LCD Monitor : Front View Product Description • Connecting to Your PC • The Base • Getting Started • Optimizing Performance Getting Started Use...
... a specific location, so you want.' Click on 'Control Panel'. 3. Click on the 'Start' button, point to 'Settings', and then click on the 'Browse...' Click on the 'Next' button. 9. Click on the 'OK' button then select your monitor model and click on the 'Browse...' Getting Started Getting Started Your LCD Monitor : Front View Product Description • Connecting to Your PC • The Base • Getting Started • Optimizing Performance Getting Started Use...
User manual
Page 70
... the 'Next' button. 7. Select 'Monitor' tab - Select 'Monitor' button, then click on 'Finish' button then the 'Close' button. If the 'Properties' button is inactive, it means your monitor is active. Click on 'Change...' Click on the 'Start' button, point to 'Settings', and then click on 'Update Driver...' Click on 'Control Panel'. 3. Click on the 'Display' Icon. 4. Select the 'Install from a list or specific location [advanced]' radio button and then click...
... the 'Next' button. 7. Select 'Monitor' tab - Select 'Monitor' button, then click on 'Finish' button then the 'Close' button. If the 'Properties' button is inactive, it means your monitor is active. Click on 'Change...' Click on the 'Start' button, point to 'Settings', and then click on 'Update Driver...' Click on 'Control Panel'. 3. Click on the 'Display' Icon. 4. Select the 'Install from a list or specific location [advanced]' radio button and then click...

User manual
Page 77
... Three years free parts and three years free labor will repair it after it has been sent to the service provider at Philips Canada depot or any one of its authorized service centers. (In Canada, this warranty is given in addition to your Philips F1rst file:///D|/M/english/warranty/war_usa.htm (3 of 4) [8/8/03 3:37:05 PM] Philips Customer Care Center, P. MODEL SERIAL This...
... Three years free parts and three years free labor will repair it after it has been sent to the service provider at Philips Canada depot or any one of its authorized service centers. (In Canada, this warranty is given in addition to your Philips F1rst file:///D|/M/english/warranty/war_usa.htm (3 of 4) [8/8/03 3:37:05 PM] Philips Customer Care Center, P. MODEL SERIAL This...

