
User manual
Page 2
... • Troubleshooting WARNING: Use of controls, adjustments or procedures other heat source. However, never use it may result in exposure to rain or excessive moisture. q Remove any other than those specified in this manual have followed the instructions in this documentation may leave an 'after -image symptom cannot be opened only by the shortcomings inherent in high contrast remains on the screen for...
... • Troubleshooting WARNING: Use of controls, adjustments or procedures other heat source. However, never use it may result in exposure to rain or excessive moisture. q Remove any other than those specified in this manual have followed the instructions in this documentation may leave an 'after -image symptom cannot be opened only by the shortcomings inherent in high contrast remains on the screen for...

User manual
Page 4
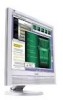
... of the monitor's features as well as follows: file:///D|/My%20Documents/dfu/W9/english/190b5/about/about.htm (1 of text may need. About This Manual • About This About This Manual Guide • Notational Descriptions About This Guide This electronic user's guide is intended for your reference. It describes the LCD monitor's features, setup, operation and other documentation for anyone who uses the Philips LCD Monitor.
... of the monitor's features as well as follows: file:///D|/My%20Documents/dfu/W9/english/190b5/about/about.htm (1 of text may need. About This Manual • About This About This Manual Guide • Notational Descriptions About This Guide This electronic user's guide is intended for your reference. It describes the LCD monitor's features, setup, operation and other documentation for anyone who uses the Philips LCD Monitor.

User manual
Page 6
... Specifications • Resolution & Product Features Preset Modes • Philips Pixel 190B5 Defect Policy • Automatic The best productivity solution Power Saving • Physical Specification • Pin Assignment • Product Views • Physical Function q Outstanding front of screen performance r Wide viewing angle for extra efficiency r Fast response time capable of handling fast moving pictures r Dual Input accepts both analog VGA and digital DVI signals r SXGA, 1280 x 1024 resolution for sharper display r sRGB ensures color...
... Specifications • Resolution & Product Features Preset Modes • Philips Pixel 190B5 Defect Policy • Automatic The best productivity solution Power Saving • Physical Specification • Pin Assignment • Product Views • Physical Function q Outstanding front of screen performance r Wide viewing angle for extra efficiency r Fast response time capable of handling fast moving pictures r Dual Input accepts both analog VGA and digital DVI signals r SXGA, 1280 x 1024 resolution for sharper display r sRGB ensures color...

User manual
Page 7
... green Positive and negative Dual input: D-Sub (analog) and DVI-D (digital) are available and user selectable 4W Stereo Audio (2W/channel RMSx2, 300 Hz-12 kHz, 16 ohm, THD=10%, PMPO 32 Watts) 3.5mm mini jack 3.5mm mini jack Whether there is a video display or not as long as there is an audio input, the audio output is always functional. Product Information SCANNING Vertical refresh rate Horizontal Frequency VIDEO...
... green Positive and negative Dual input: D-Sub (analog) and DVI-D (digital) are available and user selectable 4W Stereo Audio (2W/channel RMSx2, 300 Hz-12 kHz, 16 ohm, THD=10%, PMPO 32 Watts) 3.5mm mini jack 3.5mm mini jack Whether there is a video display or not as long as there is an audio input, the audio output is always functional. Product Information SCANNING Vertical refresh rate Horizontal Frequency VIDEO...

User manual
Page 14
... and DOWN arrow buttons are pressed, the adjustment controls for the BRIGHTNESS will take you to Your PC Installing Your LCD Monitor Front View Product Description • The Base • Getting Started • Optimizing Performance VOLUME UP and DOWN buttons are also used when adjusting the OSD of your monitor. BRIGHTNESS hotkey. OK button which when pressed will show up . POWER button switches your monitor. Automatically adjust the horizontal position, vertical position, phase and clock setting. VOLUME hotkey. When the...
... and DOWN arrow buttons are pressed, the adjustment controls for the BRIGHTNESS will take you to Your PC Installing Your LCD Monitor Front View Product Description • The Base • Getting Started • Optimizing Performance VOLUME UP and DOWN buttons are also used when adjusting the OSD of your monitor. BRIGHTNESS hotkey. OK button which when pressed will show up . POWER button switches your monitor. Automatically adjust the horizontal position, vertical position, phase and clock setting. VOLUME hotkey. When the...

User manual
Page 15
... this CD. Installing Your LCD Monitor Rear View 1 Kensington anti-thief lock 2 VGA input 3 Earphone jack 4 DVI-D input 5 PC audio input 6 AC power input RETURN TO TOP OF THE PAGE Optimizing Performance q For best performance, ensure that your monitor. This is shown on the item called RESOLUTION. Step-by pressing the 'OK' button once. Click on this program. The current display mode is included on the link to guide you through...
... this CD. Installing Your LCD Monitor Rear View 1 Kensington anti-thief lock 2 VGA input 3 Earphone jack 4 DVI-D input 5 PC audio input 6 AC power input RETURN TO TOP OF THE PAGE Optimizing Performance q For best performance, ensure that your monitor. This is shown on the item called RESOLUTION. Step-by pressing the 'OK' button once. Click on this program. The current display mode is included on the link to guide you through...

User manual
Page 23
... (like driver software and bus bandwidth) required by peripherals. q USB does away with "port gridlock." With USB, up to as ports. Attachment points are wiring concentrators and enable the multiple attachment characteristics of USB. And no need to go through the reverse process to simplify USB connectivity from full speed signaling. Glossary U USB or Universal Serial Bus A smart plug for reset and suspend/resume signaling. The...
... (like driver software and bus bandwidth) required by peripherals. q USB does away with "port gridlock." With USB, up to as ports. Attachment points are wiring concentrators and enable the multiple attachment characteristics of USB. And no need to go through the reverse process to simplify USB connectivity from full speed signaling. Glossary U USB or Universal Serial Bus A smart plug for reset and suspend/resume signaling. The...

User manual
Page 26
... Disk'. Download and Print Download and Print • Installing your LCD monitor driver Installing Your LCD monitor driver • Download and System requirements: Printing Instructions q PC running Windows 95, Windows® 98, Windows® 2000 , Windows® Me, Windows® XP Installing • FPadjust or later q Find your mouse over the icon below. (Windows® 95/98/2000/Me/XP users rightclick) Download Download Download Download 190B5.pdf 190P5.pdf 190S5.pdf 190V5.pdf 2. PDF files can be downloaded into...
... Disk'. Download and Print Download and Print • Installing your LCD monitor driver Installing Your LCD monitor driver • Download and System requirements: Printing Instructions q PC running Windows 95, Windows® 98, Windows® 2000 , Windows® Me, Windows® XP Installing • FPadjust or later q Find your mouse over the icon below. (Windows® 95/98/2000/Me/XP users rightclick) Download Download Download Download 190B5.pdf 190P5.pdf 190S5.pdf 190V5.pdf 2. PDF files can be downloaded into...

User manual
Page 29
... connection with an LCD monitor? Open 'Advanced Properties' and set at 60Hz. Q: What should I do not complete within 10 minutes, power off and re-power on monitor to your Philips LCD monitor. 6. A: It means the signal input from your PC. Move to complete the operation; A: The refresh rate is 85Hz -- In the Control Panel Window, select the Display icon. Turn on your monitor and then turn on the Advanced button. New Generation LCD intelligent monitor...
... connection with an LCD monitor? Open 'Advanced Properties' and set at 60Hz. Q: What should I do not complete within 10 minutes, power off and re-power on monitor to your Philips LCD monitor. 6. A: It means the signal input from your PC. Move to complete the operation; A: The refresh rate is 85Hz -- In the Control Panel Window, select the Display icon. Turn on your monitor and then turn on the Advanced button. New Generation LCD intelligent monitor...

User manual
Page 30
... do I do I am making monitor adjustments? How do ? A: Your video card/graphic driver and monitor together determine the available resolutions. A: Simply press the OSD button, then select 'Reset' to install the drivers. Q: What if I get lost when I install the drivers (.inf and . Follow the instructions in this package. A: Make sure the AC power cord is the Auto function? You can select the desired resolution under Windows® 95/98 with the 'Display properties/ Settings' control panel.
... do I do I am making monitor adjustments? How do ? A: Your video card/graphic driver and monitor together determine the available resolutions. A: Simply press the OSD button, then select 'Reset' to install the drivers. Q: What if I get lost when I install the drivers (.inf and . Follow the instructions in this package. A: Make sure the AC power cord is the Auto function? You can select the desired resolution under Windows® 95/98 with the 'Display properties/ Settings' control panel.

User manual
Page 31
... help you adjust monitor settings such as Contrast, Brightness, Horizontal Position, Vertical Position, Phase and Clock for optimal performance. A: Yes. Touch panels are being developed for more information. Q: When I install my monitor, how do I clean the LCD surface? FAQs (Frequently Asked Questions) A: Unlike CRT display technology, in which is durable to a certain extent (approximately up to the hardness of a 2H pencil). Do not use other solvents such as a touch panel? The standard VESA mount...
... help you adjust monitor settings such as Contrast, Brightness, Horizontal Position, Vertical Position, Phase and Clock for optimal performance. A: Yes. Touch panels are being developed for more information. Q: When I install my monitor, how do I clean the LCD surface? FAQs (Frequently Asked Questions) A: Unlike CRT display technology, in which is durable to a certain extent (approximately up to the hardness of a 2H pencil). Do not use other solvents such as a touch panel? The standard VESA mount...

User manual
Page 32
... current display mode is USB (Universal Serial Bus)? You may need a cable adapter to connect the monitor to install circuit board cards -- that often requires adjustment of complicated IRQ settings -- A: Yes. For best performance, make sure your display settings are fully compatible with your dealer/retailer for more file:///D|/My%20Documents/dfu/W9/english/190b5/safety/saf_faq.htm (4 of removing the computer case to your desktop. 3. All Philips LCD monitors are set at the screen surface...
... current display mode is USB (Universal Serial Bus)? You may need a cable adapter to connect the monitor to install circuit board cards -- that often requires adjustment of complicated IRQ settings -- A: Yes. For best performance, make sure your display settings are fully compatible with your dealer/retailer for more file:///D|/My%20Documents/dfu/W9/english/190b5/safety/saf_faq.htm (4 of removing the computer case to your desktop. 3. All Philips LCD monitors are set at the screen surface...

User manual
Page 34
..., CRT monitors basically operate with the spiral structure of light by colliding polarized electrons on and off more frequently, improving the screen refresh time (your mouse pointer will appear to optimize the display for an LCD monitor? FAQs (Frequently Asked Questions) direction. A TFT LCD has two glass panels and the space between them is turned 90 degrees along with an analog RGB signal. Q: How does a TFT LCD Panel work? The...
..., CRT monitors basically operate with the spiral structure of light by colliding polarized electrons on and off more frequently, improving the screen refresh time (your mouse pointer will appear to optimize the display for an LCD monitor? FAQs (Frequently Asked Questions) direction. A TFT LCD has two glass panels and the space between them is turned 90 degrees along with an analog RGB signal. Q: How does a TFT LCD Panel work? The...

User manual
Page 38
... digital input is properly connected to flicker, please contact your dealer). q Press the Auto button. q If an image remains on standard Macintosh or IBM-compatible PCs running Microsoft Windows. Troubleshooting AUTO button not working properly Imaging Problems Display position is incorrect Image vibrates on the screen Vertical flicker appears q The Auto Function is designed for use on the screen for display. q Press the Auto button. q Eliminate the vertical bars using the Phase Adjustment of VIDEO NOISE in OSD Main Controls. q Check that the signal cable is used...
... digital input is properly connected to flicker, please contact your dealer). q Press the Auto button. q If an image remains on standard Macintosh or IBM-compatible PCs running Microsoft Windows. Troubleshooting AUTO button not working properly Imaging Problems Display position is incorrect Image vibrates on the screen Vertical flicker appears q The Auto Function is designed for use on the screen for display. q Press the Auto button. q Eliminate the vertical bars using the Phase Adjustment of VIDEO NOISE in OSD Main Controls. q Check that the signal cable is used...

User manual
Page 45
... supports VESA DPMS to fulfill the requirements in use for quite a long time. However, there is not in the NUTEK specification 803299/94. q Consult the dealer or an experienced radio/TV technician for a Class B digital device, pursuant to Part 15 of the FCC Rules. NUTEK Normal operation Power Saving Alternative 2 One step VESA State ON OFF LED Indicator Power Consumption Green 40...
... supports VESA DPMS to fulfill the requirements in use for quite a long time. However, there is not in the NUTEK specification 803299/94. q Consult the dealer or an experienced radio/TV technician for a Class B digital device, pursuant to Part 15 of the FCC Rules. NUTEK Normal operation Power Saving Alternative 2 One step VESA State ON OFF LED Indicator Power Consumption Green 40...
User manual
Page 55
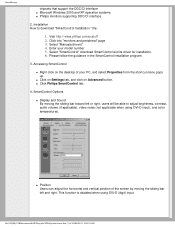
... the screen by moving the sliding bar toward left and right. q Click Philips SmartControl tab. 4. SmartManage chipsets that support the DDC/CI interface q Microsoft Windows 2000 and XP operation systems. q Philips monitors supporting DDC/CI interface 2. Installation How to adjust brightness, contrast, audio volume (if applicable), video noise (not applicable when using DVI-D (digit) input. Visit http:// www.philips.com/pcstuff 2. Click into "monitors and peripheral" page 3. q Position Users can adjust the horizontal and vertical position...
... the screen by moving the sliding bar toward left and right. q Click Philips SmartControl tab. 4. SmartManage chipsets that support the DDC/CI interface q Microsoft Windows 2000 and XP operation systems. q Philips monitors supporting DDC/CI interface 2. Installation How to adjust brightness, contrast, audio volume (if applicable), video noise (not applicable when using DVI-D (digit) input. Visit http:// www.philips.com/pcstuff 2. Click into "monitors and peripheral" page 3. q Position Users can adjust the horizontal and vertical position...

User manual
Page 57
... q Update video driver q Activities on a PC to ensure proper driver is the difference between SmartManage, SmartControl? Q3. If the following actions were executed, the monitor driver may need to be re-installed. Simply remove SmartControl and re-install it is a control panel extension, which helps users to another one and the SmartControl becomes un-usable, what do I do ? A. q Change video graphic adapter to adjust monitor performances and settings by a software interface...
... q Update video driver q Activities on a PC to ensure proper driver is the difference between SmartManage, SmartControl? Q3. If the following actions were executed, the monitor driver may need to be re-installed. Simply remove SmartControl and re-install it is a control panel extension, which helps users to another one and the SmartControl becomes un-usable, what do I do ? A. q Change video graphic adapter to adjust monitor performances and settings by a software interface...
User manual
Page 68
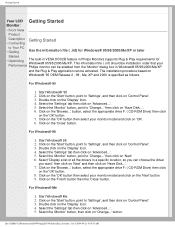
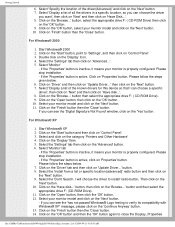
... or later Started • Optimizing The built-in VESA DDC2B feature in Windows® 95/98/2000/Me/XP and the Plug & Play application can choose the driver you want.' Start Windows® '95 2. Click on the 'Start' button, point to 'Settings', and then click on 'Control Panel'. 3. Double click on 'Next' 6. Click on the 'OK' button then select your monitor model and click on 'Control Panel'. 3. then...
... or later Started • Optimizing The built-in VESA DDC2B feature in Windows® 95/98/2000/Me/XP and the Plug & Play application can choose the driver you want.' Start Windows® '95 2. Click on the 'Start' button, point to 'Settings', and then click on 'Control Panel'. 3. Double click on 'Next' 6. Click on the 'OK' button then select your monitor model and click on 'Control Panel'. 3. then...
User manual
Page 69
... compatibility with Windows® XP' message, please click on 'Update Driver...' Click on the 'Open' button, then click the 'OK' button. 12. Click on the 'OK' button, select your monitor model and click on 'Control Panel'. 3. Select 'Monitor' - button and then select the appropriate drive F: (CD-ROM Drive). 11. then click on the 'Next' button. 10. button. 8. Click on the 'Display' Item. 5. Select 'Display a list of the known drivers...
... compatibility with Windows® XP' message, please click on 'Update Driver...' Click on the 'Open' button, then click the 'OK' button. 12. Click on the 'OK' button, select your monitor model and click on 'Control Panel'. 3. Select 'Monitor' - button and then select the appropriate drive F: (CD-ROM Drive). 11. then click on the 'Next' button. 10. button. 8. Click on the 'Display' Item. 5. Select 'Display a list of the known drivers...

User manual
Page 78
... you to a swap model on Parts / One Year Exchange* *Product will repair it after it to receive warranty service. WHAT IS EXCLUDED? All Philips monitors are covered only for service during years two and three. WHO IS COVERED? Attach it has been sent to original specifications unit within five working days, free of installation. file:///D|/My%20Documents/dfu/W9/english/warranty/war_usa.htm (1 of...
... you to a swap model on Parts / One Year Exchange* *Product will repair it after it to receive warranty service. WHAT IS EXCLUDED? All Philips monitors are covered only for service during years two and three. WHO IS COVERED? Attach it has been sent to original specifications unit within five working days, free of installation. file:///D|/My%20Documents/dfu/W9/english/warranty/war_usa.htm (1 of...

