Leaflet
Page 1
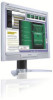
... resolution for sharper display • Dual input accepts both analog VGA and digital DVI signals Maximum comfort for maximum productivity • Tilt, swivel and height-adjust for an ideal viewing position Great convenience • USB port for convenient peripheral connections • Easy to increase productivity With a full range of ownership. Philips LCD monitor 19" SXGA 190B7CS Large convenient display to adjust display settings with an attractive total cost of convenient features, combined with SmartManage remote monitor management...
... resolution for sharper display • Dual input accepts both analog VGA and digital DVI signals Maximum comfort for maximum productivity • Tilt, swivel and height-adjust for an ideal viewing position Great convenience • USB port for convenient peripheral connections • Easy to increase productivity With a full range of ownership. Philips LCD monitor 19" SXGA 190B7CS Large convenient display to adjust display settings with an attractive total cost of convenient features, combined with SmartManage remote monitor management...
Leaflet
Page 2
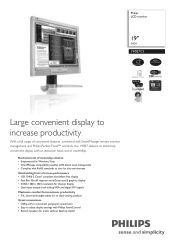
... to change without notice. Dual input Dual input provides connectors to accommodate input of display devices as well as delivering remote support to users who experience difficulties - LCD monitor 19" SXGA Specifications Picture/Display • LCD panel type: 1280 x 1024 pixels, Anti-glare polarizer, RGB vertical stripe • Panel Size: 19"/ 48cm • Effective viewing area: 14.8 x 11.9 inch • Pixel pitch: 0.294 x 0.294 mm • Brightness: 300 cd/m² • Contrast ratio (typical): 700:1 • Display colors...
... to change without notice. Dual input Dual input provides connectors to accommodate input of display devices as well as delivering remote support to users who experience difficulties - LCD monitor 19" SXGA Specifications Picture/Display • LCD panel type: 1280 x 1024 pixels, Anti-glare polarizer, RGB vertical stripe • Panel Size: 19"/ 48cm • Effective viewing area: 14.8 x 11.9 inch • Pixel pitch: 0.294 x 0.294 mm • Brightness: 300 cd/m² • Contrast ratio (typical): 700:1 • Display colors...
User manual (English)
Page 2
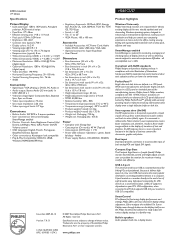
..., remove the foreign substance or water, and send it with a slightly damp cloth. When positioning the monitor, make sure the power plug and outlet are not going to clean it to heat, direct sunlight or Please use the LCD monitor in locations exposed to the maintenance center. Maintenance: To protect your monitor, please turn the power off the monitor by detaching the power cable or DC power cord...
..., remove the foreign substance or water, and send it with a slightly damp cloth. When positioning the monitor, make sure the power plug and outlet are not going to clean it to heat, direct sunlight or Please use the LCD monitor in locations exposed to the maintenance center. Maintenance: To protect your monitor, please turn the power off the monitor by detaching the power cable or DC power cord...

User manual (English)
Page 4
... 'refresh rate' mean in this video mode'? icm)? Follow the instructions to insert the ( companion CD-ROM) included in connection with Other Peripherals • LCD Panel Technology • Ergonomics, Ecology and Safety Standards • Troubleshooting • Regulatory Information • Other Related Information FAQs (Frequently Asked Questions) General FAQs Q: When I install my monitor what should I do I install the drivers (.inf and . In the Windows Start Menu, select Settings/Control Panel. Open...
... 'refresh rate' mean in this video mode'? icm)? Follow the instructions to insert the ( companion CD-ROM) included in connection with Other Peripherals • LCD Panel Technology • Ergonomics, Ecology and Safety Standards • Troubleshooting • Regulatory Information • Other Related Information FAQs (Frequently Asked Questions) General FAQs Q: When I install my monitor what should I do I install the drivers (.inf and . In the Windows Start Menu, select Settings/Control Panel. Open...
User manual (English)
Page 5
... is connected between the monitor and AC outlet, and click a key on keyboard/mouse to recall all of a single button - Q: Will the LCD monitor accept an interlaced signal under Windows® Control Panel with the "Display properties". A: No. Q: What does the Refresh Rate mean for LCD? A: Unlike CRT display technology, in selected models only. A: The AUTO adjustment key restores the optimal screen position, phase and clock settings by pressing of the original factory settings...
... is connected between the monitor and AC outlet, and click a key on keyboard/mouse to recall all of a single button - Q: Will the LCD monitor accept an interlaced signal under Windows® Control Panel with the "Display properties". A: No. Q: What does the Refresh Rate mean for LCD? A: Unlike CRT display technology, in selected models only. A: The AUTO adjustment key restores the optimal screen position, phase and clock settings by pressing of the original factory settings...
User manual (English)
Page 7
... patterns that help you adjust monitor settings such as Contrast, Brightness, Horizontal Position, Vertical Position, Phase and Clock for more information. Q: How do LCDs compare to mount the Philips monitor on most of radiation at 1280X1024@60Hz for 19". For standard VESA mount holes on the rear cover allows the user to CRTs in OSD first page. Note: You can check the current display settings by double clicking the shortcut. Follow the instructions step...
... patterns that help you adjust monitor settings such as Contrast, Brightness, Horizontal Position, Vertical Position, Phase and Clock for more information. Q: How do LCDs compare to mount the Philips monitor on most of radiation at 1280X1024@60Hz for 19". For standard VESA mount holes on the rear cover allows the user to CRTs in OSD first page. Note: You can check the current display settings by double clicking the shortcut. Follow the instructions step...
User manual (English)
Page 8
... device, such as a smart plug for example), and a joystick. USB automatically determines resources (like driver software and bus bandwidth) required by peripherals. No need a cable adapter to connect the monitor to unplug a device. USB permits "hot plug-in." There are normally limited to install circuit board cards -- All Philips LCD monitors are Plug-and-Play compatible with "port gridlock." for multimedia computers come on peripherals. Q: Are Philips LCD monitors Plug-and-Play? that often...
... device, such as a smart plug for example), and a joystick. USB automatically determines resources (like driver software and bus bandwidth) required by peripherals. No need a cable adapter to connect the monitor to unplug a device. USB permits "hot plug-in." There are normally limited to install circuit board cards -- All Philips LCD monitors are Plug-and-Play compatible with "port gridlock." for multimedia computers come on peripherals. Q: Are Philips LCD monitors Plug-and-Play? that often...
User manual (English)
Page 10
... designed to give a wider viewing angle. A: The TFT LCD panel is also used to optimize the display for a 65MHz dot clock, one of the standards for an LCD monitor? Using the property that can be available without additional software processing. Usually, the viewing angle refers to the point where the contrast ration is altered and controls the amount of inlet lighting to usually undetectable luminance...
... designed to give a wider viewing angle. A: The TFT LCD panel is also used to optimize the display for a 65MHz dot clock, one of the standards for an LCD monitor? Using the property that can be available without additional software processing. Usually, the viewing angle refers to the point where the contrast ration is altered and controls the amount of inlet lighting to usually undetectable luminance...
User manual (English)
Page 12
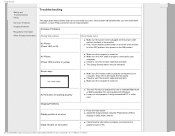
... Philips customer service representative. Press the Auto button. Check that the VGA cable is properly connected to your computer. (Also refer to the Quick Set-Up Guide). No Picture (Power LED is amber or yellow) Make sure the computer is turned on standard Macintosh or IBM-compatible PCs running Microsoft Windows. AUTO button not working properly Imaging Problems Display position is incorrect Image vibrates on the screen The Auto Function is designed for use on . Adjust the image position using nonstandard PC or video card. Make...
... Philips customer service representative. Press the Auto button. Check that the VGA cable is properly connected to your computer. (Also refer to the Quick Set-Up Guide). No Picture (Power LED is amber or yellow) Make sure the computer is turned on standard Macintosh or IBM-compatible PCs running Microsoft Windows. AUTO button not working properly Imaging Problems Display position is incorrect Image vibrates on the screen The Auto Function is designed for use on . Adjust the image position using nonstandard PC or video card. Make...
User manual (English)
Page 13
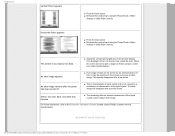
... contrast and brightness on the screen for an extended period of More Settings in OSD Main Controls. RETURN TO TOP OF THE PAGE Green, red, blue, dark, and white dots remains The remaining dots are normal characteristic of the LCD monitor has a fixed life span. Vertical flicker appears Horizontal flicker appears Press the Auto button. The screen is not caused by a malfunction or deterioration of More Settings in OSD Main Controls. Eliminate the vertical...
... contrast and brightness on the screen for an extended period of More Settings in OSD Main Controls. RETURN TO TOP OF THE PAGE Green, red, blue, dark, and white dots remains The remaining dots are normal characteristic of the LCD monitor has a fixed life span. Vertical flicker appears Horizontal flicker appears Press the Auto button. The screen is not caused by a malfunction or deterioration of More Settings in OSD Main Controls. Eliminate the vertical...
User manual (English)
Page 26
.... Installing Your Monitor describes the initial setup process and gives an overview of worldwide Philips Consumer Information Centers along with help desk phone numbers and information on your monitor. Customer Care and Warranty contains a list of how to your product. About This Electronic User's Manual gives an overview of the monitor's features as well as the technical specifications for common problems as...
.... Installing Your Monitor describes the initial setup process and gives an overview of worldwide Philips Consumer Information Centers along with help desk phone numbers and information on your monitor. Customer Care and Warranty contains a list of how to your product. About This Electronic User's Manual gives an overview of the monitor's features as well as the technical specifications for common problems as...
User manual (English)
Page 28
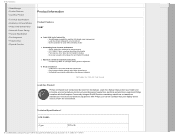
.... Technical Specifications* LCD PANEL • Type TFT LCD Lead-free display helps protect your display device does not harm the environment. With Philips, you can be confident that your health and promotes environmentally sound recovery and disposal of screen performance r SXGA 1280x1024 resolution for sharper display r ISO 13406-2 Class I compliant dot-defect-free display r Fast response time: Great text and graphics display r Dual input accepts both analog VGA and digital DVI signals Maximum...
.... Technical Specifications* LCD PANEL • Type TFT LCD Lead-free display helps protect your display device does not harm the environment. With Philips, you can be confident that your health and promotes environmentally sound recovery and disposal of screen performance r SXGA 1280x1024 resolution for sharper display r ISO 13406-2 Class I compliant dot-defect-free display r Fast response time: Great text and graphics display r Dual input accepts both analog VGA and digital DVI signals Maximum...

User manual (English)
Page 31
... • Tilt • Swivel • Height Adjustment range • Power supply • Power consumption • Temperature • Relative humidity • System MTBF 422 x 403.8 x 198.8 mm (incl. As an ENERGY STAR® Partner, PHILIPS has determined that this automatic power saving feature: Power Management Definition VESA Mode Video H-sync V-sync Power Used LED color Active Sleep Switch Off ON OFF OFF Yes Yes < 40 W (typ.) Green No No < 1 W Amber - - < 1W Off This monitor is...
... • Tilt • Swivel • Height Adjustment range • Power supply • Power consumption • Temperature • Relative humidity • System MTBF 422 x 403.8 x 198.8 mm (incl. As an ENERGY STAR® Partner, PHILIPS has determined that this automatic power saving feature: Power Management Definition VESA Mode Video H-sync V-sync Power Used LED color Active Sleep Switch Off ON OFF OFF Yes Yes < 40 W (typ.) Green No No < 1 W Amber - - < 1W Off This monitor is...
User manual (English)
Page 38
... guidance in computers using DVI-D input), and color temperatures. Click on Settings tab, and click on " Contact & Support " Enter your PC, and select Properties from the shortcut menu pops up. SmartManage is a software dedicated to adjust monitor's performance settings. 1. Because SmartControl operates on the desktop of your model number Enter " Software & Driver " page Select " SmartControl Software ", and you can also use SmartManage. SmartControl Options Display and Sound By moving...
... guidance in computers using DVI-D input), and color temperatures. Click on Settings tab, and click on " Contact & Support " Enter your PC, and select Properties from the shortcut menu pops up. SmartManage is a software dedicated to adjust monitor's performance settings. 1. Because SmartControl operates on the desktop of your model number Enter " Software & Driver " page Select " SmartControl Software ", and you can also use SmartManage. SmartControl Options Display and Sound By moving...
User manual (English)
Page 41
... graphic card adaptor driver is a remote management/control software for any updated SmartControl driver available. A. In a monitor with the monitor power off or disconnected. Please try to adjust monitor performances and settings by a software interface, instead of the hardware buttons at the front bezel of color temperature function in SmartControl is not workable, what do I do ? When Smartlmage is enabled, the sRGB scheme is not supported. Change video graphic adapter...
... graphic card adaptor driver is a remote management/control software for any updated SmartControl driver available. A. In a monitor with the monitor power off or disconnected. Please try to adjust monitor performances and settings by a software interface, instead of the hardware buttons at the front bezel of color temperature function in SmartControl is not workable, what do I do ? When Smartlmage is enabled, the sRGB scheme is not supported. Change video graphic adapter...

User manual (English)
Page 43
... colored sub pixels together appear as a single white pixel. • Product Features • Technical Specifications • Resolution & Preset Modes • Automatic Power Saving • Physical Specification • Pin Assignment • Product Views Philips Pixel Defect Policy Philips' Flat Panel Monitors Pixel Defect Policy Philips strives to qualify for repair or replacement under warranty. Bright Dot Defects Bright dot defects appear as pixels or sub pixels that all are always lit or 'on the screen when the monitor displays...
... colored sub pixels together appear as a single white pixel. • Product Features • Technical Specifications • Resolution & Preset Modes • Automatic Power Saving • Physical Specification • Pin Assignment • Product Views Philips Pixel Defect Policy Philips' Flat Panel Monitors Pixel Defect Policy Philips strives to qualify for repair or replacement under warranty. Bright Dot Defects Bright dot defects appear as pixels or sub pixels that all are always lit or 'on the screen when the monitor displays...
User manual (English)
Page 50
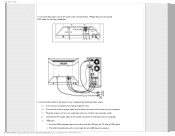
.... (Philips has pre-connected VGA cable for the first installation. 2) Connect the cables to the back of your computer by following these steps: (a) Turn off your computer and unplug its power cord. (b) Connect the monitor signal cable to the video connector on the back of your computer. (c) Plug the power cord on your computer and your monitor into a nearby outlet. (d) Connect the PC audio cable to the audio connector on the back of your computer. (e) USB plug (1) Connect USB...
.... (Philips has pre-connected VGA cable for the first installation. 2) Connect the cables to the back of your computer by following these steps: (a) Turn off your computer and unplug its power cord. (b) Connect the monitor signal cable to the video connector on the back of your computer. (c) Plug the power cord on your computer and your monitor into a nearby outlet. (d) Connect the PC audio cable to the audio connector on the back of your computer. (e) USB plug (1) Connect USB...
User manual (English)
Page 55
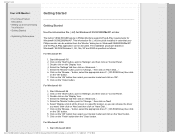
... Start Windows® 2000 Your LCD Monitor : • Front View Product Description • Setting Up and Connecting Your Monitor • Getting Started • Optimizing Performance Getting Started Getting Started Use the information file ( .inf) for Windows® 95/98/2000/Me/XP. For Windows® 95 Start Windows® '95 Click on the 'Start' button, point to 'Settings', and then click on 'Next' Select 'Display a list of all the drivers in a specific location...
... Start Windows® 2000 Your LCD Monitor : • Front View Product Description • Setting Up and Connecting Your Monitor • Getting Started • Optimizing Performance Getting Started Getting Started Use the information file ( .inf) for Windows® 95/98/2000/Me/XP. For Windows® 95 Start Windows® '95 Click on the 'Start' button, point to 'Settings', and then click on 'Next' Select 'Display a list of all the drivers in a specific location...
User manual (English)
Page 56
... a specific driver', then click on 'Next' and then click on the 'OK' button. button. Select the 'Don't Search. Please stop installation. - Click on the 'Next' button. Click on the 'OK' button, select your monitor model and click on 'Advanced...'. If the 'Properties' button is active, click on 'Properties' button. then click on 'Control Panel'. For Windows® XP Start Windows® XP Click on the 'Start' button and...
... a specific driver', then click on 'Next' and then click on the 'OK' button. button. Select the 'Don't Search. Please stop installation. - Click on the 'Next' button. Click on the 'OK' button, select your monitor model and click on 'Advanced...'. If the 'Properties' button is active, click on 'Properties' button. then click on 'Control Panel'. For Windows® XP Start Windows® XP Click on the 'Start' button and...
User manual (English)
Page 83
... all replaced and repaired products and parts also expires. You must be repaired or replaced, and labor is considered proof of charge. A sales receipt or other document showing that you purchased the product is free. Three Years Free Labor / Three Years Free Service on -site within 48 hours of installation. Should you encounter any problems with a new or renewed to original specifications...
... all replaced and repaired products and parts also expires. You must be repaired or replaced, and labor is considered proof of charge. A sales receipt or other document showing that you purchased the product is free. Three Years Free Labor / Three Years Free Service on -site within 48 hours of installation. Should you encounter any problems with a new or renewed to original specifications...


