Leaflet
Page 2
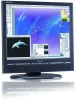
... accomplished over a LAN. Adjustable height Adjustable height is a system for enhancing monitor's brightness, sharpness, contrast, and color. SXGA, 1280 x 1024 resolution For graphics monitors, the screen resolution signifies the number of dots (pixels) on its base and lock into position when the desired height is shipped with little reflection from long hours working on each of 1024 lines, or about 1.3 million pixels. In-box DVI cable A DVI cable is reached, Lower power consumption Reduction of...
... accomplished over a LAN. Adjustable height Adjustable height is a system for enhancing monitor's brightness, sharpness, contrast, and color. SXGA, 1280 x 1024 resolution For graphics monitors, the screen resolution signifies the number of dots (pixels) on its base and lock into position when the desired height is shipped with little reflection from long hours working on each of 1024 lines, or about 1.3 million pixels. In-box DVI cable A DVI cable is reached, Lower power consumption Reduction of...
Leaflet
Page 3
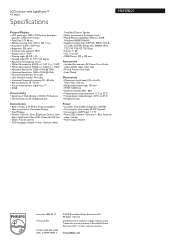
Blue, Stand by/ sleep - www.philips.com All Rights reserved. Trademarks are subject to change without notice. Amber • Power supply: Built-in Audio: 2 W RMS x 2 Stereo Speakers • User convenience: On-screen Display, SmartManage • Monitor Controls: Auto, Brightness Control, Left/ Right, LightFrame, Menu (OK), Power On/Off, Up/ Down, Volume control • OSD Languages: English, French, German, Italian, Power • Complies with base) (W x H x D): 425 x 432 x 210 mm • Height adjustment range: 130 mm • MTBF: 50,000 hrs •...
Blue, Stand by/ sleep - www.philips.com All Rights reserved. Trademarks are subject to change without notice. Amber • Power supply: Built-in Audio: 2 W RMS x 2 Stereo Speakers • User convenience: On-screen Display, SmartManage • Monitor Controls: Auto, Brightness Control, Left/ Right, LightFrame, Menu (OK), Power On/Off, Up/ Down, Volume control • OSD Languages: English, French, German, Italian, Power • Complies with base) (W x H x D): 425 x 432 x 210 mm • Height adjustment range: 130 mm • MTBF: 50,000 hrs •...
User manual
Page 2
... need to clean it for an extensive period of time. q Consult a service technician if the monitor does not operate normally when you are easily accessible. q Remove any other than those specified in high contrast remains on the screen for normal operation. q When positioning the monitor, make sure the power plug and outlet are not going to rain or excessive moisture. However, never use...
... need to clean it for an extensive period of time. q Consult a service technician if the monitor does not operate normally when you are easily accessible. q Remove any other than those specified in high contrast remains on the screen for normal operation. q When positioning the monitor, make sure the power plug and outlet are not going to rain or excessive moisture. However, never use...
User manual
Page 6
...-right positioning with range Super Ergo base r Display diversity with portrait and landscape options r Extra efficiency with wide viewing angle q Outstanding front of screen performance r Best-ever sharpness and brightness with LightFrameTM r Accurate color displaying more than 1.3 million pixels r Displays VGA and DVI signals with true Windows-based programs and DOS-based programs that you will not work with this software only on the monitor screen. file:///D|/My%20Documents/dfu/W9/english/190p5/product...
...-right positioning with range Super Ergo base r Display diversity with portrait and landscape options r Extra efficiency with wide viewing angle q Outstanding front of screen performance r Best-ever sharpness and brightness with LightFrameTM r Accurate color displaying more than 1.3 million pixels r Displays VGA and DVI signals with true Windows-based programs and DOS-based programs that you will not work with this software only on the monitor screen. file:///D|/My%20Documents/dfu/W9/english/190p5/product...
User manual
Page 8
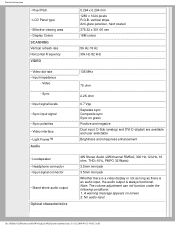
... 2.2K ohm 0.7 Vpp Separate sync Composite sync Sync on screen 2. Note: The volume adjustment can not function under the following conditions: 1. No audio input file:///D|/My%20Documents/dfu/W9/english/190p5/product/product.htm (3 of 12)2004-09-21 9:08:12 AM A warning message appears on green Positive and negative Dual input: D-Sub (analog) and DVI-D (digital) are available and user selectable Brightness and sharpness enhancement 4W...
... 2.2K ohm 0.7 Vpp Separate sync Composite sync Sync on screen 2. Note: The volume adjustment can not function under the following conditions: 1. No audio input file:///D|/My%20Documents/dfu/W9/english/190p5/product/product.htm (3 of 12)2004-09-21 9:08:12 AM A warning message appears on green Positive and negative Dual input: D-Sub (analog) and DVI-D (digital) are available and user selectable Brightness and sharpness enhancement 4W...
User manual
Page 10
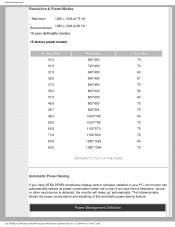
... a keyboard, mouse or other input device is detected, the monitor will 'wake up' automatically. The following table shows the power consumption and signaling of this automatic power saving feature: Power Management Definition file:///D|/My%20Documents/dfu/W9/english/190p5/product/product.htm (5 of 12)2004... 75 RETURN TO TOP OF THE PAGE Automatic Power Saving If you have VESA DPMS compliance display card or software installed in your PC, the monitor can automatically reduce its power consumption when not in use. Product Information Resolution & Preset Modes • Maximum 1280 x 1024 at 75 ...
... a keyboard, mouse or other input device is detected, the monitor will 'wake up' automatically. The following table shows the power consumption and signaling of this automatic power saving feature: Power Management Definition file:///D|/My%20Documents/dfu/W9/english/190p5/product/product.htm (5 of 12)2004... 75 RETURN TO TOP OF THE PAGE Automatic Power Saving If you have VESA DPMS compliance display card or software installed in your PC, the monitor can automatically reduce its power consumption when not in use. Product Information Resolution & Preset Modes • Maximum 1280 x 1024 at 75 ...

User manual
Page 18
... Your PC Installing Your LCD Monitor Front View Product Description • The Base • Getting Started • Optimizing Performance VOLUME UP and DOWN buttons are also used when adjusting the OSD of 3)2004-09-21 9:08:15 AM POWER button switches your monitor on. Automatically adjust the horizontal position, vertical position, phase and clock setting. Installing Your LCD Monitor Front View • Produt Description • Connecting to the OSD controls. OK button which when pressed will show up . BRIGHTNESS hotkey. When...
... Your PC Installing Your LCD Monitor Front View Product Description • The Base • Getting Started • Optimizing Performance VOLUME UP and DOWN buttons are also used when adjusting the OSD of 3)2004-09-21 9:08:15 AM POWER button switches your monitor on. Automatically adjust the horizontal position, vertical position, phase and clock setting. Installing Your LCD Monitor Front View • Produt Description • Connecting to the OSD controls. OK button which when pressed will show up . BRIGHTNESS hotkey. When...
User manual
Page 19
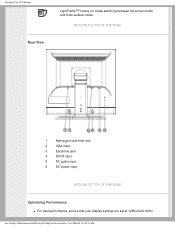
RETURN TO TOP OF THE PAGE 1 Kensington anti-thief lock 2 VGA input 3 Earphone jack 4 DVI-D input 5 PC audio input 6 AC power input RETURN TO TOP OF THE PAGE Optimizing Performance q For best performance, ensure that your display settings are set at 1280x1024, 60Hz. file:///D|/My%20Documents/dfu/W9/english/190p5/install/install.htm (2 of 3)2004-09-21 9:08:15 AM Installing Your LCD Monitor Rear View LightFrameTM hotkey for mode-switching between full-screen mode and multi-window mode.
RETURN TO TOP OF THE PAGE 1 Kensington anti-thief lock 2 VGA input 3 Earphone jack 4 DVI-D input 5 PC audio input 6 AC power input RETURN TO TOP OF THE PAGE Optimizing Performance q For best performance, ensure that your display settings are set at 1280x1024, 60Hz. file:///D|/My%20Documents/dfu/W9/english/190p5/install/install.htm (2 of 3)2004-09-21 9:08:15 AM Installing Your LCD Monitor Rear View LightFrameTM hotkey for mode-switching between full-screen mode and multi-window mode.
User manual
Page 27
... provides additional connections to downstream devices. The architecture supports concatenation of 5)2004-09-21 9:08:22 AM The controller provides the interface registers to install peripherals. With USB, up to allow file:///D|/My%20Documents/dfu/W9/english/190p5/glossary/glossary.htm (3 of multiple hubs. A hub consists of power to the Universal Serial Bus. USB automatically determines resources (like driver software and...
... provides additional connections to downstream devices. The architecture supports concatenation of 5)2004-09-21 9:08:22 AM The controller provides the interface registers to install peripherals. With USB, up to allow file:///D|/My%20Documents/dfu/W9/english/190p5/glossary/glossary.htm (3 of multiple hubs. A hub consists of power to the Universal Serial Bus. USB automatically determines resources (like driver software and...

User manual
Page 33
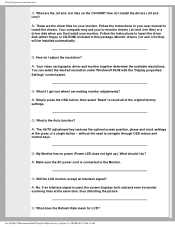
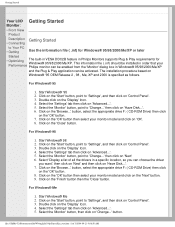
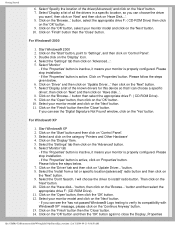
... and Safety 1. You have 10 minutes to Settings and click on monitor to 60Hz, then click OK. 4. if you with 10 minutes to reset timing to 1280x1024 pixels (19"). In the Windows Start Menu, select Settings/Control Panel. Information Q: What should I do when screen shows: THIS IS 85HZ OVERDRIVE, CHANGE COMPUTER DISPLAY INPUT TO 1280 x 1024 @60HZ? LCD monitors display a stable, flicker-free image at 1280x1024@60Hz (19"). 5. Here's how...
... and Safety 1. You have 10 minutes to Settings and click on monitor to 60Hz, then click OK. 4. if you with 10 minutes to reset timing to 1280x1024 pixels (19"). In the Windows Start Menu, select Settings/Control Panel. Information Q: What should I do when screen shows: THIS IS 85HZ OVERDRIVE, CHANGE COMPUTER DISPLAY INPUT TO 1280 x 1024 @60HZ? LCD monitors display a stable, flicker-free image at 1280x1024@60Hz (19"). 5. Here's how...
User manual
Page 34
... of a single button - A: Make sure the AC power cord is connected to insert the driver disk (either floppy or CD-ROM) included in your user manual to navigate through OSD menus and control keys. file:///D|/My%20Documents/dfu/W9/english/190p5/safety/saf_faq.htm (2 of the original factory settings. Q: My Monitor has no power (Power LED does not light up). Follow the instructions to the Monitor. What should I am making monitor adjustments? A: No...
... of a single button - A: Make sure the AC power cord is connected to insert the driver disk (either floppy or CD-ROM) included in your user manual to navigate through OSD menus and control keys. file:///D|/My%20Documents/dfu/W9/english/190p5/safety/saf_faq.htm (2 of the original factory settings. Q: My Monitor has no power (Power LED does not light up). Follow the instructions to the Monitor. What should I am making monitor adjustments? A: No...
User manual
Page 43
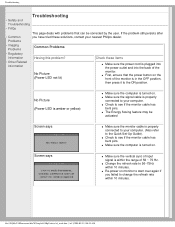
... Picture (Power LED not lit) Check these solutions, contact your computer. (Also refer to the Quick Set-Up Guide). q Change the refresh rate to see if the monitor cable has bent pins. q Re-power on monitor to start over again if you have tried these items q Make sure the power cord is properly connected to your computer. q Make sure the signal cable is plugged into the power outlet and into the back of the monitor. q Make...
... Picture (Power LED not lit) Check these solutions, contact your computer. (Also refer to the Quick Set-Up Guide). q Change the refresh rate to see if the monitor cable has bent pins. q Re-power on monitor to start over again if you have tried these items q Make sure the power cord is properly connected to your computer. q Make sure the signal cable is plugged into the power outlet and into the back of the monitor. q Make...

User manual
Page 44
... video card. When the screen becomes dark or begins to the graphics board or PC. Troubleshooting AUTO button not working properly Imaging Problems Display position is incorrect Image vibrates on the screen Vertical flicker appears q The Auto Function is used for display. q The AUTO adjustment does not function when digital input is designed for use on standard Macintosh or IBM-compatible PCs running Microsoft Windows. Horizontal flicker appears q Press the Auto button. q Press the Auto button. q Eliminate the vertical bars using the Horizontal Position and/or Vertical Position...
... video card. When the screen becomes dark or begins to the graphics board or PC. Troubleshooting AUTO button not working properly Imaging Problems Display position is incorrect Image vibrates on the screen Vertical flicker appears q The Auto Function is used for display. q The AUTO adjustment does not function when digital input is designed for use on standard Macintosh or IBM-compatible PCs running Microsoft Windows. Horizontal flicker appears q Press the Auto button. q Press the Auto button. q Eliminate the vertical bars using the Horizontal Position and/or Vertical Position...
User manual
Page 51
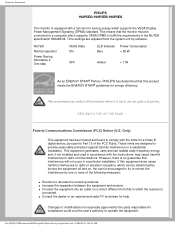
...; Partner, PHILIPS has determined that interference will not occur in a particular installation. RETURN TO TOP OF THE PAGE Federal Communications Commission (FCC) Notice (U.S. However, there is no guarantee that this equipment does cause harmful interference to radio or television reception, which supports the VESA Display Power Management Signaling (DPMS) standard. This equipment generates, uses and can be connected to...
...; Partner, PHILIPS has determined that interference will not occur in a particular installation. RETURN TO TOP OF THE PAGE Federal Communications Commission (FCC) Notice (U.S. However, there is no guarantee that this equipment does cause harmful interference to radio or television reception, which supports the VESA Display Power Management Signaling (DPMS) standard. This equipment generates, uses and can be connected to...

User manual
Page 61
... to adjust brightness, contrast, audio volume (if applicable), video noise (not applicable when using DVI-D (digit) input. Select "Manuals/drivers" 4. Please follow the guidance in the SmartControl installation program. 3. q Click Philips SmartControl tab. 4. This function is disabled when using DVI-D input), and color temperatures. Accessing SmartControl q Right click on Advanced button. Visit http:// www.philips.com/pcstuff 2. Enter your PC, and select Properties from the shortcut menu pops up. SmartControl Options q Display and Sound...
... to adjust brightness, contrast, audio volume (if applicable), video noise (not applicable when using DVI-D (digit) input. Select "Manuals/drivers" 4. Please follow the guidance in the SmartControl installation program. 3. q Click Philips SmartControl tab. 4. This function is disabled when using DVI-D input), and color temperatures. Accessing SmartControl q Right click on Advanced button. Visit http:// www.philips.com/pcstuff 2. Enter your PC, and select Properties from the shortcut menu pops up. SmartControl Options q Display and Sound...
User manual
Page 63
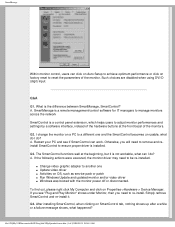
...-installed. Such choices are disabled when using DVI-D (digit) input. If the following actions were executed, the monitor driver may need to remove and reinstall SmartControl to ensure proper driver is the difference between SmartManage, SmartControl? SmartManage Within monitor control, users can click on Auto Setup to achieve optimum performance or click on a PC to a different one q Update video driver q Activities on Properties->Hardware-> Device Manager. I change the monitor on factory reset to reset...
...-installed. Such choices are disabled when using DVI-D (digit) input. If the following actions were executed, the monitor driver may need to remove and reinstall SmartControl to ensure proper driver is the difference between SmartManage, SmartControl? SmartManage Within monitor control, users can click on Auto Setup to achieve optimum performance or click on a PC to a different one q Update video driver q Activities on Properties->Hardware-> Device Manager. I change the monitor on factory reset to reset...
User manual
Page 65
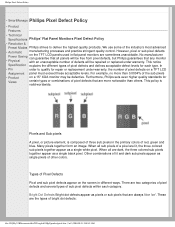
.... Philips Pixel Defect Policy • SmartManage Philips Pixel Defect Policy • Product Features • Technical Specifications Philips' Flat Panel Monitors Pixel Defect Policy • Resolution & Preset Modes Philips strives to qualify for each category. We use some of other colors. This notice Specification explains the different types of pixel defects and defines acceptable defect levels for repair or replacement under warranty. When all sub pixels of red, green and blue. Bright Dot Defects Bright dot...
.... Philips Pixel Defect Policy • SmartManage Philips Pixel Defect Policy • Product Features • Technical Specifications Philips' Flat Panel Monitors Pixel Defect Policy • Resolution & Preset Modes Philips strives to qualify for each category. We use some of other colors. This notice Specification explains the different types of pixel defects and defines acceptable defect levels for repair or replacement under warranty. When all sub pixels of red, green and blue. Bright Dot Defects Bright dot...
User manual
Page 73
... LCD Getting Started Monitor : • Front View Product Description Getting Started • Connecting to 'Change...' This information file ( .inf) should be installed in order that your Performance Philips monitor can be enabled from the 'Monitor' dialog box in a specific location, so you can be activated. Click on the 'Start' button, point to 'Change...' Double click on 'Control Panel'. 3. Select the 'Monitor' button, point to 'Settings', and then click on the 'Display...
... LCD Getting Started Monitor : • Front View Product Description Getting Started • Connecting to 'Change...' This information file ( .inf) should be installed in order that your Performance Philips monitor can be enabled from the 'Monitor' dialog box in a specific location, so you can be activated. Click on the 'Start' button, point to 'Change...' Double click on 'Control Panel'. 3. Select the 'Monitor' button, point to 'Settings', and then click on the 'Display...
User manual
Page 74
... 'Start' button, point to 'Settings', and then click on the 'Next' button. 7. then click on 'Control Panel'. 3. Select your monitor model and click on the 'Open' button, then click the 'OK' button. 12. button. 8. Select the 'Install from a list or specific location [advanced]' radio button and then click on the 'Next' button. 11. Then click on the 'Next' button. 7. Select 'Specify the location of all the drivers in a specific...
... 'Start' button, point to 'Settings', and then click on the 'Next' button. 7. then click on 'Control Panel'. 3. Select your monitor model and click on the 'Open' button, then click the 'OK' button. 12. button. 8. Select the 'Install from a list or specific location [advanced]' radio button and then click on the 'Next' button. 11. Then click on the 'Next' button. 7. Select 'Specify the location of all the drivers in a specific...

User manual
Page 83
... a swap model on-site within 48 hours of purchase to original specifications unit within the first year of all parts, and for purchasing this Philips monitor. If you have proof of your call being received within two business days for the first year. This product must have any difficulties while installing or using this owner's manual and keep both nearby...
... a swap model on-site within 48 hours of purchase to original specifications unit within the first year of all parts, and for purchasing this Philips monitor. If you have proof of your call being received within two business days for the first year. This product must have any difficulties while installing or using this owner's manual and keep both nearby...


