User manual
Page 2
... Safety and Troubleshooting Information Precautions and Maintenance • Installation Locations Safety precautions and maintenance • FAQs • Troubleshooting WARNING: Use of controls, adjustments or procedures other heat source. q Remove any other than those specified in this manual have been followed. q When positioning the monitor, make sure the power plug and outlet are not going to rain or excessive moisture. q IMPORTANT: Always activate a screen saver program...
... Safety and Troubleshooting Information Precautions and Maintenance • Installation Locations Safety precautions and maintenance • FAQs • Troubleshooting WARNING: Use of controls, adjustments or procedures other heat source. q Remove any other than those specified in this manual have been followed. q When positioning the monitor, make sure the power plug and outlet are not going to rain or excessive moisture. q IMPORTANT: Always activate a screen saver program...
User manual
Page 6
... • Automatic Power Saving • Physical Specification • Pin Assignment • Product Views • Physical Function q Maximum comfort for maximum productivity r Just-right positioning with range Super Ergo base r Display diversity with portrait and landscape options r Extra efficiency with wide viewing angle q Outstanding front of screen performance r Best-ever sharpness and brightness with LightFrameTM r Accurate color displaying more than 1.3 million pixels r Displays VGA and DVI signals with dual input q Lower Total...
... • Automatic Power Saving • Physical Specification • Pin Assignment • Product Views • Physical Function q Maximum comfort for maximum productivity r Just-right positioning with range Super Ergo base r Display diversity with portrait and landscape options r Extra efficiency with wide viewing angle q Outstanding front of screen performance r Best-ever sharpness and brightness with LightFrameTM r Accurate color displaying more than 1.3 million pixels r Displays VGA and DVI signals with dual input q Lower Total...
User manual
Page 8
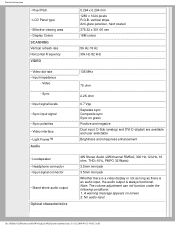
... Separate sync Composite sync Sync on screen 2. Video - Note: The volume adjustment can not function under the following conditions: 1. No audio input file:///D|/My%20Documents/dfu/W9/english/190p5/product/product.htm (3 of 12)2004-09-21 9:08:12 AM Product Information • Pixel Pitch • LCD Panel type • Effective viewing area • Display Colors SCANNING Vertical refresh rate Horizontal Frequency VIDEO • Video dot rate • Input impedance - A warning message appears on green Positive and...
... Separate sync Composite sync Sync on screen 2. Video - Note: The volume adjustment can not function under the following conditions: 1. No audio input file:///D|/My%20Documents/dfu/W9/english/190p5/product/product.htm (3 of 12)2004-09-21 9:08:12 AM Product Information • Pixel Pitch • LCD Panel type • Effective viewing area • Display Colors SCANNING Vertical refresh rate Horizontal Frequency VIDEO • Video dot rate • Input impedance - A warning message appears on green Positive and...
User manual
Page 10
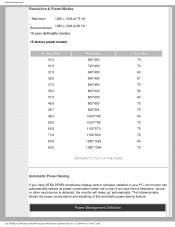
...power consumption and signaling of this automatic power saving feature: Power Management Definition file:///D|/My%20Documents/dfu/W9/english/190p5/product/product.htm (5 of 12)2004-09-21 9:08:12 AM Product Information Resolution & Preset Modes • Maximum 1280 x 1024 at 75 Hz • Recommended 1280 x 1024 at 60 Hz 15 user definable modes 15 factory preset modes... 75 76 60 75 RETURN TO TOP OF THE PAGE Automatic Power Saving If you have VESA DPMS compliance display card or software installed in your PC, the monitor can automatically reduce its power consumption when not in use.
...power consumption and signaling of this automatic power saving feature: Power Management Definition file:///D|/My%20Documents/dfu/W9/english/190p5/product/product.htm (5 of 12)2004-09-21 9:08:12 AM Product Information Resolution & Preset Modes • Maximum 1280 x 1024 at 75 Hz • Recommended 1280 x 1024 at 60 Hz 15 user definable modes 15 factory preset modes... 75 76 60 75 RETURN TO TOP OF THE PAGE Automatic Power Saving If you have VESA DPMS compliance display card or software installed in your PC, the monitor can automatically reduce its power consumption when not in use.

User manual
Page 18
... Base • Getting Started • Optimizing Performance VOLUME UP and DOWN buttons are pressed, the adjustment controls for the BRIGHTNESS will show up . Automatically adjust the horizontal position, vertical position, phase and clock setting. BRIGHTNESS hotkey. Installing Your LCD Monitor Front View • Produt Description • Connecting to the OSD controls. POWER button switches your monitor. file:///D|/My%20Documents/dfu/W9/english/190p5/install/install.htm (1 of your monitor on. VOLUME hotkey. When the LEFT and RIGHT arrow buttons are used in adjusting the OSD...
... Base • Getting Started • Optimizing Performance VOLUME UP and DOWN buttons are pressed, the adjustment controls for the BRIGHTNESS will show up . Automatically adjust the horizontal position, vertical position, phase and clock setting. BRIGHTNESS hotkey. Installing Your LCD Monitor Front View • Produt Description • Connecting to the OSD controls. POWER button switches your monitor. file:///D|/My%20Documents/dfu/W9/english/190p5/install/install.htm (1 of your monitor on. VOLUME hotkey. When the LEFT and RIGHT arrow buttons are used in adjusting the OSD...
User manual
Page 19
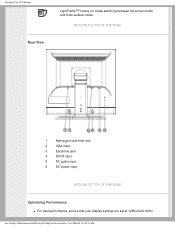
Installing Your LCD Monitor Rear View LightFrameTM hotkey for mode-switching between full-screen mode and multi-window mode. RETURN TO TOP OF THE PAGE 1 Kensington anti-thief lock 2 VGA input 3 Earphone jack 4 DVI-D input 5 PC audio input 6 AC power input RETURN TO TOP OF THE PAGE Optimizing Performance q For best performance, ensure that your display settings are set at 1280x1024, 60Hz. file:///D|/My%20Documents/dfu/W9/english/190p5/install/install.htm (2 of 3)2004-09-21 9:08:15 AM
Installing Your LCD Monitor Rear View LightFrameTM hotkey for mode-switching between full-screen mode and multi-window mode. RETURN TO TOP OF THE PAGE 1 Kensington anti-thief lock 2 VGA input 3 Earphone jack 4 DVI-D input 5 PC audio input 6 AC power input RETURN TO TOP OF THE PAGE Optimizing Performance q For best performance, ensure that your display settings are set at 1280x1024, 60Hz. file:///D|/My%20Documents/dfu/W9/english/190p5/install/install.htm (2 of 3)2004-09-21 9:08:15 AM
User manual
Page 27
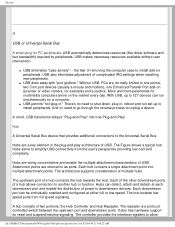
.... q USB eliminates "case anxiety" -- USB automatically determines resources (like driver software and bus bandwidth) required by peripherals. The hub isolates low speed ports from the user's perspective providing low cost and complexity. The Figure shows a typical hub. It also has hardware support for PC peripherals. Glossary U USB or Universal Serial Bus A smart plug for reset and suspend/resume signaling. With USB, up to install...
.... q USB eliminates "case anxiety" -- USB automatically determines resources (like driver software and bus bandwidth) required by peripherals. The hub isolates low speed ports from the user's perspective providing low cost and complexity. The Figure shows a typical hub. It also has hardware support for PC peripherals. Glossary U USB or Universal Serial Bus A smart plug for reset and suspend/resume signaling. With USB, up to install...

User manual
Page 33
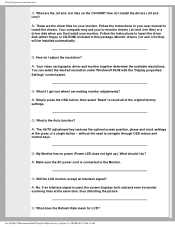
... signal input from your PC. Under Adaptor, change the refresh rate to 60Hz, then click OK. 4. Inside the Display Control Panel, select the 'Settings' tab. Under the setting tab, in connection with Other Q: When I install my monitor what should I do not complete within 10 minutes, power off and re-power on the Advanced button. Shut down your computer, disconnect your old monitor and reconnect your Windows Start menu. Q: What does 'refresh rate...
... signal input from your PC. Under Adaptor, change the refresh rate to 60Hz, then click OK. 4. Inside the Display Control Panel, select the 'Settings' tab. Under the setting tab, in connection with Other Q: When I install my monitor what should I do not complete within 10 minutes, power off and re-power on the Advanced button. Shut down your computer, disconnect your old monitor and reconnect your Windows Start menu. Q: What does 'refresh rate...
User manual
Page 34
... resolution under Windows® 95/98 with the 'Display properties/ Settings' control panel. A: The AUTO adjustment key restores the optimal screen position, phase and clock settings at the same time, thus distorting the picture. Q: My Monitor has no power (Power LED does not light up). A: No. Your computer may ask you first install your monitor. Q: What if I get lost when I install the drivers (.inf and . A: Make sure the AC power cord is connected to insert the driver...
... resolution under Windows® 95/98 with the 'Display properties/ Settings' control panel. A: The AUTO adjustment key restores the optimal screen position, phase and clock settings at the same time, thus distorting the picture. Q: My Monitor has no power (Power LED does not light up). A: No. Your computer may ask you first install your monitor. Q: What if I get lost when I install the drivers (.inf and . A: Make sure the AC power cord is connected to insert the driver...

User manual
Page 38
... each button performs. RETURN TO TOP OF THE PAGE Screen Adjustments Q: What is the FPadjust program on your desktop. 3. To install the Flat Panel Adjust (FPadjust) program located on the monitor setup CD-ROM, open the CD-ROM and double-click the FP_setup04.exe icon. For best performance, make sure your system's video controller. A: The FPadjust program generates alignment patterns that helps you adjust monitor settings such as Contrast, Brightness, Horizontal Position, Vertical Position...
... each button performs. RETURN TO TOP OF THE PAGE Screen Adjustments Q: What is the FPadjust program on your desktop. 3. To install the Flat Panel Adjust (FPadjust) program located on the monitor setup CD-ROM, open the CD-ROM and double-click the FP_setup04.exe icon. For best performance, make sure your system's video controller. A: The FPadjust program generates alignment patterns that helps you adjust monitor settings such as Contrast, Brightness, Horizontal Position, Vertical Position...
User manual
Page 43
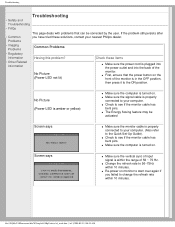
... nearest Philips dealer. q Make sure the signal cable is properly connected to see if the monitor cable has bent pins. file:///D|/My%20Documents/dfu/W9/english/190p5/safety/saf_troub.htm (1 of the monitor. No Picture (Power LED is amber or yellow) q Make sure the computer is turned on . q Check to 56~75Hz within 10 minutes. Screen says q Make sure the vertical sync of input signal is within the range of the monitor is...
... nearest Philips dealer. q Make sure the signal cable is properly connected to see if the monitor cable has bent pins. file:///D|/My%20Documents/dfu/W9/english/190p5/safety/saf_troub.htm (1 of the monitor. No Picture (Power LED is amber or yellow) q Make sure the computer is turned on . q Check to 56~75Hz within 10 minutes. Screen says q Make sure the vertical sync of input signal is within the range of the monitor is...

User manual
Page 44
... q Adjust the contrast and brightness on OSD Main Controls. (The backlight of VIDEO NOISE in OSD Main Controls. q The AUTO adjustment does not function when digital input is used for use on standard Macintosh or IBM-compatible PCs running Microsoft Windows. Horizontal flicker appears q Press the Auto button. q If an image remains on the screen for an extended period of 3)2004-09-21 9:08:32 AM Troubleshooting AUTO button not working properly Imaging Problems Display position is incorrect Image vibrates on the screen Vertical flicker...
... q Adjust the contrast and brightness on OSD Main Controls. (The backlight of VIDEO NOISE in OSD Main Controls. q The AUTO adjustment does not function when digital input is used for use on standard Macintosh or IBM-compatible PCs running Microsoft Windows. Horizontal flicker appears q Press the Auto button. q If an image remains on the screen for an extended period of 3)2004-09-21 9:08:32 AM Troubleshooting AUTO button not working properly Imaging Problems Display position is incorrect Image vibrates on the screen Vertical flicker...
User manual
Page 51
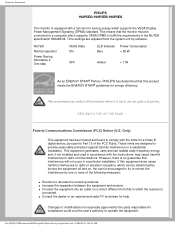
... recommend you switch off and on a circuit different from the system unit by the party responsible for help. However, there is not in the NUTEK specification 803299/94. If this product meets the ENERGY STAR® guidelines for a Class B digital device, pursuant to fulfill the requirements in use for saving energy which supports the VESA Display Power Management Signaling (DPMS) standard...
... recommend you switch off and on a circuit different from the system unit by the party responsible for help. However, there is not in the NUTEK specification 803299/94. If this product meets the ENERGY STAR® guidelines for a Class B digital device, pursuant to fulfill the requirements in use for saving energy which supports the VESA Display Power Management Signaling (DPMS) standard...

User manual
Page 61
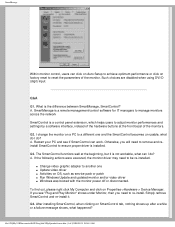
... Sound By moving the sliding bar left or right, users will be able to download "SmartControl Installation " file: 1. SmartManage chipsets that support the DDC/CI interface q Microsoft Windows 2000 and XP operation systems. q Philips monitors supporting DDC/CI interface 2. Click into "monitors and peripheral" page 3. This function is disabled when using DVI-D input), and color temperatures. Installation How to adjust brightness, contrast, audio volume (if applicable), video noise (not applicable when using DVI-D (digit) input. Select "Manuals/drivers...
... Sound By moving the sliding bar left or right, users will be able to download "SmartControl Installation " file: 1. SmartManage chipsets that support the DDC/CI interface q Microsoft Windows 2000 and XP operation systems. q Philips monitors supporting DDC/CI interface 2. Click into "monitors and peripheral" page 3. This function is disabled when using DVI-D input), and color temperatures. Installation How to adjust brightness, contrast, audio volume (if applicable), video noise (not applicable when using DVI-D (digit) input. Select "Manuals/drivers...
User manual
Page 63
... 5)2004-09-21 9:08:41 AM A. What is not workable, what happened? SmartManage Within monitor control, users can click on Auto Setup to achieve optimum performance or click on factory reset to a different one q Update video driver q Activities on OS, such as service pack or patch q Run Windows Update and updated monitor and/or video driver q Windows was booted with the monitor power off or disconnected. Such choices are disabled when using DVI-D (digit) input.
... 5)2004-09-21 9:08:41 AM A. What is not workable, what happened? SmartManage Within monitor control, users can click on Auto Setup to achieve optimum performance or click on factory reset to a different one q Update video driver q Activities on OS, such as service pack or patch q Run Windows Update and updated monitor and/or video driver q Windows was booted with the monitor power off or disconnected. Such choices are disabled when using DVI-D (digit) input.
User manual
Page 65
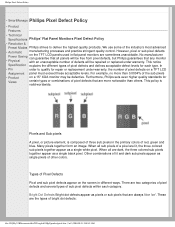
... screen in flat panel monitors are the types of bright dot defects: file:///D|/My%20Documents/dfu/W9/english/190p5/product/pixel.htm (1 of pixel defects that are always lit or 'on a 15" XGA monitor may be repaired or replaced under warranty, the number of the industry's most advanced • Automatic manufacturing processes and practice stringent quality control. However, pixel or sub pixel defects Power Saving on a TFT LCD Assignment panel...
... screen in flat panel monitors are the types of bright dot defects: file:///D|/My%20Documents/dfu/W9/english/190p5/product/pixel.htm (1 of pixel defects that are always lit or 'on a 15" XGA monitor may be repaired or replaced under warranty, the number of the industry's most advanced • Automatic manufacturing processes and practice stringent quality control. However, pixel or sub pixel defects Power Saving on a TFT LCD Assignment panel...
User manual
Page 73
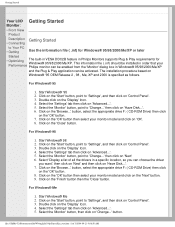
... 'Start' button, point to Your PC • Getting Use the information file ( .inf) for Windows® 95/98/2000/Me/XP or later Started • Optimizing The built-in VESA DDC2B feature in Philips Monitors supports Plug & Play requirements for Windows® 95/98/2000/Me/XP. Double click on 'Control Panel'. 3. file:///D|/My%20Documents/dfu/W9/english/190p5/install/gt_start.htm (1 of all the drivers in Windows...
... 'Start' button, point to Your PC • Getting Use the information file ( .inf) for Windows® 95/98/2000/Me/XP or later Started • Optimizing The built-in VESA DDC2B feature in Philips Monitors supports Plug & Play requirements for Windows® 95/98/2000/Me/XP. Double click on 'Control Panel'. 3. file:///D|/My%20Documents/dfu/W9/english/190p5/install/gt_start.htm (1 of all the drivers in Windows...
User manual
Page 74
.../W9/english/190p5/install/gt_start.htm (2 of the driver(Advanced)' and click on the 'Continue Anyway' button. 13. If the 'Properties' button is inactive, it means your monitor model and click on 'Have disk...'. 8. then click on the 'Finish' button then the 'Close' button. Click on the 'Next' button. 7. Click on 'Properties' button. button. 8. Select your monitor is active, click on 'Control Panel'. 3. Select 'Display a list...
.../W9/english/190p5/install/gt_start.htm (2 of the driver(Advanced)' and click on the 'Continue Anyway' button. 13. If the 'Properties' button is inactive, it means your monitor model and click on 'Have disk...'. 8. then click on the 'Finish' button then the 'Close' button. Click on the 'Next' button. 7. Click on 'Properties' button. button. 8. Select your monitor is active, click on 'Control Panel'. 3. Select 'Display a list...

User manual
Page 83
... your product. This product must have any difficulties while installing or using this owner's manual and keep both nearby. WHAT IS COVERED? For three years thereafter, all parts will repair it after it to access the Warranty Registration Card. WHAT IS EXCLUDED? file:///D|/My%20Documents/dfu/W9/english/warranty/war_usa.htm (1 of installation. If you within the first year of purchase...
... your product. This product must have any difficulties while installing or using this owner's manual and keep both nearby. WHAT IS COVERED? For three years thereafter, all parts will repair it after it to access the Warranty Registration Card. WHAT IS EXCLUDED? file:///D|/My%20Documents/dfu/W9/english/warranty/war_usa.htm (1 of installation. If you within the first year of purchase...
Leaflet
Page 3
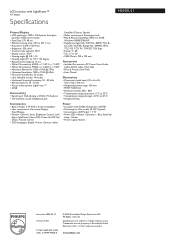
...Speakers • User convenience: On-screen Display, SmartManage • Monitor Controls: Auto, Brightness Control, Left/ Right, LightFrame, Menu (OK), Power On/Off, Up/ Down, Volume control • OSD Languages: English, French, German, Italian, Power • Complies with: E2000, Energy Star, NUTEK • Consumption (On mode): 42.5W (Typical) • Consumption (Off Mode): < 1 W • Power LED indicator: Operation - LCD monitor with LightFrame™ 19" SXGA Specifications 190P5ES/27 Picture/Display • LCD panel type: 1280 x 1024 pixels, Anti-glare polarizer, RGB vertical...
...Speakers • User convenience: On-screen Display, SmartManage • Monitor Controls: Auto, Brightness Control, Left/ Right, LightFrame, Menu (OK), Power On/Off, Up/ Down, Volume control • OSD Languages: English, French, German, Italian, Power • Complies with: E2000, Energy Star, NUTEK • Consumption (On mode): 42.5W (Typical) • Consumption (Off Mode): < 1 W • Power LED indicator: Operation - LCD monitor with LightFrame™ 19" SXGA Specifications 190P5ES/27 Picture/Display • LCD panel type: 1280 x 1024 pixels, Anti-glare polarizer, RGB vertical...


