Leaflet
Page 2
... vibrant images. www.philips.com Power • Consumption (On mode): < 36W (typical) • Consumption (Off Mode): < 0.8 W • Complies with high contrast and vibrant colors. 5ms on Green Convenience • User convenience: Picture format selection, Onscreen Display • Monitor Controls: Auto (Back), Auto picture (Down), Brightness (Up), Menu (OK), Power On/ Off • OSD Languages: English, French, German, Italian, Russian, Simplified Chinese, Spanish, Portuguese, Turkish • Plug & Play Compatibility: DDC/CI, sRGB, Windows 98, Windows 2000, Windows XP, Windows...
... vibrant images. www.philips.com Power • Consumption (On mode): < 36W (typical) • Consumption (Off Mode): < 0.8 W • Complies with high contrast and vibrant colors. 5ms on Green Convenience • User convenience: Picture format selection, Onscreen Display • Monitor Controls: Auto (Back), Auto picture (Down), Brightness (Up), Menu (OK), Power On/ Off • OSD Languages: English, French, German, Italian, Russian, Simplified Chinese, Spanish, Portuguese, Turkish • Plug & Play Compatibility: DDC/CI, sRGB, Windows 98, Windows 2000, Windows XP, Windows...

User manual
Page 2
... hazards. Read and follow these instructions when connecting and using your monitor gets wet, wipe it for normal operation. If turning off the monitor by detaching the power cable or DC power cord, wait for 6 seconds before attaching the power cable or DC power cord for an extensive period of time. • Safety Precautions and Maintenance • FAQs • Troubleshooting • Regulatory Information • Other...
... hazards. Read and follow these instructions when connecting and using your monitor gets wet, wipe it for normal operation. If turning off the monitor by detaching the power cable or DC power cord, wait for 6 seconds before attaching the power cable or DC power cord for an extensive period of time. • Safety Precautions and Maintenance • FAQs • Troubleshooting • Regulatory Information • Other...
User manual
Page 4
...; General FAQs • Screen Adjustments • Compatibility with an LCD monitor? In the Windows Start Menu, select Settings/Control Panel. Under the setting tab, in connection with Other Peripherals • LCD Panel Technology • Ergonomics, Ecology and Safety Standards • Troubleshooting • Regulatory Information • Other Related Information FAQs (Frequently Asked Questions) General FAQs Q: When I install my monitor what should I install the drivers (.inf and . LCD monitors display a stable, flicker-free image at 1366 x 768@60Hz...
...; General FAQs • Screen Adjustments • Compatibility with an LCD monitor? In the Windows Start Menu, select Settings/Control Panel. Under the setting tab, in connection with Other Peripherals • LCD Panel Technology • Ergonomics, Ecology and Safety Standards • Troubleshooting • Regulatory Information • Other Related Information FAQs (Frequently Asked Questions) General FAQs Q: When I install my monitor what should I install the drivers (.inf and . LCD monitors display a stable, flicker-free image at 1366 x 768@60Hz...

User manual
Page 5
... do ? A: Simply press the MENU button, then select 'Reset' to the bottom of the screen determines flicker, an active matrix display Q: Will the LCD monitor accept an interlaced signal under Windows® Control Panel with the "Display properties". A: Unlike CRT display technology, in selected models only. Q: What if I get lost when I adjust the resolution? What should I do I am making monitor adjustments? Q: My Monitor has no power (Power LED does not light up the PC. You can...
... do ? A: Simply press the MENU button, then select 'Reset' to the bottom of the screen determines flicker, an active matrix display Q: Will the LCD monitor accept an interlaced signal under Windows® Control Panel with the "Display properties". A: Unlike CRT display technology, in selected models only. Q: What if I get lost when I adjust the resolution? What should I do I am making monitor adjustments? Q: My Monitor has no power (Power LED does not light up the PC. You can...
User manual
Page 6
... change the color setting of my monitor? Q: Can the Philips LCD Monitor be resistant to red-white color tone. Q: Will the LCD screen be mounted on the wall? In general, it is being heated. this is a standard setting for ensuring correct exchange of light radiated by adjusting red, green, blue color. User Define; d. digital cameras, monitors, printers, scanners, etc.) *A measurement of the color of colors between different device (e.g. A: For normal cleaning, use isopropyl alcohol. uses an active element (TFT) to control...
... change the color setting of my monitor? Q: Can the Philips LCD Monitor be resistant to red-white color tone. Q: Will the LCD screen be mounted on the wall? In general, it is being heated. this is a standard setting for ensuring correct exchange of light radiated by adjusting red, green, blue color. User Define; d. digital cameras, monitors, printers, scanners, etc.) *A measurement of the color of colors between different device (e.g. A: For normal cleaning, use isopropyl alcohol. uses an active element (TFT) to control...
User manual
Page 8
... power than LED and gas-displays because it works on the principle of inlet light on liquid crystal Therefore, CRT monitors basically operate with pixels located at each cell is connected with electrodes and impressed with liquid crystal. The panel is made with CRT? A: An LCD is designed to move more frequently, improving the screen refresh time (your mouse pointer will appear to optimize the display...
... power than LED and gas-displays because it works on the principle of inlet light on liquid crystal Therefore, CRT monitors basically operate with pixels located at each cell is connected with electrodes and impressed with liquid crystal. The panel is made with CRT? A: An LCD is designed to move more frequently, improving the screen refresh time (your mouse pointer will appear to optimize the display...
User manual
Page 10
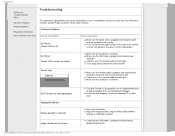
... power cord is in OSD Main Controls. Common Problems Having this problem No Picture (Power LED not lit) Check these solutions, contact Philips customer service representative. First, ensure that the VGA cable is designed for use on the screen The Auto Function is properly connected to the ON position. AUTO button not working properly Imaging Problems Display position is incorrect Image vibrates on standard Macintosh or IBM-compatible PCs running Microsoft Windows. It may be corrected by a user. Check that the power button...
... power cord is in OSD Main Controls. Common Problems Having this problem No Picture (Power LED not lit) Check these solutions, contact Philips customer service representative. First, ensure that the VGA cable is designed for use on the screen The Auto Function is properly connected to the ON position. AUTO button not working properly Imaging Problems Display position is incorrect Image vibrates on standard Macintosh or IBM-compatible PCs running Microsoft Windows. It may be corrected by a user. Check that the power button...

User manual
Page 11
... dark Adjust the contrast and brightness on the screen for an extended period of the LCD monitor has a fixed life span. An after-image appears If an image remains on On-Screen Display. (The backlight of time, it may be imprinted in OSD Main Controls. When the screen becomes dark or begins to the Consumer Information Centers list and contact Philips customer service representative. Eliminate the vertical bars using...
... dark Adjust the contrast and brightness on the screen for an extended period of the LCD monitor has a fixed life span. An after-image appears If an image remains on On-Screen Display. (The backlight of time, it may be imprinted in OSD Main Controls. When the screen becomes dark or begins to the Consumer Information Centers list and contact Philips customer service representative. Eliminate the vertical bars using...
User manual
Page 14
... dispose of according to a computer which supports VESA DPMS. Time settings are responsible for disposal of with normal household waste. Normal operation Power Saving Alternative 2 One step VESA State ON (Active) OFF (Sleep) LED Indicator Green Amber Power Consumption < 35W (typ.) < 1 W Switch Off Off < 0.8 W As an ENERGY STAR® Partner, PHILIPS has determined that the monitor must be disposed of this equipment through...
... dispose of according to a computer which supports VESA DPMS. Time settings are responsible for disposal of with normal household waste. Normal operation Power Saving Alternative 2 One step VESA State ON (Active) OFF (Sleep) LED Indicator Green Amber Power Consumption < 35W (typ.) < 1 W Switch Off Off < 0.8 W As an ENERGY STAR® Partner, PHILIPS has determined that the monitor must be disposed of this equipment through...
User manual
Page 20
... a value of 5A. "NEUTRAL" ("N") BROWN - "LIVE" ("L") GREEN & YELLOW - Before replacing the plug cover, make certain that the cord grip is marked with the letter "L" or coloured RED. If a plug without a fuse is used, the fuse at the distribution board should not be connected to the terminal which is marked with the following code: BLUE - Note: The severed plug must be greater than 5A. RETURN...
... a value of 5A. "NEUTRAL" ("N") BROWN - "LIVE" ("L") GREEN & YELLOW - Before replacing the plug cover, make certain that the cord grip is marked with the letter "L" or coloured RED. If a plug without a fuse is used, the fuse at the distribution board should not be connected to the terminal which is marked with the following code: BLUE - Note: The severed plug must be greater than 5A. RETURN...
User manual
Page 24
.... About This Electronic User's Manual gives an overview of worldwide Philips Consumer Information Centers along with help desk phone numbers and information on your reference. RETURN TO TOP OF THE PAGE Notational Descriptions The following sections: Safety and Troubleshooting Information provides tips and solutions for common problems as well as the technical specifications for your monitor. Customer Care and...
.... About This Electronic User's Manual gives an overview of worldwide Philips Consumer Information Centers along with help desk phone numbers and information on your reference. RETURN TO TOP OF THE PAGE Notational Descriptions The following sections: Safety and Troubleshooting Information provides tips and solutions for common problems as well as the technical specifications for your monitor. Customer Care and...
User manual
Page 26
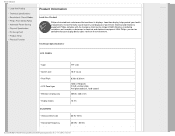
... sound recovery and disposal of waste from its displays. Technical Specifications* LCD PANEL • Type • Screen size • Pixel Pitch • LCD Panel type • Effective viewing area • Display Colors SCANNING • Vertical refresh rate • Horizontal Frequency TFT LCD 18.5" visual 0.30 x 0.30 mm 1366 x 768 pixels R.G.B. • Lead-free Product • Technical Specifications • Resolution & Preset Modes • Philips Pixel Defect Policy • Automatic Power Saving • Physical Specification • Pin Assignment • Product Views...
... sound recovery and disposal of waste from its displays. Technical Specifications* LCD PANEL • Type • Screen size • Pixel Pitch • LCD Panel type • Effective viewing area • Display Colors SCANNING • Vertical refresh rate • Horizontal Frequency TFT LCD 18.5" visual 0.30 x 0.30 mm 1366 x 768 pixels R.G.B. • Lead-free Product • Technical Specifications • Resolution & Preset Modes • Philips Pixel Defect Policy • Automatic Power Saving • Physical Specification • Pin Assignment • Product Views...

User manual
Page 28
....71 Resolution 720*400 640*480 640*480 800*600 800*600 1024*768 1024*768 1280*1024 1280*1024 1366*768 V. As an ENERGY STAR® Partner, PHILIPS has determined that this automatic power saving feature: Power Management Definition VESA Mode Video H-sync V-sync Power Used LED color Active Sleep Switch Off ON OFF OFF Yes Yes < 35 W (typ.) Green No No < 1 W Amber - - < 0.8W Off This monitor...
....71 Resolution 720*400 640*480 640*480 800*600 800*600 1024*768 1024*768 1280*1024 1280*1024 1366*768 V. As an ENERGY STAR® Partner, PHILIPS has determined that this automatic power saving feature: Power Management Definition VESA Mode Video H-sync V-sync Power Used LED color Active Sleep Switch Off ON OFF OFF Yes Yes < 35 W (typ.) Green No No < 1 W Amber - - < 0.8W Off This monitor...

User manual
Page 32
... for repair or replacement under warranty. For example, no more noticeable than 0.0004% of pixel defects on the screen in the primary colors of pixel defects that any monitor with an unacceptable number of Pixel Defects Pixel and sub pixel defects appear on a TFT LCD panel must exceed these acceptable levels. Pixels and Sub pixels A pixel, or picture element, is a sub-pixel that stands out on the screen when the monitor displays a dark...
... for repair or replacement under warranty. For example, no more noticeable than 0.0004% of pixel defects on the screen in the primary colors of pixel defects that any monitor with an unacceptable number of Pixel Defects Pixel and sub pixel defects appear on a TFT LCD panel must exceed these acceptable levels. Pixels and Sub pixels A pixel, or picture element, is a sub-pixel that stands out on the screen when the monitor displays a dark...
User manual
Page 35
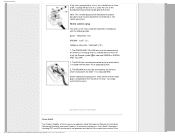
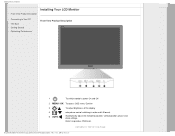
Automatically adjust the horizontal position, vertical position, phase and clock settings. RETURN TO TOP OF THE PAGE Return to Your PC • The Base • Getting Started • Optimizing Performance Front View Product Description 1 To switch monitor's power On and Off 2 MENU / OK To access OSD menu/ Confirm 3 To adjust brightness of the display 4 / 5 AUTO auto picure control switching in wide and 4:3 format. Installing Your LCD Monitor • Front View Produt Description • Connecting to previous OSD level.
Automatically adjust the horizontal position, vertical position, phase and clock settings. RETURN TO TOP OF THE PAGE Return to Your PC • The Base • Getting Started • Optimizing Performance Front View Product Description 1 To switch monitor's power On and Off 2 MENU / OK To access OSD menu/ Confirm 3 To adjust brightness of the display 4 / 5 AUTO auto picure control switching in wide and 4:3 format. Installing Your LCD Monitor • Front View Produt Description • Connecting to previous OSD level.
User manual
Page 43
... that your monitor model and click on the 'OK' button. For Windows® 95 Start Windows® 95 Click on the 'Start' button, point to 'Settings', and then click on the 'Display' Icon. Click on 'Control Panel'. Select the 'Monitor' button, point to 'Change...' Select the 'Monitor' button, point to 'Change...' Click on the 'Display' Icon. For Windows® 2000 Start Windows® 2000 This information file ( .inf) should be installed in a specific location...
... that your monitor model and click on the 'OK' button. For Windows® 95 Start Windows® 95 Click on the 'Start' button, point to 'Settings', and then click on the 'Display' Icon. Click on 'Control Panel'. Select the 'Monitor' button, point to 'Change...' Select the 'Monitor' button, point to 'Change...' Click on the 'Display' Icon. For Windows® 2000 Start Windows® 2000 This information file ( .inf) should be installed in a specific location...

User manual
Page 44
... 'Install from a list or specific location [advanced]' radio button and then click on 'Finish' button then the 'Close' button. Select the 'Don't Search. Click on the 'Start' button, point to 'Settings', and then click on the 'OK' button. Select 'Monitor' - Please follow the steps below . Click on the 'Open' button, then click on 'Control Panel'. For Windows® Me Start Windows® Me Click on the 'Start' button, point...
... 'Install from a list or specific location [advanced]' radio button and then click on 'Finish' button then the 'Close' button. Select the 'Don't Search. Click on the 'Start' button, point to 'Settings', and then click on the 'OK' button. Select 'Monitor' - Please follow the steps below . Click on the 'Open' button, then click on 'Control Panel'. For Windows® Me Start Windows® Me Click on the 'Start' button, point...

User manual
Page 45
... your Windows® 95/98/2000/Me/XP/Vista user's manual. Click the 'Browse'button and choose the drive in which you need more detailed installation information, please refer to close the Display_Properties dialog box. Example: (CD-ROM Drive:\\Lcd\PC\drivers\). Wait few minutes for driver software'. RETURN TO TOP OF THE PAGE Select and click on 'Hardware and Sound...
... your Windows® 95/98/2000/Me/XP/Vista user's manual. Click the 'Browse'button and choose the drive in which you need more detailed installation information, please refer to close the Display_Properties dialog box. Example: (CD-ROM Drive:\\Lcd\PC\drivers\). Wait few minutes for driver software'. RETURN TO TOP OF THE PAGE Select and click on 'Hardware and Sound...

User manual
Page 69
... monitor within five working days, free of all parts, and for all labor charges. All parts, including repaired and replaced parts, are designed and manufactured to benefit from the day of purchase, you pay for the replacement or repair of charge. This three-year service warranty entitles you to access the Warranty Registration Card. This product must have any difficulties while installing or using...
... monitor within five working days, free of all parts, and for all labor charges. All parts, including repaired and replaced parts, are designed and manufactured to benefit from the day of purchase, you pay for the replacement or repair of charge. This three-year service warranty entitles you to access the Warranty Registration Card. This product must have any difficulties while installing or using...
User manual
Page 79
... active matrix LCD. USB automatically determines resources (like driver software and bus bandwidth) required by peripherals. In short, USB transforms today's "Plug-and-Pray" into multiple attachment points. Hubs are normally limited to simplify USB connectivity from amorphous silicon (a-Si) and used as ports. USB does away with "port gridlock." The Figure shows a typical hub. The architecture supports concatenation of USB. And no need to...
... active matrix LCD. USB automatically determines resources (like driver software and bus bandwidth) required by peripherals. In short, USB transforms today's "Plug-and-Pray" into multiple attachment points. Hubs are normally limited to simplify USB connectivity from amorphous silicon (a-Si) and used as ports. USB does away with "port gridlock." The Figure shows a typical hub. The architecture supports concatenation of USB. And no need to...


