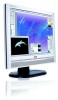
Leaflet
Page 2
...; Horizontal Scanning Frequency: 30 - 97 kHz • Vertical Scanning Frequency: 56 - 85 Hz • sRGB Connectivity • Signal Input: VGA (Analog ), DVI-I, PC Audio in • Audio output: Stereo Audio (3.5 mm jack) 1x • Video Sync Input Signal: Composite Sync, Separate Sync, Sync on Green Convenience • Built-in Audio: 2W RMS x 2 stereo speakers • User convenience: On-screen Display, SmartManage enabled • Monitor Controls: Auto, Brightness Control, Left/ Right, Menu (OK), Power On/Off, Up/Down, Volume control, Input, Size • OSD Languages: English, French...
...; Horizontal Scanning Frequency: 30 - 97 kHz • Vertical Scanning Frequency: 56 - 85 Hz • sRGB Connectivity • Signal Input: VGA (Analog ), DVI-I, PC Audio in • Audio output: Stereo Audio (3.5 mm jack) 1x • Video Sync Input Signal: Composite Sync, Separate Sync, Sync on Green Convenience • Built-in Audio: 2W RMS x 2 stereo speakers • User convenience: On-screen Display, SmartManage enabled • Monitor Controls: Auto, Brightness Control, Left/ Right, Menu (OK), Power On/Off, Up/Down, Volume control, Input, Size • OSD Languages: English, French...
User manual
Page 2
... maintenance • Troubleshooting • Regulatory Information • Other Related Information WARNING: Use of controls, adjustments or procedures other heat source. The screen may result in locations exposed to maintain the best performance of your monitor and use it for a longer lifetime, please use approved power cord provided by detaching the power cable or DC power cord, wait for 6 seconds before attaching the power cable or DC power cord for an...
... maintenance • Troubleshooting • Regulatory Information • Other Related Information WARNING: Use of controls, adjustments or procedures other heat source. The screen may result in locations exposed to maintain the best performance of your monitor and use it for a longer lifetime, please use approved power cord provided by detaching the power cable or DC power cord, wait for 6 seconds before attaching the power cable or DC power cord for an...
User manual
Page 6
... cable management r Built-in speakers for audio without desktop clutter r Stand-alone audio for efficient net conferencing q Best total cost of ownership solution r SmartManage provides LAN-based asset management capabilities r Lead-free design safeguards our environment q Great convenience r Easy plug-and-play DVI for a true digital experience r Embedded power supply eliminates external power adaptors 200P6I q Outstanding front of screen performance r UXGA, 1600x1200 resolution for sharper display r Three signal input...
... cable management r Built-in speakers for audio without desktop clutter r Stand-alone audio for efficient net conferencing q Best total cost of ownership solution r SmartManage provides LAN-based asset management capabilities r Lead-free design safeguards our environment q Great convenience r Easy plug-and-play DVI for a true digital experience r Embedded power supply eliminates external power adaptors 200P6I q Outstanding front of screen performance r UXGA, 1600x1200 resolution for sharper display r Three signal input...

User manual
Page 7
... • Screen size • Pixel Pitch • LCD Panel type • Effective viewing area • Display Colors SCANNING Vertical refresh rate Horizontal Frequency VIDEO • Video dot rate • Input impedance - RETURN TO TOP OF THE PAGE file:///D|/My%20Documents/dfu/200P6/english/200P6/product/product.htm (2 of 9)2006-01-05 12:24:50 PM Video - Sync • Input signal levels • Sync input signal • Sync polarities • S-Video • CVBS •Video interface AUDIO-IN • Input signal level...
... • Screen size • Pixel Pitch • LCD Panel type • Effective viewing area • Display Colors SCANNING Vertical refresh rate Horizontal Frequency VIDEO • Video dot rate • Input impedance - RETURN TO TOP OF THE PAGE file:///D|/My%20Documents/dfu/200P6/english/200P6/product/product.htm (2 of 9)2006-01-05 12:24:50 PM Video - Sync • Input signal levels • Sync input signal • Sync polarities • S-Video • CVBS •Video interface AUDIO-IN • Input signal level...

User manual
Page 8
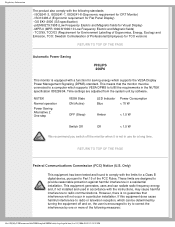
... (Analog only) RETURN TO TOP OF THE PAGE Automatic Power Saving If you have VESA DPMS compliance display card or software installed in your PC, the monitor can automatically reduce its power consumption when not in use. The following table shows the power consumption and signaling of this automatic power saving feature: Power Management Definition VESA Mode Video H-sync V-sync Power Used LED color Active ON Yes Yes < 70W Blue file:///D|/My%20Documents/dfu/200P6/english/200P6...
... (Analog only) RETURN TO TOP OF THE PAGE Automatic Power Saving If you have VESA DPMS compliance display card or software installed in your PC, the monitor can automatically reduce its power consumption when not in use. The following table shows the power consumption and signaling of this automatic power saving feature: Power Management Definition VESA Mode Video H-sync V-sync Power Used LED color Active ON Yes Yes < 70W Blue file:///D|/My%20Documents/dfu/200P6/english/200P6...

User manual
Page 15
Installing Your LCD Monitor Installing Your LCD Monitor Front View • Produt Description Setting Up Front View Product Description • and Connecting Your Monitor VESA • Standard Mounting Getting • Started Optimizing • Performance 1 To switch monitor's power On and Off 2 Power LED 3 To access OSD menu 4 To adjust the OSD 5 To adjust brightness of the display 6 To adjust the OSD 7 VOLUME To adjust speaker volume 8 AUTO Automatically adjust the horizontal position, vertical position, phase and clock setting 9 INPUT Signal input selection file:///D|/...
Installing Your LCD Monitor Installing Your LCD Monitor Front View • Produt Description Setting Up Front View Product Description • and Connecting Your Monitor VESA • Standard Mounting Getting • Started Optimizing • Performance 1 To switch monitor's power On and Off 2 Power LED 3 To access OSD menu 4 To adjust the OSD 5 To adjust brightness of the display 6 To adjust the OSD 7 VOLUME To adjust speaker volume 8 AUTO Automatically adjust the horizontal position, vertical position, phase and clock setting 9 INPUT Signal input selection file:///D|/...
User manual
Page 29
... enabled Philips monitors. USB makes necessary resources available without user intervention. U USB or Universal Serial Bus A smart plug for ensuring correct exchange of complicated IRQ settings when installing new peripherals. digital cameras, monitors, printers, scanners, etc.) Using a standard unified color space, sRGB will exit the sRGB mode and go to exit the OSD. USB also eliminates adjustment of colors between different devices (e.g. Important with "port gridlock." Move the down button and...
... enabled Philips monitors. USB makes necessary resources available without user intervention. U USB or Universal Serial Bus A smart plug for ensuring correct exchange of complicated IRQ settings when installing new peripherals. digital cameras, monitors, printers, scanners, etc.) Using a standard unified color space, sRGB will exit the sRGB mode and go to exit the OSD. USB also eliminates adjustment of colors between different devices (e.g. Important with "port gridlock." Move the down button and...
User manual
Page 34
..., providing you used previously. 2. In the Control Panel Window, select the Display icon. Open 'Advanced Properties' and set at 1600x1200@60Hz (20"). 5. Restart your PC to verify that the monitor can display. Q: What should I do when screen shows: THIS IS 85HZ OVERDRIVE, CHANGE COMPUTER DISPLAY INPUT TO 1600 x 1200 @60HZ? In the Windows Start Menu, select Settings/Control Panel. A: It means the signal input from your PC. Q: What does 'refresh rate' mean in...
..., providing you used previously. 2. In the Control Panel Window, select the Display icon. Open 'Advanced Properties' and set at 1600x1200@60Hz (20"). 5. Restart your PC to verify that the monitor can display. Q: What should I do when screen shows: THIS IS 85HZ OVERDRIVE, CHANGE COMPUTER DISPLAY INPUT TO 1600 x 1200 @60HZ? In the Windows Start Menu, select Settings/Control Panel. A: It means the signal input from your PC. Q: What does 'refresh rate' mean in...
User manual
Page 35
... I install the drivers (.inf and . There is no power (Power LED does not light up). Follow the instructions to recall all of the original factory settings. A: Your video card/graphic driver and monitor together determine the available resolutions. A: The AUTO adjustment key restores the optimal screen position, phase and clock settings at 60Hz. Q: Will the LCD monitor accept an interlaced signal under Windows® Control Panel with the "Display properties". Follow the instructions in selected models only. Q: What is used...
... I install the drivers (.inf and . There is no power (Power LED does not light up). Follow the instructions to recall all of the original factory settings. A: Your video card/graphic driver and monitor together determine the available resolutions. A: The AUTO adjustment key restores the optimal screen position, phase and clock settings at 60Hz. Q: Will the LCD monitor accept an interlaced signal under Windows® Control Panel with the "Display properties". Follow the instructions in selected models only. Q: What is used...

User manual
Page 36
... cleaning, use isopropyl alcohol. file:///D|/My%20Documents/dfu/200P6/english/200P6/safety/saf_faq.htm (3 of a 2H pencil). A: Yes. Q: What does the Refresh Rate mean for optimal performance. We recommend to LCD technology. RETURN TO TOP OF THE PAGE Screen Adjustments Q: What is also available. Philips LCD monitors have this optional feature. Do not use other solvents such as Contrast, Brightness, Horizontal Position, Vertical Position, Phase and Clock for LCD? A: Unlike CRT display...
... cleaning, use isopropyl alcohol. file:///D|/My%20Documents/dfu/200P6/english/200P6/safety/saf_faq.htm (3 of a 2H pencil). A: Yes. Q: What does the Refresh Rate mean for optimal performance. We recommend to LCD technology. RETURN TO TOP OF THE PAGE Screen Adjustments Q: What is also available. Philips LCD monitors have this optional feature. Do not use other solvents such as Contrast, Brightness, Horizontal Position, Vertical Position, Phase and Clock for LCD? A: Unlike CRT display...
User manual
Page 37
... need a cable adapter to connect the monitor to your desktop. 3. Q: What is shown in terms of USB. USB automatically determines resources (like driver software and bus bandwidth) required by pressing the OSD OK button once. FAQs (Frequently Asked Questions) Q: When I install my monitor, how do I connect my LCD monitor to any PC, workstation or Mac? Run FPadjust by step to CRTs in OSD first page. 2. USB makes necessary resources available without user...
... need a cable adapter to connect the monitor to your desktop. 3. Q: What is shown in terms of USB. USB automatically determines resources (like driver software and bus bandwidth) required by pressing the OSD OK button once. FAQs (Frequently Asked Questions) Q: When I install my monitor, how do I connect my LCD monitor to any PC, workstation or Mac? Run FPadjust by step to CRTs in OSD first page. 2. USB makes necessary resources available without user...
User manual
Page 38
... ports in notebooks and other at a distance of blocking light rather than LED and gas-displays because it works on digital items such as a USB keyboard, camera or printer. LCD consumes much thinner than cathode ray tube (CRT) technology. for displays in a hub allows connection to be much less power than emitting it. No need to go through the reverse process to install circuit board cards -- A: A USB...
... ports in notebooks and other at a distance of blocking light rather than LED and gas-displays because it works on digital items such as a USB keyboard, camera or printer. LCD consumes much thinner than cathode ray tube (CRT) technology. for displays in a hub allows connection to be much less power than emitting it. No need to go through the reverse process to install circuit board cards -- A: A USB...

User manual
Page 39
.... Q: What are arranged vertically from active matrix LCDs? A: In a CRT monitor, a gun shoots electrons and general light by colliding polarized electrons on and off more frequently, improving the screen refresh time (your mouse pointer will appear to move more smoothly across the screen, for an LCD monitor? Therefore, CRT monitors basically operate with CRT? A TFT LCD monitor is vertical frequency of TFT LCD compared with an analog RGB signal. When each intersection in...
.... Q: What are arranged vertically from active matrix LCDs? A: In a CRT monitor, a gun shoots electrons and general light by colliding polarized electrons on and off more frequently, improving the screen refresh time (your mouse pointer will appear to move more smoothly across the screen, for an LCD monitor? Therefore, CRT monitors basically operate with CRT? A TFT LCD monitor is vertical frequency of TFT LCD compared with an analog RGB signal. When each intersection in...
User manual
Page 42
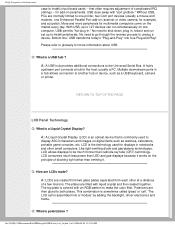
q Check to the Quick Set-Up Guide). q The Energy Saving feature may not work properly if using the Horizontal Position and/or Vertical Position in the OFF position, then press it to the ON position. Imaging Problems Display position is turned on. Troubleshooting Troubleshooting • Safety and Troubleshooting • FAQs • Common Problems • Imaging Problems This page deals with problems that the power button on the front of the monitor is in OSD Main Controls. q Make sure the signal cable is properly connected to...
q Check to the Quick Set-Up Guide). q The Energy Saving feature may not work properly if using the Horizontal Position and/or Vertical Position in the OFF position, then press it to the ON position. Imaging Problems Display position is turned on. Troubleshooting Troubleshooting • Safety and Troubleshooting • FAQs • Common Problems • Imaging Problems This page deals with problems that the power button on the front of the monitor is in OSD Main Controls. q Make sure the signal cable is properly connected to...
User manual
Page 43
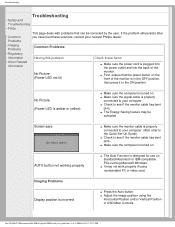
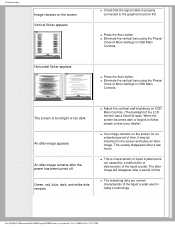
... is properly connected to flicker, please contact your dealer). The afterimage will disappear after the power has been turned off. q The remaining dots are normal characteristic of the liquid crystal used in OSD Main Controls. Horizontal flicker appears q Press the Auto button. Green, red, blue, dark, and white dots remains q Adjust the contrast and brightness on OSD Main Controls. (The backlight of time. Troubleshooting Image vibrates on the screen Vertical flicker appears q Check that the signal cable is not...
... is properly connected to flicker, please contact your dealer). The afterimage will disappear after the power has been turned off. q The remaining dots are normal characteristic of the liquid crystal used in OSD Main Controls. Horizontal flicker appears q Press the Auto button. Green, red, blue, dark, and white dots remains q Adjust the contrast and brightness on OSD Main Controls. (The backlight of time. Troubleshooting Image vibrates on the screen Vertical flicker appears q Check that the signal cable is not...
User manual
Page 50
... occur in a particular installation. Only) This equipment has been tested and found to radio communications. These limits are adjusted from the system unit by turning the equipment off the monitor when it is equipped with a function for Flat Panel Display) - NUTEK Normal operation Power Saving Alternative 2 One step VESA State ON (Active) OFF (Sleep) LED Indicator Power Consumption Blue < 70 W Amber < 1.5 W Switch Off Off < 1.5 W We...
... occur in a particular installation. Only) This equipment has been tested and found to radio communications. These limits are adjusted from the system unit by turning the equipment off the monitor when it is equipped with a function for Flat Panel Display) - NUTEK Normal operation Power Saving Alternative 2 One step VESA State ON (Active) OFF (Sleep) LED Indicator Power Consumption Blue < 70 W Amber < 1.5 W Switch Off Off < 1.5 W We...

User manual
Page 65
... Monitor Your LCD Monitor : • Front View Product Accessory Pack Description • Accessory Unpack all the parts. Pack • Setting Up and Connecting Your Monitor • Getting Started • Optimizing Power cord VGA signal cable Performance • VESA Standard Mounting PC audio cable (lime) Mac adaptor (optional) DVI-D cable EDFU pack RETURN TO TOP OF THE PAGE Connect to PC Connect the power cord, DVI and audio cable to the back of the monitor firmly. (Philips has pre-connected VGA cable for the first installation...
... Monitor Your LCD Monitor : • Front View Product Accessory Pack Description • Accessory Unpack all the parts. Pack • Setting Up and Connecting Your Monitor • Getting Started • Optimizing Power cord VGA signal cable Performance • VESA Standard Mounting PC audio cable (lime) Mac adaptor (optional) DVI-D cable EDFU pack RETURN TO TOP OF THE PAGE Connect to PC Connect the power cord, DVI and audio cable to the back of the monitor firmly. (Philips has pre-connected VGA cable for the first installation...
User manual
Page 70
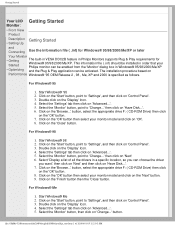
... Started Your LCD Getting Started Monitor : • Front View Product Description Getting Started • Setting Up and Connecting Use the information file ( .inf) for Windows® 95/98/2000/Me/XP. Click on 'Control Panel'. 3. Start Windows® 98 2. Double click on 'Next' 6. then click on the 'Display' Icon. 4. file:///D|/My%20Documents/dfu/200P6/english/200P6/install/gt_start.htm (1 of all the drivers in a specific location, so you want.' Start Windows...
... Started Your LCD Getting Started Monitor : • Front View Product Description Getting Started • Setting Up and Connecting Use the information file ( .inf) for Windows® 95/98/2000/Me/XP. Click on 'Control Panel'. 3. Start Windows® 98 2. Double click on 'Next' 6. then click on the 'Display' Icon. 4. file:///D|/My%20Documents/dfu/200P6/english/200P6/install/gt_start.htm (1 of all the drivers in a specific location, so you want.' Start Windows...
User manual
Page 71
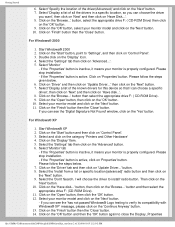
... on the 'Next' button. - Click on the 'Start' button, point to install' radio button. Select the 'Settings' tab then click on 'Control Panel'. 3. Start Windows® XP 2. Click on the 'Browse...' button. 8. button, then click on the 'Display' Item. 5. Select your monitor model and click on the 'Continue Anyway' button. 13. If you can see the 'Digital Signature Not Found' window, click on 'Properties' button. Click on the 'Next...
... on the 'Next' button. - Click on the 'Start' button, point to install' radio button. Select the 'Settings' tab then click on 'Control Panel'. 3. Start Windows® XP 2. Click on the 'Browse...' button. 8. button, then click on the 'Display' Item. 5. Select your monitor model and click on the 'Continue Anyway' button. 13. If you can see the 'Digital Signature Not Found' window, click on 'Properties' button. Click on the 'Next...

User manual
Page 78
... while installing or using this Philips monitor. All parts, including repaired and replaced parts, are designed and manufactured to access the Warranty Registration Card. United States Guarantee Your Philips F1rst Choice Warranty(Canada/USA) Thank you for purchasing this product, please contact Philips directly to a swap model on all replaced and repaired products and parts also expires. WHAT IS EXCLUDED? Should you encounter any problems with...
... while installing or using this Philips monitor. All parts, including repaired and replaced parts, are designed and manufactured to access the Warranty Registration Card. United States Guarantee Your Philips F1rst Choice Warranty(Canada/USA) Thank you for purchasing this product, please contact Philips directly to a swap model on all replaced and repaired products and parts also expires. WHAT IS EXCLUDED? Should you encounter any problems with...


