Leaflet
Page 2
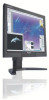
...; Horizontal Scanning Frequency: 30 - 98 kHz • Vertical Scanning Frequency: 56 - 85 Hz • Picture enhancement: SmartImage • sRGB Connectivity • Signal Input: VGA (Analog ), DVI-I, DVI-D • USB: USB 2.0 x 4 • Video Sync Input Signal: Composite Sync, Separate Sync, Sync on Green • Video input impedance: 75 ohm • Sync input impedance: 2.2k ohm • Video input signal levels: 0.7 Vpp Convenience • User convenience: On-screen Display, SmartManage enabled • Monitor Controls: Auto, Brightness Control (Up/ Down), Left/Right, Menu (OK), Power...
...; Horizontal Scanning Frequency: 30 - 98 kHz • Vertical Scanning Frequency: 56 - 85 Hz • Picture enhancement: SmartImage • sRGB Connectivity • Signal Input: VGA (Analog ), DVI-I, DVI-D • USB: USB 2.0 x 4 • Video Sync Input Signal: Composite Sync, Separate Sync, Sync on Green • Video input impedance: 75 ohm • Sync input impedance: 2.2k ohm • Video input signal levels: 0.7 Vpp Convenience • User convenience: On-screen Display, SmartManage enabled • Monitor Controls: Auto, Brightness Control (Up/ Down), Left/Right, Menu (OK), Power...
User manual
Page 2
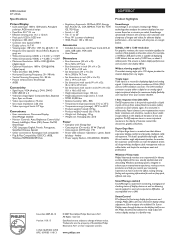
...-11 1:16:15 PM Read and follow these instructions when connecting and using your local service center. (Please refer to Customer Care Consumer Information Center) q Do not subject the LCD monitor to shock, electrical hazards and/or mechanical hazards. q When positioning the monitor, make sure the power plug and outlet are easily accessible. q Remove any other than those specified in this documentation...
...-11 1:16:15 PM Read and follow these instructions when connecting and using your local service center. (Please refer to Customer Care Consumer Information Center) q Do not subject the LCD monitor to shock, electrical hazards and/or mechanical hazards. q When positioning the monitor, make sure the power plug and outlet are easily accessible. q Remove any other than those specified in this documentation...
User manual
Page 3
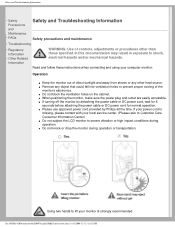
... power is not repairable or removable. A high contrast static image that falls within the following temperature and humidity ranges. q To avoid the risk of 3)2006-12-11 1:16:15 PM When moving your display from image retention. The screen may be opened only by the inherent technological limitations of Image, which is off immediately and disconnect the power cord. Consult a service technician if the monitor...
... power is not repairable or removable. A high contrast static image that falls within the following temperature and humidity ranges. q To avoid the risk of 3)2006-12-11 1:16:15 PM When moving your display from image retention. The screen may be opened only by the inherent technological limitations of Image, which is off immediately and disconnect the power cord. Consult a service technician if the monitor...
User manual
Page 4
... on your user manual to the monitor that your Philips LCD monitor. 6. Follow the instructions in connection with Other Peripherals Q: When I install my monitor what should I do I install the drivers (.inf and . In the Windows Start Menu, select Settings/Control Panel. icm files) or a driver disk when you used previously. 2. Unplug all cables, then connect your PC to install the drivers. icm)? Follow the instructions to 1600x1200 pixels (20"). 3. icm files) will be installed automatically. Open 'Advanced Properties...
... on your user manual to the monitor that your Philips LCD monitor. 6. Follow the instructions in connection with Other Peripherals Q: When I install my monitor what should I do I install the drivers (.inf and . In the Windows Start Menu, select Settings/Control Panel. icm files) or a driver disk when you used previously. 2. Unplug all cables, then connect your PC to install the drivers. icm)? Follow the instructions to 1600x1200 pixels (20"). 3. icm files) will be installed automatically. Open 'Advanced Properties...
User manual
Page 5
... (TFT) to control each individual pixel and the refresh rate is therefore not really applicable to wake up the PC. A: Unlike CRT display technology, in selected models only. Q: What if I get lost when I do? Note: Auto function is used, the screen displays both odd and even horizontal scanning lines at the same time, thus distorting the picture. Q: Will the LCD monitor accept an interlaced signal under PC models...
... (TFT) to control each individual pixel and the refresh rate is therefore not really applicable to wake up the PC. A: Unlike CRT display technology, in selected models only. Q: What if I get lost when I do? Note: Auto function is used, the screen displays both odd and even horizontal scanning lines at the same time, thus distorting the picture. Q: Will the LCD monitor accept an interlaced signal under PC models...
User manual
Page 6
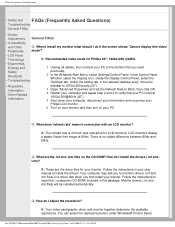
.... LCD image retention can choose his/her preference color setting by adjusting red, green, blue color. *A measurement of the color of colors between different device (e.g. For extensive cleaning, please use a clean, soft cloth. b. 9300K; digital cameras, monitors, printers, scanners, etc.) e. a. 6500K; sRGB; the user can occur when a static residual image remains visible on the wall? Q: What is being heated. Most image retention can change the color setting of time without keyboard or mouse input...
.... LCD image retention can choose his/her preference color setting by adjusting red, green, blue color. *A measurement of the color of colors between different device (e.g. For extensive cleaning, please use a clean, soft cloth. b. 9300K; digital cameras, monitors, printers, scanners, etc.) e. a. 6500K; sRGB; the user can occur when a static residual image remains visible on the wall? Q: What is being heated. Most image retention can change the color setting of time without keyboard or mouse input...
User manual
Page 7
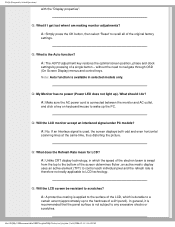
... Contrast, Brightness, Horizontal Position, Vertical Position, Phase and Clock for 20". Q: When I install my monitor, how do I avoid image retention? Run FPadjust by pressing the OSD OK button once. A: To reduce the possibility of 8)2006-12-11 1:16:19 PM Q: Can image retention be repaired and is shown in use . 3. To install the Flat Panel Adjust (FPadjust) program located on the screen for lengthy periods can't be repaired? Follow the instructions...
... Contrast, Brightness, Horizontal Position, Vertical Position, Phase and Clock for 20". Q: When I install my monitor, how do I avoid image retention? Run FPadjust by pressing the OSD OK button once. A: To reduce the possibility of 8)2006-12-11 1:16:19 PM Q: Can image retention be repaired and is shown in use . 3. To install the Flat Panel Adjust (FPadjust) program located on the screen for lengthy periods can't be repaired? Follow the instructions...
User manual
Page 8
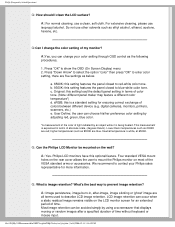
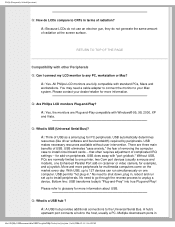
... need a cable adapter to connect the monitor to glossary for more information. There are fully compatible with Windows® 95, 98, 2000, XP and Vista. that often requires adjustment of removing the computer case to any PC, workstation or Mac? A hub's upstream port connects a hub to the Universal Serial Bus. More and more information about USB. USB does away with other Peripherals Q: Can I connect my LCD monitor to install...
... need a cable adapter to connect the monitor to glossary for more information. There are fully compatible with Windows® 95, 98, 2000, XP and Vista. that often requires adjustment of removing the computer case to any PC, workstation or Mac? A hub's upstream port connects a hub to the Universal Serial Bus. More and more information about USB. USB does away with other Peripherals Q: Can I connect my LCD monitor to install...
User manual
Page 12
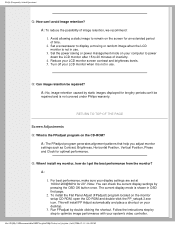
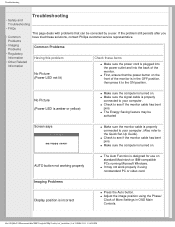
q Adjust the image position using nonstandard PC or video card. Common Problems • Regulatory Information • Other Related Information Having this problem No Picture (Power LED not lit) Check these solutions, contact Philips customer service representative. q The Energy Saving feature may not work properly if using the Phase/ Clock of the monitor is properly connected to your computer. No Picture (Power LED is amber or yellow) q Make sure the computer is turned on. q It may...
q Adjust the image position using nonstandard PC or video card. Common Problems • Regulatory Information • Other Related Information Having this problem No Picture (Power LED not lit) Check these solutions, contact Philips customer service representative. q The Energy Saving feature may not work properly if using the Phase/ Clock of the monitor is properly connected to your computer. No Picture (Power LED is amber or yellow) q Make sure the computer is turned on. q It may...
User manual
Page 13
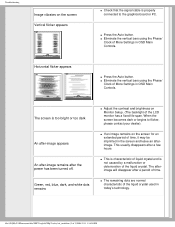
.... Green, red, blue, dark, and white dots remains q Adjust the contrast and brightness on the screen for an extended period of the liquid crystal used in OSD Main Controls. q The remaining dots are normal characteristic of time, it may be imprinted in OSD Main Controls. q Eliminate the vertical bars using the Phase/ Clock of 3)2006-12-11 1:16:20 PM q Press the Auto button. Troubleshooting Image vibrates on the screen Vertical flicker...
.... Green, red, blue, dark, and white dots remains q Adjust the contrast and brightness on the screen for an extended period of the liquid crystal used in OSD Main Controls. q The remaining dots are normal characteristic of time, it may be imprinted in OSD Main Controls. q Eliminate the vertical bars using the Phase/ Clock of 3)2006-12-11 1:16:20 PM q Press the Auto button. Troubleshooting Image vibrates on the screen Vertical flicker...
User manual
Page 31
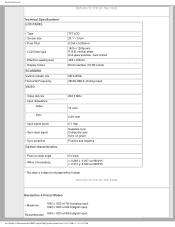
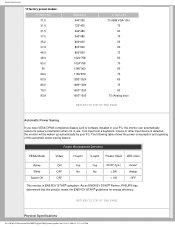
... change without notice. Product Information RETURN TO TOP OF THE PAGE Technical Specifications* LCD PANEL • Type • Screen size • Pixel Pitch • LCD Panel type • Effective viewing area • Display Colors SCANNING Vertical refresh rate Horizontal Frequency VIDEO TFT LCD 20.1" / 51cm 0.255 x 0.255mm 1600 x 1200pixels R.G.B. vertical stripe Anti-glare polarizer, hard coated 408 x 306mm 8 bits interface (16.7M colors) 56Hz-85Hz 30kHz-98kHz (Analog input) • Video dot rate • Input impedance - Video - Sync • Input signal...
... change without notice. Product Information RETURN TO TOP OF THE PAGE Technical Specifications* LCD PANEL • Type • Screen size • Pixel Pitch • LCD Panel type • Effective viewing area • Display Colors SCANNING Vertical refresh rate Horizontal Frequency VIDEO TFT LCD 20.1" / 51cm 0.255 x 0.255mm 1600 x 1200pixels R.G.B. vertical stripe Anti-glare polarizer, hard coated 408 x 306mm 8 bits interface (16.7M colors) 56Hz-85Hz 30kHz-98kHz (Analog input) • Video dot rate • Input impedance - Video - Sync • Input signal...
User manual
Page 32
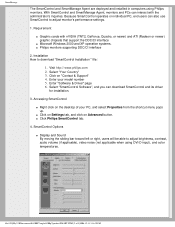
... that this automatic power saving feature: Power Management Definition VESA Mode Video H-sync V-sync Power Used LED color Active Sleep Switch Off ON OFF OFF Yes Yes 50 W* (typ.) Green No No < 2W Amber - - < 1W OFF This monitor is detected, the monitor will be waken up automatically by your PC, the monitor can automatically reduce its power consumption when not in your PC. freq (Hz) 70 (IBM VGA 10h) 70...
... that this automatic power saving feature: Power Management Definition VESA Mode Video H-sync V-sync Power Used LED color Active Sleep Switch Off ON OFF OFF Yes Yes 50 W* (typ.) Green No No < 2W Amber - - < 1W OFF This monitor is detected, the monitor will be waken up automatically by your PC, the monitor can automatically reduce its power consumption when not in your PC. freq (Hz) 70 (IBM VGA 10h) 70...
User manual
Page 47
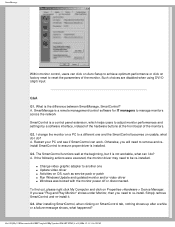
... computers using DVI-D input), and color temperatures. q Click Philips SmartControl tab. 4. Enter your PC, and select Properties from the shortcut menu pops up. file:///D|/My%20Documents/dfu/200P7/english/200p7/product/SMART.HTM (2 of your model number 5. Enter "Software & Driver" page 6. Installation How to adjust brightness, contrast, audio volume (if applicable), video noise (not applicable when using Philips monitors. With SmartControl and SmartManage Agent, monitors and PCs can download SmartControl and its driver for installation. 3.
... computers using DVI-D input), and color temperatures. q Click Philips SmartControl tab. 4. Enter your PC, and select Properties from the shortcut menu pops up. file:///D|/My%20Documents/dfu/200P7/english/200p7/product/SMART.HTM (2 of your model number 5. Enter "Software & Driver" page 6. Installation How to adjust brightness, contrast, audio volume (if applicable), video noise (not applicable when using Philips monitors. With SmartControl and SmartManage Agent, monitors and PCs can download SmartControl and its driver for installation. 3.
User manual
Page 49
... I do ? Simply remove SmartControl and re-install it is a control panel extension, which helps users to adjust monitor performances and settings by a software interface, instead of the monitors. Q&A Q1. I do ? A. If you see if SmartControl can I change the monitor on a PC to a different one q Update video driver q Activities on OS, such as service pack or patch q Run Windows Update and updated monitor and/or video driver q Windows was booted with the monitor power off or disconnected...
... I do ? Simply remove SmartControl and re-install it is a control panel extension, which helps users to adjust monitor performances and settings by a software interface, instead of the monitors. Q&A Q1. I do ? A. If you see if SmartControl can I change the monitor on a PC to a different one q Update video driver q Activities on OS, such as service pack or patch q Run Windows Update and updated monitor and/or video driver q Windows was booted with the monitor power off or disconnected...
User manual
Page 51
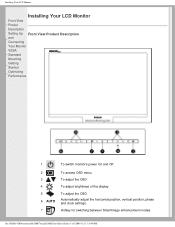
... Setting Up Front View Product Description • and Connecting Your Monitor VESA • Standard Mounting Getting • Started Optimizing • Performance 1 To switch monitor's power On and Off 2 3 4 5 6 AUTO 7 To access OSD menu To adjust the OSD To adjust brightness of 3)2006-12-11 1:16:40 PM file:///D|/My%20Documents/dfu/200P7/english/200p7/install/install.htm (1 of the display To adjust the OSD Automatically adjust the horizontal position, vertical position, phase and clock settings. Hotkey for switching between SmartImage enhancement modes...
... Setting Up Front View Product Description • and Connecting Your Monitor VESA • Standard Mounting Getting • Started Optimizing • Performance 1 To switch monitor's power On and Off 2 3 4 5 6 AUTO 7 To access OSD menu To adjust the OSD To adjust brightness of 3)2006-12-11 1:16:40 PM file:///D|/My%20Documents/dfu/200P7/english/200p7/install/install.htm (1 of the display To adjust the OSD Automatically adjust the horizontal position, vertical position, phase and clock settings. Hotkey for switching between SmartImage enhancement modes...
User manual
Page 55
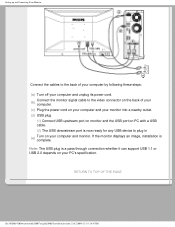
.../200P7/english/200p7/install/connect.htm (2 of your computer. (c) Plug the power cord on your computer and your monitor into a nearby outlet. (d) USB plug (1) Connect USB upstream port on monitor and the USB port on PC with a USB cable. (2) The USB downstream port is complete. Setting up and Connecting Your Monitor Connect the cables to the back of your computer by following these steps: (a) Turn off your computer and unplug its power cord. (b) Connect the monitor signal cable to the video connector on...
.../200P7/english/200p7/install/connect.htm (2 of your computer. (c) Plug the power cord on your computer and your monitor into a nearby outlet. (d) USB plug (1) Connect USB upstream port on monitor and the USB port on PC with a USB cable. (2) The USB downstream port is complete. Setting up and Connecting Your Monitor Connect the cables to the back of your computer by following these steps: (a) Turn off your computer and unplug its power cord. (b) Connect the monitor signal cable to the video connector on...
User manual
Page 60
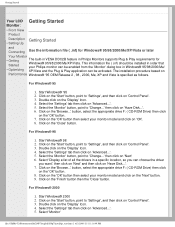
... the 'Close' button. Select 'Monitor' file:///D|/My%20Documents/dfu/200P7/english/200p7/install/gt_start.htm (1 of all the drivers in Philips Monitors supports Plug & Play requirements for Windows® 95/98/2000/Me/XP/Vista or later Your Monitor • Getting Started The built-in VESA DDC2B feature in a specific location, so you can be activated. Double click on 'Control Panel'. 3. For Windows® 98 1. Select 'Display a list...
... the 'Close' button. Select 'Monitor' file:///D|/My%20Documents/dfu/200P7/english/200p7/install/gt_start.htm (1 of all the drivers in Philips Monitors supports Plug & Play requirements for Windows® 95/98/2000/Me/XP/Vista or later Your Monitor • Getting Started The built-in VESA DDC2B feature in a specific location, so you can be activated. Double click on 'Control Panel'. 3. For Windows® 98 1. Select 'Display a list...
User manual
Page 61
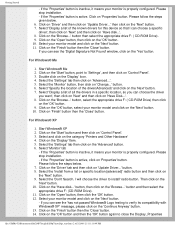
... the 'Next' button. 10. If the 'Properties' button is inactive, it means your monitor model and click on 'Control Panel'. 3. Then click on the 'Have disk...' Click on the 'Driver' tab and then click on 'Control Panel'. 3. Click on the 'Start' button, point to close the Display_Properties file:///D|/My%20Documents/dfu/200P7/english/200p7/install/gt_start.htm (2 of all the drivers in a specific location, so...
... the 'Next' button. 10. If the 'Properties' button is inactive, it means your monitor model and click on 'Control Panel'. 3. Then click on the 'Have disk...' Click on the 'Driver' tab and then click on 'Control Panel'. 3. Click on the 'Start' button, point to close the Display_Properties file:///D|/My%20Documents/dfu/200P7/english/200p7/install/gt_start.htm (2 of all the drivers in a specific location, so...
User manual
Page 62
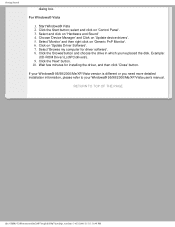
.../english/200p7/install/gt_start.htm (3 of 3)2006-12-11 1:16:49 PM Start Windows® Vista 2. Example: (CD-ROM Drive:\\Lcd\PC\drivers\). 9. Click the 'Next' button. 10. Click on 'Generic PnP Monitor'. 6. If your Windows® 95/98/2000/Me/XP/Vista user's manual. Select 'Monitor' and then right click on 'Update Driver Software'. 7. select and click on 'Control Panel'. 3. Wait few minutes for driver software'. 8. Click the Start button...
.../english/200p7/install/gt_start.htm (3 of 3)2006-12-11 1:16:49 PM Start Windows® Vista 2. Example: (CD-ROM Drive:\\Lcd\PC\drivers\). 9. Click the 'Next' button. 10. Click on 'Generic PnP Monitor'. 6. If your Windows® 95/98/2000/Me/XP/Vista user's manual. Select 'Monitor' and then right click on 'Update Driver Software'. 7. select and click on 'Control Panel'. 3. Wait few minutes for driver software'. 8. Click the Start button...
User manual
Page 73
... you encounter any problems with a new or renewed to you pay for the replacement or repair of purchase. All Philips monitors are covered only for the first year. Attach it has been sent to this Philips monitor. WHO IS COVERED? All parts, including repaired and replaced parts, are designed and manufactured to access the Warranty Registration Card. Three Years Free Labor / Three Years Free Service on all...
... you encounter any problems with a new or renewed to you pay for the replacement or repair of purchase. All Philips monitors are covered only for the first year. Attach it has been sent to this Philips monitor. WHO IS COVERED? All parts, including repaired and replaced parts, are designed and manufactured to access the Warranty Registration Card. Three Years Free Labor / Three Years Free Service on all...


