
Leaflet
Page 2
... and shows with picture presets for Movies, Sports, Video games and weak signal reception. • AutoSound™ Audio volume levels are trademarks of television closed -captioning when the MUTE button is quick and easy. Any-Button-On Top Controls Channel Auto-Programming English/Spanish menu Event On/Off + 240-minute Sleep Timer Closed Caption viewing This television receiver provides display of Philips Consumer Electronics Company. Side AV + Headphone Inputs/Outputs Rear AV UPC: Product Dimensions: Product Weight: Carton Dimensions: Carton Weight: Carton contains: 0 37849...
... and shows with picture presets for Movies, Sports, Video games and weak signal reception. • AutoSound™ Audio volume levels are trademarks of television closed -captioning when the MUTE button is quick and easy. Any-Button-On Top Controls Channel Auto-Programming English/Spanish menu Event On/Off + 240-minute Sleep Timer Closed Caption viewing This television receiver provides display of Philips Consumer Electronics Company. Side AV + Headphone Inputs/Outputs Rear AV UPC: Product Dimensions: Product Weight: Carton Dimensions: Carton Weight: Carton contains: 0 37849...
Quick start guide
Page 1
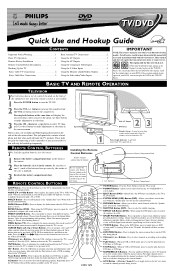
...'s sound level. Allows you to operate the television. When using the remote control to choose between DVD viewing and TV viewing. SMART PICTURE Button - For single channel entries, press the numbered button for connecting a video camcorder or any sporting event), or Weak Signal (used with the Play button to back out of the onscreen menu until it 's previous level. This jack panel also contains a headphone jack that you desire. REMOTE CONTROL BUTTONS Installing the Remote Control Batteries Remote Control (shown from the TV's screen...
...'s sound level. Allows you to operate the television. When using the remote control to choose between DVD viewing and TV viewing. SMART PICTURE Button - For single channel entries, press the numbered button for connecting a video camcorder or any sporting event), or Weak Signal (used with the Play button to back out of the onscreen menu until it 's previous level. This jack panel also contains a headphone jack that you desire. REMOTE CONTROL BUTTONS Installing the Remote Control Batteries Remote Control (shown from the TV's screen...
Quick start guide
Page 2
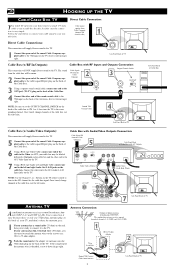
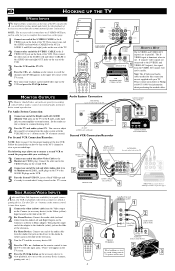
... channel. Screw it down finger tight. Connect the other end of TV 2 Direct Cable Connections: This connection will NOT supply Stereo sound to the 75Ω input on the back of TV ANTENNA TV Antenna Connection: Acombination antenna receives normal broadcast channels (VHF 2-13 and UHF 14-69). buttons on the TV. ANT 75‰ Monitor out VIDEO L/Mono AUDIO AV1 in Y Pb AV2 in R Pr COMPONENT VIDEO INPUT S-VIDEO Jack Panel Back of the television...
... channel. Screw it down finger tight. Connect the other end of TV 2 Direct Cable Connections: This connection will NOT supply Stereo sound to the 75Ω input on the back of TV ANTENNA TV Antenna Connection: Acombination antenna receives normal broadcast channels (VHF 2-13 and UHF 14-69). buttons on the TV. ANT 75‰ Monitor out VIDEO L/Mono AUDIO AV1 in Y Pb AV2 in R Pr COMPONENT VIDEO INPUT S-VIDEO Jack Panel Back of the television...
Quick start guide
Page 3
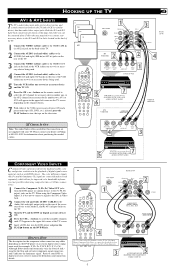
... AV1 channel for accessory device number two. AV1 or AV2 will be connected alone. Refer to your DVD or digital accessory owner's manual for definitions and connection details. 5 7 VCR TWO (or accessory device) (EQUIPPED WITH VIDEO AND AUDIO OUTPUT JACKS) CVI POWER SLEEP TV VCR MODE EJECT SYSTEM MENU OSD AUDIO REPEAT REPEAT A-B SUBTITLE SMART SOUND TV/DVD SMART PICTURE MENU DVD MENU 1 BACK OF TV Monitor out VIDEO L/Mono AUDIO AV1 in Y Pb 2 AV2 in R Pr COMPONENT VIDEO INPUT S-VIDEO COMPONENT VIDEO CABLES (Green, Blue, Red) AUDIO CABLES (RED...
... AV1 channel for accessory device number two. AV1 or AV2 will be connected alone. Refer to your DVD or digital accessory owner's manual for definitions and connection details. 5 7 VCR TWO (or accessory device) (EQUIPPED WITH VIDEO AND AUDIO OUTPUT JACKS) CVI POWER SLEEP TV VCR MODE EJECT SYSTEM MENU OSD AUDIO REPEAT REPEAT A-B SUBTITLE SMART SOUND TV/DVD SMART PICTURE MENU DVD MENU 1 BACK OF TV Monitor out VIDEO L/Mono AUDIO AV1 in Y Pb 2 AV2 in R Pr COMPONENT VIDEO INPUT S-VIDEO COMPONENT VIDEO CABLES (Green, Blue, Red) AUDIO CABLES (RED...
Quick start guide
Page 4
... R Pr COMPONENT VIDEO INPUT 1 S-VIDEO POWER SLEEP TV VCR MODE EJECT SYSTEM MENU AUDIO OSD REPEAT REPEAT A-B SUBTITLE SMART SOUND TV/DVD SMART PICTURE MENU DVD MENU 5 VOL CH MUTE OK PAUSE STOP PLAY 1 2 3 456 AUDIO CABLE (RED/WHITE) 2 L R AUDIO OUT S-VIDEO CABLE HELPFUL HINT The S-VIDEO and VIDEO AV2 in(puts) are 1 connected to the S-VIDEO and VIDEO AV2 in parallel. Then plug the single end of the adapter to the Audio In (white) jack on the remote to scroll the channels until SVHS...
... R Pr COMPONENT VIDEO INPUT 1 S-VIDEO POWER SLEEP TV VCR MODE EJECT SYSTEM MENU AUDIO OSD REPEAT REPEAT A-B SUBTITLE SMART SOUND TV/DVD SMART PICTURE MENU DVD MENU 5 VOL CH MUTE OK PAUSE STOP PLAY 1 2 3 456 AUDIO CABLE (RED/WHITE) 2 L R AUDIO OUT S-VIDEO CABLE HELPFUL HINT The S-VIDEO and VIDEO AV2 in(puts) are 1 connected to the S-VIDEO and VIDEO AV2 in parallel. Then plug the single end of the adapter to the Audio In (white) jack on the remote to scroll the channels until SVHS...

User manual
Page 3
... mercury. The power supply cord or the plug has been damaged; or B. The appliance has been exposed to Article 820-40 of the lead-in any way, such as recommended by qualified service personnel when: A. Wall or Ceiling Mounting - An outdoor antenna should be connected to the grounding system of the building, as close to the point of cable entry as...
... mercury. The power supply cord or the plug has been damaged; or B. The appliance has been exposed to Article 820-40 of the lead-in any way, such as recommended by qualified service personnel when: A. Wall or Ceiling Mounting - An outdoor antenna should be connected to the grounding system of the building, as close to the point of cable entry as...
User manual
Page 4
... a circuit different from digital apparatus as set complies with the FCC-Rules, Part 15 and with the limits for Region 1 in a particular installation. SAFETY INSTRUCTIONS - Only a qualified service person should remove the cover or attempt to which can not play on your DVDs. Declaration of Discs are designed to Part 15 of this device. Read before operating equipment Safety Precautions Warning...
... a circuit different from digital apparatus as set complies with the FCC-Rules, Part 15 and with the limits for Region 1 in a particular installation. SAFETY INSTRUCTIONS - Only a qualified service person should remove the cover or attempt to which can not play on your DVDs. Declaration of Discs are designed to Part 15 of this device. Read before operating equipment Safety Precautions Warning...
User manual
Page 5
... Time 19 Blocking Programming Based on Movie Ratings 20 Blocking Programming Based on TV Ratings 21 Other AutoLock™ Blocking Options 22 How to Use the Active Control 23 Remote Control Use Setting the Sleeptimer Control 24 How to use the Closed Captioning Control 25 Setting the SmartPicture™ Control 26 Setting the SmartSound™ Control 27 Using the QuadraSurf™ Buttons (Alternate Channel) . . .28-29 Remote Use with Accessory Devices (Direct Method) . . . . .28 Operating the DVD Player Operating the DVD Player - Playing a DVD...
... Time 19 Blocking Programming Based on Movie Ratings 20 Blocking Programming Based on TV Ratings 21 Other AutoLock™ Blocking Options 22 How to Use the Active Control 23 Remote Control Use Setting the Sleeptimer Control 24 How to use the Closed Captioning Control 25 Setting the SmartPicture™ Control 26 Setting the SmartSound™ Control 27 Using the QuadraSurf™ Buttons (Alternate Channel) . . .28-29 Remote Use with Accessory Devices (Direct Method) . . . . .28 Operating the DVD Player Operating the DVD Player - Playing a DVD...
User manual
Page 6
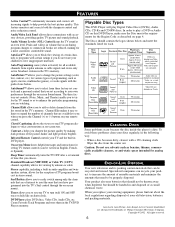
... list stored in volume that you do not want your TV to block the viewing of certain channels or programs with accessory devices, providing quality TV picture and sound playback. AutoPicture™ allows you to change the picture settings (color, tint, contrast, etc.) for the Region Code as to enhance the particular programming you to play Digital Video Discs (DVDs), Audio CDs, CD-Rs and CD-RW discs. Sleep Timer...
... list stored in volume that you do not want your TV to block the viewing of certain channels or programs with accessory devices, providing quality TV picture and sound playback. AutoPicture™ allows you to change the picture settings (color, tint, contrast, etc.) for the Region Code as to enhance the particular programming you to play Digital Video Discs (DVDs), Audio CDs, CD-Rs and CD-RW discs. Sleep Timer...

User manual
Page 7
... remote to show the on-screen menu. 2 Press the CURSOR UP or DOWN buttons to scroll through the on -screen text features such as Closed Caption (CC) TV shows. Main Picture Sound Features Install Brightness Color Picture Sharpness Tint More... 1 POWER SLEEP TV VCR MODE EJECT SYSTEM MENU OSD AUDIO REPEAT REPEAT A-B SUBTITLE SMART SOUND TV/DVD SMART PICTURE MENU DVD MENU 5 2 2 VOL OK MUTE PAUSE STOP CH PLAY 1 2 3 456 789 A/CH CC 0 3 4 Main Picture Sound Features Install Language Tuner Mode Auto Program Channel...
... remote to show the on-screen menu. 2 Press the CURSOR UP or DOWN buttons to scroll through the on -screen text features such as Closed Caption (CC) TV shows. Main Picture Sound Features Install Brightness Color Picture Sharpness Tint More... 1 POWER SLEEP TV VCR MODE EJECT SYSTEM MENU OSD AUDIO REPEAT REPEAT A-B SUBTITLE SMART SOUND TV/DVD SMART PICTURE MENU DVD MENU 5 2 2 VOL OK MUTE PAUSE STOP CH PLAY 1 2 3 456 789 A/CH CC 0 3 4 Main Picture Sound Features Install Language Tuner Mode Auto Program Channel...
User manual
Page 8
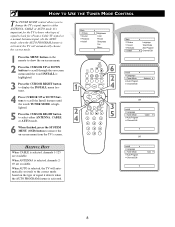
...'s signal input to either ANTENNA, CABLE, or AUTO mode. 6 When finished, press the SYSTEM MENU (OSD) button to remove the on -screen menu until the word INSTALL is highlighted. 3 Press the CURSOR RIGHT button to display the INSTALL menu features. 4 Press CURSOR UP or DOWN buttons to scroll the Install features until the words TUNER MODE is activated. Install Language Tuner Mode Auto Program Channel Edit English Auto 8 Main Picture Sound Features Install Brightness Color Picture Sharpness Tint More... 1 POWER SLEEP TV VCR MODE EJECT SYSTEM MENU OSD AUDIO...
...'s signal input to either ANTENNA, CABLE, or AUTO mode. 6 When finished, press the SYSTEM MENU (OSD) button to remove the on -screen menu until the word INSTALL is highlighted. 3 Press the CURSOR RIGHT button to display the INSTALL menu features. 4 Press CURSOR UP or DOWN buttons to scroll the Install features until the words TUNER MODE is activated. Install Language Tuner Mode Auto Program Channel Edit English Auto 8 Main Picture Sound Features Install Brightness Color Picture Sharpness Tint More... 1 POWER SLEEP TV VCR MODE EJECT SYSTEM MENU OSD AUDIO...
User manual
Page 9
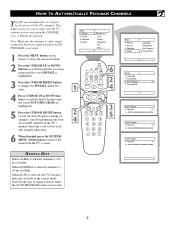
...More... 1 POWER SLEEP TV VCR MODE EJECT SYSTEM MENU OSD AUDIO REPEAT REPEAT A-B SUBTITLE SMART SOUND TV/DVD SMART PICTURE MENU DVD MENU 6 2 4 2 4 VOL OK MUTE PAUSE STOP CH PLAY 1 2 3 456 789 A/CH CC 0 3 5 Main Picture Sound Features Install Language Tuner Mode Auto Program Channel Edit Install Language Tuner Mode Auto Program Channel Edit Auto Program Channel 12 Auto Program Channel 13 Auto Program Channel 14 HELPFUL HINT When CABLE is selected, channels 1-125 are highlighted. 5 Press the CURSOR RIGHT button to start the Auto Program scanning of signal it...
...More... 1 POWER SLEEP TV VCR MODE EJECT SYSTEM MENU OSD AUDIO REPEAT REPEAT A-B SUBTITLE SMART SOUND TV/DVD SMART PICTURE MENU DVD MENU 6 2 4 2 4 VOL OK MUTE PAUSE STOP CH PLAY 1 2 3 456 789 A/CH CC 0 3 5 Main Picture Sound Features Install Language Tuner Mode Auto Program Channel Edit Install Language Tuner Mode Auto Program Channel Edit Auto Program Channel 12 Auto Program Channel 13 Auto Program Channel 14 HELPFUL HINT When CABLE is selected, channels 1-125 are highlighted. 5 Press the CURSOR RIGHT button to start the Auto Program scanning of signal it...
User manual
Page 13
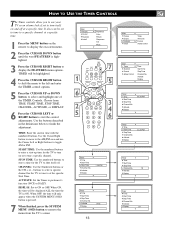
... TV's screen Main Picture Sound Features Install Brightness Color Picture Sharpness Tint More... TIME: Enter the current time with the numbered buttons. DISPLAY: Set to start -up time for the TV to turn itself off at the specific Start Time. Activate Display Timer Time Start Time Stop Time Channel No. Activate Display 0 10 Timer Time Start Time Stop Time Channel No. Activate Display On Use the buttons described in ON. ACTIVATE: Set the Timer to finish the adjustment. Main Picture Sound Features Install Timer AutoLock Format Active Control 1 6 2 5 POWER SLEEP TV VCR MODE...
... TV's screen Main Picture Sound Features Install Brightness Color Picture Sharpness Tint More... TIME: Enter the current time with the numbered buttons. DISPLAY: Set to start -up time for the TV to turn itself off at the specific Start Time. Activate Display Timer Time Start Time Stop Time Channel No. Activate Display 0 10 Timer Time Start Time Stop Time Channel No. Activate Display On Use the buttons described in ON. ACTIVATE: Set the Timer to finish the adjustment. Main Picture Sound Features Install Timer AutoLock Format Active Control 1 6 2 5 POWER SLEEP TV VCR MODE...
User manual
Page 16
... Format Active Control Access Code XXXX Incorrect Features Timer AutoLock Format Active Control New Code - - - - it isn't possible for certain programming. The screen will then ask you to CONFIRM the code you enter your access code or changing it 's been altered by using the NUMBERED buttons. Main Picture Sound Features Install Brightness Color Picture Sharpness Tint More... 1 POWER SLEEP TV EJECT VCR MODE 2SYSTEM MENU OSD AUDIO REPEAT REPEAT A-B SUBTITLE SMART SOUND 4SMART PICTURE TV/DVD MENU DVD MENU 2 4 VOL OK MUTE PAUSE STOP CH PLAY...
... Format Active Control Access Code XXXX Incorrect Features Timer AutoLock Format Active Control New Code - - - - it isn't possible for certain programming. The screen will then ask you to CONFIRM the code you enter your access code or changing it 's been altered by using the NUMBERED buttons. Main Picture Sound Features Install Brightness Color Picture Sharpness Tint More... 1 POWER SLEEP TV EJECT VCR MODE 2SYSTEM MENU OSD AUDIO REPEAT REPEAT A-B SUBTITLE SMART SOUND 4SMART PICTURE TV/DVD MENU DVD MENU 2 4 VOL OK MUTE PAUSE STOP CH PLAY...
User manual
Page 18
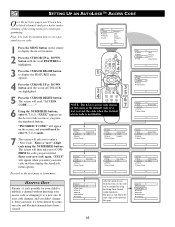
...... 1 POWER SLEEP TV VCR MODE EJECT SYSTEM MENU OSD AUDIO REPEAT REPEAT A-B SUBTITLE SMART SOUND TV/DVD SMART PICTURE MENU DVD MENU 9 2 4 7 2 VOL OK MUTE PAUSE STOP CH PLAY 3 5 4 8 1 2 3 7 456 789 A/CH 6 CC 0 NOTE: The 0,7,1,1 access code shown on this page is the default code or a way to reset the code when the current access code is blocked with the Movie and TV Ratings. Main Picture Sound Features Install Timer AutoLock Format Active Control Features Timer AutoLock Format Active Control Features Timer...
...... 1 POWER SLEEP TV VCR MODE EJECT SYSTEM MENU OSD AUDIO REPEAT REPEAT A-B SUBTITLE SMART SOUND TV/DVD SMART PICTURE MENU DVD MENU 9 2 4 7 2 VOL OK MUTE PAUSE STOP CH PLAY 3 5 4 8 1 2 3 7 456 789 A/CH 6 CC 0 NOTE: The 0,7,1,1 access code shown on this page is the default code or a way to reset the code when the current access code is blocked with the Movie and TV Ratings. Main Picture Sound Features Install Timer AutoLock Format Active Control Features Timer AutoLock Format Active Control Features Timer...
User manual
Page 23
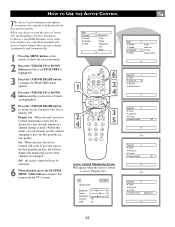
Display On - the Active control will not display the monitoring screen when channels are changed. Off - On - When selected, the Active Control will work to give the best possible picture quality. Main Picture Sound Features Install Brightness Color Picture Sharpness Tint More... 1 POWER SLEEP TV VCR MODE EJECT SYSTEM MENU OSD AUDIO REPEAT REPEAT A-B SUBTITLE SMART SOUND TV/DVD SMART PICTURE MENU DVD MENU 6 2 4 2 4 VOL OK MUTE PAUSE STOP CH PLAY 1 2 3 456 789 A/CH CC 0 3 5 Active Control Monitoring Screen Will appear when the Active Control is...
Display On - the Active control will not display the monitoring screen when channels are changed. Off - On - When selected, the Active Control will work to give the best possible picture quality. Main Picture Sound Features Install Brightness Color Picture Sharpness Tint More... 1 POWER SLEEP TV VCR MODE EJECT SYSTEM MENU OSD AUDIO REPEAT REPEAT A-B SUBTITLE SMART SOUND TV/DVD SMART PICTURE MENU DVD MENU 6 2 4 2 4 VOL OK MUTE PAUSE STOP CH PLAY 1 2 3 456 789 A/CH CC 0 3 5 Active Control Monitoring Screen Will appear when the Active Control is...
User manual
Page 25
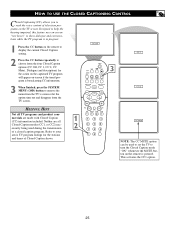
... the SYSTEM MENU (OSD) button to remove the menu from the TV's screen or let the option time out and disappear from the four Closed Caption options (CC Off, CC 1, CC 2, CC Mute). Neither are all TV programs and product commercials are made with Closed Caption (CC) information included. CC Off POWER SLEEP TV VCR MODE EJECT SYSTEM MENU OSD AUDIO REPEAT REPEAT A-B SUBTITLE 3 SMART SOUND TV/DVD SMART PICTURE MENU DVD MENU CC...
... the SYSTEM MENU (OSD) button to remove the menu from the TV's screen or let the option time out and disappear from the four Closed Caption options (CC Off, CC 1, CC 2, CC Mute). Neither are all TV programs and product commercials are made with Closed Caption (CC) information included. CC Off POWER SLEEP TV VCR MODE EJECT SYSTEM MENU OSD AUDIO REPEAT REPEAT A-B SUBTITLE 3 SMART SOUND TV/DVD SMART PICTURE MENU DVD MENU CC...
User manual
Page 35
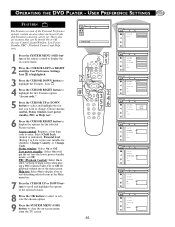
... off 1en User Preference Settings 2 SLEEP TV VCR MODE POWER EJECT 9 1 SYSTEM MENU 7AUDIO OSD REPEAT REPEAT A-B SUBTITLE 5SMART SOUND TV/DVD SMART PICTURE MENU DVD MENU 8 VOL OK 1 4 MUTE PAUSE STOP 2 5 3CH PLAY 5 73 6 2 4 6 789 A/CH CC 0 35 off 1en Black Level shift On Video shift off 1en Access control Status window Low power standby PBC Help text Enter code... Playback Control, and Help text). 1 Press the SYSTEM MENU (OSD) button on the remote control to change. On...
... off 1en User Preference Settings 2 SLEEP TV VCR MODE POWER EJECT 9 1 SYSTEM MENU 7AUDIO OSD REPEAT REPEAT A-B SUBTITLE 5SMART SOUND TV/DVD SMART PICTURE MENU DVD MENU 8 VOL OK 1 4 MUTE PAUSE STOP 2 5 3CH PLAY 5 73 6 2 4 6 789 A/CH CC 0 35 off 1en Black Level shift On Video shift off 1en Access control Status window Low power standby PBC Help text Enter code... Playback Control, and Help text). 1 Press the SYSTEM MENU (OSD) button on the remote control to change. On...
User manual
Page 49
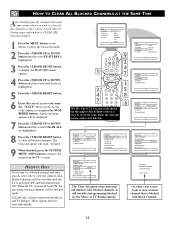
.... • Check the TV power cord. CLEANING • To avoid possible shock hazard, be DVD disks, laser disks, video games, CD-i disks, videotapes, digital television boxes, broadcast channels, cable channels, satellite channels, and others in your viewing): • DVD menus-listings of DVD disk content • Letterbox black bars-shown at the top and bottom of the TV screen when a wide screen (16:9) movie is being used . Avoid wearing jewelry...
.... • Check the TV power cord. CLEANING • To avoid possible shock hazard, be DVD disks, laser disks, video games, CD-i disks, videotapes, digital television boxes, broadcast channels, cable channels, satellite channels, and others in your viewing): • DVD menus-listings of DVD disk content • Letterbox black bars-shown at the top and bottom of the TV screen when a wide screen (16:9) movie is being used . Avoid wearing jewelry...
User manual
Page 50
... or Reverse 40 Sound Settings 33 Still Picture/Picture by the TV. GLOSSARY OF TERMS Auto Programming • The procedure of adding or deleting channel numbers into the more recent Televisions and VCRs. Designed to help the user with VCRs or cameras. Side Audio/Video Inputs • Located on the Television or VCR. Surf • The action of four separate Surf lists holding up and use with specific feature controls (color adjustment, programming, etc.). Status...
... or Reverse 40 Sound Settings 33 Still Picture/Picture by the TV. GLOSSARY OF TERMS Auto Programming • The procedure of adding or deleting channel numbers into the more recent Televisions and VCRs. Designed to help the user with VCRs or cameras. Side Audio/Video Inputs • Located on the Television or VCR. Surf • The action of four separate Surf lists holding up and use with specific feature controls (color adjustment, programming, etc.). Status...


