
Leaflet
Page 2
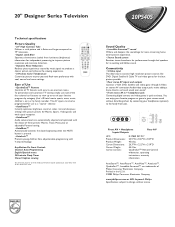
... AOL keyword: Philips Specifications subject to connect high resolution picture sources like DVD, Digital Satellite & Cable TV and video games for the best picture possible. • Rear stereo AV inputs and outputs Connect a VCR, DVD, Satellite and video game through dual speakers for Movies, Sports, Video games and weak signal reception. • AutoSound™ Audio volume levels are trademarks of Philips Consumer Electronics Company. Front AV + Headphone Inputs/Outputs Rear AV UPC: Product Dimensions: Product Weight: Carton Dimensions: Carton Weight: Carton contains...
... AOL keyword: Philips Specifications subject to connect high resolution picture sources like DVD, Digital Satellite & Cable TV and video games for the best picture possible. • Rear stereo AV inputs and outputs Connect a VCR, DVD, Satellite and video game through dual speakers for Movies, Sports, Video games and weak signal reception. • AutoSound™ Audio volume levels are trademarks of Philips Consumer Electronics Company. Front AV + Headphone Inputs/Outputs Rear AV UPC: Product Dimensions: Product Weight: Carton Dimensions: Carton Weight: Carton contains...

User manual
Page 1
Color TV Directions for Use Model No.: Serial No.: Important! Return your new product. Need help you with any of the Features. CALL US BEFORE YOU CONSIDER RETURNING THE PRODUCT. Visit us ! Call us on the web at www.philips.com Printed in China 3141 055 22001 Philips representatives are ready to start enjoying your new product right away! See why inside. We want you through Connections, First-time Setup, or any questions about your Warranty Registration Card within 10 days. We can guide you to help ?
Color TV Directions for Use Model No.: Serial No.: Important! Return your new product. Need help you with any of the Features. CALL US BEFORE YOU CONSIDER RETURNING THE PRODUCT. Visit us ! Call us on the web at www.philips.com Printed in China 3141 055 22001 Philips representatives are ready to start enjoying your new product right away! See why inside. We want you through Connections, First-time Setup, or any questions about your Warranty Registration Card within 10 days. We can guide you to help ?

User manual
Page 2
.... Owner Confirmation Your completed Warranty Registration Card serves as the owner of lightning" indicates uninsulated material within 10 days confirms your right to the "family!" t This "bolt of your model. CAUTION: To prevent electric shock, match wide blade of owning a PHILIPS product...REMOVE COVER (OR BACK). Return your Warranty Registration Card today to ensure you receive all the benefits you're entitled to prevent operating and maintenance problems. WARNING: TO PREVENT FIRE OR SHOCK HAZARD, DO NOT EXPOSE THIS EQUIPMENT TO RAIN OR MOISTURE. NO USER-SERVICEABLE PARTS...
.... Owner Confirmation Your completed Warranty Registration Card serves as the owner of lightning" indicates uninsulated material within 10 days confirms your right to the "family!" t This "bolt of your model. CAUTION: To prevent electric shock, match wide blade of owning a PHILIPS product...REMOVE COVER (OR BACK). Return your Warranty Registration Card today to ensure you receive all the benefits you're entitled to prevent operating and maintenance problems. WARNING: TO PREVENT FIRE OR SHOCK HAZARD, DO NOT EXPOSE THIS EQUIPMENT TO RAIN OR MOISTURE. NO USER-SERVICEABLE PARTS...
User manual
Page 3
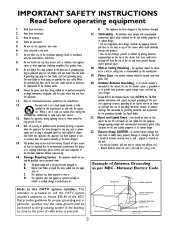
... UNIT (NEC SECTION 810-20) GROUNDING CONDUCTORS (NEC SECTION 810-21) GROUND CLAMPS POWER SERVICE GROUNDING ELECTRODE SYSTEM (NEC ART 250, PART H) The power supply cord or the plug has been damaged; ance; or E. An outdoor antenna should be sure the antenna system is not used , use attachments/accessories specified by the manufacturer, or sold with one wider than the other...
... UNIT (NEC SECTION 810-20) GROUNDING CONDUCTORS (NEC SECTION 810-21) GROUND CLAMPS POWER SERVICE GROUNDING ELECTRODE SYSTEM (NEC ART 250, PART H) The power supply cord or the plug has been damaged; ance; or E. An outdoor antenna should be sure the antenna system is not used , use attachments/accessories specified by the manufacturer, or sold with one wider than the other...
User manual
Page 4
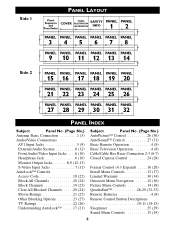
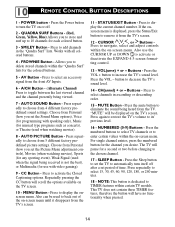
... AutoLock 17 (21) Subject Panel No. (Page No.) AutoPicture™ Control 26 (30) AutoSound™ Control 27 (31) Basic Remote Operation 4 (8) Basic Television Operation 4 (8) Cable/Cable Box Basic Connection 2-3 (6-7) Closed Caption Control 24 (28) Format Control (4:3 Expand) . . . . .16 (20) Install Menu Controls 13 (17) Limited Warranty 30 (34) Onscreen Menu Navigation . . . . . .12 (16) Picture Menu Controls 14 (18) QuadraSurf 28-29 (32-33) Remote Batteries 4 (8) Remote Control Button Descriptions 10-11 (14-15) Sleeptimer 25 (29) Sound Menu Controls 15 (19) 4
... AutoLock 17 (21) Subject Panel No. (Page No.) AutoPicture™ Control 26 (30) AutoSound™ Control 27 (31) Basic Remote Operation 4 (8) Basic Television Operation 4 (8) Cable/Cable Box Basic Connection 2-3 (6-7) Closed Caption Control 24 (28) Format Control (4:3 Expand) . . . . .16 (20) Install Menu Controls 13 (17) Limited Warranty 30 (34) Onscreen Menu Navigation . . . . . .12 (16) Picture Menu Controls 14 (18) QuadraSurf 28-29 (32-33) Remote Batteries 4 (8) Remote Control Button Descriptions 10-11 (14-15) Sleeptimer 25 (29) Sound Menu Controls 15 (19) 4
User manual
Page 5
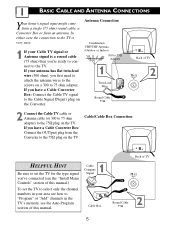
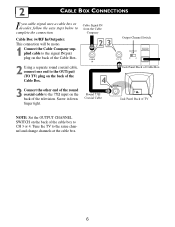
.... Cable/Cable Box Connection 75 ⍀ Monitor AV1 out in your Cable TV signal or Antenna signal is very easy. 1 If your area see how to the Cable Signal IN(put ) plug from an antenna. If you 've connected (see the Auto Program section of TV HELPFUL HINT Be sure to set the TV to select only the channel numbers in VIDEO L AUDIO R S-VIDEO Back of this manual.) To set the TV for the type signal you have a Cable...
.... Cable/Cable Box Connection 75 ⍀ Monitor AV1 out in your Cable TV signal or Antenna signal is very easy. 1 If your area see how to the Cable Signal IN(put ) plug from an antenna. If you 've connected (see the Auto Program section of TV HELPFUL HINT Be sure to set the TV to select only the channel numbers in VIDEO L AUDIO R S-VIDEO Back of this manual.) To set the TV for the type signal you have a Cable...
User manual
Page 6
... Cable 75 ⍀ Monitor AV1 out in VIDEO L AUDIO R S-VIDEO Jack Panel Back of TV NOTE: Set the OUTPUT CHANNEL SWITCH on the back of the Cable Box. 2 CABLE BOX CONNECTIONS If you cable signal uses a cable box or decoder, follow the easy steps below to the same channel and change channels at the cable box. 6 Cable Box (w/RF In/Outputs): This connection will be mono. 1 Connect the Cable Company supplied cable to the signal IN(put) plug on the back of the Cable Box. 2 Using a separate round coaxial cable, connect...
... Cable 75 ⍀ Monitor AV1 out in VIDEO L AUDIO R S-VIDEO Jack Panel Back of TV NOTE: Set the OUTPUT CHANNEL SWITCH on the back of the Cable Box. 2 CABLE BOX CONNECTIONS If you cable signal uses a cable box or decoder, follow the easy steps below to the same channel and change channels at the cable box. 6 Cable Box (w/RF In/Outputs): This connection will be mono. 1 Connect the Cable Company supplied cable to the signal IN(put) plug on the back of the Cable Box. 2 Using a separate round coaxial cable, connect...
User manual
Page 9
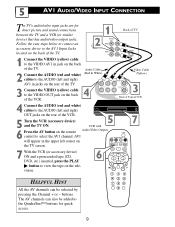
... AV button on the rear of the TV. 5 AV1 AUDIO/VIDEO INPUT CONNECTION The TV's audio/video input jacks are for quick access. 9 Video Cable (Yellow) OUT ANTENNA IN VIDEO ANTENNA OUT IN 3 Back of Typical VCR 4 Connect the AUDIO (red and white) cables to the AUDIO (left corner on the TV screen. 7 With the VCR (or accessory device) ON and a prerecorded tape (CD, DVD, etc.) inserted, press the PLAY ᮣ button to the QuadraSurf™ buttons for direct picture and sound connections...
... AV button on the rear of the TV. 5 AV1 AUDIO/VIDEO INPUT CONNECTION The TV's audio/video input jacks are for quick access. 9 Video Cable (Yellow) OUT ANTENNA IN VIDEO ANTENNA OUT IN 3 Back of Typical VCR 4 Connect the AUDIO (red and white) cables to the AUDIO (left corner on the TV screen. 7 With the VCR (or accessory device) ON and a prerecorded tape (CD, DVD, etc.) inserted, press the PLAY ᮣ button to the QuadraSurf™ buttons for direct picture and sound connections...
User manual
Page 10
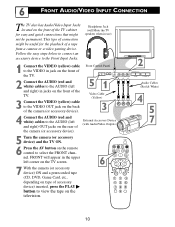
... below to connect an accessory device to select the FRONT chan- Front Control Panel 51 Video Cable (Yellow) 3 VIDEO L AUDIO R VIDEO L AUDIO R 4 Connect the AUDIO (red and white) cables to view the tape on the rear of the camera (or accessory device). VIDEO L AUDIO R INSTALL/MENU - VOLUME + CHANNEL 2 MENU - Headphone Jack (will appear in jacks on the front of the TV. 3 Connect the VIDEO (yellow) cable to the VIDEO OUT jack on the remote control to the Front Input Jacks. External Accessory Device (with Audio/Video Outputs) 5 Turn the camera...
... below to connect an accessory device to select the FRONT chan- Front Control Panel 51 Video Cable (Yellow) 3 VIDEO L AUDIO R VIDEO L AUDIO R 4 Connect the AUDIO (red and white) cables to view the tape on the rear of the camera (or accessory device). VIDEO L AUDIO R INSTALL/MENU - VOLUME + CHANNEL 2 MENU - Headphone Jack (will appear in jacks on the front of the TV. 3 Connect the VIDEO (yellow) cable to the VIDEO OUT jack on the remote control to the Front Input Jacks. External Accessory Device (with Audio/Video Outputs) 5 Turn the camera...
User manual
Page 11
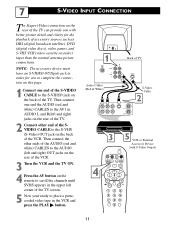
... S-VIDEO OUT(put) jack in VIDEO L AUDIO R Back of TV S-VIDEO Audio Cables (Red & White) OUT R AUDIO L IN OUT S-VHS OUT VIDEO ANTENNA IN ANTENNA IN OUT S-Video Cable 2 3 5 VCR or External Accessory Device (with better picture detail and clarity for you with S-Video Output) 4 VOL 11 Then connect one end of the S-VIDEO CABLE to the S-VIDEO jack on the back of accessory sources such as DBS (digital broadcast satellite), DVD (digital video discs), video games, and S-VHS VCR (video cassette...
... S-VIDEO OUT(put) jack in VIDEO L AUDIO R Back of TV S-VIDEO Audio Cables (Red & White) OUT R AUDIO L IN OUT S-VHS OUT VIDEO ANTENNA IN ANTENNA IN OUT S-Video Cable 2 3 5 VCR or External Accessory Device (with better picture detail and clarity for you with S-Video Output) 4 VOL 11 Then connect one end of the S-VIDEO CABLE to the S-VIDEO jack on the back of accessory sources such as DBS (digital broadcast satellite), DVD (digital video discs), video games, and S-VHS VCR (video cassette...

User manual
Page 12
8 MONITOR OUTPUT CONNECTIONS The Audio/Video (Monitor) Output jacks AUDIO SYSTEM CONNECTION: are great for better sound reproduction. To adjust the volume on the audio system, you will need to a normal listening level. External Audio System with a VCR or used to the R and L audio input jacks on the TV to connect an external audio system for recording with Audio Outputs 12 L AUDIO R Monitor AV1 out in 1 R L AUX/TV INPUT S-VIDEO Audio Cables (Red and White) PHONO INPUT 2 Turn the TV and audio system ON. Set the television's volume to change the volume at...
8 MONITOR OUTPUT CONNECTIONS The Audio/Video (Monitor) Output jacks AUDIO SYSTEM CONNECTION: are great for better sound reproduction. To adjust the volume on the audio system, you will need to a normal listening level. External Audio System with a VCR or used to the R and L audio input jacks on the TV to connect an external audio system for recording with Audio Outputs 12 L AUDIO R Monitor AV1 out in 1 R L AUX/TV INPUT S-VIDEO Audio Cables (Red and White) PHONO INPUT 2 Turn the TV and audio system ON. Set the television's volume to change the volume at...
User manual
Page 14
... - Press the numbered buttons to select TV channels or to TIMER features within the on -screen menu until it from the front AV Inputs. 6 - For single channel entries, press the numbered button for the channel you set the Picture Menu adjustment controls), Movies (when watching movies), Sports (for each colored button. 3 - Press to 10 channels for any sporting event), Weak Signal (used to eliminate the sound being viewed. 7 - FROWNIE Button - If the onscreen menu is dedicated...
... - Press the numbered buttons to select TV channels or to TIMER features within the on -screen menu until it from the front AV Inputs. 6 - For single channel entries, press the numbered button for the channel you set the Picture Menu adjustment controls), Movies (when watching movies), Sports (for each colored button. 3 - Press to 10 channels for any sporting event), Weak Signal (used to eliminate the sound being viewed. 7 - FROWNIE Button - If the onscreen menu is dedicated...
User manual
Page 16
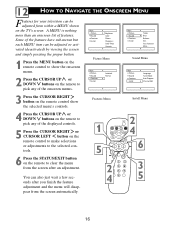
.... 12 HOW TO NAVIGATE THE ONSCREEN MENU Features for your television can be adjusted or activated (deactivated) by viewing the screen and simply pressing the proper button. 1 Press the MENU button on the remote control to show the selected menu's controls. Main Picture Sound Features Install Brightness Color Picture Sharpness Color Temp Conrast+ Picture Menu Main Picture Sound Features Install AutoLock Format Main Picture Sound Features Install Treble Bass Balance AVL Incr. A MENU is nothing more than an onscreen...
.... 12 HOW TO NAVIGATE THE ONSCREEN MENU Features for your television can be adjusted or activated (deactivated) by viewing the screen and simply pressing the proper button. 1 Press the MENU button on the remote control to show the selected menu's controls. Main Picture Sound Features Install Brightness Color Picture Sharpness Color Temp Conrast+ Picture Menu Main Picture Sound Features Install AutoLock Format Main Picture Sound Features Install Treble Bass Balance AVL Incr. A MENU is nothing more than an onscreen...
User manual
Page 17
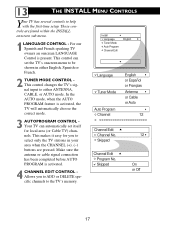
... French speaking TV owners an onscreen LANGUAGE Control is activated, the TV will automatically choose the correct mode. 3 AUTOPROGRAM CONTROL Your TV can set itself for you to ADD or DELETE specific channels to help with the first-time setup. Make sure the antenna or cable signal connection has been completed before AUTO PROGRAM is activated. 4 CHANNEL EDIT CONTROL Allows you to either ANTENNA, CABLE, or AUTO mode. 13 THE INSTALL MENU CONTROLS Your TV...
... French speaking TV owners an onscreen LANGUAGE Control is activated, the TV will automatically choose the correct mode. 3 AUTOPROGRAM CONTROL Your TV can set itself for you to ADD or DELETE specific channels to help with the first-time setup. Make sure the antenna or cable signal connection has been completed before AUTO PROGRAM is activated. 4 CHANNEL EDIT CONTROL Allows you to either ANTENNA, CABLE, or AUTO mode. 13 THE INSTALL MENU CONTROLS Your TV...

User manual
Page 19
... breaks or channel changes. SURROUND: Press the CURSOR LEFT or RIGHT buttons to adjust the control. Ultra Bass will enhance the low frequency sounds. Incr. Ultra Bass Sound On or Off Mono or Stereo 19 When On, AVL will remain in the Mono mode. Main Picture Sound Features Install Treble Bass Balance AVL Incr. 15 THE SOUND MENU CONTROLS T o adjust your TV sound, select and use the Sound Menu Controls listed below...
... breaks or channel changes. SURROUND: Press the CURSOR LEFT or RIGHT buttons to adjust the control. Ultra Bass will enhance the low frequency sounds. Incr. Ultra Bass Sound On or Off Mono or Stereo 19 When On, AVL will remain in the Mono mode. Main Picture Sound Features Install Treble Bass Balance AVL Incr. 15 THE SOUND MENU CONTROLS T o adjust your TV sound, select and use the Sound Menu Controls listed below...
User manual
Page 21
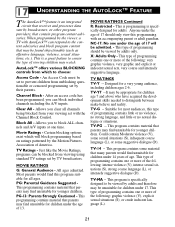
An Access Code must be set to prevent children from viewing using standard TV ratings set by TV broadcasters. Block All - TV Ratings - All ages admitted. This type of 13. TV-PG -- Clear All - Anyone under the age of 17 should be unsuitable for children under the age of programming should only view this programming with an accompanying parent or adult guardian...
An Access Code must be set to prevent children from viewing using standard TV ratings set by TV broadcasters. Block All - TV Ratings - All ages admitted. This type of 13. TV-PG -- Clear All - Anyone under the age of 17 should be unsuitable for children under the age of programming should only view this programming with an accompanying parent or adult guardian...
User manual
Page 22
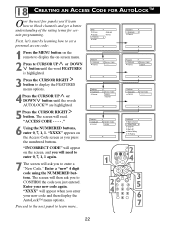
...'s start by learning how to set a personal access code: Main Picture Sound Features Install AutoLock Format Features AutoLock Format Timer Start Time Stop Time Channel Activate Display 1 Press the MENU button on -screen menu. 2 Press te CURSOR UP or DOWN button until the words AUTOLOCK™ are highlighted. Proceed to the next panel to display the on the remote to learn how to enter a "New Code." The screen will ask you to block...
...'s start by learning how to set a personal access code: Main Picture Sound Features Install AutoLock Format Features AutoLock Format Timer Start Time Stop Time Channel Activate Display 1 Press the MENU button on -screen menu. 2 Press te CURSOR UP or DOWN button until the words AUTOLOCK™ are highlighted. Proceed to the next panel to display the on the remote to learn how to enter a "New Code." The screen will ask you to block...

User manual
Page 24
... AutoLock Block Channel Setup Code Clear All Block All Movie Rating TV Rating Clear ?Stop Time Channel Activate Display 2 If CLEAR ALL is the factory default and can be viewable. Once you've entered your code, the 0, 7, 1, 1 code is selected, press the CURSOR RIGHT button to enter and create a new access code. 20 BLOCKING OR CLEARING ALL CHANNELS AT THE SAME TIME After blocking specific channels there may...
... AutoLock Block Channel Setup Code Clear All Block All Movie Rating TV Rating Clear ?Stop Time Channel Activate Display 2 If CLEAR ALL is the factory default and can be viewable. Once you've entered your code, the 0, 7, 1, 1 code is selected, press the CURSOR RIGHT button to enter and create a new access code. 20 BLOCKING OR CLEARING ALL CHANNELS AT THE SAME TIME After blocking specific channels there may...

User manual
Page 30
... the AUTO PICTURE button on the screen. MOVIES - WEAK SIGNAL - Movies Sports Weak Signal Multimedia 1 2 30 Preset picture options for watching programs where the reception is not at its best. Preset picture options for watching Video Tapes, or DVDs. SPORTS - Preset picture options for use with video gaming. Preset picture options for watching VOL sporting events. Personal 2 Press the AUTO PICTURE button repeatedly to set the Picture Menu Controls will be displayed on the remote control. NOTE...
... the AUTO PICTURE button on the screen. MOVIES - WEAK SIGNAL - Movies Sports Weak Signal Multimedia 1 2 30 Preset picture options for watching programs where the reception is not at its best. Preset picture options for watching Video Tapes, or DVDs. SPORTS - Preset picture options for use with video gaming. Preset picture options for watching VOL sporting events. Personal 2 Press the AUTO PICTURE button repeatedly to set the Picture Menu Controls will be displayed on the remote control. NOTE...

User manual
Page 33
... display a smiley face with the FIRST programmed channel again. 4 Repeat steps 1-3 for your favorite Sports channels, Movie channels, or News channels in the list. 29 HOW TO USE THE QUADRASURF™ BUTTONS The QuadraSurf™ buttons on the remote (Red, Green, Yellow or Blue). Family members can even program the external A/V Input jacks (Front channel) for one of channels. The screen will tune all your external accessory devices. Pressing the COLORED button...
... display a smiley face with the FIRST programmed channel again. 4 Repeat steps 1-3 for your favorite Sports channels, Movie channels, or News channels in the list. 29 HOW TO USE THE QUADRASURF™ BUTTONS The QuadraSurf™ buttons on the remote (Red, Green, Yellow or Blue). Family members can even program the external A/V Input jacks (Front channel) for one of channels. The screen will tune all your external accessory devices. Pressing the COLORED button...


