
Leaflet
Page 1
Designer Series Television 20PS47S 20" FauxFlat™ Stereo TV with S-Video Highlights • 20" high contrast picture tube • QuadraSurf™ Universal remote controller • S-Video high resolution input for DVD Features • Rear stereo AV inputs and outputs • Front stereo AV inputs + headphone jack • Digital comb filter for fine picture detail • Incredible Surround™ sound AutoFeaturePak • AutoPicture™ • AutoSound™ • AutoMute™ • AutoLock™
Designer Series Television 20PS47S 20" FauxFlat™ Stereo TV with S-Video Highlights • 20" high contrast picture tube • QuadraSurf™ Universal remote controller • S-Video high resolution input for DVD Features • Rear stereo AV inputs and outputs • Front stereo AV inputs + headphone jack • Digital comb filter for fine picture detail • Incredible Surround™ sound AutoFeaturePak • AutoPicture™ • AutoSound™ • AutoMute™ • AutoLock™
Leaflet
Page 2
...Reduction Reduces picture graininess caused by connecting your personal flesh-tone preference with 15.119 of Philips Consumer Electronics Company. 20" Designer Series Television 20PS47S Technical specifications Picture Quality • 20" high contrast picture tube Delivers a vivid ...Front stereo AV in the U.S.A. ©2003 Philips Consumer Electronics Company www.philipsusa.com or AOL keyword: Philips Specifications subject to the handy front jack. Ease of Use • QuadraSurf™ Universal Remote Controls all TV features plus an adjustable Personal setting....
...Reduction Reduces picture graininess caused by connecting your personal flesh-tone preference with 15.119 of Philips Consumer Electronics Company. 20" Designer Series Television 20PS47S Technical specifications Picture Quality • 20" high contrast picture tube Delivers a vivid ...Front stereo AV in the U.S.A. ©2003 Philips Consumer Electronics Company www.philipsusa.com or AOL keyword: Philips Specifications subject to the handy front jack. Ease of Use • QuadraSurf™ Universal Remote Controls all TV features plus an adjustable Personal setting....
User manual
Page 5
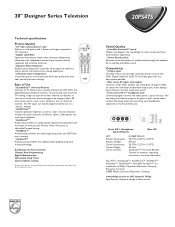
... same time will display the on the TV when operating the TV with the remote. 1 4 VIDEO L AUDIO R INSTALL/MENU - Once in the remote. VOLUME + CHANNEL Remote 2 Sensor Window 3 VOL T o load the supplied batteries into the remote: 1. Be sure the (+) and (-) ends of the batteries line up correctly....) 3. Remove the battery compartment lid on the front of the TV to turn the TV ON. Back of the remote. 2. REMOTE CONTROL 4 Point the remote control toward the remote sensor window on -screen menu. Reattach the battery lid. Place the batteries (2-AA) in the menu, use these ...
... same time will display the on the TV when operating the TV with the remote. 1 4 VIDEO L AUDIO R INSTALL/MENU - Once in the remote. VOLUME + CHANNEL Remote 2 Sensor Window 3 VOL T o load the supplied batteries into the remote: 1. Be sure the (+) and (-) ends of the batteries line up correctly....) 3. Remove the battery compartment lid on the front of the TV to turn the TV ON. Back of the remote. 2. REMOTE CONTROL 4 Point the remote control toward the remote sensor window on -screen menu. Reattach the battery lid. Place the batteries (2-AA) in the menu, use these ...
User manual
Page 6
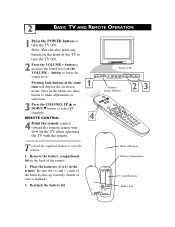
... in jack on the back of the TV. 2 Connect the AUDIO (red and white) cables to the AUDIO (left and right) OUT jacks on the remote control to select the AV1 channel. buttons. button on the rear of Typical VCR 3 VCR with Audio/Video Outputs 5 6 VOL HELPFUL HINT 4 All the AV channels...
... in jack on the back of the TV. 2 Connect the AUDIO (red and white) cables to the AUDIO (left and right) OUT jacks on the remote control to select the AV1 channel. buttons. button on the rear of Typical VCR 3 VCR with Audio/Video Outputs 5 6 VOL HELPFUL HINT 4 All the AV channels...
User manual
Page 7
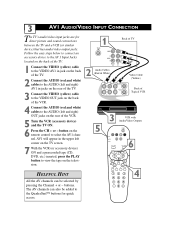
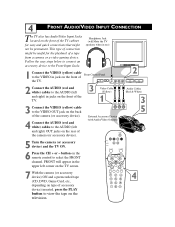
... device) and the TV ON. 6 Press the CH + or - FRONT will Mute the TV speakers when in use) 1 Connect the VIDEO (yellow) cable Front Control Panel to the VIDEO OUT jack on the back VIDEO L AUDIO R 5 of the camera (or accessory device). Follow the easy steps below to connect an... 4 (CD, DVD, Game Card, etc., depending on type of accessory device) inserted, press the PLAY button to select the FRONT channel. button on the remote control to view the tape on the television. 4 FRONT AUDIO/VIDEO INPUT CONNECTION The TV also has Audio/Video Input Jacks located on the front of...
... device) and the TV ON. 6 Press the CH + or - FRONT will Mute the TV speakers when in use) 1 Connect the VIDEO (yellow) cable Front Control Panel to the VIDEO OUT jack on the back VIDEO L AUDIO R 5 of the camera (or accessory device). Follow the easy steps below to connect an... 4 (CD, DVD, Game Card, etc., depending on type of accessory device) inserted, press the PLAY button to select the FRONT channel. button on the remote control to view the tape on the television. 4 FRONT AUDIO/VIDEO INPUT CONNECTION The TV also has Audio/Video Input Jacks located on the front of...
User manual
Page 9
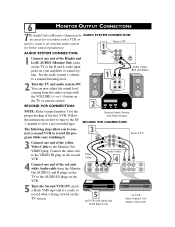
... and it . 3 Connect one end of the red and white Audio cable from the audio system with Audio Outputs the instructions on the TV or remote control. Follow External Audio System with the VOLUME (+) or (-) button on how to tune to the AV 1 channel to a normal listening level. 1 R L (Red and White) 2 Turn...
... and it . 3 Connect one end of the red and white Audio cable from the audio system with Audio Outputs the instructions on the TV or remote control. Follow External Audio System with the VOLUME (+) or (-) button on how to tune to the AV 1 channel to a normal listening level. 1 R L (Red and White) 2 Turn...
User manual
Page 10
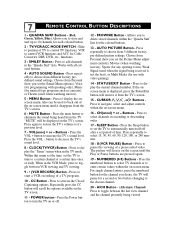
...or Pause buttons are pressed again. 19 - NUMBERED (0-9) Buttons - Press the numbered buttons to select TV channels or to navigate, select and adjust controls within the "Quadra Surf" lists for the colored buttons. 13 - TV/VCR/ACC MODE SWITCH - Buttons - Press repeatedly to display the current ... functions and ACC for a second or two before changing to delete stored channels within the on the TV's screen. 7 REMOTE CONTROL BUTTON DESCRIPTIONS 1 - Slide to position of the on the screen until it disappears from Personal (how you desire. AUTO SOUND Button - ...
...or Pause buttons are pressed again. 19 - NUMBERED (0-9) Buttons - Press the numbered buttons to select TV channels or to navigate, select and adjust controls within the "Quadra Surf" lists for the colored buttons. 13 - TV/VCR/ACC MODE SWITCH - Buttons - Press repeatedly to display the current ... functions and ACC for a second or two before changing to delete stored channels within the on the TV's screen. 7 REMOTE CONTROL BUTTON DESCRIPTIONS 1 - Slide to position of the on the screen until it disappears from Personal (how you desire. AUTO SOUND Button - ...
User manual
Page 12
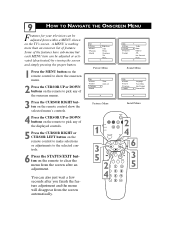
... of features. A MENU is nothing more than an onscreen list of the displayed controls. 5 Press the CURSOR RIGHT or CURSOR LEFT button on the remote control to make selections or adjustments to the selected controls. 6 Press the STATUS/EXIT button on the TV's screen. Surround More... Features...and simply pressing the proper button. 1 Press the MENU button on the remote control to show the onscreen menu. 2 Press the CURSOR UP or DOWN buttons on the remote control show the selected menu's controls. Main Picture Sound Features Install Brightness Color Picture Sharpness Tint More... You can...
... of features. A MENU is nothing more than an onscreen list of the displayed controls. 5 Press the CURSOR RIGHT or CURSOR LEFT button on the remote control to make selections or adjustments to the selected controls. 6 Press the STATUS/EXIT button on the TV's screen. Surround More... Features...and simply pressing the proper button. 1 Press the MENU button on the remote control to show the onscreen menu. 2 Press the CURSOR UP or DOWN buttons on the remote control show the selected menu's controls. Main Picture Sound Features Install Brightness Color Picture Sharpness Tint More... You can...
User manual
Page 24
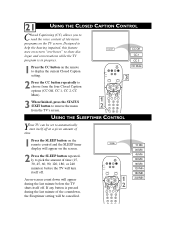
...program is pressed during the last minute before the TV shuts itself off. 21 USING THE CLOSED CAPTION CONTROL Closed Captioning (CC) allows you to read the voice content of time (15, 30, 45,...down will turn itself off at a given amount of time. 1 Press the SLEEP button on the remote control and the SLEEP timer display will appear on the screen. 2 Press the SLEEP button repeatedly to ...pick the amount of television programs on the TV screen. An on the remote to display the current Closed Caption setting. 2 Press the CC button repeatedly to choose from the four...
...program is pressed during the last minute before the TV shuts itself off. 21 USING THE CLOSED CAPTION CONTROL Closed Captioning (CC) allows you to read the voice content of time (15, 30, 45,...down will turn itself off at a given amount of time. 1 Press the SLEEP button on the remote control and the SLEEP timer display will appear on the screen. 2 Press the SLEEP button repeatedly to ...pick the amount of television programs on the TV screen. An on the remote to display the current Closed Caption setting. 2 Press the CC button repeatedly to choose from the four...
User manual
Page 25
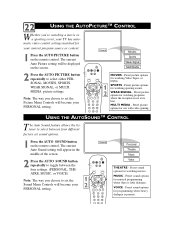
... current program source or content. 1 Press the AUTO PICTURE button on the remote control. The current Auto Sound setting will appear in the middle of the screen...., or VOICE) Note: The way you choose to select between four different factory set the Picture Menu Controls will become your PERSONAL setting. Preset sound options for programming where heavy dialogue is present. Preset sound options... SPORTS - The current Auto Picture setting will be displayed on the remote control. VOICE - Preset picture options for watching programs where the reception is little dialogue. MUSIC -
... current program source or content. 1 Press the AUTO PICTURE button on the remote control. The current Auto Sound setting will appear in the middle of the screen...., or VOICE) Note: The way you choose to select between four different factory set the Picture Menu Controls will become your PERSONAL setting. Preset sound options for programming where heavy dialogue is present. Preset sound options... SPORTS - The current Auto Picture setting will be displayed on the remote control. VOICE - Preset picture options for watching programs where the reception is little dialogue. MUSIC -

User manual
Page 26
... CHANNEL (+) or (-) buttons (or the NUMBER buttons) to select a channel to add to one of the SURF lists. 2 Press the SMILEY button on the remote control to ADD the channel to one of the the SURF lists. 12 Select List! 12 Added! 12 Remove Item? - 23 HOW TO USE THE QUADRASURF...™ BUTTONS The QuadraSurf™ control allows you set up four different personal channel 12 Surf lists using the colored buttons (on the remote control), each holding up to 10) to each of the SURF lists; 4 Press the COLORED Quadra Surf button...
... CHANNEL (+) or (-) buttons (or the NUMBER buttons) to select a channel to add to one of the SURF lists. 2 Press the SMILEY button on the remote control to ADD the channel to one of the the SURF lists. 12 Select List! 12 Added! 12 Remove Item? - 23 HOW TO USE THE QUADRASURF...™ BUTTONS The QuadraSurf™ control allows you set up four different personal channel 12 Surf lists using the colored buttons (on the remote control), each holding up to 10) to each of the SURF lists; 4 Press the COLORED Quadra Surf button...

User manual
Page 27
..., Green, Yellow or Blue). 24 HOW TO USE THE QUADRASURF™ BUTTONS The Quadra Surf buttons on your remote control allow you to remove it from the screen and the same COLORED button is pressed, the surf channels will be displayed starting with the FIRST ... the first programmed channel for that surf list. 2 While the colored "smiley" face still appears on the screen, press the same COLORED button on the remote to tune the second channel programmed for that specific surf list. 3 Repeatedly pressing the same COLORED button while the "smiley" face appears will return you...
..., Green, Yellow or Blue). 24 HOW TO USE THE QUADRASURF™ BUTTONS The Quadra Surf buttons on your remote control allow you to remove it from the screen and the same COLORED button is pressed, the surf channels will be displayed starting with the FIRST ... the first programmed channel for that surf list. 2 While the colored "smiley" face still appears on the screen, press the same COLORED button on the remote to tune the second channel programmed for that specific surf list. 3 Repeatedly pressing the same COLORED button while the "smiley" face appears will return you...
User manual
Page 28
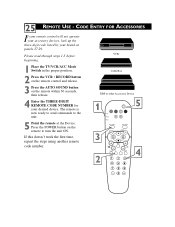
CODE ENTRY FOR ACCESSORIES If your remote control will not operate your accessory devices, look up the three-digit code listed by your desired device. Cable Box DBS or other Accessory Device 4 Enter the THREE-DIGIT REMOTE CODE NUMBER for your brand on the remote within 30 seconds, then release... Press the POWER button on the remote to the unit. 5 Point the remote at the Device. VCR Please read through steps 1-5 before beginning. 1 Place the TV/VCR/ACC Mode Switch in the proper position. 2 Press the VCR • RECORD button on the remote control and release. 3 Press the AUTO...
CODE ENTRY FOR ACCESSORIES If your remote control will not operate your accessory devices, look up the three-digit code listed by your desired device. Cable Box DBS or other Accessory Device 4 Enter the THREE-DIGIT REMOTE CODE NUMBER for your brand on the remote within 30 seconds, then release... Press the POWER button on the remote to the unit. 5 Point the remote at the Device. VCR Please read through steps 1-5 before beginning. 1 Place the TV/VCR/ACC Mode Switch in the proper position. 2 Press the VCR • RECORD button on the remote control and release. 3 Press the AUTO...
User manual
Page 30
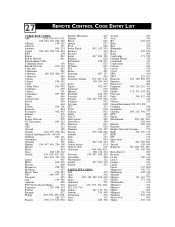
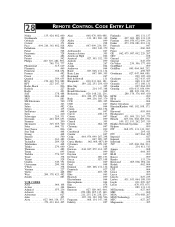
27 REMOTE CONTROL CODE ENTRY LIST CABLE BOX CODES ABC 028, 030, 034, 035, 038, 040, 041, 044, 060 Allegro 180, 342 Andover 571 Antronix 049, 234 Archer . . . ...., 183 NSC 090, 097, 183 Novaplex 645 Oak 034, 046 Optimus 048 PVP Stereo Visual Matrix . . . . .030 Panasonic 027, 048, 134 Panther 664 Paragon 027 Philips 052, 054, 058, 180, 269, 317 Pioneer 050, 171, 560, 904 Popular Mechanics 427 Prelude 797 Pulsar 027 Quasar 027 RCA 048 Radio Shack 042...
27 REMOTE CONTROL CODE ENTRY LIST CABLE BOX CODES ABC 028, 030, 034, 035, 038, 040, 041, 044, 060 Allegro 180, 342 Andover 571 Antronix 049, 234 Archer . . . ...., 183 NSC 090, 097, 183 Novaplex 645 Oak 034, 046 Optimus 048 PVP Stereo Visual Matrix . . . . .030 Panasonic 027, 048, 134 Panther 664 Paragon 027 Philips 052, 054, 058, 180, 269, 317 Pioneer 050, 171, 560, 904 Popular Mechanics 427 Prelude 797 Pulsar 027 Quasar 027 RCA 048 Radio Shack 042...
User manual
Page 31
28 REMOTE CONTROL CODE ENTRY LIST Nokia 135, 424, 482, 600 Nordmende 389 Orbitech 528 Oxford 371 Pace . . . . . .094, 210, 363, 482, 818 Palladium 598 Palsat 528 Panasonic 728 Panda 482 Patriot 542 Philips 227, 319, 482, 598, 749, 751, 777 Phonotrend 315, 619 Plasmatic 469 Primestar 388, 654 Promax 482 Prosat 315 Quadral...
28 REMOTE CONTROL CODE ENTRY LIST Nokia 135, 424, 482, 600 Nordmende 389 Orbitech 528 Oxford 371 Pace . . . . . .094, 210, 363, 482, 818 Palladium 598 Palsat 528 Panasonic 728 Panda 482 Patriot 542 Philips 227, 319, 482, 598, 749, 751, 777 Phonotrend 315, 619 Plasmatic 469 Primestar 388, 654 Promax 482 Prosat 315 Quadral...
User manual
Page 36
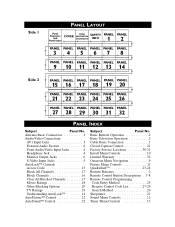
... PANEL INDEX Subject Panel No. Basic Remote Operation 2 Basic Television Operation 2 Cable Basic Connection 1 Closed Caption Control 21 Factory Service Locations 30-31 Install Menu Controls 10 Limited Warranty 32 Onscreen Menu Navigation 9 Picture Menu Controls 11 QuadraSurf 23-24 Remote Batteries 2 Remote Control Button Descriptions . .7-8 Remote Control Programming Code Entry Method 25 Remote Control Code List 27-29 Search Method...
... PANEL INDEX Subject Panel No. Basic Remote Operation 2 Basic Television Operation 2 Cable Basic Connection 1 Closed Caption Control 21 Factory Service Locations 30-31 Install Menu Controls 10 Limited Warranty 32 Onscreen Menu Navigation 9 Picture Menu Controls 11 QuadraSurf 23-24 Remote Batteries 2 Remote Control Button Descriptions . .7-8 Remote Control Programming Code Entry Method 25 Remote Control Code List 27-29 Search Method...


