
Leaflet
Page 2
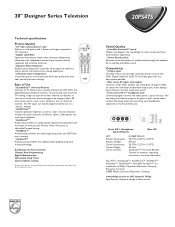
..., color, tint and sharpness settings with picture presets for Movies, Sports, Video games and weak signal reception. • AutoSound™ Audio volume levels are trademarks of the FCC rules. You can also be programmed for use each of the four colored surf buttons to view up to connect high resolution picture sources like DVD, Digital Satellite & Cable TV and video games for an exciting and lifelike sound. QuadraSurf™ Universal Remote Control w/ batteries, operating instructions, warranty information Faux Flat...
..., color, tint and sharpness settings with picture presets for Movies, Sports, Video games and weak signal reception. • AutoSound™ Audio volume levels are trademarks of the FCC rules. You can also be programmed for use each of the four colored surf buttons to view up to connect high resolution picture sources like DVD, Digital Satellite & Cable TV and video games for an exciting and lifelike sound. QuadraSurf™ Universal Remote Control w/ batteries, operating instructions, warranty information Faux Flat...
User manual
Page 2
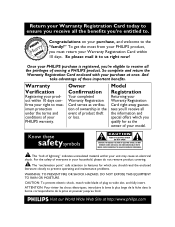
...PHILIPS product, you should read the enclosed literature closely to prevent operating and maintenance problems. WARNING: TO PREVENT FIRE OR SHOCK HAZARD, DO NOT EXPOSE THIS EQUIPMENT TO RAIN OR MOISTURE. So complete and return the Warranty Registration Card enclosed with your household, please do not remove product covering. NO USER-SERVICEABLE PARTS...CAUTION: TO REDUCE THE RISK OF ELECTRIC SHOCK, DO NOT REMOVE COVER (OR BACK). Owner Confirmation Your completed Warranty Registration Card serves as the owner of everyone in the event of lightning" indicates uninsulated material ...
...PHILIPS product, you should read the enclosed literature closely to prevent operating and maintenance problems. WARNING: TO PREVENT FIRE OR SHOCK HAZARD, DO NOT EXPOSE THIS EQUIPMENT TO RAIN OR MOISTURE. So complete and return the Warranty Registration Card enclosed with your household, please do not remove product covering. NO USER-SERVICEABLE PARTS...CAUTION: TO REDUCE THE RISK OF ELECTRIC SHOCK, DO NOT REMOVE COVER (OR BACK). Owner Confirmation Your completed Warranty Registration Card serves as the owner of everyone in the event of lightning" indicates uninsulated material ...
User manual
Page 3
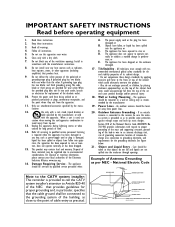
... such as power-supply cord or plug is required when the apparatus has been damaged in any of the ventilation openings. Refer all servicing to environmental considerations. Disposal of the building, as per NEC - Wall or Ceiling Mounting - Follow all warnings. 4. Clean only with the manufacturers instructions. 8. Do not defeat the safety purpose of Antenna Grounding as close to provide...
... such as power-supply cord or plug is required when the apparatus has been damaged in any of the ventilation openings. Refer all servicing to environmental considerations. Disposal of the building, as per NEC - Wall or Ceiling Mounting - Follow all warnings. 4. Clean only with the manufacturers instructions. 8. Do not defeat the safety purpose of Antenna Grounding as close to provide...
User manual
Page 4
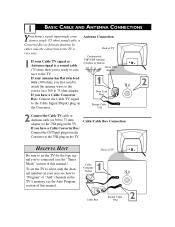
... a Cable Converter Box: Connect the Cable TV signal to the Cable Signal IN(put ) plug from an antenna. Cable/Cable Box Connection HELPFUL HINT Be sure to set the TV to select only the channel numbers in your antenna has flat twin-lead wire (300 ohm), you first need to attach the antenna wires to the screws on the Converter. If your area see the "Tuner Mode" section of this manual. Back of TV 75 ⍀ VIDEO L AUDIO R Monitor...
... a Cable Converter Box: Connect the Cable TV signal to the Cable Signal IN(put ) plug from an antenna. Cable/Cable Box Connection HELPFUL HINT Be sure to set the TV to select only the channel numbers in your antenna has flat twin-lead wire (300 ohm), you first need to attach the antenna wires to the screws on the Converter. If your area see the "Tuner Mode" section of this manual. Back of TV 75 ⍀ VIDEO L AUDIO R Monitor...
User manual
Page 6
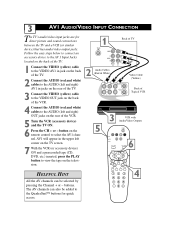
...; buttons for direct picture and sound connections between the TV and a VCR (or similar device) that has audio/video output jacks. button on the rear of Typical VCR 3 VCR with Audio/Video Outputs 5 6 VOL HELPFUL HINT 4 All the AV channels can also be selected by pressing the Channel + or - 3 AV1 AUDIO/VIDEO INPUT CONNECTION The TV's audio/video input jacks are for quick access. AV1 will appear in 2 Audio Cables (Red & White) S-VIDEO Video Cable (Yellow) OUT R AUDIO L IN OUT ANTENNA IN VIDEO ANTENNA OUT IN Back of the VCR. 5 Turn the VCR (accessory...
...; buttons for direct picture and sound connections between the TV and a VCR (or similar device) that has audio/video output jacks. button on the rear of Typical VCR 3 VCR with Audio/Video Outputs 5 6 VOL HELPFUL HINT 4 All the AV channels can also be selected by pressing the Channel + or - 3 AV1 AUDIO/VIDEO INPUT CONNECTION The TV's audio/video input jacks are for quick access. AV1 will appear in 2 Audio Cables (Red & White) S-VIDEO Video Cable (Yellow) OUT R AUDIO L IN OUT ANTENNA IN VIDEO ANTENNA OUT IN Back of the VCR. 5 Turn the VCR (accessory...
User manual
Page 7
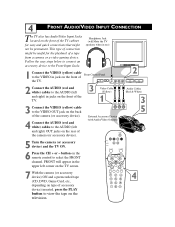
... Control Panel to view the tape on the television. VOLUME + CHANNEL 2 Connect the AUDIO (red and white) cables to the AUDIO (left corner on the TV screen. 4 FRONT AUDIO/VIDEO INPUT CONNECTION The TV also has Audio/Video Input Jacks located on the front of the TV cabinet for easy and quick connections that might be permanent. VOLUME + CHANNEL 2 INSTALL/MENU - button on the remote control to the VIDEO OUT jack on the back VIDEO L AUDIO R 5 of a tape from a camera or a video gaming device. VIDEO L AUDIO R VIDEO L AUDIO R INSTALL/MENU - This type...
... Control Panel to view the tape on the television. VOLUME + CHANNEL 2 Connect the AUDIO (red and white) cables to the AUDIO (left corner on the TV screen. 4 FRONT AUDIO/VIDEO INPUT CONNECTION The TV also has Audio/Video Input Jacks located on the front of the TV cabinet for easy and quick connections that might be permanent. VOLUME + CHANNEL 2 INSTALL/MENU - button on the remote control to the VIDEO OUT jack on the back VIDEO L AUDIO R 5 of a tape from a camera or a video gaming device. VIDEO L AUDIO R VIDEO L AUDIO R INSTALL/MENU - This type...
User manual
Page 8
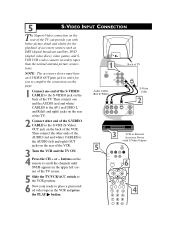
...), DVD (digital video discs), video games, and SVHS VCR (video cassette recorder) tapes than the normal antenna picture connections. ner of the TV screen. 5 Slide the TV/VCR/ACC switch to the VCR position. 6 Now your ready to the S-VHS (S-Video) OUT jack on the back of the VCR. Then connect the other end of the S-VIDEO CABLE to place a prerecorded video tape in the VCR and press the PLAY ᮣ button. 5 S-VIDEO INPUT CONNECTION The S(uper)-Video connection...
...), DVD (digital video discs), video games, and SVHS VCR (video cassette recorder) tapes than the normal antenna picture connections. ner of the TV screen. 5 Slide the TV/VCR/ACC switch to the VCR position. 6 Now your ready to the S-VHS (S-Video) OUT jack on the back of the VCR. Then connect the other end of the S-VIDEO CABLE to place a prerecorded video tape in the VCR and press the PLAY ᮣ button. 5 S-VIDEO INPUT CONNECTION The S(uper)-Video connection...
User manual
Page 9
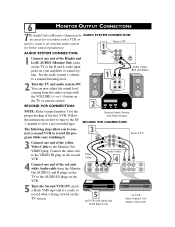
... VCR. 4 Connect one end of the yellow Video Cable to the R and L audio input Audio Cables jacks on the TV to the Monitor Out VIDEO plug. You can now adjust the sound level AUX/TV INPUT PHONO INPUT coming from the Monitor Out AUDIO L and R plugs on the 3 75 ⍀ VIDEO Back of the red and white Audio cable from the audio system with Audio Outputs the instructions on the TV or remote control. Follow External Audio System with the VOLUME (+) or (-) button...
... VCR. 4 Connect one end of the yellow Video Cable to the R and L audio input Audio Cables jacks on the TV to the Monitor Out VIDEO plug. You can now adjust the sound level AUX/TV INPUT PHONO INPUT coming from the Monitor Out AUDIO L and R plugs on the 3 75 ⍀ VIDEO Back of the red and white Audio cable from the audio system with Audio Outputs the instructions on the TV or remote control. Follow External Audio System with the VOLUME (+) or (-) button...
User manual
Page 10
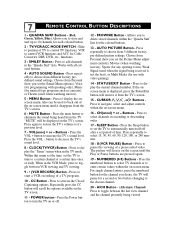
... used to control VCR functions and ACC for Cable Converter, DBS, DVD, etc., functions. 3 - Buttons - Within this menu set the time, set period of TV to control TV functions, VCR to back out of the on the TV screen. 11 - Press to select channels in the TV mode. Press to activate the Closed Captioning options. For single channel entries, press the numbered button for each colored button. 2 - 7 REMOTE CONTROL BUTTON DESCRIPTIONS 1 - Press the VOL + button to display the "Timer" menu...
... used to control VCR functions and ACC for Cable Converter, DBS, DVD, etc., functions. 3 - Buttons - Within this menu set the time, set period of TV to control TV functions, VCR to back out of the on the TV screen. 11 - Press to select channels in the TV mode. Press to activate the Closed Captioning options. For single channel entries, press the numbered button for each colored button. 2 - 7 REMOTE CONTROL BUTTON DESCRIPTIONS 1 - Press the VOL + button to display the "Timer" menu...
User manual
Page 12
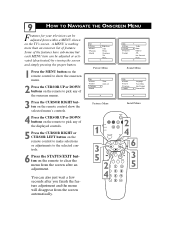
...'s screen. Main Picture Sound Features Install Brightness Color Picture Sharpness Tint More... Surround More... Sound Menu Main Picture Sound Features Install Language Tuner Mode Auto Program Channel Edit 3 Press the CURSOR RIGHT button on the remote to pick any of the features have sub-menus but each MENU item can be adjusted from within a MENU shown on the remote to clear the menu from the screen automatically. 1 3 5 VOL 2 4 2 4 6 3 5 Picture Menu Main Picture Sound Features Install Timer AutoLock Main Picture Sound Features Install Treble...
...'s screen. Main Picture Sound Features Install Brightness Color Picture Sharpness Tint More... Surround More... Sound Menu Main Picture Sound Features Install Language Tuner Mode Auto Program Channel Edit 3 Press the CURSOR RIGHT button on the remote to pick any of the features have sub-menus but each MENU item can be adjusted from within a MENU shown on the remote to clear the menu from the screen automatically. 1 3 5 VOL 2 4 2 4 6 3 5 Picture Menu Main Picture Sound Features Install Timer AutoLock Main Picture Sound Features Install Treble...
User manual
Page 13
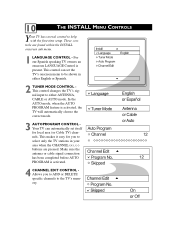
... controls are pressed. Install Language Tuner Mode Auto Program Channel Edit English 2 TUNER MODE CONTROL This control changes the TV's signal input to either English or Spanish. Make sure the antenna or cable signal connection has been completed before AUTO PROGRAM is present. For our Spanish speaking TV owners an onscreen LANGUAGE Control is activated. 4 CHANNEL EDIT CONTROL Allows you to help with the first-time setup. Language Tuner Mode 3 AUTOPROGRAM CONTROL Your TV can set itself for you to ADD or DELETE specific channels...
... controls are pressed. Install Language Tuner Mode Auto Program Channel Edit English 2 TUNER MODE CONTROL This control changes the TV's signal input to either English or Spanish. Make sure the antenna or cable signal connection has been completed before AUTO PROGRAM is present. For our Spanish speaking TV owners an onscreen LANGUAGE Control is activated. 4 CHANNEL EDIT CONTROL Allows you to help with the first-time setup. Language Tuner Mode 3 AUTOPROGRAM CONTROL Your TV can set itself for you to ADD or DELETE specific channels...
User manual
Page 15
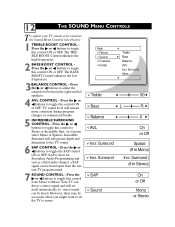
... detect a stereo signal and will remain more consistent during program changes or commercial breaks. 5 INCREDIBLE SURROUND CONTROL - The BASS BOOST Control enhances the low frequencies. 3BALANCE CONTROL - Main Picture Sound Features Install Treble Bass Balance AVL Incr. 12 THE SOUND MENU CONTROLS T o adjust your TV sound, select and use the Sound Menu Controls listed below: 1 TREBLE BOOST CONTROL Press the ᮣ or ᮤ buttons to the TV sound. 6 SAP CONTROL - The TREBLE BOOST Control enhances the...
... detect a stereo signal and will remain more consistent during program changes or commercial breaks. 5 INCREDIBLE SURROUND CONTROL - The BASS BOOST Control enhances the low frequencies. 3BALANCE CONTROL - Main Picture Sound Features Install Treble Bass Balance AVL Incr. 12 THE SOUND MENU CONTROLS T o adjust your TV sound, select and use the Sound Menu Controls listed below: 1 TREBLE BOOST CONTROL Press the ᮣ or ᮤ buttons to the TV sound. 6 SAP CONTROL - The TREBLE BOOST Control enhances the...
User manual
Page 16
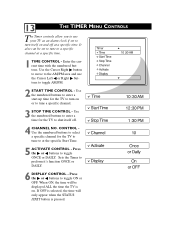
... a specific channel at a specific time. 1 TIME CONTROL - If OFF is selected, the time will be set to turn on or to tune a specific channel. 3 STOP TIME CONTROL - Enter the current time with the numbered buttons. Use the numbered buttons to enter a time for the TV to shut itself on . Timer Time Start Time Stop Time Channel Activate Display 10 :30 AM 2 START TIME CONTROL - Sets the Timer to toggle AM/PM. Press the ᮣ or ᮤ buttons to at the specific Start Time. 5 ACTIVATE CONTROL...
... a specific channel at a specific time. 1 TIME CONTROL - If OFF is selected, the time will be set to turn on or to tune a specific channel. 3 STOP TIME CONTROL - Enter the current time with the numbered buttons. Use the numbered buttons to enter a time for the TV to shut itself on . Timer Time Start Time Stop Time Channel Activate Display 10 :30 AM 2 START TIME CONTROL - Sets the Timer to toggle AM/PM. Press the ᮣ or ᮤ buttons to at the specific Start Time. 5 ACTIVATE CONTROL...
User manual
Page 17
... various BLOCKING controls from unblocking questionable or censored programming set to prevent children from which will be admitted. - Movie Ratings - X: Adults Only - TV-G -- This type of programming contains one or more of programming should only view this program suitable for all channels being blocked from viewing using standard TV ratings set with AutoLock™ can block individual channels including the A/V inputs. Most parents would find...
... various BLOCKING controls from unblocking questionable or censored programming set to prevent children from which will be admitted. - Movie Ratings - X: Adults Only - TV-G -- This type of programming contains one or more of programming should only view this program suitable for all channels being blocked from viewing using standard TV ratings set with AutoLock™ can block individual channels including the A/V inputs. Most parents would find...

User manual
Page 18
... access code: 1 Press the MENU button on the remote to block channels and get a better understanding of the rating terms for certain programming. Enter a "new" 4 digit code using the NUMBERED buttons. Enter your new code and then display the AutoLock™ menu options. Features Timer AutoLock Access Code XXXX Incorrect Features Timer AutoLock Confirm Code XXXX 1 2VOL 4 Features Timer AutoLock Timer Start Time Stop Time Channel Activate Display Features Timer AutoLock Access Code XXXX Features Timer AutoLock New Code ---- AutoLock Block Channel Setup Code...
... access code: 1 Press the MENU button on the remote to block channels and get a better understanding of the rating terms for certain programming. Enter a "new" 4 digit code using the NUMBERED buttons. Enter your new code and then display the AutoLock™ menu options. Features Timer AutoLock Access Code XXXX Incorrect Features Timer AutoLock Confirm Code XXXX 1 2VOL 4 Features Timer AutoLock Timer Start Time Stop Time Channel Activate Display Features Timer AutoLock Access Code XXXX Features Timer AutoLock New Code ---- AutoLock Block Channel Setup Code...
User manual
Page 25
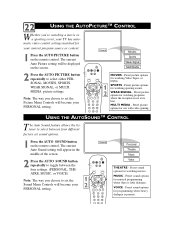
... the screen. 2 Press the AUTO SOUND button repeatedly to toggle between four different factory set the Sound Menu Controls will be displayed on the remote control. Preset sound options for programming where heavy dialogue is not at its best. Preset picture options for watching Video Tapes, or DVDs. 1 SPORTS - USING THE AUTOSOUND™ CONTROL T he Auto Sound feature allows the listener to select either PERSONAL, MOVIES, SPORTS, WEAK SIGNAL, or MULTI MEDIA picture settings. Preset picture options...
... the screen. 2 Press the AUTO SOUND button repeatedly to toggle between four different factory set the Sound Menu Controls will be displayed on the remote control. Preset sound options for programming where heavy dialogue is not at its best. Preset picture options for watching Video Tapes, or DVDs. 1 SPORTS - USING THE AUTOSOUND™ CONTROL T he Auto Sound feature allows the listener to select either PERSONAL, MOVIES, SPORTS, WEAK SIGNAL, or MULTI MEDIA picture settings. Preset picture options...

User manual
Page 27
... screen will display a smiley face with the channel number, pressing the "frownie" face button will tune all the programmed channels. 24 HOW TO USE THE QUADRASURF™ BUTTONS The Quadra Surf buttons on the remote to the four Quadra Surf lists (the four colored buttons, see the previous page for more details). 10 99 56 41 39 12 18 22 28 35 1 2 5 3 VOL 5 12 Remove...
... screen will display a smiley face with the channel number, pressing the "frownie" face button will tune all the programmed channels. 24 HOW TO USE THE QUADRASURF™ BUTTONS The Quadra Surf buttons on the remote to the four Quadra Surf lists (the four colored buttons, see the previous page for more details). 10 99 56 41 39 12 18 22 28 35 1 2 5 3 VOL 5 12 Remove...
User manual
Page 28
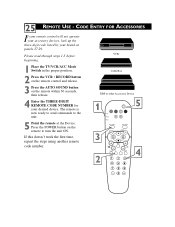
... the VCR • RECORD button on the remote control and release. 3 Press the AUTO SOUND button on the remote to the unit. 5 Point the remote at the Device. If this doesn't work the first time, repeat the steps using another remote 3 code number. 25 REMOTE USE - Cable Box DBS or other Accessory Device 4 Enter the THREE-DIGIT REMOTE CODE NUMBER for your brand on panels 27-29. VOL 4 2 Press the POWER button on the remote within 30...
... the VCR • RECORD button on the remote control and release. 3 Press the AUTO SOUND button on the remote to the unit. 5 Point the remote at the Device. If this doesn't work the first time, repeat the steps using another remote 3 code number. 25 REMOTE USE - Cable Box DBS or other Accessory Device 4 Enter the THREE-DIGIT REMOTE CODE NUMBER for your brand on panels 27-29. VOL 4 2 Press the POWER button on the remote within 30...
User manual
Page 35
... IS SERVICE AVAILABLE? Adjustments of the controls discussed there may last, this owner's manual and keep the original box and packing material in duration to this limitation may vary between countries where product is officially distributed by Philips Consumer Electronics Company. 32 LIMITED WARRANTY COLOR TELEVISION - 90 Days Free Labor, One Year Free Replacement of Parts (Two Years Free Replacement on Color Picture Tube) Must be repaired or replaced free, and...
... IS SERVICE AVAILABLE? Adjustments of the controls discussed there may last, this owner's manual and keep the original box and packing material in duration to this limitation may vary between countries where product is officially distributed by Philips Consumer Electronics Company. 32 LIMITED WARRANTY COLOR TELEVISION - 90 Days Free Labor, One Year Free Replacement of Parts (Two Years Free Replacement on Color Picture Tube) Must be repaired or replaced free, and...
User manual
Page 36
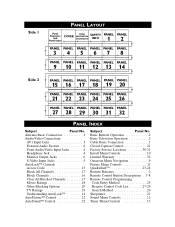
...Cable Basic Connection 1 Closed Caption Control 21 Factory Service Locations 30-31 Install Menu Controls 10 Limited Warranty 32 Onscreen Menu Navigation 9 Picture Menu Controls 11 QuadraSurf 23-24 Remote Batteries 2 Remote Control Button Descriptions . .7-8 Remote Control Programming Code Entry Method 25 Remote Control Code List 27-29 Search Method 26 Sleeptimer 21 Sound Menu Controls 12 Timer Menu Controls 13 Side 1 PANEL LAYOUT Panel Sequence and Panel Index COVER MODEL SAFETY REGISTRATION INFORMATION INFO PANEL 1 PANEL 2 PANEL PANEL PANEL PANEL PANEL...
...Cable Basic Connection 1 Closed Caption Control 21 Factory Service Locations 30-31 Install Menu Controls 10 Limited Warranty 32 Onscreen Menu Navigation 9 Picture Menu Controls 11 QuadraSurf 23-24 Remote Batteries 2 Remote Control Button Descriptions . .7-8 Remote Control Programming Code Entry Method 25 Remote Control Code List 27-29 Search Method 26 Sleeptimer 21 Sound Menu Controls 12 Timer Menu Controls 13 Side 1 PANEL LAYOUT Panel Sequence and Panel Index COVER MODEL SAFETY REGISTRATION INFORMATION INFO PANEL 1 PANEL 2 PANEL PANEL PANEL PANEL PANEL...


