User manual
Page 1
User Manual Color TV 14PT6441/37 20PT6441/37 20PT6341/37 20PT5441/37 Thank you may access our online help fast? If you have read your Philips product more enjoyable. Need help at www.p4c.philips.com or call 1-800-531-0039 while with your product. Model No.: Serial No.: 3141 055 22591 Read your User Manual first for quick tips that your using your instructions and still need assistance you for choosing Philips.
User Manual Color TV 14PT6441/37 20PT6441/37 20PT6341/37 20PT5441/37 Thank you may access our online help fast? If you have read your Philips product more enjoyable. Need help at www.p4c.philips.com or call 1-800-531-0039 while with your product. Model No.: Serial No.: 3141 055 22591 Read your User Manual first for quick tips that your using your instructions and still need assistance you for choosing Philips.

User manual
Page 2
... 21 QuadraSurf 27-28 Movie Ratings 22 Remote Batteries 3 Other Blocking Options 24 Remote Control Button Descriptions 9-10 TV Ratings 23 Sleeptimer 25 Understanding AutoLock 18 Sound Menu Controls 14-15 Automcatically Programming TV . . . . . .13 Tuner Mode 16 Side 1 PANEL LAYOUT Panel Sequence and COVER MODEL REGISTRATION INFORMATION SAFETY INFO Panel Index...
... 21 QuadraSurf 27-28 Movie Ratings 22 Remote Batteries 3 Other Blocking Options 24 Remote Control Button Descriptions 9-10 TV Ratings 23 Sleeptimer 25 Understanding AutoLock 18 Sound Menu Controls 14-15 Automcatically Programming TV . . . . . .13 Tuner Mode 16 Side 1 PANEL LAYOUT Panel Sequence and COVER MODEL REGISTRATION INFORMATION SAFETY INFO Panel Index...

User manual
Page 5
...8486; plug on the Converter. Round Cable 75Ω AV out CVI AV in 75‰ VIDEO Y L S-VIDEO Pb AUDIO R Pr Back of TV If you have a Cable Converter Direct Cable Connection Box: Connect the OUT(put) plug from the Converter to the Cable Signal IN(put) plug on...case the connection to 75 ohm adapter. buttons to scroll through all the channels stored in 75‰ VIDEO Y L S-VIDEO Pb AUDIO R Pr Back of TV 1 75 ⍀ HELPFUL HINT After using the AutoProgram Control, press the CH + and - Cable signal coming from an antenna. 1 BASIC ANTENNA AND CABLE...
...8486; plug on the Converter. Round Cable 75Ω AV out CVI AV in 75‰ VIDEO Y L S-VIDEO Pb AUDIO R Pr Back of TV If you have a Cable Converter Direct Cable Connection Box: Connect the OUT(put) plug from the Converter to the Cable Signal IN(put) plug on...case the connection to 75 ohm adapter. buttons to scroll through all the channels stored in 75‰ VIDEO Y L S-VIDEO Pb AUDIO R Pr Back of TV 1 75 ⍀ HELPFUL HINT After using the AutoProgram Control, press the CH + and - Cable signal coming from an antenna. 1 BASIC ANTENNA AND CABLE...

User manual
Page 6
...; Coaxial Cable AV out CVI AV in 75‰ VIDEO Y L S-VIDEO Pb AUDIO R Pr NOTE: If applicable, set the OUTPUT CHANNEL SWITCH on the TV. Cable Signal IN Cable Box (w/Audio/Video Outputs): This connection will supply Stereo sound. 4 Connect the Cable Company supplied cable to the cable signal IN.... Once tuned, change channels at the cable box. AV out CVI AV in 75‰ VIDEO Y L S-VIDEO Pb AUDIO R Pr Jack Panel Back of TV cable box to the left and right Audio Out L & R jacks on the back of the television. 2 CABLE BOX CONNECTIONS If you cable signal uses a ...
...; Coaxial Cable AV out CVI AV in 75‰ VIDEO Y L S-VIDEO Pb AUDIO R Pr NOTE: If applicable, set the OUTPUT CHANNEL SWITCH on the TV. Cable Signal IN Cable Box (w/Audio/Video Outputs): This connection will supply Stereo sound. 4 Connect the Cable Company supplied cable to the cable signal IN.... Once tuned, change channels at the cable box. AV out CVI AV in 75‰ VIDEO Y L S-VIDEO Pb AUDIO R Pr Jack Panel Back of TV cable box to the left and right Audio Out L & R jacks on the back of the television. 2 CABLE BOX CONNECTIONS If you cable signal uses a ...

User manual
Page 7
... into the remote: Back of Controls, 14PT6441/37 shown. button to lower the sound level. 20PT6441/37 Controls located on front and top of set. 20PT5441/37 Controls located on front of set . Example of Remote 1. Battery Compartment 2. Door Cover VIDEO L AUDIO R MENU 1 4 Remote Sensor Window -...both buttons at the same time will display the onscreen menu. Remove the battery compartment lid on the TV when operating the TV with the remote. Once in the remote. 3 BASIC TV AND REMOTE CONTROL OPERATION 1 Press the POWER button to increase the sound level, or the VOLUME ...
... into the remote: Back of Controls, 14PT6441/37 shown. button to lower the sound level. 20PT6441/37 Controls located on front and top of set. 20PT5441/37 Controls located on front of set . Example of Remote 1. Battery Compartment 2. Door Cover VIDEO L AUDIO R MENU 1 4 Remote Sensor Window -...both buttons at the same time will display the onscreen menu. Remove the battery compartment lid on the TV when operating the TV with the remote. Once in the remote. 3 BASIC TV AND REMOTE CONTROL OPERATION 1 Press the POWER button to increase the sound level, or the VOLUME ...

User manual
Page 8
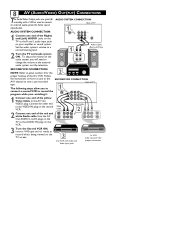
... on the rear of Typical VCR 4 Connect the AUDIO (red and white) cables to view the tape on the rear of the VCR. Back of TV 1 222 75 ⍀ AV Out CVI AV In VIDEO Y L Pb AUDIO R Pr 2 S-VIDEO Audio Cables (Red & White) Video Cable (Yellow) 3 OUT R AUDIO L IN OUT VIDEO... on the television. 6 VOL HELPFUL HINT All the AV channels can also be selected by pressing the Channel + or - 4 AV (AUDIO/VIDEO) INPUT CONNECTION The TV's audio/video input jacks are for quick access. The AV channels can be added to the VIDEO OUT jack on the remote control to select...
... on the rear of Typical VCR 4 Connect the AUDIO (red and white) cables to view the tape on the rear of the VCR. Back of TV 1 222 75 ⍀ AV Out CVI AV In VIDEO Y L Pb AUDIO R Pr 2 S-VIDEO Audio Cables (Red & White) Video Cable (Yellow) 3 OUT R AUDIO L IN OUT VIDEO... on the television. 6 VOL HELPFUL HINT All the AV channels can also be selected by pressing the Channel + or - 4 AV (AUDIO/VIDEO) INPUT CONNECTION The TV's audio/video input jacks are for quick access. The AV channels can be added to the VIDEO OUT jack on the remote control to select...

User manual
Page 9
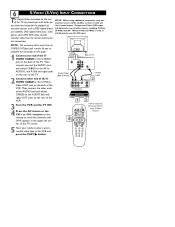
...20PT6441/37 remote control to tune the TV to Front the side (or front)...camera, gaming unit, etc.). 3 Video Cable Side Jack 1 panel of TV VIDEO L AUDIO R 2 3 Audio Optional 5 AUDIO VIDEO LEFT RIGHT S-VIDEO...Headphones Jack Panel of Accessory Device Audio Cables Video Cable Jack Panel of the TV. 5 FRONT AND SIDE AV CONNECTIONS Audio and Video Front (or Side) Inputs...on the remote control to tune these inputs. Front Jack panel of TV 2 For Stereo Devices: Connect the audio cable (red and white)... Turn the TV and the accessory device ON. Optional 1 Connect the video (yellow) cable...
...20PT6441/37 remote control to tune the TV to Front the side (or front)...camera, gaming unit, etc.). 3 Video Cable Side Jack 1 panel of TV VIDEO L AUDIO R 2 3 Audio Optional 5 AUDIO VIDEO LEFT RIGHT S-VIDEO...Headphones Jack Panel of Accessory Device Audio Cables Video Cable Jack Panel of the TV. 5 FRONT AND SIDE AV CONNECTIONS Audio and Video Front (or Side) Inputs...on the remote control to tune these inputs. Front Jack panel of TV 2 For Stereo Devices: Connect the audio cable (red and white)... Turn the TV and the accessory device ON. Optional 1 Connect the video (yellow) cable...
User manual
Page 10
... back of the VCR. 6 S-VIDEO (S-VHS) INPUT CONNECTIONS The S(uper)-Video connection on the rear NOTE: When using additional accessories, only one of the TV screen. 5 Now your ready to place a prerecorded video tape in the VCR and press the PLAY ᮣ button. external source will be audible, as... other ends of the AUDIO (red and white) CABLES to the AV In AUDIO L and R (left and right) OUT jacks on the rear of the TV. 2 Connect other inputs, including S-Video cast satellite), DVD (digital video discs), video (S-VHS) and AV. Component Video (CVI) input accessory sources such as...
... back of the VCR. 6 S-VIDEO (S-VHS) INPUT CONNECTIONS The S(uper)-Video connection on the rear NOTE: When using additional accessories, only one of the TV screen. 5 Now your ready to place a prerecorded video tape in the VCR and press the PLAY ᮣ button. external source will be audible, as... other ends of the AUDIO (red and white) CABLES to the AV In AUDIO L and R (left and right) OUT jacks on the rear of the TV. 2 Connect other inputs, including S-Video cast satellite), DVD (digital video discs), video (S-VHS) and AV. Component Video (CVI) input accessory sources such as...

User manual
Page 11
... color bandwidth information (not possible when using additional accessories, only one tion in the upper left and right) output jacks on the rear of the TV screen. 5 Insert a DVD disc into the DVD player and press the PLAY ᮣ button on the DVD Player. 3 5 Accessory Device Equipped with DVD ... details. 4 VOL The will be audible, as with Component Video Outputs HELPFUL HINT The description for example, Y, Pb, Pr; Pr L 3 Turn the TV and the DVD (or digital accessory device) ON. 4 Press the AV button or the CH + or CH - Y, Cr, Cb). Component Video Cables ...
... color bandwidth information (not possible when using additional accessories, only one tion in the upper left and right) output jacks on the rear of the TV screen. 5 Insert a DVD disc into the DVD player and press the PLAY ᮣ button on the DVD Player. 3 5 Accessory Device Equipped with DVD ... details. 4 VOL The will be audible, as with Component Video Outputs HELPFUL HINT The description for example, Y, Pb, Pr; Pr L 3 Turn the TV and the DVD (or digital accessory device) ON. 4 Press the AV button or the CH + or CH - Y, Cr, Cb). Component Video Cables ...
User manual
Page 12
... external audio system for better sound reproduction. AV Out CVI AV In VIDEO Y L 1 Connect one end of the R(ight) and L(eft) AUDIO jacks on the TV to the R and L audio input jacks on your watching it 's ready to record what's being viewed on the VCR. 3 Turn the Second VCR ON, insert... and Video Input Jacks 1st VCR (refer to panel 4 for proper connection) Set the audio system's volume to panel number 4 for the 2 proper hookup of TV tape. The following steps allow you will need to the AV Out VIDEO plug. To adjust the volume on how to tune to the AV1...
... external audio system for better sound reproduction. AV Out CVI AV In VIDEO Y L 1 Connect one end of the R(ight) and L(eft) AUDIO jacks on the TV to the R and L audio input jacks on your watching it 's ready to record what's being viewed on the VCR. 3 Turn the Second VCR ON, insert... and Video Input Jacks 1st VCR (refer to panel 4 for proper connection) Set the audio system's volume to panel number 4 for the 2 proper hookup of TV tape. The following steps allow you will need to the AV Out VIDEO plug. To adjust the volume on how to tune to the AV1...

User manual
Page 13
... VOL + button to display the on -screen menu until it 's previous level. SLEEP Button Press the Sleep button to set the TV to back out of time. AUTO SOUND Button Press repeatedly to select an accessory signal input from different factory pre-defined sound settings. ...button to the "QuadraSurf" lists. SMILEY Button Press to add channels to decrease the TV's sound level. 9 REMOTE CONTROL BUTTON DESCRIPTIONS QUADRASURF Buttons (Red, Green, Yellow, Blue) Allows you to store and surf up to activate...
... VOL + button to display the on -screen menu until it 's previous level. SLEEP Button Press the Sleep button to set the TV to back out of time. AUTO SOUND Button Press repeatedly to select an accessory signal input from different factory pre-defined sound settings. ...button to the "QuadraSurf" lists. SMILEY Button Press to add channels to decrease the TV's sound level. 9 REMOTE CONTROL BUTTON DESCRIPTIONS QUADRASURF Buttons (Red, Green, Yellow, Blue) Allows you to store and surf up to activate...

User manual
Page 14
... controls within the on -screen menu is dedicated to TIMER features within the on or off. A/CH Button (Alternate Channel) Press to turn the TV on -screen menu. FROWNIE Button Allows you desire. Works with all colored buttons. If the on -screen menu. NOTE: This button is displayed,... press the Status/Exit button of remove it from the TV's screen. 3, 4, 1, and 2 Buttons Press to delete channels from Personal (how you set the Picture Menu Adjustment controls), Movies (for movies), Sports (for...
... controls within the on -screen menu is dedicated to TIMER features within the on or off. A/CH Button (Alternate Channel) Press to turn the TV on -screen menu. FROWNIE Button Allows you desire. Works with all colored buttons. If the on -screen menu. NOTE: This button is displayed,... press the Status/Exit button of remove it from the TV's screen. 3, 4, 1, and 2 Buttons Press to delete channels from Personal (how you set the Picture Menu Adjustment controls), Movies (for movies), Sports (for...

User manual
Page 15
...the STATUS/EXIT button to scroll though the on -screen menu. 2 Press the CURSOR UP 3 or DOWN 4 buttons to remove the menu from the TV's screen. Installation Langue Mode synt. diter progr. It does not change the other onscreen text features such as Closed Caption (CC...) TV shows. 11 HOW TO USE THE LANGUAGE CONTROL For French and Spanish speaking TV owners an onscreen LANGUAGE option is highlighted. auto. Main Picture Sound Features Install 1 Press the MENU button ...
...the STATUS/EXIT button to scroll though the on -screen menu. 2 Press the CURSOR UP 3 or DOWN 4 buttons to remove the menu from the TV's screen. Installation Langue Mode synt. diter progr. It does not change the other onscreen text features such as Closed Caption (CC...) TV shows. 11 HOW TO USE THE LANGUAGE CONTROL For French and Spanish speaking TV owners an onscreen LANGUAGE option is highlighted. auto. Main Picture Sound Features Install 1 Press the MENU button ...
User manual
Page 16
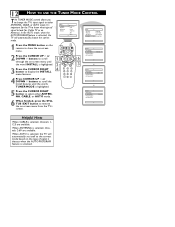
..., or AUTO mode. 6 When finished, press the STATUS /EXIT button to remove the on the type of signal to look for the TV to know what type of signal it detects when the AUTO PROGRAM feature is highlighted. 6 3 Install Language Tuner Mode Auto Program Channel Edit... selected, channels 2-69 are available. Main Picture Sound Features Install Brightness Color Picture Sharpness Tint More... When ANTENNA is activated, the TV will automatically set itself to scroll the Install features until the words TUNER MODE is activated. Main Picture Sound Features Install Language Tuner ...
..., or AUTO mode. 6 When finished, press the STATUS /EXIT button to remove the on the type of signal to look for the TV to know what type of signal it detects when the AUTO PROGRAM feature is highlighted. 6 3 Install Language Tuner Mode Auto Program Channel Edit... selected, channels 2-69 are available. Main Picture Sound Features Install Brightness Color Picture Sharpness Tint More... When ANTENNA is activated, the TV will automatically set itself to scroll the Install features until the words TUNER MODE is activated. Main Picture Sound Features Install Language Tuner ...

User manual
Page 17
...the STATUS /EXIT button to the correct mode based on -screen menu until the words AUTO PROGRAM are highlighted. When AUTO is selected, the TV will store all available channels in your area when the CHANNEL (+), (-) buttons are pressed. Install Language Tuner Mode Auto Program Channel Edit 6 ...Press the CURSOR RIGHT 2 button to the lowest available channel when done. 13 AUTOMATICALLY PROGRAM Your TV can automatically set itself for you to select only the TV stations in the TV's memory then tune to start the Auto Program scanning of signal it easy for local area (or...
...the STATUS /EXIT button to the correct mode based on -screen menu until the words AUTO PROGRAM are highlighted. When AUTO is selected, the TV will store all available channels in your area when the CHANNEL (+), (-) buttons are pressed. Install Language Tuner Mode Auto Program Channel Edit 6 ...Press the CURSOR RIGHT 2 button to the lowest available channel when done. 13 AUTOMATICALLY PROGRAM Your TV can automatically set itself for you to select only the TV stations in the TV's memory then tune to start the Auto Program scanning of signal it easy for local area (or...
User manual
Page 18
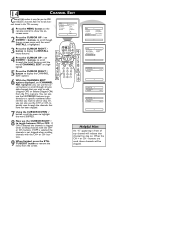
... channels with the CH+ or CH- buttons. 9 When finished, press the STATUS/EXIT button to add (skipped OFF) or delete (Skipped ON) from the TV's memory. Brightness Color Picture Sharpness Tint More... 2 49 3 5 8 6 6 8 Main Picture Sound Features Install Language Tuner Mode Auto Program Channel Edit Install...Auto Program Channel Edit Channel No. Skipped On Channel Edit Channel No. Helpful Hint An "X" appearing in front of channels stored in the TV's memory. 1 Press the MENU button on the remote control to scroll through the channels that you wish to remove the menu from the...
... channels with the CH+ or CH- buttons. 9 When finished, press the STATUS/EXIT button to add (skipped OFF) or delete (Skipped ON) from the TV's memory. Brightness Color Picture Sharpness Tint More... 2 49 3 5 8 6 6 8 Main Picture Sound Features Install Language Tuner Mode Auto Program Channel Edit Install...Auto Program Channel Edit Channel No. Skipped On Channel Edit Channel No. Helpful Hint An "X" appearing in front of channels stored in the TV's memory. 1 Press the MENU button on the remote control to scroll through the channels that you wish to remove the menu from the...

User manual
Page 19
... preferences. (NORMAL will make the whites, bluish; Press the CURSOR RIGHT 2 or LEFT 1 buttons to add or eliminate color. 15 PICTURE MENU CONTROLS T o adjust your TV picture controls, select a channel and use the Picture Menu Controls listed below: 1 BRIGHTNESS CONTROL Press the CURSOR RIGHT 2 or LEFT 1 buttons until lightest parts of...
... preferences. (NORMAL will make the whites, bluish; Press the CURSOR RIGHT 2 or LEFT 1 buttons to add or eliminate color. 15 PICTURE MENU CONTROLS T o adjust your TV picture controls, select a channel and use the Picture Menu Controls listed below: 1 BRIGHTNESS CONTROL Press the CURSOR RIGHT 2 or LEFT 1 buttons until lightest parts of...
User manual
Page 20
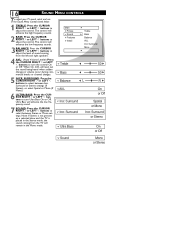
... LEFT 1 buttons to adjust the control. Surround Incr. Note: If Stereo is not present on a selected show and the TV is placed in the Stereo mode, the sound coming from the TV will enhance the high frequency sounds. 2 BASS: Press the CURSOR RIGHT 2 or LEFT 1 buttons to select between Incr....buttons to turn the control On Treble 50 or Off. Bass 50 mercial breaks or channel changes. 5 INCR. 16 SOUND MENU CONTROLS T o adjust your TV sound, select and use the Sound Menu Controls listed below: 1 TREBLE: Press the CURSOR RIGHT 2 or LEFT 1 buttons to adjust the control.
... LEFT 1 buttons to adjust the control. Surround Incr. Note: If Stereo is not present on a selected show and the TV is placed in the Stereo mode, the sound coming from the TV will enhance the high frequency sounds. 2 BASS: Press the CURSOR RIGHT 2 or LEFT 1 buttons to select between Incr....buttons to turn the control On Treble 50 or Off. Bass 50 mercial breaks or channel changes. 5 INCR. 16 SOUND MENU CONTROLS T o adjust your TV sound, select and use the Sound Menu Controls listed below: 1 TREBLE: Press the CURSOR RIGHT 2 or LEFT 1 buttons to adjust the control.

User manual
Page 21
... or DOWN 4 buttons when the onscreen menu is shown in movie theaters. Expand 4:3 - Standard format for the TV. 17 THE 4:3 EXPAND FORMAT CONTROL Many times while watching movies from the TV's screen. Enlarges the picture to fill out the entire screen area, eliminating the "letter box" effect. 6 When... options (AutoLock or Format). 4 Press the CURSOR DOWN 4 button until the word Format is shown in "letter box" format. when shown on a TV screen, the image will toggle the standard 4:3 format and the Expand 4:3 format. This is the format that is highlighted. 5 Press the CURSOR RIGHT ...
... or DOWN 4 buttons when the onscreen menu is shown in movie theaters. Expand 4:3 - Standard format for the TV. 17 THE 4:3 EXPAND FORMAT CONTROL Many times while watching movies from the TV's screen. Enlarges the picture to fill out the entire screen area, eliminating the "letter box" effect. 6 When... options (AutoLock or Format). 4 Press the CURSOR DOWN 4 button until the word Format is shown in "letter box" format. when shown on a TV screen, the image will toggle the standard 4:3 format and the Expand 4:3 format. This is the format that is highlighted. 5 Press the CURSOR RIGHT ...

User manual
Page 22
... and intensely suggestive language. This program is specifically designed to censor the type of viewing children may be set by the viewer, a TV with AutoLock™ can block individual channels including the A/V inputs. NC-17: No one or more of programming should only view this... program suitable for younger children. This type of programming contains one time. All ages admitted. Anyone under 14 years of 13. TV-PG -- An Access Code must be found objectionable (such as offensive language, violence, sexual situations, etc.). Just like the Movie Ratings,...
... and intensely suggestive language. This program is specifically designed to censor the type of viewing children may be set by the viewer, a TV with AutoLock™ can block individual channels including the A/V inputs. NC-17: No one or more of programming should only view this... program suitable for younger children. This type of programming contains one time. All ages admitted. Anyone under 14 years of 13. TV-PG -- An Access Code must be found objectionable (such as offensive language, violence, sexual situations, etc.). Just like the Movie Ratings,...


