
User manual
Page 1
User Manual Color TV 14PT6441/37 20PT6441/37 20PT6341/37 20PT5441/37 Thank you may access our online help fast? If you have read your instructions and still need assistance you for quick tips that your using your Philips product more enjoyable. Need help at www.p4c.philips.com or call 1-800-531-0039 while with your User Manual first for choosing Philips. Model No.: Serial No.: 3141 055 22591 Read your product.
User Manual Color TV 14PT6441/37 20PT6441/37 20PT6341/37 20PT5441/37 Thank you may access our online help fast? If you have read your instructions and still need assistance you for quick tips that your using your Philips product more enjoyable. Need help at www.p4c.philips.com or call 1-800-531-0039 while with your User Manual first for choosing Philips. Model No.: Serial No.: 3141 055 22591 Read your product.

User manual
Page 2
... Basic Connection 1 AutoPicture™ Control 25 Audio/Video Connections AutoSound™ Control 25 AV Input Jacks 4 Basic Remote Operation 3 Component Video Input Jacks 7 Basic Television Operation 3 Front (Side) Audio/Video Input Jacks . . .5 Cable Box Connection 2 Headphone Jack 5 Channel Edit 14 AV Output Jacks 8 Closed Caption Control 25 S-Video Input Jacks 6 Factory Service Locations 30-31 AutoLock™ Controls Format Controls 17 Access Code 19 Language Controls 11 Block All Channels 21 Limited Warranty 32 Block Channels 20 Picture Menu Controls 15...
... Basic Connection 1 AutoPicture™ Control 25 Audio/Video Connections AutoSound™ Control 25 AV Input Jacks 4 Basic Remote Operation 3 Component Video Input Jacks 7 Basic Television Operation 3 Front (Side) Audio/Video Input Jacks . . .5 Cable Box Connection 2 Headphone Jack 5 Channel Edit 14 AV Output Jacks 8 Closed Caption Control 25 S-Video Input Jacks 6 Factory Service Locations 30-31 AutoLock™ Controls Format Controls 17 Access Code 19 Language Controls 11 Block All Channels 21 Limited Warranty 32 Block Channels 20 Picture Menu Controls 15...

User manual
Page 3
... the "family!" Owner Confirmation Your completed Warranty Registration Card serves as the owner of your PHILIPS warranty. NO USER-SERVICEABLE PARTS INSIDE. THIN 10 D TRATION N Hurry! W I EEDED Congratulations on your purchase at http://www.philips.com So complete and return the Warranty Registration Card enclosed with your purchase, and welcome to us right now! Model Registration Returning your Warranty Registration Card within...
... the "family!" Owner Confirmation Your completed Warranty Registration Card serves as the owner of your PHILIPS warranty. NO USER-SERVICEABLE PARTS INSIDE. THIN 10 D TRATION N Hurry! W I EEDED Congratulations on your purchase at http://www.philips.com So complete and return the Warranty Registration Card enclosed with your purchase, and welcome to us right now! Model Registration Returning your Warranty Registration Card within...

User manual
Page 4
... replacement of the cabinet. Use only with a cart, stand, tripod, bracket, or table specified by the manufacturer. 19. Unplug this apparatus near any heat sources such as to a wall or ceiling only as practical. Disposal of these design standards by applying excessive pull force to the front, or top, of Antenna Grounding as powersupply cord or plug is connected...
... replacement of the cabinet. Use only with a cart, stand, tripod, bracket, or table specified by the manufacturer. 19. Unplug this apparatus near any heat sources such as to a wall or ceiling only as practical. Disposal of these design standards by applying excessive pull force to the front, or top, of Antenna Grounding as powersupply cord or plug is connected...

User manual
Page 6
..., change channels at the cable box, not the television. Tune the TV to the AV In Audio L & R Input jacks on the TV remote control to tune to CH 3 or 4. Jack Panel Back of the Audio Left and Right Cable to the 75Ω input on the cable box. Jack Panel Back of Cable Box 3 75 ⍀ 3 Connect the other end to the from the Cable Box (w/RF In/Outputs): Cable Company This connection will supply Stereo sound. 4 Connect the Cable Company supplied cable...
..., change channels at the cable box, not the television. Tune the TV to the AV In Audio L & R Input jacks on the TV remote control to tune to CH 3 or 4. Jack Panel Back of the Audio Left and Right Cable to the 75Ω input on the cable box. Jack Panel Back of Cable Box 3 75 ⍀ 3 Connect the other end to the from the Cable Box (w/RF In/Outputs): Cable Company This connection will supply Stereo sound. 4 Connect the Cable Company supplied cable...
User manual
Page 10
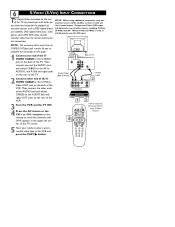
... corner of the VCR. 3 Turn the VCR and the TV ON. 4 Press the AV button or the CH + or CH - Component Video (CVI) input accessory sources such as there is used, it will be audible, as DBS (digital broad- Then connect the other ends of the AUDIO (red and white) CABLES to the AUDIO (left and right) jacks on the back of sound inputs. external source will dominate...
... corner of the VCR. 3 Turn the VCR and the TV ON. 4 Press the AV button or the CH + or CH - Component Video (CVI) input accessory sources such as there is used, it will be audible, as DBS (digital broad- Then connect the other ends of the AUDIO (red and white) CABLES to the AUDIO (left and right) jacks on the back of sound inputs. external source will dominate...

User manual
Page 11
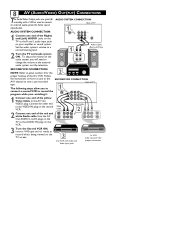
... Component Video Outputs HELPFUL HINT The description for the component video connectors may vary, the letters b and r stand for the highest possible color and picture resolu- Refer to your DVD or digital accessory owner's manual for improved color bandwidth information (not possible when using the Component Video Inputs, it luminance (Y) signal are connected and will dominate over the AV input. Component Video Cables 2 Connect the red and white (Green, Blue, AUDIO CABLES to the Audio (L and R) AV In Input Jacks COMP VIDEO...
... Component Video Outputs HELPFUL HINT The description for the component video connectors may vary, the letters b and r stand for the highest possible color and picture resolu- Refer to your DVD or digital accessory owner's manual for improved color bandwidth information (not possible when using the Component Video Inputs, it luminance (Y) signal are connected and will dominate over the AV input. Component Video Cables 2 Connect the red and white (Green, Blue, AUDIO CABLES to the Audio (L and R) AV In Input Jacks COMP VIDEO...
User manual
Page 12
... you will need to panel number 4 for better sound reproduction. Follow the instructions on your watching it 's ready to connect an external audio system for the 2 proper hookup of TV 1 AV Out CVI AV In VIDEO Y L Pb AUDIO R Pr S-VIDEO 1 R L AUX/TV INPUT PHONO INPUT Audio Cables (Red and White) SECOND VCR CONNECTION: NOTE: Refer to change the volume at the external audio system, not the television. AV Out CVI AV In VIDEO Y L 1 Connect one...
... you will need to panel number 4 for better sound reproduction. Follow the instructions on your watching it 's ready to connect an external audio system for the 2 proper hookup of TV 1 AV Out CVI AV In VIDEO Y L Pb AUDIO R Pr S-VIDEO 1 R L AUX/TV INPUT PHONO INPUT Audio Cables (Red and White) SECOND VCR CONNECTION: NOTE: Refer to change the volume at the external audio system, not the television. AV Out CVI AV In VIDEO Y L 1 Connect one...

User manual
Page 13
... accessory signal input from different factory pre-defined sound settings. Also can VOL be displayed on the TV screen. AV Button Press to it disappears from Personal (how you choose for musical type programs such as concerts), or Theatre (used to activate the Closed Captioning options. SLEEP Button Press the Sleep button to set the TV to automatically turn itself off after a set the Sound Menu options), Voice (for programming with all colored buttons. CC Button...
... accessory signal input from different factory pre-defined sound settings. Also can VOL be displayed on the TV screen. AV Button Press to it disappears from Personal (how you choose for musical type programs such as concerts), or Theatre (used to activate the Closed Captioning options. SLEEP Button Press the Sleep button to set the TV to automatically turn itself off after a set the Sound Menu options), Voice (for programming with all colored buttons. CC Button...

User manual
Page 14
Works with all colored buttons. STATUS/EXIT Button Press to choose from Personal (how you set the Picture Menu Adjustment controls), Movies (for movies), Sports (for video games). Choose from 5 different factory predefined picture settings. NOTE: This button is not great), or Multimedia (for any sporting event), Weak Signal (used when the signal being viewed. AUTO PICTURE Button Press repeatedly to display the current channel number. Also use the CURSOR 3 or CURSOR 4 to select channels in ascending or descending...
Works with all colored buttons. STATUS/EXIT Button Press to choose from Personal (how you set the Picture Menu Adjustment controls), Movies (for movies), Sports (for video games). Choose from 5 different factory predefined picture settings. NOTE: This button is not great), or Multimedia (for any sporting event), Weak Signal (used when the signal being viewed. AUTO PICTURE Button Press repeatedly to display the current channel number. Also use the CURSOR 3 or CURSOR 4 to select channels in ascending or descending...

User manual
Page 15
... change the other onscreen text features such as Closed Caption (CC) TV shows. Installation Langue Mode synt. Main Picture Sound Features Install 1 Press the MENU button on the remote control to show the on-screen menu. 2 Press the CURSOR UP 3 or DOWN 4 buttons to scroll though the on-screen menu until the word LANGUAGE is high- Brightness Color Picture Sharpness Tint More... 2 46 Main Picture Sound Features Install Language Tuner Mode Auto Program Channel Edit Install Language Tuner Mode Auto Program Channel Edit English...
... change the other onscreen text features such as Closed Caption (CC) TV shows. Installation Langue Mode synt. Main Picture Sound Features Install 1 Press the MENU button on the remote control to show the on-screen menu. 2 Press the CURSOR UP 3 or DOWN 4 buttons to scroll though the on-screen menu until the word LANGUAGE is high- Brightness Color Picture Sharpness Tint More... 2 46 Main Picture Sound Features Install Language Tuner Mode Auto Program Channel Edit Install Language Tuner Mode Auto Program Channel Edit English...
User manual
Page 16
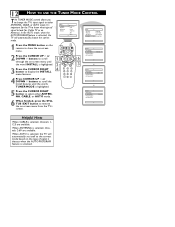
...Mode Auto Program Channel Edit English Antenna OR Install Language Tuner Mode Auto Program Channel Edit English Cable OR 5 Press the CURSOR RIGHT button to select either ANTENNA, CABLE, or AUTO mode. When ANTENNA is selected, the TV will automatically choose the correct mode. Main Picture Sound Features Install Brightness Color Picture Sharpness Tint More... When AUTO is selected, channels 2-69 are available. 12 HOW TO USE THE TUNER MODE CONTROL T he TUNER MODE control allows you to change the TV's input signal to the correct mode based on the type of signal to remove...
...Mode Auto Program Channel Edit English Antenna OR Install Language Tuner Mode Auto Program Channel Edit English Cable OR 5 Press the CURSOR RIGHT button to select either ANTENNA, CABLE, or AUTO mode. When ANTENNA is selected, the TV will automatically choose the correct mode. Main Picture Sound Features Install Brightness Color Picture Sharpness Tint More... When AUTO is selected, channels 2-69 are available. 12 HOW TO USE THE TUNER MODE CONTROL T he TUNER MODE control allows you to change the TV's input signal to the correct mode based on the type of signal to remove...

User manual
Page 17
... can automatically set itself for you to remove the menu from the TV's screen. Main Picture Sound Features Install Brightness Color Picture Sharpness Tint More... Main Picture Sound Features Install Language Tuner Mode Auto Program Channel Edit 1 Press the MENU button on the remote to show the on-screen menu. 2 Press the CURSOR UP 3 or DOWN 4 buttons to start the Auto Program scanning of signal it easy for local area (or Cable TV) channels. Install Language Tuner Mode Auto Program Channel Edit 6 3 Auto Program Channel 12 Auto Program Channel 13 Auto Program Channel 14...
... can automatically set itself for you to remove the menu from the TV's screen. Main Picture Sound Features Install Brightness Color Picture Sharpness Tint More... Main Picture Sound Features Install Language Tuner Mode Auto Program Channel Edit 1 Press the MENU button on the remote to show the on-screen menu. 2 Press the CURSOR UP 3 or DOWN 4 buttons to start the Auto Program scanning of signal it easy for local area (or Cable TV) channels. Install Language Tuner Mode Auto Program Channel Edit 6 3 Auto Program Channel 12 Auto Program Channel 13 Auto Program Channel 14...
User manual
Page 18
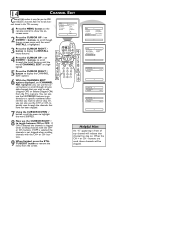
... NUMBERED buttons to go directly to add or skip. to toggle between ON or OFF. buttons. 9 When finished, press the STATUS/EXIT button to scroll through the Install features until the words CHANNEL EDIT are used, those channels will indicate that have not been skipped. sor buttons to remove the menu from the screen. Brightness Color Picture Sharpness Tint More... 2 49 3 5 8 6 6 8 Main Picture Sound Features Install Language Tuner Mode Auto Program Channel Edit Install...
... NUMBERED buttons to go directly to add or skip. to toggle between ON or OFF. buttons. 9 When finished, press the STATUS/EXIT button to scroll through the Install features until the words CHANNEL EDIT are used, those channels will indicate that have not been skipped. sor buttons to remove the menu from the screen. Brightness Color Picture Sharpness Tint More... 2 49 3 5 8 6 6 8 Main Picture Sound Features Install Language Tuner Mode Auto Program Channel Edit Install...

User manual
Page 22
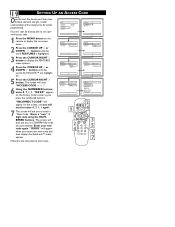
... from your viewing set to choose: Access Code - This is programming is specifically designed for a very young audience, including children ages 2-6. X: Adults Only - Suitable for children age 7 and above who have acquired the development skills needed to block ALL channels and A/V inputs at one under the age of 17 will block programming based on ratings patterned by the Motion Pictures Association of...
... from your viewing set to choose: Access Code - This is programming is specifically designed for a very young audience, including children ages 2-6. X: Adults Only - Suitable for children age 7 and above who have acquired the development skills needed to block ALL channels and A/V inputs at one under the age of 17 will block programming based on ratings patterned by the Motion Pictures Association of...
User manual
Page 23
... access code: Main Picture Sound Features Install AutoLock Format Features AutoLock Format Timer Start Time Stop Time Channel Activate Display 1 Press the MENU button on the remote to block channels and get a better understanding of the rating terms for certain programming. Features AutoLock Format Access Code XXXX Incorrect Features AutoLock Format New Code - - - - 5 Press the CURSOR RIGHT 2 button. Proceed to the next panel to learn how to display the on the Access Code screen as you press the numbered buttons...
... access code: Main Picture Sound Features Install AutoLock Format Features AutoLock Format Timer Start Time Stop Time Channel Activate Display 1 Press the MENU button on the remote to block channels and get a better understanding of the rating terms for certain programming. Features AutoLock Format Access Code XXXX Incorrect Features AutoLock Format New Code - - - - 5 Press the CURSOR RIGHT 2 button. Proceed to the next panel to learn how to display the on the Access Code screen as you press the numbered buttons...

User manual
Page 30
... for use with video gaming. MUSIC - VOL NOTE: The way you choose to set sound options. 1 Press the AUTO SOUND button on the remote control. Preset picture options for watching Video Tapes, or 1 DVDs. 2 SPORTS - AUTO SOUND T he Auto Sound feature allows the listener to select between the four settings. (PERSONAL, MUSIC, VOICE, or THEATRE) NOTE: The way you 're watching a movie or a sporting event, your TV has automatic video control settings...
... for use with video gaming. MUSIC - VOL NOTE: The way you choose to set sound options. 1 Press the AUTO SOUND button on the remote control. Preset picture options for watching Video Tapes, or 1 DVDs. 2 SPORTS - AUTO SOUND T he Auto Sound feature allows the listener to select between the four settings. (PERSONAL, MUSIC, VOICE, or THEATRE) NOTE: The way you 're watching a movie or a sporting event, your TV has automatic video control settings...

User manual
Page 33
... channel selection. • Add the desired channel numbers (using the CHANNEL EDIT control) into the outlet and push the POWER button again. • Check that the outlet is not on a wall switch. • Be sure the fuse is not blown on the AC power strip, if one is not on the remote to hook up auxiliary equipment, check the audio jack connec- No Picture • Check antenna connections. 29 TROUBLESHOOTING...
... channel selection. • Add the desired channel numbers (using the CHANNEL EDIT control) into the outlet and push the POWER button again. • Check that the outlet is not on a wall switch. • Be sure the fuse is not blown on the AC power strip, if one is not on the remote to hook up auxiliary equipment, check the audio jack connec- No Picture • Check antenna connections. 29 TROUBLESHOOTING...
Leaflet
Page 1
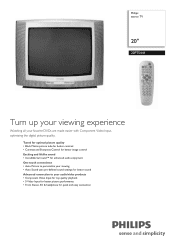
... audio enjoyment One touch convenience • Auto Picture to personalize your viewing • Auto Sound uses pre-defined sound settings for better sound Advanced connection to your favorite DVDs are made easier with Component Video Input, optimizing the digital picture quality. Philips stereo TV 20" 20PT5441 Turn up your viewing experience Watching all your audio/video products • Component Video Input for top quality playback • S-Video Input for better picture performance • Front Stereo AV & headphone for quick and easy connection...
... audio enjoyment One touch convenience • Auto Picture to personalize your viewing • Auto Sound uses pre-defined sound settings for better sound Advanced connection to your favorite DVDs are made easier with Component Video Input, optimizing the digital picture quality. Philips stereo TV 20" 20PT5441 Turn up your viewing experience Watching all your audio/video products • Component Video Input for top quality playback • S-Video Input for better picture performance • Front Stereo AV & headphone for quick and easy connection...
Leaflet
Page 2
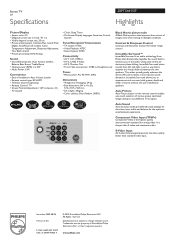
... 20PT5441/37 Highlights Picture/Display • Aspect ratio: 4:3 • Diagonal screen size: 21 inch / 51 cm • Visible diagonal screen size: 20 cm • Picture enhancement: Contrast Plus, Comb Filter Digital, AutoPicture (5 modes), Color Temperature Adjustment, Sharpness Adjustment, Tint, Black stretch • Picture processing: 60Hz Analog Sound • Sound Enhancement: Auto Volume Leveller, Balance, Bass Boost, Treble Boost • Output power (RMS): 2 x 3W • Music Power: 6 W Convenience • Ease of Installation: Auto Volume Leveler • Remote control type...
... 20PT5441/37 Highlights Picture/Display • Aspect ratio: 4:3 • Diagonal screen size: 21 inch / 51 cm • Visible diagonal screen size: 20 cm • Picture enhancement: Contrast Plus, Comb Filter Digital, AutoPicture (5 modes), Color Temperature Adjustment, Sharpness Adjustment, Tint, Black stretch • Picture processing: 60Hz Analog Sound • Sound Enhancement: Auto Volume Leveller, Balance, Bass Boost, Treble Boost • Output power (RMS): 2 x 3W • Music Power: 6 W Convenience • Ease of Installation: Auto Volume Leveler • Remote control type...


