

User manual
Page 1
Call us on the web at www.philips.com 3121 235 20621 CALL US BEFORE YOU CONSIDER RETURNING THE PRODUCT. 1-800-531-0039 or Visit us ! Return your new product. Need help you with any of the Features. Philips representatives are ready to start enjoying your new product right away! We want you through Connections, First-time Setup, or any questions about your Warranty Registration Card within 10 days. See why inside. Color TV Directions for Use Important! We can guide you to help ?
Call us on the web at www.philips.com 3121 235 20621 CALL US BEFORE YOU CONSIDER RETURNING THE PRODUCT. 1-800-531-0039 or Visit us ! Return your new product. Need help you with any of the Features. Philips representatives are ready to start enjoying your new product right away! We want you through Connections, First-time Setup, or any questions about your Warranty Registration Card within 10 days. See why inside. Color TV Directions for Use Important! We can guide you to help ?
User manual
Page 4
...on the back of the television for a quick source function to swap between your television system. Not all registered trademarks of Philips Consumer Electronics Company. END-OF-LIFE DISPOSAL Your new television and its packing contain materials that can be handed in this ... contacting your children viewing inappropriate material. for setting of certain channels or external audio/video connections where you to fill the entire TV screen. These Jacks can recycle your area. AutoLock™ feature allows you might not want your dealer or requesting service. Expand...
...on the back of the television for a quick source function to swap between your television system. Not all registered trademarks of Philips Consumer Electronics Company. END-OF-LIFE DISPOSAL Your new television and its packing contain materials that can be handed in this ... contacting your children viewing inappropriate material. for setting of certain channels or external audio/video connections where you to fill the entire TV screen. These Jacks can recycle your area. AutoLock™ feature allows you might not want your dealer or requesting service. Expand...

User manual
Page 5
...lid on P the front of case is first turned ON (and with the remote. VOL 5 7 6 5 Or to see what channel the TV is used to turn the TV ON. 2 Press the CHANNEL (P) UP or (P) DOWN button to lower the sound level. Sensor for activating remote control commands when the remote is.... P 3 Press the VOLUME button to increase the sound level, or the VOLUME button to select TV channels. Note: You can also press the STATUS/EXIT button (on the TV when operating the TV with channel changes.) You can also press any button on the back of the remote. 6 Place the batteries (2-AA...
...lid on P the front of case is first turned ON (and with the remote. VOL 5 7 6 5 Or to see what channel the TV is used to turn the TV ON. 2 Press the CHANNEL (P) UP or (P) DOWN button to lower the sound level. Sensor for activating remote control commands when the remote is.... P 3 Press the VOLUME button to increase the sound level, or the VOLUME button to select TV channels. Note: You can also press the STATUS/EXIT button (on the TV when operating the TV with channel changes.) You can also press any button on the back of the remote. 6 Place the batteries (2-AA...

User manual
Page 6
...to choose from different factory pre-defined sound settings. Also use with all colored buttons. Buttons - Press the numbered buttons to select TV channels or to activate or deactivate the EXPAND 4:3 screen formatting control. Press to choose from 5 different factory pre-defined picture settings.... Repeatedly press the CC button will be used when the signal being heard from the TV's screen. Press repeatedly to add channels in ascending or descending order. A/CH Button - (Alternate Channel) Press to display the ...
...to choose from different factory pre-defined sound settings. Also use with all colored buttons. Buttons - Press the numbered buttons to select TV channels or to activate or deactivate the EXPAND 4:3 screen formatting control. Press to choose from 5 different factory pre-defined picture settings.... Repeatedly press the CC button will be used when the signal being heard from the TV's screen. Press repeatedly to add channels in ascending or descending order. A/CH Button - (Alternate Channel) Press to display the ...

User manual
Page 7
...-69 (UHF). 1 Twin Lead Wire 300 to 75-ohm Adapter 2 Round 75Ω Coaxial Cable from Cable 1 Company (Round 75Ω coaxial cable) BACK OF TV 1 Connect the open end of the antenna wire is threaded, screw it down finger tight. buttons to add all available channels into the... 2-13 and UHF 14-69). If so, this connection is only one 75Ω (ohm) antenna plug on the back of TV BASIC CABLE TELEVISION CONNECTION Your Cable TV input into the TV's memory, then press the CH + and - Your connection is easy because there is very simple. If your antenna has flat...
...-69 (UHF). 1 Twin Lead Wire 300 to 75-ohm Adapter 2 Round 75Ω Coaxial Cable from Cable 1 Company (Round 75Ω coaxial cable) BACK OF TV 1 Connect the open end of the antenna wire is threaded, screw it down finger tight. buttons to add all available channels into the... 2-13 and UHF 14-69). If so, this connection is only one 75Ω (ohm) antenna plug on the back of TV BASIC CABLE TELEVISION CONNECTION Your Cable TV input into the TV's memory, then press the CH + and - Your connection is easy because there is very simple. If your antenna has flat...

User manual
Page 8
... Cable Company 1 Connect the open end of the round Cable Company supplied cable to the left and right Audio Out L & R jacks on the back of TV S-VIDEO 6 ANT 75‰ Monitor out AV1 in VIDEO Y L/Mono AUDIO Pb AV2 in R Pr COMPONENT VIDEO INPUT Jack Panel Back of the Cable Box... of the Cable Box. 1 CABLE IN Jack Panel Back of the round Cable Company supplied cable to the cable signal IN(put ) (TO TV) plug on the TV to complete the connection. Cable Signal IN from the Cable Company 4 Jack Panel Back of Cable Box Cable Box with Audio/Video Outputs): NEL...
... Cable Company 1 Connect the open end of the round Cable Company supplied cable to the left and right Audio Out L & R jacks on the back of TV S-VIDEO 6 ANT 75‰ Monitor out AV1 in VIDEO Y L/Mono AUDIO Pb AV2 in R Pr COMPONENT VIDEO INPUT Jack Panel Back of the Cable Box... of the Cable Box. 1 CABLE IN Jack Panel Back of the round Cable Company supplied cable to the cable signal IN(put ) (TO TV) plug on the TV to complete the connection. Cable Signal IN from the Cable Company 4 Jack Panel Back of Cable Box Cable Box with Audio/Video Outputs): NEL...

User manual
Page 9
... the AV2 channel, then the S-Video (SVHS) channel, then back to select the AV1 channel for accessory device number one can be connected BACK OF TV alone. AV1 Connection 2 2 ANT/CABLE S-VIDEO OUT OUT R L AUDIO OUT VIDEO OUT BACK OF VCR 1 4 5 7 VCR ONE (or accessory device) (EQUIPPED ...two) or accessory device being watched. AV1 and AV2 Input Jack connections are shown on this connection are not supplied with your dealer or Philips at 800-531-0039 for direct picture and sound connections NOTE: Repeatedly pressing the AV button on the television. c CHECK IT OUT Repeatedly...
... the AV2 channel, then the S-Video (SVHS) channel, then back to select the AV1 channel for accessory device number one can be connected BACK OF TV alone. AV1 Connection 2 2 ANT/CABLE S-VIDEO OUT OUT R L AUDIO OUT VIDEO OUT BACK OF VCR 1 4 5 7 VCR ONE (or accessory device) (EQUIPPED ...two) or accessory device being watched. AV1 and AV2 Input Jack connections are shown on this connection are not supplied with your dealer or Philips at 800-531-0039 for direct picture and sound connections NOTE: Repeatedly pressing the AV button on the television. c CHECK IT OUT Repeatedly...

User manual
Page 10
... S-VIDEO 3 Connect one end the AUDIO (red and white) CABLES to the AV2 in AUDIO L and R(left corner of the TV screen. 7 Now your dealer or Philips at 800-531-0039 for information about purchasing the needed for this connection are in (puts) are not supplied with better picture detail... and clarity for you with your TV. Note: The S-Video and Audio cables needed cables. 10 NOTE: The accessory device must have ...
... S-VIDEO 3 Connect one end the AUDIO (red and white) CABLES to the AV2 in AUDIO L and R(left corner of the TV screen. 7 Now your dealer or Philips at 800-531-0039 for information about purchasing the needed for this connection are in (puts) are not supplied with better picture detail... and clarity for you with your TV. Note: The S-Video and Audio cables needed cables. 10 NOTE: The accessory device must have ...

User manual
Page 11
...it is best not to have a video signal connected to the (Y, Pb, Pr) in Video Input jack. Refer to your dealer or Philips at 800-531-0039 for information about purchasing the needed for this connection are connected and received separately, which allows for the blue and ... jacks on the DVD player or accessory digital source equipment used (for definitions and connection details. Although abbreviations and terms may differ depending on the TV. When using composite video or S-Video connections). 1 Connect the Component (Y, Pb, Pr) Video OUT jacks from the current channel, then AV1 ...
...it is best not to have a video signal connected to the (Y, Pb, Pr) in Video Input jack. Refer to your dealer or Philips at 800-531-0039 for information about purchasing the needed for this connection are connected and received separately, which allows for the blue and ... jacks on the DVD player or accessory digital source equipment used (for definitions and connection details. Although abbreviations and terms may differ depending on the TV. When using composite video or S-Video connections). 1 Connect the Component (Y, Pb, Pr) Video OUT jacks from the current channel, then AV1 ...

User manual
Page 12
...Y Pb AV2 in VIDEO Y L/Mono AUDIO Pb R Pr COMPONENT VIDEO INPUT AUDIO CABLES (Red & White) S-VIDEO 1 R L AUX/TV INPUT PHONO INPUT 2 AUDIO SYSTEM with your TV. Please contact your dealer or Philips at 800-531-0039 for the proper hookup of the red and white Audio cable from Page 9) 12 c CHECK...with AUDIO INPUTS For Second VCR Connection/Recorder: NOTE: Refer to the VIDEO IN plug on your amplifier or sound system. 2 Turn the TV and audio system ON. The Audio cables needed cables. Follow the instructions on this connection are fixed and the volume would have to be ...
...Y Pb AV2 in VIDEO Y L/Mono AUDIO Pb R Pr COMPONENT VIDEO INPUT AUDIO CABLES (Red & White) S-VIDEO 1 R L AUX/TV INPUT PHONO INPUT 2 AUDIO SYSTEM with your TV. Please contact your dealer or Philips at 800-531-0039 for the proper hookup of the red and white Audio cable from Page 9) 12 c CHECK...with AUDIO INPUTS For Second VCR Connection/Recorder: NOTE: Refer to the VIDEO IN plug on your amplifier or sound system. 2 Turn the TV and audio system ON. The Audio cables needed cables. Follow the instructions on this connection are fixed and the volume would have to be ...
User manual
Page 13
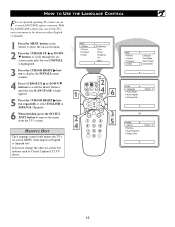
... Program Channel Edit English OR Instalar Idioma Sintonia Auto Programa Editar Canal Espa ol 13 HOW TO USE THE LANGUAGE CONTROL For our Spanish speaking TV owners an onscreen LANGUAGE option is highlighted. 5 Press the CURSOR RIGHT ᮣ button repeatedly to select ENGLISH or ESPAÑOL (Spanish). 6 When... finished, press the STATUS /EXIT button to remove the menu from the TV's screen. It does not change the other on -screen MENU items appear in either English or Spanish. 1 Press the MENU button on the remote ...
... Program Channel Edit English OR Instalar Idioma Sintonia Auto Programa Editar Canal Espa ol 13 HOW TO USE THE LANGUAGE CONTROL For our Spanish speaking TV owners an onscreen LANGUAGE option is highlighted. 5 Press the CURSOR RIGHT ᮣ button repeatedly to select ENGLISH or ESPAÑOL (Spanish). 6 When... finished, press the STATUS /EXIT button to remove the menu from the TV's screen. It does not change the other on -screen MENU items appear in either English or Spanish. 1 Press the MENU button on the remote ...

User manual
Page 14
... automatically choose the correct mode. 1 Press the MENU button on the remote to show the on -screen menu from the TV's screen. Main Picture Sound Features Install Brightness Color Picture Sharpness Tint More... 2 1 46 VOL 2 4 3 5 Main Picture Sound Features Install Language Tuner Mode Auto ... AUTO PROGRAM feature is selected, channels 1-125 are available. HOW TO USE THE TUNER MODE CONTROL T he TUNER MODE control allows you to change the TV's signal input to either ANTENNA, CABLE, or AUTO mode. 6 When finished, press the STATUS /EXIT button to remove the on -screen menu. 2 Press ...
... automatically choose the correct mode. 1 Press the MENU button on the remote to show the on -screen menu from the TV's screen. Main Picture Sound Features Install Brightness Color Picture Sharpness Tint More... 2 1 46 VOL 2 4 3 5 Main Picture Sound Features Install Language Tuner Mode Auto ... AUTO PROGRAM feature is selected, channels 1-125 are available. HOW TO USE THE TUNER MODE CONTROL T he TUNER MODE control allows you to change the TV's signal input to either ANTENNA, CABLE, or AUTO mode. 6 When finished, press the STATUS /EXIT button to remove the on -screen menu. 2 Press ...

User manual
Page 15
... PROGRAM is activated. 1 Press the MENU button on the remote to show the on the type of channels. When AUTO is selected, the TV will store all available channels in your area when the CHANNEL (+), (-) buttons are pressed. Auto Programming will automatically set itself to the correct ... start the Auto Program scanning of signal it easy for local area (or Cable TV) channels. HOW TO AUTOMATICALLY PROGRAM CHANNELS Your TV can automatically set itself for you to select only the TV stations in the TV's memory then tune to the lowest available channel when done. 6 When finished, ...
... PROGRAM is activated. 1 Press the MENU button on the remote to show the on the type of channels. When AUTO is selected, the TV will store all available channels in your area when the CHANNEL (+), (-) buttons are pressed. Auto Programming will automatically set itself to the correct ... start the Auto Program scanning of signal it easy for local area (or Cable TV) channels. HOW TO AUTOMATICALLY PROGRAM CHANNELS Your TV can automatically set itself for you to select only the TV stations in the TV's memory then tune to the lowest available channel when done. 6 When finished, ...

User manual
Page 16
... No. HOW TO ADD OR DELETE CHANNELS Channel Edit makes it easy for you wish to add (Skipped OFF), or delete (Skipped ON) from the TV's memory. 7 Using the CURSOR DOWN ▼ button, scroll the menu to highlight the word SKIPPED. 8 Now use the CURSOR RIGHT ᮣ button to toggle...to scroll the Install features until the words CHANNEL EDIT are highlighted. 5 Press the CURSOR RIGHT ᮣ button to ADD or DELETE channels from the TV's screen. If ON is selected the channel is not skipped when scrolling channels with the NUMBERED or the CH + or - Skipped Off 16 Skipped ...
... No. HOW TO ADD OR DELETE CHANNELS Channel Edit makes it easy for you wish to add (Skipped OFF), or delete (Skipped ON) from the TV's memory. 7 Using the CURSOR DOWN ▼ button, scroll the menu to highlight the word SKIPPED. 8 Now use the CURSOR RIGHT ᮣ button to toggle...to scroll the Install features until the words CHANNEL EDIT are highlighted. 5 Press the CURSOR RIGHT ᮣ button to ADD or DELETE channels from the TV's screen. If ON is selected the channel is not skipped when scrolling channels with the NUMBERED or the CH + or - Skipped Off 16 Skipped ...

User manual
Page 17
SHARPNESS: Press the ᮣ or ᮤ buttons to add or eliminate color. Dynamic Noise Reduction helps to eliminate "noise" from the TV's screen. HOW TO USE THE PICTURE ADJUSTMENT CONTROLS T o adjust your TV picture controls, select a channel and follow the steps shown below: 1 Press the MENU button on the remote to display the...
SHARPNESS: Press the ᮣ or ᮤ buttons to add or eliminate color. Dynamic Noise Reduction helps to eliminate "noise" from the TV's screen. HOW TO USE THE PICTURE ADJUSTMENT CONTROLS T o adjust your TV picture controls, select a channel and follow the steps shown below: 1 Press the MENU button on the remote to display the...

User manual
Page 18
...7075; or ᮤ buttons to select between Stereo or Mono settings. HOW TO USE THE SOUND ADJUSTMENT CONTROLS Besides the normal volume level control, your TV also has Treble Boost, Bass Boost, Balance, AVL (automatic volume leveler), and Sound (Stereo/Mono) controls. 1 Press the MENU button on the ...remote to display the on a selected show and the TV is highlighted (Treble Boost, Bass Boost, Balance, AVL, or Sound ). 5 Press the CURSOR RIGHT ᮣ or LEFT ᮤ button to turn the adjust...
...7075; or ᮤ buttons to select between Stereo or Mono settings. HOW TO USE THE SOUND ADJUSTMENT CONTROLS Besides the normal volume level control, your TV also has Treble Boost, Bass Boost, Balance, AVL (automatic volume leveler), and Sound (Stereo/Mono) controls. 1 Press the MENU button on the ...remote to display the on a selected show and the TV is highlighted (Treble Boost, Bass Boost, Balance, AVL, or Sound ). 5 Press the CURSOR RIGHT ᮣ or LEFT ᮤ button to turn the adjust...
User manual
Page 19
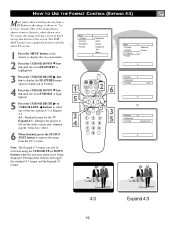
...26 3 5 Main Picture Sound Features Install AutoLock Format Features AutoLock Format 4:3 OR Features AutoLock Format Expand 4:3 4:3 19 Expand 4:3 when shown on a TV screen, the image will toggle the standard 4:3 format and the Expand 4:3 format. This is the format that is not being displayed. Standard format for... the TV. Pressing these buttons will have areas of black on -screen menu. 2 Press the CURSOR DOWN ▼ button until the word ...
...26 3 5 Main Picture Sound Features Install AutoLock Format Features AutoLock Format 4:3 OR Features AutoLock Format Expand 4:3 4:3 19 Expand 4:3 when shown on a TV screen, the image will toggle the standard 4:3 format and the Expand 4:3 format. This is the format that is not being displayed. Standard format for... the TV. Pressing these buttons will have areas of black on -screen menu. 2 Press the CURSOR DOWN ▼ button until the word ...

User manual
Page 20
...violence, very graphic and explicit or indecent sexual acts, very coarse and intensely suggestive language. 20 TV Rating TV-Y On TV-Y7 TV-G TV-PG TV-14 TV-MA TV PARENTAL GUIDELINES (TV BROADCASTERS) TV TV-Y - (All children -- All ages admitted. R: Restricted -This is programming is an integrated...data sent by adults and therefore may watch. Y gram is a great feature to distinguish between make-believe and reality. TV TV-PG - (Parental Guidance PG Suggested -- This program contains some suggestive dialogue (D). Movie Ratings: Block programming based on ...
...violence, very graphic and explicit or indecent sexual acts, very coarse and intensely suggestive language. 20 TV Rating TV-Y On TV-Y7 TV-G TV-PG TV-14 TV-MA TV PARENTAL GUIDELINES (TV BROADCASTERS) TV TV-Y - (All children -- All ages admitted. R: Restricted -This is programming is an integrated...data sent by adults and therefore may watch. Y gram is a great feature to distinguish between make-believe and reality. TV TV-PG - (Parental Guidance PG Suggested -- This program contains some suggestive dialogue (D). Movie Ratings: Block programming based on ...

User manual
Page 21
...code you just entered. Features AutoLock Format Confirm Code XXXX AutoLock Block Channel Setup Code Clear All Block All Movie Rating TV Rating OffStop Time Channel Activate Display First, let's start by someone else and blocked channels have been viewed. The screen ... Access Code XXXX Incorrect Features AutoLock Format New Code - - - - AutoLock Block Channel Setup Code Clear All Block All Movie Rating TV Rating OffStop Time Channel Activate Display 21 Main Picture Sound Features Install AutoLock Format Features AutoLock Format Features AutoLock Format Access Code - - ...
...code you just entered. Features AutoLock Format Confirm Code XXXX AutoLock Block Channel Setup Code Clear All Block All Movie Rating TV Rating OffStop Time Channel Activate Display First, let's start by someone else and blocked channels have been viewed. The screen ... Access Code XXXX Incorrect Features AutoLock Format New Code - - - - AutoLock Block Channel Setup Code Clear All Block All Movie Rating TV Rating OffStop Time Channel Activate Display 21 Main Picture Sound Features Install AutoLock Format Features AutoLock Format Features AutoLock Format Access Code - - ...

User manual
Page 22
...Access Code to view the channel, ALL blocked channels will be displayed. 8 Press the CURSOR UP ▲ or DOWN ▼ buttons until the TV has been turned off. Features AutoLock Format Access Code XXXX AutoLock Block Channel Setup Code Clear All Block All Movie Rating... Install AutoLock Format Features AutoLock Format Features AutoLock Format Access Code - - - - Enter your Access Code to view a tuned channel that channel. When the TV is blocked with Block Channel. When ON is selected the channel will appear on the Access Code display as you wish to turn blocking ON...
...Access Code to view the channel, ALL blocked channels will be displayed. 8 Press the CURSOR UP ▲ or DOWN ▼ buttons until the TV has been turned off. Features AutoLock Format Access Code XXXX AutoLock Block Channel Setup Code Clear All Block All Movie Rating... Install AutoLock Format Features AutoLock Format Features AutoLock Format Access Code - - - - Enter your Access Code to view a tuned channel that channel. When the TV is blocked with Block Channel. When ON is selected the channel will appear on the Access Code display as you wish to turn blocking ON...


