

User manual
Page 1
...of Contents 21A582BH 21B582BH GETTING STARTED Introduction 1 Safety 1 Description of Controls 2-3 Setting Up Guide Foldout HOW TO USE THE ON SCREEN DISPLAY MAIN CONTROLS WINDOW Brightness 4 Contrast 4 Degauss 5 SCREEN SIZE & POSITION WINDOW Full Size 6 Horizontal Position 6 Horizontal Size 7 Vertical Position 7 Vertical Size 7 COLOR TEMPERATURE WINDOW 9300 K CAD/CAM 8 6500 K DTP 8 5500 K Photo Retouch 8 User Presets 9 SPECIAL CONTROLS WINDOW Language 10 Power Saving 10 OSD Controls 11 Video Input 11 ADVANCED CONTROLS WINDOW Rotary Default 12 Moire 12 Vertical Linearity...
...of Contents 21A582BH 21B582BH GETTING STARTED Introduction 1 Safety 1 Description of Controls 2-3 Setting Up Guide Foldout HOW TO USE THE ON SCREEN DISPLAY MAIN CONTROLS WINDOW Brightness 4 Contrast 4 Degauss 5 SCREEN SIZE & POSITION WINDOW Full Size 6 Horizontal Position 6 Horizontal Size 7 Vertical Position 7 Vertical Size 7 COLOR TEMPERATURE WINDOW 9300 K CAD/CAM 8 6500 K DTP 8 5500 K Photo Retouch 8 User Presets 9 SPECIAL CONTROLS WINDOW Language 10 Power Saving 10 OSD Controls 11 Video Input 11 ADVANCED CONTROLS WINDOW Rotary Default 12 Moire 12 Vertical Linearity...

User manual
Page 2
... to the video card's scanning frequency and displays an image with a slightly damp cloth. Specialized companies can still use alcohol or ammoniabased liquids. • Consult a service technician if the monitor does not operate normally when following the instructions in the picture. The monitor automatically scans horizontal frequencies from 30KHz to 115KHz(201P),107KHz(201B), and vertical frequencies from stoves or any other application that support the...
... to the video card's scanning frequency and displays an image with a slightly damp cloth. Specialized companies can still use alcohol or ammoniabased liquids. • Consult a service technician if the monitor does not operate normally when following the instructions in the picture. The monitor automatically scans horizontal frequencies from 30KHz to 115KHz(201P),107KHz(201B), and vertical frequencies from stoves or any other application that support the...

User manual
Page 3
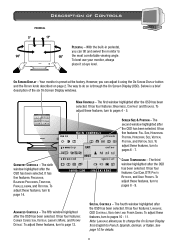
.... 2 When not used with the monitor. Connect one end of hooking video from the computer to conceal cable connections. (Cable connections shown in here. See foldout for details. Turns the unit On and Off. TOP VIEW FRONT VIEW LED - See page 12. ROTARY Knob - Plug the power cord in the manual are without the cover on and at full power. Light Emitting Diode turns green when the monitor is on .) REAR VIEW H/H-V V R G B ISD-SUB...
.... 2 When not used with the monitor. Connect one end of hooking video from the computer to conceal cable connections. (Cable connections shown in here. See foldout for details. Turns the unit On and Off. TOP VIEW FRONT VIEW LED - See page 12. ROTARY Knob - Plug the power cord in the manual are without the cover on and at full power. Light Emitting Diode turns green when the monitor is on .) REAR VIEW H/H-V V R G B ISD-SUB...
User manual
Page 4
...: BRIGHTNESS, CONTRAST and DEGAUSS. ADVANCED CONTROLS - To adjust these features, turn to page 12. To adjust these features, turn to pages 4 - 5. ma i n MA I N CONTROL S sc reen g e ome t r y adv an c ed EXIT RESET co l or spec i a l 1 6 0 0 x 1 2 00 1 0 6 . 3 K / 8 5HZ SCREEN SIZE & POSITION - MAIN CONTROLS - The second window highlighted after the OSD has been selected. It has four features: LANGUAGE, OSD CONTROLS, VIDEO INPUT AND POWER SAVING. See page 10 for details. 3 ON SCREEN DISPLAY - However, you can tilt...
...: BRIGHTNESS, CONTRAST and DEGAUSS. ADVANCED CONTROLS - To adjust these features, turn to page 12. To adjust these features, turn to pages 4 - 5. ma i n MA I N CONTROL S sc reen g e ome t r y adv an c ed EXIT RESET co l or spec i a l 1 6 0 0 x 1 2 00 1 0 6 . 3 K / 8 5HZ SCREEN SIZE & POSITION - MAIN CONTROLS - The second window highlighted after the OSD has been selected. It has four features: LANGUAGE, OSD CONTROLS, VIDEO INPUT AND POWER SAVING. See page 10 for details. 3 ON SCREEN DISPLAY - However, you can tilt...

User manual
Page 5
... monitor) to MAIN CONTROLS window. BRIGHTNESS 5 Press the ON SCREEN DISPLAY button to return to adjust the brightness. BRIGHTNESS 80% 4 Turn the ROTARY knob (at the lower right-hand corner of the light coming from the screen. ma i n CONTRAST g e ome t r y EXIT adv an c ed RESET 3 Press the ON SCREEN DISPLAY button to DEGAUSS, turn the ROTARY knob until DEGAUSS icon is highlighted. CONTRAST 80% 4 Turn the ROTARY knob to Use the On Screen Display (OSD...
... monitor) to MAIN CONTROLS window. BRIGHTNESS 5 Press the ON SCREEN DISPLAY button to return to adjust the brightness. BRIGHTNESS 80% 4 Turn the ROTARY knob (at the lower right-hand corner of the light coming from the screen. ma i n CONTRAST g e ome t r y EXIT adv an c ed RESET 3 Press the ON SCREEN DISPLAY button to DEGAUSS, turn the ROTARY knob until DEGAUSS icon is highlighted. CONTRAST 80% 4 Turn the ROTARY knob to Use the On Screen Display (OSD...
User manual
Page 6
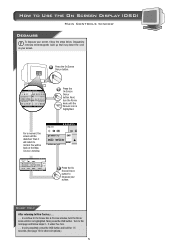
... below. Smart Help After returning to MAIN CONTROLS to continue to Use the On Screen Display (OSD) Main Controls window Degauss To degauss your screen, follow steps 2 - 5 under FULL SIZE. . . . ma i n MA I N CONTROL S sc reen g e ome t r y adv an c ed EXIT RESET co l or spec i a l 1 6 0 0 x 1 2 00 1 0 6 . 3 K / 8 5HZ 1 Press the ON SCREEN DISPLAY button. Degaussing removes electromagnetic build up that may distort the color on your screen. Next, turn the ROTARY knob...
... below. Smart Help After returning to MAIN CONTROLS to continue to Use the On Screen Display (OSD) Main Controls window Degauss To degauss your screen, follow steps 2 - 5 under FULL SIZE. . . . ma i n MA I N CONTROL S sc reen g e ome t r y adv an c ed EXIT RESET co l or spec i a l 1 6 0 0 x 1 2 00 1 0 6 . 3 K / 8 5HZ 1 Press the ON SCREEN DISPLAY button. Degaussing removes electromagnetic build up that may distort the color on your screen. Next, turn the ROTARY knob...
User manual
Page 7
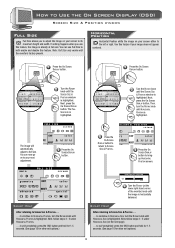
... exit options.) 6 Smart Help After returning to SCREEN SIZE & POSITION to continue to HORIZONTAL SIZE, turn the ROTARY knob until HORIZONTAL POSITION is highlighted. FULL S I N CONTROL S s c r een g e ome t r y adv an c ed EXIT RESET co l or spec i a l 1 6 0 0 x 1 2 00 1 0 6 . 3 K / 8 5HZ 1 Press the ON SCREEN DISPLAY button. How to Use the On Screen Display (OSD) Screen Size & Position window Full Size Full Size allows you use Full Size to both enable and disable this feature if your image does not appear centered...
... exit options.) 6 Smart Help After returning to SCREEN SIZE & POSITION to continue to HORIZONTAL SIZE, turn the ROTARY knob until HORIZONTAL POSITION is highlighted. FULL S I N CONTROL S s c r een g e ome t r y adv an c ed EXIT RESET co l or spec i a l 1 6 0 0 x 1 2 00 1 0 6 . 3 K / 8 5HZ 1 Press the ON SCREEN DISPLAY button. How to Use the On Screen Display (OSD) Screen Size & Position window Full Size Full Size allows you use Full Size to both enable and disable this feature if your image does not appear centered...

User manual
Page 8
... the monitor) until VERTICAL POSITION is the horizontal size you want . Next, press the ON SCREEN DISPLAY button. ma i n MA I N CONTROL S sc reen g e ome t r y adv an c ed EXIT RESET co l or spec i a l 1 6 0 0 x 1 2 00 1 0 6 . 3 K / 8 5HZ 2 Turn the ROTARY knob until VERTICAL POSITION or VERTICAL SIZE is highlighted. Then, turn the ROTARY knob until the SCREEN SIZE & POSITION window is highlighted. 5 Press the ON SCREEN DISPLAY button to return to SCREEN SIZE & POSITION. Then, turn the ROTARY knob until the SCREEN SIZE & POSITION window...
... the monitor) until VERTICAL POSITION is the horizontal size you want . Next, press the ON SCREEN DISPLAY button. ma i n MA I N CONTROL S sc reen g e ome t r y adv an c ed EXIT RESET co l or spec i a l 1 6 0 0 x 1 2 00 1 0 6 . 3 K / 8 5HZ 2 Turn the ROTARY knob until VERTICAL POSITION or VERTICAL SIZE is highlighted. Then, turn the ROTARY knob until the SCREEN SIZE & POSITION window is highlighted. 5 Press the ON SCREEN DISPLAY button to return to SCREEN SIZE & POSITION. Then, turn the ROTARY knob until the SCREEN SIZE & POSITION window...

User manual
Page 9
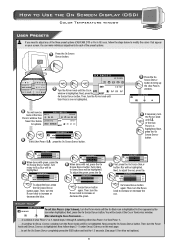
... SCREEN DISPLAY button. One for Photo Retouch. To save the preset settings for Desktop Publishing (DTP). How to Use the On Screen Display (OSD) Color Temperature window 9300 K Cad/Cam / 6500 K DTP / 5500 K Photo Retouch Your monitor has three preset options you select an option, the computer automatically adjusts itself for other exit options.) 8 Smart Help After returning to COLOR TEMPERATURE to continue to USER PRESETS, turn...
... SCREEN DISPLAY button. One for Photo Retouch. To save the preset settings for Desktop Publishing (DTP). How to Use the On Screen Display (OSD) Color Temperature window 9300 K Cad/Cam / 6500 K DTP / 5500 K Photo Retouch Your monitor has three preset options you select an option, the computer automatically adjusts itself for other exit options.) 8 Smart Help After returning to COLOR TEMPERATURE to continue to USER PRESETS, turn...
User manual
Page 10
... SCREEN DISPLAY button. USER PRESETS 1 2 3 9 You will be highlighted. USER PRESET 1 RED 78% GREEN 78% BLUE 78% To adjust the blue, press the ON SCREEN DISPLAY button again. RED will now be back at the USER PRESETS window. ma i n USER PRESETS sc reen g e ome t r y EXIT RESET co l or USER PRESET 1 RED GREEN 8 To exit USER PRESET 11 , press the ON SCREEN DISPLAY button. 4 If necessary, turn the ROTARY knob to BLUE,BLUE will be back at the COLOR TEMPERATURE window...
... SCREEN DISPLAY button. USER PRESETS 1 2 3 9 You will be highlighted. USER PRESET 1 RED 78% GREEN 78% BLUE 78% To adjust the blue, press the ON SCREEN DISPLAY button again. RED will now be back at the USER PRESETS window. ma i n USER PRESETS sc reen g e ome t r y EXIT RESET co l or USER PRESET 1 RED GREEN 8 To exit USER PRESET 11 , press the ON SCREEN DISPLAY button. 4 If necessary, turn the ROTARY knob to BLUE,BLUE will be back at the COLOR TEMPERATURE window...

User manual
Page 11
... SCREEN DISPLAY button to select POWER SAVING ON or OFF. ma i n MA I N CONTROL S sc reen g e ome t r y adv an c ed EXIT RESET co l or spec i a l 1 6 0 0 x 1 2 00 1 0 6 . 3 K / 8 5HZ 2 Turn the ROTARY knob until OSD CONTROLS icon is highlighted. Next, follow the steps below. to bring up LANGUAGE screen. LANGUAGE in one of the monitor) until SPECIAL CONTROLS is highlighted. The default is English, but not being used . ome t r y v an c ed EXIT RESET...
... SCREEN DISPLAY button to select POWER SAVING ON or OFF. ma i n MA I N CONTROL S sc reen g e ome t r y adv an c ed EXIT RESET co l or spec i a l 1 6 0 0 x 1 2 00 1 0 6 . 3 K / 8 5HZ 2 Turn the ROTARY knob until OSD CONTROLS icon is highlighted. Next, follow the steps below. to bring up LANGUAGE screen. LANGUAGE in one of the monitor) until SPECIAL CONTROLS is highlighted. The default is English, but not being used . ome t r y v an c ed EXIT RESET...

User manual
Page 12
... SPECIAL CONTROLS . . . . . . to OSD CONTROLS. Video Input VIDEO INPUT helps determine what you see on the monitor screen. It is set the time for the On Screen Display to time out, and change the vertical and horizontal position of the OSD on the screen. ma i n MA I N CONTROL S sc reen g e ome t r y adv an c ed EXIT RESET co l or spec i a l 1 6 0 0 x 1 2 00 1 0 6 . 3 K / 8 5HZ 2 Turn the ROTARY knob until the VIDEO INPUT icon is different than the output signal, you...
... SPECIAL CONTROLS . . . . . . to OSD CONTROLS. Video Input VIDEO INPUT helps determine what you see on the monitor screen. It is set the time for the On Screen Display to time out, and change the vertical and horizontal position of the OSD on the screen. ma i n MA I N CONTROL S sc reen g e ome t r y adv an c ed EXIT RESET co l or spec i a l 1 6 0 0 x 1 2 00 1 0 6 . 3 K / 8 5HZ 2 Turn the ROTARY knob until the VIDEO INPUT icon is different than the output signal, you...
User manual
Page 13
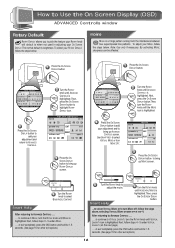
... the ON SCREEN DISPLAY button to bring up MOIRE screen. To adjust your adjustment and to bring up ADVANCED CONTROLS screen. ROTARY DEFAULT ma i n scre g e ome t r y adv an c ed EXIT RESET co l spec i 3 Press the ON SCREEN DISPLAY button to bring up ROTARY DEFAULT screen. See SMART HELP to select VERTICAL MOIRE or turn MOIRE off, follow the steps below . How to Use the On Screen Display (OSD) ADVANCED Controls window Rotary Default ROTARY DEFAULT allows you...
... the ON SCREEN DISPLAY button to bring up MOIRE screen. To adjust your adjustment and to bring up ADVANCED CONTROLS screen. ROTARY DEFAULT ma i n scre g e ome t r y adv an c ed EXIT RESET co l spec i 3 Press the ON SCREEN DISPLAY button to bring up ROTARY DEFAULT screen. See SMART HELP to select VERTICAL MOIRE or turn MOIRE off, follow the steps below . How to Use the On Screen Display (OSD) ADVANCED Controls window Rotary Default ROTARY DEFAULT allows you...
User manual
Page 14
... EXIT RESET co l spec i 3 Press the ON SCREEN DISPLAY button to bring up " the corners of a pixel on the screen corresponds with its intended location. How to Use the On Screen Display (OSD) ADVANCED Controls window VERTICAL LINEARITY Linearity is the degree with which the actual location of an image on the screen To adjust your CORNER CORRECTION, follow the steps below . Next, press the ON SCREEN DISPLAY button.Then, turn...
... EXIT RESET co l spec i 3 Press the ON SCREEN DISPLAY button to bring up " the corners of a pixel on the screen corresponds with its intended location. How to Use the On Screen Display (OSD) ADVANCED Controls window VERTICAL LINEARITY Linearity is the degree with which the actual location of an image on the screen To adjust your CORNER CORRECTION, follow the steps below . Next, press the ON SCREEN DISPLAY button.Then, turn...

User manual
Page 15
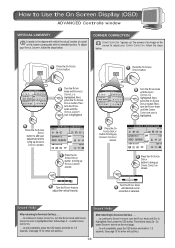
... instructions for 1.5 seconds. All changes will save the change and return the screen to GEOMETRY CONTROLS. 50% 3b Turn the ROTARY knob (on page 15. 14 Next, press the ON SCREEN DISPLAY button. To return to make changes to one item, follow steps 4b 5c and 4c to factory presets, see "To Reset an Individual Window" on the lower right-hand corner of the monitor) to adjust...
... instructions for 1.5 seconds. All changes will save the change and return the screen to GEOMETRY CONTROLS. 50% 3b Turn the ROTARY knob (on page 15. 14 Next, press the ON SCREEN DISPLAY button. To return to make changes to one item, follow steps 4b 5c and 4c to factory presets, see "To Reset an Individual Window" on the lower right-hand corner of the monitor) to adjust...

User manual
Page 16
... CONTROLS. For example, MAIN CONTROLS. Turn the ROTARY knob to another window. For example, BRIGHTNESS. 1 6 0 0 x 1 2 00 1 0 6 . 3 K / 8 5HZ ma i n RESET s c r een g e ome t r y adv an c ed EXIT RESET co l or spec i a l 1 6 0 0 x 1 2 00 1 0 6 . 3 K / 8 5HZ 2 Turn the ROTARY knob until EXIT is highlighted. Exit & Reset from the On Screen Display Exiting from the On Screen Display removes the On Screen Display from the monitor screen. How to Use the On Screen Display (OSD) Exit and Reset Exit & Reset from a window...
... CONTROLS. For example, MAIN CONTROLS. Turn the ROTARY knob to another window. For example, BRIGHTNESS. 1 6 0 0 x 1 2 00 1 0 6 . 3 K / 8 5HZ ma i n RESET s c r een g e ome t r y adv an c ed EXIT RESET co l or spec i a l 1 6 0 0 x 1 2 00 1 0 6 . 3 K / 8 5HZ 2 Turn the ROTARY knob until EXIT is highlighted. Exit & Reset from the On Screen Display Exiting from the On Screen Display removes the On Screen Display from the monitor screen. How to Use the On Screen Display (OSD) Exit and Reset Exit & Reset from a window...

User manual
Page 17
... computer. 2. Connect the (optional) BNC monitor cable and set D-SUB/BNC switch to BNC. 4. Connect the (optional) USB Hub and cable to the computer and to your monitor instead of monitor. Connect the shielded power cable. 5. Note: USB Hub and cables sold separately. Additional Hook Up Options BNC and USB Set Ups BNC Connections BNC is still being developed, Philips has included the hardware so you have USB port.) 3. Connect the shielded power cable. 4. Turn on...
... computer. 2. Connect the (optional) BNC monitor cable and set D-SUB/BNC switch to BNC. 4. Connect the (optional) USB Hub and cable to the computer and to your monitor instead of monitor. Connect the shielded power cable. 5. Note: USB Hub and cables sold separately. Additional Hook Up Options BNC and USB Set Ups BNC Connections BNC is still being developed, Philips has included the hardware so you have USB port.) 3. Connect the shielded power cable. 4. Turn on...

User manual
Page 18
....7 69.0 71.8 80.0 91.1 106.3 105.5 112.5 V. To turn this automatic power-saving feature. The tables at the bottom of the function requires a computer with VESA DPMS, the monitor is Energy Star compliant and power management compatible. Power Management Definition VESA's mode Video H-sync V-sync Power used with a computer equipped with VESA DPMS power management capabilities. Power saving(%) 0% 87.5% 87.5% 95.8% LED color Green Yellow Yellow Amber AS AN ENERGY STAR PARTNER...
....7 69.0 71.8 80.0 91.1 106.3 105.5 112.5 V. To turn this automatic power-saving feature. The tables at the bottom of the function requires a computer with VESA DPMS, the monitor is Energy Star compliant and power management compatible. Power Management Definition VESA's mode Video H-sync V-sync Power used with a computer equipped with VESA DPMS power management capabilities. Power saving(%) 0% 87.5% 87.5% 95.8% LED color Green Yellow Yellow Amber AS AN ENERGY STAR PARTNER...

User manual
Page 19
...13 H. connected to pin 10 6 10 5 Self test 11 15 6 Red video ground 7 Green video ground 8 Blue video ground 9 No pin 10 Logic ground 11 Identical output - Geometry A set up 16 User Presets 9 Vertical Linearity 13 Vertical Position 7 Vertical Size 7 Video Input 11 Warranty (Appendix 60 Specifications GENERAL CRT Screen size Viewable Image Size (VIS) Focusing method Dot pitch Phosphor Screen treatment Display area Factory preset Maximum usable Scanning frequency Horizontal (line) Vertical (frame) Input power Power consumption Thermal dissipation Input signal Video Sync...
...13 H. connected to pin 10 6 10 5 Self test 11 15 6 Red video ground 7 Green video ground 8 Blue video ground 9 No pin 10 Logic ground 11 Identical output - Geometry A set up 16 User Presets 9 Vertical Linearity 13 Vertical Position 7 Vertical Size 7 Video Input 11 Warranty (Appendix 60 Specifications GENERAL CRT Screen size Viewable Image Size (VIS) Focusing method Dot pitch Phosphor Screen treatment Display area Factory preset Maximum usable Scanning frequency Horizontal (line) Vertical (frame) Input power Power consumption Thermal dissipation Input signal Video Sync...

User manual
Page 20
... an adapter. Power button on the monitor. The Energy Saving Feature may be a non-VESA-DDC Standard card. Screen says NO SYNC INPUT NNOO SYNC INNPPUUTT NO SYNC INPUT when you are using a non-VESA-DDC standard video card, consult your refresh rate. Make sure the D-Sub/BNC switch on No Color If you turn on top of the monitor is switched off. It may need degaussing. Edges of the monitor is Green in the correct position. Picture has a double image...
... an adapter. Power button on the monitor. The Energy Saving Feature may be a non-VESA-DDC Standard card. Screen says NO SYNC INPUT NNOO SYNC INNPPUUTT NO SYNC INPUT when you are using a non-VESA-DDC standard video card, consult your refresh rate. Make sure the D-Sub/BNC switch on No Color If you turn on top of the monitor is switched off. It may need degaussing. Edges of the monitor is Green in the correct position. Picture has a double image...


