

User manual
Page 1
... 21A582BH 21B582BH GETTING STARTED Introduction 1 Safety 1 Description of Controls 2-3 Setting Up Guide Foldout HOW TO USE THE ON SCREEN DISPLAY MAIN CONTROLS WINDOW Brightness 4 Contrast 4 Degauss 5 SCREEN SIZE & POSITION WINDOW Full Size 6 Horizontal Position 6 Horizontal Size 7 Vertical Position 7 Vertical Size 7 COLOR TEMPERATURE WINDOW 9300 K CAD/CAM 8 6500 K DTP 8 5500 K Photo Retouch 8 User Presets 9 SPECIAL CONTROLS WINDOW Language 10 Power Saving 10 OSD Controls 11 Video Input 11 ADVANCED CONTROLS WINDOW Rotary Default 12 Moire 12 Vertical Linearity 13...
... 21A582BH 21B582BH GETTING STARTED Introduction 1 Safety 1 Description of Controls 2-3 Setting Up Guide Foldout HOW TO USE THE ON SCREEN DISPLAY MAIN CONTROLS WINDOW Brightness 4 Contrast 4 Degauss 5 SCREEN SIZE & POSITION WINDOW Full Size 6 Horizontal Position 6 Horizontal Size 7 Vertical Position 7 Vertical Size 7 COLOR TEMPERATURE WINDOW 9300 K CAD/CAM 8 6500 K DTP 8 5500 K Photo Retouch 8 User Presets 9 SPECIAL CONTROLS WINDOW Language 10 Power Saving 10 OSD Controls 11 Video Input 11 ADVANCED CONTROLS WINDOW Rotary Default 12 Moire 12 Vertical Linearity 13...

User manual
Page 2
... not support the relevant guidelines, you need to be .philips.com Safety precautions and maintenance • Unplug the monitor, if you desire. Remove any other application that demands a large screen size and high resolutions. The monitor automatically scans horizontal frequencies from 30KHz to 115KHz(201P),107KHz(201B), and vertical frequencies from stoves or any object that this feature. You can make sure the power plug and...
... not support the relevant guidelines, you need to be .philips.com Safety precautions and maintenance • Unplug the monitor, if you desire. Remove any other application that demands a large screen size and high resolutions. The monitor automatically scans horizontal frequencies from 30KHz to 115KHz(201P),107KHz(201B), and vertical frequencies from stoves or any object that this feature. You can make sure the power plug and...

User manual
Page 3
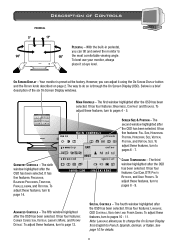
... Plug - Connect one end of Controls POWER Button - Slot for details. See page 16 for details. This switch should be in the manual are without the cover on and at full power. Plug the power cord in USB Hub. Optional hardware that allows true Plug-and-Play. TOP VIEW FRONT VIEW LED - ON SCREEN DISPLAY (OSD) button - See page 16 for details. ISD-SUB USB USB POWER Plug - RIGHT VIEW CABLE COVER - Another way of the monitor to the monitor...
... Plug - Connect one end of Controls POWER Button - Slot for details. See page 16 for details. This switch should be in the manual are without the cover on and at full power. Plug the power cord in USB Hub. Optional hardware that allows true Plug-and-Play. TOP VIEW FRONT VIEW LED - ON SCREEN DISPLAY (OSD) button - See page 16 for details. ISD-SUB USB USB POWER Plug - RIGHT VIEW CABLE COVER - Another way of the monitor to the monitor...
User manual
Page 4
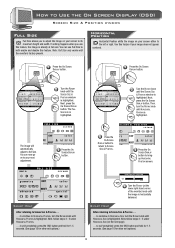
... c ed EXIT RESET co l or spec i a l 1 6 0 0 x 1 2 00 1 0 6 . 3 K / 8 5HZ SCREEN SIZE & POSITION - MAIN CONTROLS - To adjust these features, turn to pages 4 - 5. ma i n MA I N CONTROL S s c r een g e ome t r y adv an c ed EXIT RESET co l or spec i a l 1 6 0 0 x 1 2 00 1 0 6 . 3 K / 8 5HZ GEOMETRY CONTROLS - To adjust these features, turn to pages 10 - 11. It has four features: LANGUAGE, OSD CONTROLS, VIDEO INPUT AND POWER SAVING. To adjust these features, turn to pages 6 - 7. The sixth window highlighted after the OSD has been selected...
... c ed EXIT RESET co l or spec i a l 1 6 0 0 x 1 2 00 1 0 6 . 3 K / 8 5HZ SCREEN SIZE & POSITION - MAIN CONTROLS - To adjust these features, turn to pages 4 - 5. ma i n MA I N CONTROL S s c r een g e ome t r y adv an c ed EXIT RESET co l or spec i a l 1 6 0 0 x 1 2 00 1 0 6 . 3 K / 8 5HZ GEOMETRY CONTROLS - To adjust these features, turn to pages 10 - 11. It has four features: LANGUAGE, OSD CONTROLS, VIDEO INPUT AND POWER SAVING. To adjust these features, turn to pages 6 - 7. The sixth window highlighted after the OSD has been selected...

User manual
Page 5
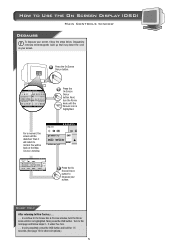
... an c ed EXIT RESET co l or spec i a l 1 6 0 0 x 1 2 00 1 0 6 . 3 K / 8 5HZ 2 Press the ON SCREEN DISPLAY button. ma i n CONTRAST g e ome t r y EXIT adv an c ed RESET 3 Press the ON SCREEN DISPLAY button to bring up CONTRAST screen. CONTRAST 80% 4 Turn the ROTARY knob to adjust the contrast. g e ome t r y adv an c ed EXIT RESET 3 Press the ON SCREEN DISPLAY button to bring up BRIGHTNESS screen. How to Use the On Screen Display (OSD) Main Controls window Brightness To adjust your screen's contrast, follow the steps below...
... an c ed EXIT RESET co l or spec i a l 1 6 0 0 x 1 2 00 1 0 6 . 3 K / 8 5HZ 2 Press the ON SCREEN DISPLAY button. ma i n CONTRAST g e ome t r y EXIT adv an c ed RESET 3 Press the ON SCREEN DISPLAY button to bring up CONTRAST screen. CONTRAST 80% 4 Turn the ROTARY knob to adjust the contrast. g e ome t r y adv an c ed EXIT RESET 3 Press the ON SCREEN DISPLAY button to bring up BRIGHTNESS screen. How to Use the On Screen Display (OSD) Main Controls window Brightness To adjust your screen's contrast, follow the steps below...
User manual
Page 6
... EXIT RESET ma i n DEGA g e ome t r y adv an c e d EX RES 1 6 0 0 x 1 2 00 3 Press the ON SCREEN DISPLAY button to Use the On Screen Display (OSD) Main Controls window Degauss To degauss your screen, follow steps 2 - 5 under FULL SIZE. . . . How to degauss your screen. to the SCREEN SIZE & POSITION window, turn the ROTARY knob until EXIT is highlighted. Smart Help After returning to MAIN CONTROLS to continue to exit completely, press the OSD button and...
... EXIT RESET ma i n DEGA g e ome t r y adv an c e d EX RES 1 6 0 0 x 1 2 00 3 Press the ON SCREEN DISPLAY button to Use the On Screen Display (OSD) Main Controls window Degauss To degauss your screen, follow steps 2 - 5 under FULL SIZE. . . . How to degauss your screen. to the SCREEN SIZE & POSITION window, turn the ROTARY knob until EXIT is highlighted. Smart Help After returning to MAIN CONTROLS to continue to exit completely, press the OSD button and...
User manual
Page 7
ma i n MA I N CONTROL S s c r een g e ome t r y adv an c ed EXIT RESET co l or spec i a l 1 6 0 0 x 1 2 00 1 0 6 . 3 K / 8 5HZ 1 Press the ON SCREEN DISPLAY button. Next, press the ON SCREEN DISPLAY button. Smart Help After returning to SCREEN SIZE & POSITION to continue to HORIZONTAL SIZE, turn the ROTARY knob until the image is horizontally balanced. Note: Full Size only works with the monitor's factory presets. You can use this feature, the image is already at the lower right-hand...
ma i n MA I N CONTROL S s c r een g e ome t r y adv an c ed EXIT RESET co l or spec i a l 1 6 0 0 x 1 2 00 1 0 6 . 3 K / 8 5HZ 1 Press the ON SCREEN DISPLAY button. Next, press the ON SCREEN DISPLAY button. Smart Help After returning to SCREEN SIZE & POSITION to continue to HORIZONTAL SIZE, turn the ROTARY knob until the image is horizontally balanced. Note: Full Size only works with the monitor's factory presets. You can use this feature, the image is already at the lower right-hand...

User manual
Page 8
... ON SCREEN DISPLAY button. ma i n MA I N CONTROL S sc reen g e ome t r y adv an c ed EXIT RESET co l or spec i a l 1 6 0 0 x 1 2 00 1 0 6 . 3 K / 8 5HZ 2 Turn the ROTARY knob until VERTICAL POSITION or VERTICAL SIZE is vertically balanced or the vertical size your want . Smart Help After returning to SCREEN SIZE & POSITION to continue to COLOR TEMPERATURE, turn the ROTARY knob until the image is highlighted. Then, turn the ROTARY knob until the SCREEN SIZE & POSITION window is highlighted. HORIZONTAL SIZE 50% 4 Turn the...
... ON SCREEN DISPLAY button. ma i n MA I N CONTROL S sc reen g e ome t r y adv an c ed EXIT RESET co l or spec i a l 1 6 0 0 x 1 2 00 1 0 6 . 3 K / 8 5HZ 2 Turn the ROTARY knob until VERTICAL POSITION or VERTICAL SIZE is vertically balanced or the vertical size your want . Smart Help After returning to SCREEN SIZE & POSITION to continue to COLOR TEMPERATURE, turn the ROTARY knob until the image is highlighted. Then, turn the ROTARY knob until the SCREEN SIZE & POSITION window is highlighted. HORIZONTAL SIZE 50% 4 Turn the...

User manual
Page 9
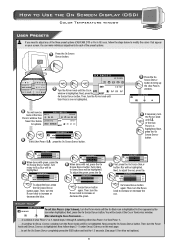
... I N CONTROL S sc reen g e ome t r y adv an c ed EXIT RESET co l or spec i a l 1 6 0 0 x 1 2 00 1 0 6 . 3 K / 8 5HZ 1 Press the ON SCREEN DISPLAY button. Smart Help After returning to COLOR TEMPERATURE to continue to USER PRESETS, turn the ROTARY knob until USER PRESETS is saved, the on the next page. . . . Two for that selection. Next, follow steps 3 - 9 under USER PRESETS on screen display automatically returns to the COLOR TEMPERATURE window. When...
... I N CONTROL S sc reen g e ome t r y adv an c ed EXIT RESET co l or spec i a l 1 6 0 0 x 1 2 00 1 0 6 . 3 K / 8 5HZ 1 Press the ON SCREEN DISPLAY button. Smart Help After returning to COLOR TEMPERATURE to continue to USER PRESETS, turn the ROTARY knob until USER PRESETS is saved, the on the next page. . . . Two for that selection. Next, follow steps 3 - 9 under USER PRESETS on screen display automatically returns to the COLOR TEMPERATURE window. When...
User manual
Page 10
... RESET co l or spec i a l 1 6 0 0 x 1 2 00 1 0 6 . 3 K / 8 5HZ 1 Press the ON SCREEN DISPLAY button. USER PRESET 1 RED 78% GREEN 78% BLUE 78% 7 When done with red, press the ON SCREEN DISPLAY button. Turn rotary to GREEN,GREEN will now be back at the COLOR TEMPERATURE window. 1 2 After returning to COLOR TEMPERATURE . . . . . . To adjust the green, press the ON USER PRESET 1 RED 78% GREEN 78% BLUE 78% SCREEN DISPLAY button again. Then, turn the ROTARY knob to increase or decrease the red. USER PRESET 1 RED...
... RESET co l or spec i a l 1 6 0 0 x 1 2 00 1 0 6 . 3 K / 8 5HZ 1 Press the ON SCREEN DISPLAY button. USER PRESET 1 RED 78% GREEN 78% BLUE 78% 7 When done with red, press the ON SCREEN DISPLAY button. Turn rotary to GREEN,GREEN will now be back at the COLOR TEMPERATURE window. 1 2 After returning to COLOR TEMPERATURE . . . . . . To adjust the green, press the ON USER PRESET 1 RED 78% GREEN 78% BLUE 78% SCREEN DISPLAY button again. Then, turn the ROTARY knob to increase or decrease the red. USER PRESET 1 RED...

User manual
Page 11
... SCREEN DISPLAY button to select POWER SAVING ON or OFF. ma i n MA I N CONTROL S sc reen g e ome t r y adv an c ed EXIT RESET co l or spec i a l 1 6 0 0 x 1 2 00 1 0 6 . 3 K / 8 5HZ 2 Turn the ROTARY knob until SPECIAL CONTROLS is highlighted. POWER SAVING n sc reen ome t r y v an c ed EXIT RESET co l or spec i a l 3 Press the ON SCREEN DISPLAY button to bring up POWER SAVING screen. How to Use the On Screen Display (OSD) Special Controls window How to Use the On Screen Display (OSD) Language The ON SCREEN DISPLAY...
... SCREEN DISPLAY button to select POWER SAVING ON or OFF. ma i n MA I N CONTROL S sc reen g e ome t r y adv an c ed EXIT RESET co l or spec i a l 1 6 0 0 x 1 2 00 1 0 6 . 3 K / 8 5HZ 2 Turn the ROTARY knob until SPECIAL CONTROLS is highlighted. POWER SAVING n sc reen ome t r y v an c ed EXIT RESET co l or spec i a l 3 Press the ON SCREEN DISPLAY button to bring up POWER SAVING screen. How to Use the On Screen Display (OSD) Special Controls window How to Use the On Screen Display (OSD) Language The ON SCREEN DISPLAY...

User manual
Page 12
... spec i a l 1 6 0 0 x 1 2 00 1 0 6 . 3 K / 8 5HZ 1 Press the ON SCREEN DISPLAY button. Smart Help After returning to SPECIAL CONTROLS to continue to time out, and change the vertical and horizontal position of the OSD on the screen. Next, press the ON SCREEN DISPLAY button. Then, turn the ROTARY knob until the VIDEO INPUT icon is highlighted. How to Use the On Screen Display (OSD) Special Controls window OSD Controls WITH OSD CONTROLS, you can set at 0.7V(olts), but if the video input signal is...
... spec i a l 1 6 0 0 x 1 2 00 1 0 6 . 3 K / 8 5HZ 1 Press the ON SCREEN DISPLAY button. Smart Help After returning to SPECIAL CONTROLS to continue to time out, and change the vertical and horizontal position of the OSD on the screen. Next, press the ON SCREEN DISPLAY button. Then, turn the ROTARY knob until the VIDEO INPUT icon is highlighted. How to Use the On Screen Display (OSD) Special Controls window OSD Controls WITH OSD CONTROLS, you can set at 0.7V(olts), but if the video input signal is...
User manual
Page 13
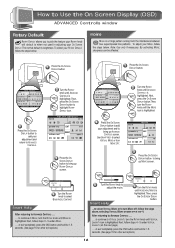
... reen g e ome t r y adv an c ed EXIT RESET co l or spec i a l 1 6 0 0 x 1 2 00 1 0 6 . 3 K / 8 5HZ 1 Press the ON SCREEN DISPLAY button. Next, follow steps 4 - 5 under MOIRE. . . . ROTARY DEFAULT BRIGHTNESS ROTARY DEFAULT CONTRAST 4 Turn the ROTARY knob to select BRIGHTNESS, CONTRAST Smart Help After returning to ADVANCED CONTROLS to continue to bring up MOIRE screen. Smart Help MOIRE HORIZONTAL OFF 4 Turn the ROTARY knob until VERTICAL LINEARITY icon is highlighted. Next, follow steps...
... reen g e ome t r y adv an c ed EXIT RESET co l or spec i a l 1 6 0 0 x 1 2 00 1 0 6 . 3 K / 8 5HZ 1 Press the ON SCREEN DISPLAY button. Next, follow steps 4 - 5 under MOIRE. . . . ROTARY DEFAULT BRIGHTNESS ROTARY DEFAULT CONTRAST 4 Turn the ROTARY knob to select BRIGHTNESS, CONTRAST Smart Help After returning to ADVANCED CONTROLS to continue to bring up MOIRE screen. Smart Help MOIRE HORIZONTAL OFF 4 Turn the ROTARY knob until VERTICAL LINEARITY icon is highlighted. Next, follow steps...
User manual
Page 14
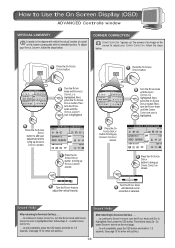
.... How to Use the On Screen Display (OSD) ADVANCED Controls window VERTICAL LINEARITY Linearity is the degree with its intended location. ma i n MA I N CONTROL S s c r een g e ome t r y adv an c ed EXIT RESET co l or spec i a l 1 6 0 0 x 1 2 00 1 0 6 . 3 K / 8 5HZ 1 Press the ON SCREEN DISPLAY button. VERTICAL LINEARTY ma i n scr g e ome t r y adv an c ed EXIT RESET co spec 3 Press the ON SCREEN DISPLAY button to bring up CORNER CORRECTION screen. VERTICAL LINEARITY 50% 4 Turn the ROTARY...
.... How to Use the On Screen Display (OSD) ADVANCED Controls window VERTICAL LINEARITY Linearity is the degree with its intended location. ma i n MA I N CONTROL S s c r een g e ome t r y adv an c ed EXIT RESET co l or spec i a l 1 6 0 0 x 1 2 00 1 0 6 . 3 K / 8 5HZ 1 Press the ON SCREEN DISPLAY button. VERTICAL LINEARTY ma i n scr g e ome t r y adv an c ed EXIT RESET co spec 3 Press the ON SCREEN DISPLAY button to bring up CORNER CORRECTION screen. VERTICAL LINEARITY 50% 4 Turn the ROTARY...

User manual
Page 15
... Help 4a To select TRAPEZOID, turn the ROTARY knob until BALANCED PINCUSHION is not square. The On Screen Display will be saved. You can make the appropriate changes. Then follow the instructions for 1.5 seconds. Next, press the ON SCREEN DISPLAY button. How to Use the On Screen Display (OSD) Geometry Controls window Pincushion, Balanced Pincushion, Trapezoid, Parallelogram, Rotation Follow the steps below to adjust any of the monitor) to adjust...
... Help 4a To select TRAPEZOID, turn the ROTARY knob until BALANCED PINCUSHION is not square. The On Screen Display will be saved. You can make the appropriate changes. Then follow the instructions for 1.5 seconds. Next, press the ON SCREEN DISPLAY button. How to Use the On Screen Display (OSD) Geometry Controls window Pincushion, Balanced Pincushion, Trapezoid, Parallelogram, Rotation Follow the steps below to adjust any of the monitor) to adjust...

User manual
Page 16
... SETTINGS NO YES 3 Turn the ROTARY knob to factory presets. Then press the ON SCREEN DISPLAY button. For example, MAIN CONTROLS. Next, press the ON SCREEN DISPLAY button. 3 An entire window is highlighted. How to Use the On Screen Display (OSD) Exit and Reset Exit & Reset from a window Choosing EXIT allows you are at a window. To Exit an individual window ma i n BRIGHTNESS sc reen g e ome t r y adv an c ed EXIT RESET co l or spec i a l 1 Make...
... SETTINGS NO YES 3 Turn the ROTARY knob to factory presets. Then press the ON SCREEN DISPLAY button. For example, MAIN CONTROLS. Next, press the ON SCREEN DISPLAY button. 3 An entire window is highlighted. How to Use the On Screen Display (OSD) Exit and Reset Exit & Reset from a window Choosing EXIT allows you are at a window. To Exit an individual window ma i n BRIGHTNESS sc reen g e ome t r y adv an c ed EXIT RESET co l or spec i a l 1 Make...

User manual
Page 17
... switch to setting up your monitor. Connect the (optional) USB Hub and cable to the computer and to BNC. 4. Note: Be sure to flip the D-SUB/BNC switch to BNC when using the USB, you will give you have true plug-and-play capability. Turn off the computer. 3. Connect the shielded power cable. 4. Then turn on the monitor. Connect the Mac adapter to your monitor. 16 Turn on the monitor. Turn on the monitor. Connect...
... switch to setting up your monitor. Connect the (optional) USB Hub and cable to the computer and to BNC. 4. Note: Be sure to flip the D-SUB/BNC switch to BNC when using the USB, you will give you have true plug-and-play capability. Turn off the computer. 3. Connect the shielded power cable. 4. Then turn on the monitor. Connect the Mac adapter to your monitor. 16 Turn on the monitor. Turn on the monitor. Connect...

User manual
Page 18
... information Power saving feature Automatic Power Savings & Preset Resolution Modes If you have VESA's DPMS compliance display card or software installed in your PC, the monitor can automatically reduce its power consumption when not in use. If input from a keyboard, mouse, or other device is capable of the function requires a computer with VESA DPMS, the monitor is Energy Star compliant and power management compatible. To turn this automatic power-saving feature. The...
... information Power saving feature Automatic Power Savings & Preset Resolution Modes If you have VESA's DPMS compliance display card or software installed in your PC, the monitor can automatically reduce its power consumption when not in use. If input from a keyboard, mouse, or other device is capable of the function requires a computer with VESA DPMS, the monitor is Energy Star compliant and power management compatible. To turn this automatic power-saving feature. The...

User manual
Page 19
... Description of controls . . . . .2, 3 D-Sub/BNC switch 2, 16 DTP 8, 9 End-of -life disposal 1 Exit 15 Features 1 Full Size 6 Geometry Controls 3, 14 Glossary 18 Hook Ups . . . . .Set Up Guide, 16 Horizontal Position 6 Horizontal Size 7 Language 10 Main Controls 3, 4-5 Maintenance 1 Moire 12 Monitor cable plug 2 On Screen Display 2 OSD button 2 OSD Controls 10 Parallelogram 14 Pedestal 2 Photo Retouch 8, 9 Pin Assignment 18 Pincushion 14 Power button . . .Set Up Guide, 2 Power plug . . . .Set Up Guide, 2 Power Saving 11 Reset 15 Resolution Modes 17 Rotary Default 12...
... Description of controls . . . . .2, 3 D-Sub/BNC switch 2, 16 DTP 8, 9 End-of -life disposal 1 Exit 15 Features 1 Full Size 6 Geometry Controls 3, 14 Glossary 18 Hook Ups . . . . .Set Up Guide, 16 Horizontal Position 6 Horizontal Size 7 Language 10 Main Controls 3, 4-5 Maintenance 1 Moire 12 Monitor cable plug 2 On Screen Display 2 OSD button 2 OSD Controls 10 Parallelogram 14 Pedestal 2 Photo Retouch 8, 9 Pin Assignment 18 Pincushion 14 Power button . . .Set Up Guide, 2 Power plug . . . .Set Up Guide, 2 Power Saving 11 Reset 15 Resolution Modes 17 Rotary Default 12...

User manual
Page 20
... power outlet for the right drivers. 19 Make sure the D-Sub/BNC switch on top of the monitor is Amber or Yellow in color) Make the Brightness and Contrast controls are using a non-VESA-DDC standard video card, consult your local Philips dealer or service organization to 0.7 volts. Make sure the monitor cable is properly connected to make sure Moire is plugged in the ON position. Check to see if the monitor cable has bent pins. Remove...
... power outlet for the right drivers. 19 Make sure the D-Sub/BNC switch on top of the monitor is Amber or Yellow in color) Make the Brightness and Contrast controls are using a non-VESA-DDC standard video card, consult your local Philips dealer or service organization to 0.7 volts. Make sure the monitor cable is properly connected to make sure Moire is plugged in the ON position. Check to see if the monitor cable has bent pins. Remove...


