User manual (English)
Page 2
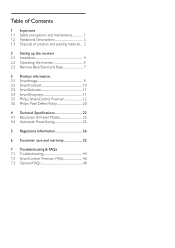
... 1.3 Disposal of product and packing material.... 3 2 Setting up the monitor 2.1 Installation 4 2.2 Operating the monitor 5 2.3 Remove Base Stand and Base 7 3 Product information 3.1 SmartImage 9 3.2 SmartContrast 10 3.3 SmartSaturate 11 3.4 SmartSharpness 11 3.5 Philips SmartControl Premium 12 3.6 Philips Pixel Defect Policy 20 4 Technical Specifications 22 4.1 Resolution & Preset Modes 25 4.2 Automatic PowerSaving 25 5 Regulatory Information 26 6 Customer care and warranty 32 7 Troubleshooting & FAQs 7.1 Troubleshooting 44 7.2 SmartControl Premium FAQs 46 7.3 General FAQs 48
... 1.3 Disposal of product and packing material.... 3 2 Setting up the monitor 2.1 Installation 4 2.2 Operating the monitor 5 2.3 Remove Base Stand and Base 7 3 Product information 3.1 SmartImage 9 3.2 SmartContrast 10 3.3 SmartSaturate 11 3.4 SmartSharpness 11 3.5 Philips SmartControl Premium 12 3.6 Philips Pixel Defect Policy 20 4 Technical Specifications 22 4.1 Resolution & Preset Modes 25 4.2 Automatic PowerSaving 25 5 Regulatory Information 26 6 Customer care and warranty 32 7 Troubleshooting & FAQs 7.1 Troubleshooting 44 7.2 SmartControl Premium FAQs 46 7.3 General FAQs 48

User manual (English)
Page 3
... positioning the monitor, make sure the power plug and outlet are not going to use it with dry cloth as soon as , alcohol, or ammonia-based liquids to clean your monitor. • To avoid the risk of direct sunlight and away from possible damage, do not put excessive pressure on the LCD panel. do not expose the monitor to maintain the best performance...
... positioning the monitor, make sure the power plug and outlet are not going to use it with dry cloth as soon as , alcohol, or ammonia-based liquids to clean your monitor. • To avoid the risk of direct sunlight and away from possible damage, do not put excessive pressure on the LCD panel. do not expose the monitor to maintain the best performance...

User manual (English)
Page 4
... when the operating instructions given in " or "after the power has been switched off. • IMPORTANT: Always activate a moving screen saver program when you leave your monitor will not disappear and cannot be opened only by qualified service personnel. • If there is mandated by the relevant regulatory authority. Uninterrupted display of still or static images over an extended...
... when the operating instructions given in " or "after the power has been switched off. • IMPORTANT: Always activate a moving screen saver program when you leave your monitor will not disappear and cannot be opened only by qualified service personnel. • If there is mandated by the relevant regulatory authority. Uninterrupted display of still or static images over an extended...

User manual (English)
Page 6
...Attach the monitor base stand to avoid scratching or damaging the screen. 2. Unauthorized duplication is firmly fixed. Hold the monitor base stand with both hands and firmly insert the base stand into the base column. Power cord VGA signal cable (optional) DVI cable (optional) Install base stand 220S2 1. Caution Do not release the height adjustment pin lock from Koninklijke Philips Electronics N.V. CLICK! Version M2220S 5B.0V601.001 220S2 plus LCD Monitor Monitor LCD / Monitor LCD / LCD-Monitor / Monitor LCD / LCD LCD 220S2 Monitor Quick start guide Guide de...
...Attach the monitor base stand to avoid scratching or damaging the screen. 2. Unauthorized duplication is firmly fixed. Hold the monitor base stand with both hands and firmly insert the base stand into the base column. Power cord VGA signal cable (optional) DVI cable (optional) Install base stand 220S2 1. Caution Do not release the height adjustment pin lock from Koninklijke Philips Electronics N.V. CLICK! Version M2220S 5B.0V601.001 220S2 plus LCD Monitor Monitor LCD / Monitor LCD / LCD-Monitor / Monitor LCD / LCD LCD 220S2 Monitor Quick start guide Guide de...

User manual (English)
Page 7
... OSD menu : There are six modes to be selected. Turn off your monitor into a nearby outlet. 5. If the monitor displays an image, installation is a feature in all Philips LCD monitors. Plug the power cord of the monitor to move the cursor, OK to confirm the choice or change. 5 5 It allows an end user to adjust screen performance or select functions of the monitor firmly. 2. Connecting to your computer. 4. Connect the monitor signal cable to the video connector on screen display...
... OSD menu : There are six modes to be selected. Turn off your monitor into a nearby outlet. 5. If the monitor displays an image, installation is a feature in all Philips LCD monitors. Plug the power cord of the monitor to move the cursor, OK to confirm the choice or change. 5 5 It allows an end user to adjust screen performance or select functions of the monitor firmly. 2. Connecting to your computer. 4. Connect the monitor signal cable to the video connector on screen display...
User manual (English)
Page 8
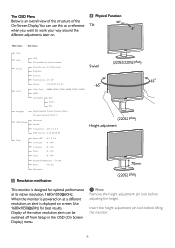
... the native resolution alert can use this as a reference when you want to work your way around the different adjustments later on screen: Use 1680x1050@60Hz for best results. On, Off Gamma - 1.8, 2.0, 2.2, 2.4, 2.6 Color Temp. - 5000K, 6500K, 7500K, 8200K, 9300K, 11500K sRGB User Define Red Green Blue Swivel -65 -65 (220S2/220S2 plus ) Height adjustment Setup Power LED - 0, 1, 2, 3, 4 H. Display of the On-Screen Display.You can be switched off from Setup in the OSD (On Screen Display) menu...
... the native resolution alert can use this as a reference when you want to work your way around the different adjustments later on screen: Use 1680x1050@60Hz for best results. On, Off Gamma - 1.8, 2.0, 2.2, 2.4, 2.6 Color Temp. - 5000K, 6500K, 7500K, 8200K, 9300K, 11500K sRGB User Define Red Green Blue Swivel -65 -65 (220S2/220S2 plus ) Height adjustment Setup Power LED - 0, 1, 2, 3, 4 H. Display of the On-Screen Display.You can be switched off from Setup in the OSD (On Screen Display) menu...

User manual (English)
Page 18
...; Disable Theft Deterrence Mode opens pane screen on the task tray icon displays the menu options for Upgrade, About, and Exit.When Enable task tray menu is disabled, the task tray icon will indicate Theft Deterrence Enabled and provide PIN Options button: • Theft Deterrence Enabled is a toggle. • Enable Context Menu on the following screen: • User can enter PIN between 4 and 9 digits numbers...
...; Disable Theft Deterrence Mode opens pane screen on the task tray icon displays the menu options for Upgrade, About, and Exit.When Enable task tray menu is disabled, the task tray icon will indicate Theft Deterrence Enabled and provide PIN Options button: • Theft Deterrence Enabled is a toggle. • Enable Context Menu on the following screen: • User can enter PIN between 4 and 9 digits numbers...

User manual (English)
Page 24
4 Technical Specifications 220S2/220S2 plus Picture/Display LCD panel type Backlight Panel size Aspect ratio Pixel Pitch Brightness Smar tContrast Contrast ratio (typ.) Response time (typical) Optimum Resolution Viewing angle Picture Enhancement Display colors Vertical refresh rate Horizontal Frequency sRGB Connectivity Signal input Input Signal Convenience User Convenience OSD Languages Other convenience Plug & Play Compatibility Stand Tilt Swivel Height adjustment TFT-LCD CCFL 22'' W (55.9 cm) 16:10 0.282 x 0.282 mm 250 cd/m² 50000:1 1000:1 5 ms 1680 x 1050 @ 60Hz 176° (H) / 170...
4 Technical Specifications 220S2/220S2 plus Picture/Display LCD panel type Backlight Panel size Aspect ratio Pixel Pitch Brightness Smar tContrast Contrast ratio (typ.) Response time (typical) Optimum Resolution Viewing angle Picture Enhancement Display colors Vertical refresh rate Horizontal Frequency sRGB Connectivity Signal input Input Signal Convenience User Convenience OSD Languages Other convenience Plug & Play Compatibility Stand Tilt Swivel Height adjustment TFT-LCD CCFL 22'' W (55.9 cm) 16:10 0.282 x 0.282 mm 250 cd/m² 50000:1 1000:1 5 ms 1680 x 1050 @ 60Hz 176° (H) / 170...
User manual (English)
Page 27
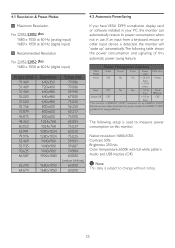
... 60 Hz (analog input) 1680 x 1050 at 60 Hz (digital input) Recommended Resolution For 220S2/220S2 plus 1680 x 1050 at 60 Hz (digital input) H. The following table shows the power consumption and signaling of this automatic power saving feature: Power Management Definition VESA Mode Video H-sync V-sync Power LED color Used Active ON Yes Yes < 28.5 W White (typ.) < 31 W (max.) Sleep OFF No No < 0.8 W White (typ.) (Blinking) Switch Off OFF - - < 0.5 W OFF (typ.) This monitor is subject to...
... 60 Hz (analog input) 1680 x 1050 at 60 Hz (digital input) Recommended Resolution For 220S2/220S2 plus 1680 x 1050 at 60 Hz (digital input) H. The following table shows the power consumption and signaling of this automatic power saving feature: Power Management Definition VESA Mode Video H-sync V-sync Power LED color Used Active ON Yes Yes < 28.5 W White (typ.) < 31 W (max.) Sleep OFF No No < 0.8 W White (typ.) (Blinking) Switch Off OFF - - < 0.5 W OFF (typ.) This monitor is subject to...
User manual (English)
Page 29
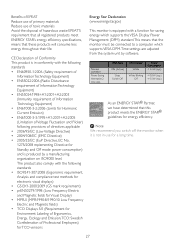
... Energy Star Declaration (www.energystar.gov) This monitor is equipped with a function for saving energy which supports the VESA Display Power Management (DPM) standard.This means that these products will consume less energy throughout their life. Normal operation Power Saving Alternative 2 One step VESA State ON (Active) Sleep Switch Off LED Indicator White Power Consumption < 24 W (typ.) White Blinking < 0.8 W (typ.) Off < 0.5 W (typ.) As an ENERGY STAR...
... Energy Star Declaration (www.energystar.gov) This monitor is equipped with a function for saving energy which supports the VESA Display Power Management (DPM) standard.This means that these products will consume less energy throughout their life. Normal operation Power Saving Alternative 2 One step VESA State ON (Active) Sleep Switch Off LED Indicator White Power Consumption < 24 W (typ.) White Blinking < 0.8 W (typ.) Off < 0.5 W (typ.) As an ENERGY STAR...

User manual (English)
Page 35
... for which the faulty monitor has to be collected and the swap model should be used • Other cards installed Having the following details before contacting the Philips helpdesk. What is caused by accidents including but not limited to lightning, water or fire, misuse or neglect; • Reception problems caused by signal conditions or cable or antenna systems outside...
... for which the faulty monitor has to be collected and the swap model should be used • Other cards installed Having the following details before contacting the Philips helpdesk. What is caused by accidents including but not limited to lightning, water or fire, misuse or neglect; • Reception problems caused by signal conditions or cable or antenna systems outside...

User manual (English)
Page 37
... illegible; • the model or production number on the product has been altered, deleted, removed or made illegible; • repairs or product modifications and lterations have been altered in any problems, we advise you to read the operating instructions carefully before contacting our dealers or Information Centers In case your Philips product is not working correctly or is...
... illegible; • the model or production number on the product has been altered, deleted, removed or made illegible; • repairs or product modifications and lterations have been altered in any problems, we advise you to read the operating instructions carefully before contacting our dealers or Information Centers In case your Philips product is not working correctly or is...

User manual (English)
Page 42
... have any difficulties while installing or using this Philips monitor. All Philips monitors are designed and manufactured to access the Warranty Registration Card. Israel Company: Eastronics LTD Address: 13 Rozanis St. Should you encounter any problems with your monitor within the second or third year of charge. P.O.B. 39300,Tel Aviv 61392 Israel Tel: 1-800-567000 call free in at your...
... have any difficulties while installing or using this Philips monitor. All Philips monitors are designed and manufactured to access the Warranty Registration Card. Israel Company: Eastronics LTD Address: 13 Rozanis St. Should you encounter any problems with your monitor within the second or third year of charge. P.O.B. 39300,Tel Aviv 61392 Israel Tel: 1-800-567000 call free in at your...

User manual (English)
Page 46
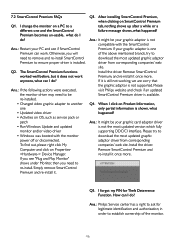
...; make sure the monitor cable has no bent pins on the screen • Check that can do manual adjustments via the OSD menu. 7 Troubleshooting & FAQs 7.1 Troubleshooting AUTO button doesn't function • The auto function is applicable only in DVI-Digital mode as it to the ON position. If yes, repair or replace the cable. • The Energy Saving feature may be corrected by a user. Imaging Problems Image is not centered • Adjust the image position using the "Auto" function in OSD Main Controls...
...; make sure the monitor cable has no bent pins on the screen • Check that can do manual adjustments via the OSD menu. 7 Troubleshooting & FAQs 7.1 Troubleshooting AUTO button doesn't function • The auto function is applicable only in DVI-Digital mode as it to the ON position. If yes, repair or replace the cable. • The Energy Saving feature may be corrected by a user. Imaging Problems Image is not centered • Adjust the image position using the "Auto" function in OSD Main Controls...

User manual (English)
Page 47
... not covered under your screen. Green, red, blue, dark, and white dots appears on On-Screen Display. "Burn-in", "afterimaging", or "ghost imaging" is not muted. Horizontal flicker appears • Adjust the image using the "Auto" function in OSD Main Controls. • Eliminate the vertical bars using the power LED Setup in VGA mode. Image appears blurred, indistinct or too dark • Adjust the contrast and brightness on the screen • The remaining dots are not working • Check if USB upstream cable...
... not covered under your screen. Green, red, blue, dark, and white dots appears on On-Screen Display. "Burn-in", "afterimaging", or "ghost imaging" is not muted. Horizontal flicker appears • Adjust the image using the "Auto" function in OSD Main Controls. • Eliminate the vertical bars using the power LED Setup in VGA mode. Image appears blurred, indistinct or too dark • Adjust the contrast and brightness on the screen • The remaining dots are not working • Check if USB upstream cable...
User manual (English)
Page 48
... is not compatible with the monitor power off or disconnected. Q4. Install the driver. How can I do ? Otherwise, you need to be your graphic adaptor is installed. Ans.: Philips Service center has a right to re-install. To find out, please right click My Computer and click on OS, such as service pack or patch • Run Windows Update and updated monitor and/or video driver • Windows was...
... is not compatible with the monitor power off or disconnected. Q4. Install the driver. How can I do ? Otherwise, you need to be your graphic adaptor is installed. Ans.: Philips Service center has a right to re-install. To find out, please right click My Computer and click on OS, such as service pack or patch • Run Windows Update and updated monitor and/or video driver • Windows was...

User manual (English)
Page 50
..., in this video mode'? Q7: How should I install the drivers (.inf and .icm)? Ans.: For normal cleaning, use isopropyl alcohol. Q4: How do if the screen shows 'Cannot display this package. Ans.: Simply press the OK button, then select 'Reset' to recall all cables, then connect your PC to the monitor that you can select the desired resolution under Windows® Control Panel with the "Display properties". How...
..., in this video mode'? Q7: How should I install the drivers (.inf and .icm)? Ans.: For normal cleaning, use isopropyl alcohol. Q4: How do if the screen shows 'Cannot display this package. Ans.: Simply press the OK button, then select 'Reset' to recall all cables, then connect your PC to the monitor that you can select the desired resolution under Windows® Control Panel with the "Display properties". How...

User manual (English)
Page 51
... PVA technologies. Ans.: Yes. digital cameras, monitors, printers, scanners, etc) 3. the user can change the color setting of absolute scale, (degrees Kelvin). Ans.: Yes, the monitors are Plug-and-Play compatible with a red-white color tone, while a 11500K temperature yields 'cool, blue-white toning." 2. Q8: Can I connect my LCD monitor to your color setting through OSD control as the following procedures, • Press "OK" to show the OSD (On Screen Display) menu • Press "Down...
... PVA technologies. Ans.: Yes. digital cameras, monitors, printers, scanners, etc) 3. the user can change the color setting of absolute scale, (degrees Kelvin). Ans.: Yes, the monitors are Plug-and-Play compatible with a red-white color tone, while a 11500K temperature yields 'cool, blue-white toning." 2. Q8: Can I connect my LCD monitor to your color setting through OSD control as the following procedures, • Press "OK" to show the OSD (On Screen Display) menu • Press "Down...
Leaflet
Page 2
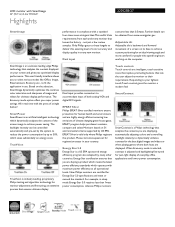
... movement of images and videos for the best digital images and videos or when playing games where dark hues are highly energy efficient ensuring low emissions of the screen image to accommodate input of a single button! Only Philips goes to these lengths to achieve custom positioning for just-right display of color accuracy and display quality in use. SmartImage is adjusted and backlighting fine-tuned for an ideal viewing angle...
... movement of images and videos for the best digital images and videos or when playing games where dark hues are highly energy efficient ensuring low emissions of the screen image to accommodate input of a single button! Only Philips goes to these lengths to achieve custom positioning for just-right display of color accuracy and display quality in use. SmartImage is adjusted and backlighting fine-tuned for an ideal viewing angle...

Leaflet
Page 3
...; Picture enhancement: SmartImage • Display colors: 16.7 M • Scanning Frequency: 30 -83 kHz (H) / 56 -75 Hz (V) • sRGB Connectivity • Signal Input: VGA (Analog ), DVI-D (digital, HDCP) • Sync Input: Separate Sync, Sync on Green Convenience • User convenience: SmartPower, SmartImage, Brightness, Menu, Power On/Off • OSD Languages: English, French, German, Spanish, Italian, Russian, Simplified Chinese, Portuguese • Other convenience: VESA mount (100x100mm), Kensington lock • Plug & Play Compatibility: DDC/CI, Windows 7/ Vista/XP/2000/98, Mac...
...; Picture enhancement: SmartImage • Display colors: 16.7 M • Scanning Frequency: 30 -83 kHz (H) / 56 -75 Hz (V) • sRGB Connectivity • Signal Input: VGA (Analog ), DVI-D (digital, HDCP) • Sync Input: Separate Sync, Sync on Green Convenience • User convenience: SmartPower, SmartImage, Brightness, Menu, Power On/Off • OSD Languages: English, French, German, Spanish, Italian, Russian, Simplified Chinese, Portuguese • Other convenience: VESA mount (100x100mm), Kensington lock • Plug & Play Compatibility: DDC/CI, Windows 7/ Vista/XP/2000/98, Mac...


