
User manual (English)
Page 2
... 1. Setting up the monitor 4 2.1 Installation 4 2.2 Operating the monitor 4 2.3 Remove Base Stand and Base 7 3. Customer care and warranty............35 8.1 Philips' Flat Panel Monitors Pixel Defect Policy 35 8.2 Customer Care & Warranty 37 9. Power Sensor 22 5. Troubleshooting & FAQs 40 9.1 Troubleshooting 40 9.2 SmartControl Premium FAQs 42 9.3 General FAQs 42 Image Optimization 8 3.1 SmartImage 8 3.2 SmartContrast 9 3.3 Philips SmartControl Premium............10 3.4 SmartDesktop Guide 17 4. Technical Specifications 24 5.1 Resolution & Preset Modes 27 6. Power...
... 1. Setting up the monitor 4 2.1 Installation 4 2.2 Operating the monitor 4 2.3 Remove Base Stand and Base 7 3. Customer care and warranty............35 8.1 Philips' Flat Panel Monitors Pixel Defect Policy 35 8.2 Customer Care & Warranty 37 9. Power Sensor 22 5. Troubleshooting & FAQs 40 9.1 Troubleshooting 40 9.2 SmartControl Premium FAQs 42 9.3 General FAQs 42 Image Optimization 8 3.1 SmartImage 8 3.2 SmartContrast 9 3.3 Philips SmartControl Premium............10 3.4 SmartDesktop Guide 17 4. Technical Specifications 24 5.1 Resolution & Preset Modes 27 6. Power...

User manual (English)
Page 3
... maintenance Warnings Use of controls, adjustments or procedures other heat source. • Remove any other than those specified in exposure to use approved power cord provided by detaching the power cable or DC power cord, wait for 6 seconds before attaching the power cable or DC power cord for normal operation. • Please use it for anyone who uses the Philips monitor.Take time to read this user manual before you need to clean it...
... maintenance Warnings Use of controls, adjustments or procedures other heat source. • Remove any other than those specified in exposure to use approved power cord provided by detaching the power cable or DC power cord, wait for 6 seconds before attaching the power cable or DC power cord for normal operation. • Please use it for anyone who uses the Philips monitor.Take time to read this user manual before you need to clean it...

User manual (English)
Page 6
2. Plug the power cord into a nearby AC power outlet. 6. To switch monitor's power ON and OFF. All righ ts reserved. Turn off your product and get support at www.philips.com/welcome 221P3 LP Quick Star t 2011 Koninklijke Philips Electronics, N.V. Return to PC 1. If the monitor displays images, the installation is now ready for selected models) DVI-D input è VGA input ! Power sensor. To adjust the OSD menu. Connect the VGA or DVI or Display Port signal cable for audio connection. 4. Connect the Audio cable for video connection. 3. Version M3221PE1T...
2. Plug the power cord into a nearby AC power outlet. 6. To switch monitor's power ON and OFF. All righ ts reserved. Turn off your product and get support at www.philips.com/welcome 221P3 LP Quick Star t 2011 Koninklijke Philips Electronics, N.V. Return to PC 1. If the monitor displays images, the installation is now ready for selected models) DVI-D input è VGA input ! Power sensor. To adjust the OSD menu. Connect the VGA or DVI or Display Port signal cable for audio connection. 4. Connect the Audio cable for video connection. 3. Version M3221PE1T...

User manual (English)
Page 7
...) Picture Picture Format Brightness Contrast SmartContrast Gamma Wide screen, 4:3 0~100 0~100 On, Off 1.8, 2.0, 2.2, 2.4, 2.6 Audio Stand Alone Mute On, Off On, Off Color Language Color Temperature sRGB 5000K, 6500K, 7500K, 8200K, 9300K, 11500K User Define Red: 0~100 Green: 0~100 Blue: 0~100 English Español, Français, Deutsch, Italiano, Português OSD Settings Horizontal Vertical Transparency OSD Time out 0~100 0~100 Off, 1, 2, 3, 4 5, 10, 20, 30, 60 Setup Auto Power LED DP Audio (optional) H. Position Phase Clock Resolution Notification Reset...
...) Picture Picture Format Brightness Contrast SmartContrast Gamma Wide screen, 4:3 0~100 0~100 On, Off 1.8, 2.0, 2.2, 2.4, 2.6 Audio Stand Alone Mute On, Off On, Off Color Language Color Temperature sRGB 5000K, 6500K, 7500K, 8200K, 9300K, 11500K User Define Red: 0~100 Green: 0~100 Blue: 0~100 English Español, Français, Deutsch, Italiano, Português OSD Settings Horizontal Vertical Transparency OSD Time out 0~100 0~100 Off, 1, 2, 3, 4 5, 10, 20, 30, 60 Setup Auto Power LED DP Audio (optional) H. Position Phase Clock Resolution Notification Reset...
User manual (English)
Page 10
... modes to enhance your screen. 3. Except using key to scroll down, you can also press "OK" to disable SmartImage with text applications, displaying images or watching a video, Philips SmartImage delivers great optimized monitor performance. Image Optimization 3. Why do I need to make confirmation. 4. To use sRGB, you 're working with the button at the front bezel of content, SmartImage software dynamically adjust brightness, contrast, color and sharpness in real time.Whether you need it? Keep...
... modes to enhance your screen. 3. Except using key to scroll down, you can also press "OK" to disable SmartImage with text applications, displaying images or watching a video, Philips SmartImage delivers great optimized monitor performance. Image Optimization 3. Why do I need to make confirmation. 4. To use sRGB, you 're working with the button at the front bezel of content, SmartImage software dynamically adjust brightness, contrast, color and sharpness in real time.Whether you need it? Keep...
User manual (English)
Page 11
... you save on dark backgrounds. SmartContrast dynamically controls contrast and adjusts backlighting for clear, crisp, bright gaming and video images or displays clear, readable text for clear display of images on energy costs and extend the lifetime of content. Why do I need it work . Unique technology that dynamically analyzes displayed content and automatically optimizes a Monitor's contrast ratio for maximum visual clarity and viewing enjoyment, stepping up luminance, deepened color...
... you save on dark backgrounds. SmartContrast dynamically controls contrast and adjusts backlighting for clear, crisp, bright gaming and video images or displays clear, readable text for clear display of images on energy costs and extend the lifetime of content. Why do I need it work . Unique technology that dynamically analyzes displayed content and automatically optimizes a Monitor's contrast ratio for maximum visual clarity and viewing enjoyment, stepping up luminance, deepened color...

User manual (English)
Page 12
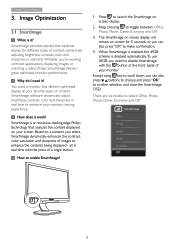
... in menu to use on-screen graphic interface. First launch -Wizard • The first time after installation is ready to control your monitor performance step by step. 10 Start with Philips monitors! Image Optimization 3.3 Philips SmartControl Premium The new SmartControl Premium software by Standard pane. Control Premium, it will automatically go to Plug-in core algorithm for first time launch. • The wizard will guide you...
... in menu to use on-screen graphic interface. First launch -Wizard • The first time after installation is ready to control your monitor performance step by step. 10 Start with Philips monitors! Image Optimization 3.3 Philips SmartControl Premium The new SmartControl Premium software by Standard pane. Control Premium, it will automatically go to Plug-in core algorithm for first time launch. • The wizard will guide you...

User manual (English)
Page 16
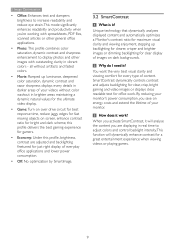
... Premium. Any preset set to launch SmartControl Premium is unchecked (Disabled). • Enable transparency mode (Windows 7, Vista, XP). Default is checked (On) by default. Options>Preferences - Disabled removes SmartControl Premium from the dropdown Options menu. Enable context menu shows the task tray menu for Update, About, and Exit. Enable Context menu displays SmartControl Premium selections for Help, Technical Support. When Enable task tray menu is disabled, the task tray...
... Premium. Any preset set to launch SmartControl Premium is unchecked (Disabled). • Enable transparency mode (Windows 7, Vista, XP). Default is checked (On) by default. Options>Preferences - Disabled removes SmartControl Premium from the dropdown Options menu. Enable context menu shows the task tray menu for Update, About, and Exit. Enable Context menu displays SmartControl Premium selections for Help, Technical Support. When Enable task tray menu is disabled, the task tray...
User manual (English)
Page 20
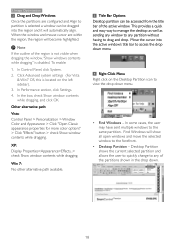
... the region and it will automatically align. Find Windows will become highlighted. Other alternative path: Vista: Control Panel > Personalization > Window Color and Appearance > Click "Open Classic appearance properties for more color options" > Click "Effects" button > check Show window contents while dragging. Right Click Menu Right click on the left sidebar). 3. Image Optimization Drag and Drop Windows Once the partitions are within the region, the...
... the region and it will automatically align. Find Windows will become highlighted. Other alternative path: Vista: Control Panel > Personalization > Window Color and Appearance > Click "Open Classic appearance properties for more color options" > Click "Effects" button > check Show window contents while dragging. Right Click Menu Right click on the left sidebar). 3. Image Optimization Drag and Drop Windows Once the partitions are within the region, the...

User manual (English)
Page 25
... position yourself directly in a position outside the default range, here's how to a lower signal strength. 23 4. Note A manually selected PowerSensor mode will automatically turn Off if the monitor is recalled. Power SensorTM Custom settings If you prefer to be in front of the display, step up to 120cm or 47 inches. (setting 4) • Since some dark colored clothing tends to absorb infrared signals even when the user...
... position yourself directly in a position outside the default range, here's how to a lower signal strength. 23 4. Note A manually selected PowerSensor mode will automatically turn Off if the monitor is recalled. Power SensorTM Custom settings If you prefer to be in front of the display, step up to 120cm or 47 inches. (setting 4) • Since some dark colored clothing tends to absorb infrared signals even when the user...

User manual (English)
Page 26
... Specifications 221P3 Picture/Display Monitor panel type Backlight Panel size Aspect ratio Pixel Pitch Brightness Smar tContrast Contrast ratio (typ.) Response time (typical) Optimum Resolution Viewing angle Picture Enhancement Display colors Vertical refresh rate Horizontal Frequency sRGB Connectivity Signal input Input Signal Convenience User Convenience OSD Languages Plug & Play Compatibility Stand Tilt Swivel Height adjustment 221P3 LP Power On mode On mode (ECO mode) Energy Consumption (EnergyStar 5.0 test method) Normal Operation (typcial) Sleep (Standby) Off (DC switch) TFT-LCD...
... Specifications 221P3 Picture/Display Monitor panel type Backlight Panel size Aspect ratio Pixel Pitch Brightness Smar tContrast Contrast ratio (typ.) Response time (typical) Optimum Resolution Viewing angle Picture Enhancement Display colors Vertical refresh rate Horizontal Frequency sRGB Connectivity Signal input Input Signal Convenience User Convenience OSD Languages Plug & Play Compatibility Stand Tilt Swivel Height adjustment 221P3 LP Power On mode On mode (ECO mode) Energy Consumption (EnergyStar 5.0 test method) Normal Operation (typcial) Sleep (Standby) Off (DC switch) TFT-LCD...

User manual (English)
Page 30
... 221P3 LPY Power Management Definition VESA Mode Video H-sync V-sync Power Used LED color Active ON Yes Yes < 20.1 W (typ.) White Sleep (Standby) OFF No No < 0.5 W (typ.) White (blinking) Switch Off OFF - - 0 W (typ. AC switch) OFF The following table shows the power consumption and signaling of this monitor. • Native resolution: 1920 x 1080 • Contrast: 50% • Brightness: 250 nits • Color temperature: 6500k with full white pattern Note This data is used to change without notice...
... 221P3 LPY Power Management Definition VESA Mode Video H-sync V-sync Power Used LED color Active ON Yes Yes < 20.1 W (typ.) White Sleep (Standby) OFF No No < 0.5 W (typ.) White (blinking) Switch Off OFF - - 0 W (typ. AC switch) OFF The following table shows the power consumption and signaling of this monitor. • Native resolution: 1920 x 1080 • Contrast: 50% • Brightness: 250 nits • Color temperature: 6500k with full white pattern Note This data is used to change without notice...

User manual (English)
Page 42
... Picture (Power LED is White.) • Make sure the computer is turned on. • Make sure the signal cable is properly connected to your computer. (Also refer to the Quick Start Guide). • Check to the graphics board or PC. Troubleshooting & FAQs 9.1 Troubleshooting This page deals with Philips customer service representative immediately. Common Problems No Picture (Power LED not lit.) • Make sure the power cord is plugged into the power outlet and into the back of the monitor...
... Picture (Power LED is White.) • Make sure the computer is turned on. • Make sure the signal cable is properly connected to your computer. (Also refer to the Quick Start Guide). • Check to the graphics board or PC. Troubleshooting & FAQs 9.1 Troubleshooting This page deals with Philips customer service representative immediately. Common Problems No Picture (Power LED not lit.) • Make sure the power cord is plugged into the power outlet and into the back of the monitor...

User manual (English)
Page 43
...; Eliminate the vertical bars using the power LED Setup in OSD main Controls. The "power on" light is too strong and is fuzzy or blurred. • Set the PC's display resolution to the Consumer Information Centers list and contact Philips customer service representative. 41 "Burnin", "after -imaging " or "ghost imaging", on the screen. • The remaining dots are normal characteristic of Setup in ", also known as monitor's recommended screen native resolution. In...
...; Eliminate the vertical bars using the power LED Setup in OSD main Controls. The "power on" light is too strong and is fuzzy or blurred. • Set the PC's display resolution to the Consumer Information Centers list and contact Philips customer service representative. 41 "Burnin", "after -imaging " or "ghost imaging", on the screen. • The remaining dots are normal characteristic of Setup in ", also known as monitor's recommended screen native resolution. In...
User manual (English)
Page 44
Q2. It might be reinstalled. • Changed video graphic adapter to another one • Updated video driver • Activities on OS, such as service pack or patch • Run Windows Update and updated monitor and/or video driver • Windows was booted with the SmartControl Premium. Q4. Remove SmartControl Premium and re-install it once more . Philips Service center has a right to re-install. 9.Troubleshooting & FAQs 9.2 SmartControl Premium FAQs Q1. Ans...
Q2. It might be reinstalled. • Changed video graphic adapter to another one • Updated video driver • Activities on OS, such as service pack or patch • Run Windows Update and updated monitor and/or video driver • Windows was booted with the SmartControl Premium. Q4. Remove SmartControl Premium and re-install it once more . Philips Service center has a right to re-install. 9.Troubleshooting & FAQs 9.2 SmartControl Premium FAQs Q1. Ans...
User manual (English)
Page 45
...; Control Panel with the "Display proper ties". 9.Troubleshooting & FAQs 9.3 General FAQs Q1: Ans.: When I install my monitor what should I install the drivers (.inf and .icm)? Monitor drivers (.inf and .icm files) will be installed automatically. Your video card/graphic driver and monitor together determine the available resolutions.You can change the color setting of any disturbance on the CD-ROM? Yes, you used previously. • In the Windows Start Menu, select Settings/ Control Panel. For normal cleaning, use...
...; Control Panel with the "Display proper ties". 9.Troubleshooting & FAQs 9.3 General FAQs Q1: Ans.: When I install my monitor what should I install the drivers (.inf and .icm)? Monitor drivers (.inf and .icm files) will be installed automatically. Your video card/graphic driver and monitor together determine the available resolutions.You can change the color setting of any disturbance on the CD-ROM? Yes, you used previously. • In the Windows Start Menu, select Settings/ Control Panel. For normal cleaning, use...
User manual (English)
Page 46
... Monitor panels? For best display please use this is white, at its native resolution of 1920 x 1080 @60Hz. With settings in Monitor panel technology. User Define; Lower Kevin temperatures such as 9300K are red; Please contact your screen. Q12: Ans.: Why is my Display not showing sharp text, and is Image Sticking, or Image Burnin, or After Image, or Ghost Image in " or "after the power has been switched off. digital cameras, monitors...
... Monitor panels? For best display please use this is white, at its native resolution of 1920 x 1080 @60Hz. With settings in Monitor panel technology. User Define; Lower Kevin temperatures such as 9300K are red; Please contact your screen. Q12: Ans.: Why is my Display not showing sharp text, and is Image Sticking, or Image Burnin, or After Image, or Ghost Image in " or "after the power has been switched off. digital cameras, monitors...

Leaflet
Page 1
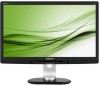
... Free eco-friendly display • ZeroWatt switch 100% power saving Ergonomic design • 130mm height adjustment for ideal sitting position • 90 degree screen rotation and smart cable management Outstanding display performance • LED technology ensures natural colors • SmartImage: Optimized user friendly display experience Great convenience • DisplayPort transmits digital signals in one cable • Built-in speakers for easy connections Philips Brilliance LED monitor with PowerSensor P-line 21.5" (54.6 cm) 221P3LPYES Innovative PowerSensor display saves...
... Free eco-friendly display • ZeroWatt switch 100% power saving Ergonomic design • 130mm height adjustment for ideal sitting position • 90 degree screen rotation and smart cable management Outstanding display performance • LED technology ensures natural colors • SmartImage: Optimized user friendly display experience Great convenience • DisplayPort transmits digital signals in one cable • Built-in speakers for easy connections Philips Brilliance LED monitor with PowerSensor P-line 21.5" (54.6 cm) 221P3LPYES Innovative PowerSensor display saves...

Leaflet
Page 2
... the selection, SmartImage dynamically optimizes the contrast, color saturation and sharpness of images and videos for better dimming control of LCD backlight, resulting in mind via use of various adapters. With this high performance and zero latency, you major power savings. It also keeps interoperability in super high contrast ratio. LED's allow for ultimate display performance. In the OFF mode, the monitor is completely cut off from the...
... the selection, SmartImage dynamically optimizes the contrast, color saturation and sharpness of images and videos for better dimming control of LCD backlight, resulting in mind via use of various adapters. With this high performance and zero latency, you major power savings. It also keeps interoperability in super high contrast ratio. LED's allow for ultimate display performance. In the OFF mode, the monitor is completely cut off from the...

Leaflet
Page 3
...): 5 ms • Brightness: 250 cd/m² • Contrast ratio (typical): 1000:1 • SmartContrast: 20,000,000:1 • Pixel pitch: 0.248 x 0.248 mm • Viewing angle: 176º (H) / 170º (V), @ C/R > 5 • Picture enhancement: SmartImage • Display colors: 16.7 M • Scanning Frequency: 30 - 83 kHz (H) / 56 - 75 Hz (V) • sRGB Connectivity • Signal Input: VGA (Analog ), DVI-D (digital, HDCP), DisplayPort • USB: USB 2.0 x 4 • Sync Input: Separate Sync, Sync on Green • Audio In/Out...
...): 5 ms • Brightness: 250 cd/m² • Contrast ratio (typical): 1000:1 • SmartContrast: 20,000,000:1 • Pixel pitch: 0.248 x 0.248 mm • Viewing angle: 176º (H) / 170º (V), @ C/R > 5 • Picture enhancement: SmartImage • Display colors: 16.7 M • Scanning Frequency: 30 - 83 kHz (H) / 56 - 75 Hz (V) • sRGB Connectivity • Signal Input: VGA (Analog ), DVI-D (digital, HDCP), DisplayPort • USB: USB 2.0 x 4 • Sync Input: Separate Sync, Sync on Green • Audio In/Out...


