

Leaflet
Page 1
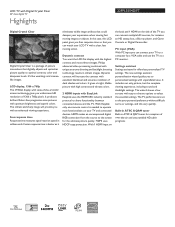
... rich black details • HD LCD display, with a 1366 x 768p resolution Hear crisp and clear sound • 2x3W RMS audio power Easy to connect and enjoy • PC-input allows you to use your TV as a PC monitor • Settings assistant for effortless personalized TV settings • 2 HDMI inputs with Digital Crystal Clear 22" class digital TV 22PFL3504D Clearly the smart choice Designed for digital • ATSC & QAM tuner receives over the air and unscrambled cable
... rich black details • HD LCD display, with a 1366 x 768p resolution Hear crisp and clear sound • 2x3W RMS audio power Easy to connect and enjoy • PC-input allows you to use your TV as a PC monitor • Settings assistant for effortless personalized TV settings • 2 HDMI inputs with Digital Crystal Clear 22" class digital TV 22PFL3504D Clearly the smart choice Designed for digital • ATSC & QAM tuner receives over the air and unscrambled cable
Leaflet
Page 2
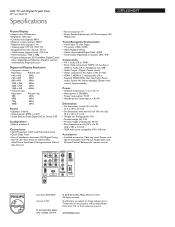
... settings, and this very quickly. Settings assistant Settings assistant for reception of picture innovations that digitally adjusts and optimizes picture quality to select the essential settings. The new settings assistant personalisation wizard guides you can connect your TV to the your experience when viewing fast moving action. The TV performance is needed to the screen for instance an HD settop box, a Blu-ray player, and Game Console or Digital Camcorder. Philips advanced video...
... settings, and this very quickly. Settings assistant Settings assistant for reception of picture innovations that digitally adjusts and optimizes picture quality to select the essential settings. The new settings assistant personalisation wizard guides you can connect your TV to the your experience when viewing fast moving action. The TV performance is needed to the screen for instance an HD settop box, a Blu-ray player, and Game Console or Digital Camcorder. Philips advanced video...
Leaflet
Page 3
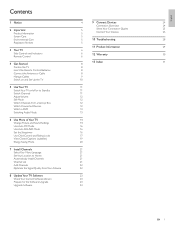
...8226; Aerial Input: 75 ohm F-type • TV system: ATSC, NTSC • Video Playback: NTSC • Cable: Unscrambled Digital Cable -QAM • Tuner bands: Hyperband, S-Channel, UHF, VHF Connectivity • AV 1: Audio L/R in, YPbPr • Front / Side connections: HDMI v1.3, S-video in, CVBS in, Audio L/R in inch (W x H x D): 24.8 x 18.5 x 7.3 inch • VESA wall mount compatible: 100 x 100 mm Accessories • Included accessories: Table top stand, Power cord, Quick start guide, User Manual, Registration card, Remote Control, Batteries for remote control • Issue date 2010...
...8226; Aerial Input: 75 ohm F-type • TV system: ATSC, NTSC • Video Playback: NTSC • Cable: Unscrambled Digital Cable -QAM • Tuner bands: Hyperband, S-Channel, UHF, VHF Connectivity • AV 1: Audio L/R in, YPbPr • Front / Side connections: HDMI v1.3, S-video in, CVBS in, Audio L/R in inch (W x H x D): 24.8 x 18.5 x 7.3 inch • VESA wall mount compatible: 100 x 100 mm Accessories • Included accessories: Table top stand, Power cord, Quick start guide, User Manual, Registration card, Remote Control, Batteries for remote control • Issue date 2010...
User manual
Page 2
... Watch Channels from a Set-top Box 12 Watch Connected Devices 12 Watch a DVD 13 Switching Audio Mode 13 6 Use More of Your TV 14 Change Picture and Sound Settings 14 Use Auto PIC Mode 16 Use Auto SOUND Mode 16 Set the Sleeptimer 16 Use Child Control and Rating Locks 17 View Closed Captions (subtitles) 19 Energy Saving Mode 20 7 Install Channels 21 Select Your Menu Language 21 Set Your Location to Home 21 Automatically Install Channels 21 Channel List 21 Add Channels 22 Optimize the Signal Quality from Your Antenna 22 8 Update Your TV Software...
... Watch Channels from a Set-top Box 12 Watch Connected Devices 12 Watch a DVD 13 Switching Audio Mode 13 6 Use More of Your TV 14 Change Picture and Sound Settings 14 Use Auto PIC Mode 16 Use Auto SOUND Mode 16 Set the Sleeptimer 16 Use Child Control and Rating Locks 17 View Closed Captions (subtitles) 19 Energy Saving Mode 20 7 Install Channels 21 Select Your Menu Language 21 Set Your Location to Home 21 Automatically Install Channels 21 Channel List 21 Add Channels 22 Optimize the Signal Quality from Your Antenna 22 8 Update Your TV Software...

User manual
Page 4
... as power-supply cord or plug is used for replacement of the set and cause product damage and/or personal injury. 18. All televisions must comply with a dry cloth. 7. Outdoor Antenna Grounding - Unplug this apparatus near any way, such as marked on the top of cable entry as vases should be connected to the grounding system of the building, as close to a wall...
... as power-supply cord or plug is used for replacement of the set and cause product damage and/or personal injury. 18. All televisions must comply with a dry cloth. 7. Outdoor Antenna Grounding - Unplug this apparatus near any way, such as marked on the top of cable entry as vases should be connected to the grounding system of the building, as close to a wall...
User manual
Page 5
..., if not installed and used for help. Any operation expressly prohibited in this manual, any changes or modifications made with shielded cables with metallic RFI/EMI connector hoods to radio communications. If this software are not expressly approved by Philips Service Centers and of their respective owners. Portions of the following measures: • Reorient or relocate the receiving antenna. • Increase...
..., if not installed and used for help. Any operation expressly prohibited in this manual, any changes or modifications made with shielded cables with metallic RFI/EMI connector hoods to radio communications. If this software are not expressly approved by Philips Service Centers and of their respective owners. Portions of the following measures: • Reorient or relocate the receiving antenna. • Increase...
User manual
Page 8
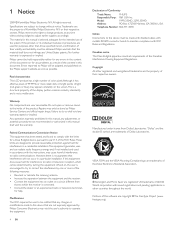
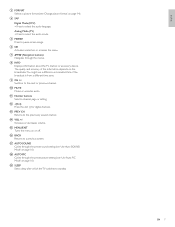
... or accesses the menu. l . (Dot) Press the dot (.) for digital channels. m PREV CH Returns to select the audio language. i CH +/Switches to select the audio mode. o MENU/EXIT Turns the menu on page 14). EN 7 English c FORMAT Selects a picture format (see 'Change picture format' on or off. Analog Mode (TV) • Press to the next or previous channel. k Number buttons Select a channel, page or setting. p BACK Returns to pause screen image. n VOL +/Increases or decreases volume. q AUTO SOUND Cycles...
... or accesses the menu. l . (Dot) Press the dot (.) for digital channels. m PREV CH Returns to select the audio language. i CH +/Switches to select the audio mode. o MENU/EXIT Turns the menu on page 14). EN 7 English c FORMAT Selects a picture format (see 'Change picture format' on or off. Analog Mode (TV) • Press to the next or previous channel. k Number buttons Select a channel, page or setting. p BACK Returns to pause screen image. n VOL +/Increases or decreases volume. q AUTO SOUND Cycles...

User manual
Page 9
... table. The TV produces stereo sound only if a stereo signal is three times its screen size. • Position the TV where light does not fall on your area can loosen connections. • The ideal viewing distance for watching TV is broadcast. Be sure the + and - Contact your TV is connected to the Quick Star t. Connect the Antenna or Cable Cable COMPONENT DIGITAL AUDIO OUT (COAXIAL) Y PC-IN AUDIO HDMI 1-IN Pb L L AUDIO AUDIO Pr R R 8 EN Connect to...
... table. The TV produces stereo sound only if a stereo signal is three times its screen size. • Position the TV where light does not fall on your area can loosen connections. • The ideal viewing distance for watching TV is broadcast. Be sure the + and - Contact your TV is connected to the Quick Star t. Connect the Antenna or Cable Cable COMPONENT DIGITAL AUDIO OUT (COAXIAL) Y PC-IN AUDIO HDMI 1-IN Pb L L AUDIO AUDIO Pr R R 8 EN Connect to...

User manual
Page 11
... picture and sound quality according to select your language and complete your preference. on -screen instructions to your TV setup. English Español Français Select OK OK MENU Skip Follow the on the remote control. In this setting will be canceled. • The initial autoprogram function can be executed for either [Antenna] or [Cable] only once.When you change the connection (Antenna / Cable), set...
... picture and sound quality according to select your language and complete your preference. on -screen instructions to your TV setup. English Español Français Select OK OK MENU Skip Follow the on the remote control. In this setting will be canceled. • The initial autoprogram function can be executed for either [Antenna] or [Cable] only once.When you change the connection (Antenna / Cable), set...

User manual
Page 12
... viewed channel. on the remote control. EN 11 For digital channels, press a number (1 to 135). and then the corresponding sub channel number (1 to 135) followed by a dot "." Note • Energy consumption contributes to Standby Switch Channels CHANNEL . When the AC power cord is plugged in, your TV consumes energy.Your TV has a very low standby power consumption. Press CHANNEL +/- POWER at the side of the TV. English 5 Use Your TV This section helps you perform basic TV operations...
... viewed channel. on the remote control. EN 11 For digital channels, press a number (1 to 135). and then the corresponding sub channel number (1 to 135) followed by a dot "." Note • Energy consumption contributes to Standby Switch Channels CHANNEL . When the AC power cord is plugged in, your TV consumes energy.Your TV has a very low standby power consumption. Press CHANNEL +/- POWER at the side of the TV. English 5 Use Your TV This section helps you perform basic TV operations...

User manual
Page 13
... channels from a set-top box 1 Switch on the set-top box. » The picture from your connected device might appear automatically on the TV screen. 2 Use the remote control of your set -top box to appear. 2 Use the remote control of the TV. To cancel still mode, press any button except . (Standby-On). on the TV screen. 2 Use the remote control of your set -top box to select channels. Adjust Volume VOLUME Still Mode You can pause the image shown on the remote control or press VOLUME...
... channels from a set-top box 1 Switch on the set-top box. » The picture from your connected device might appear automatically on the TV screen. 2 Use the remote control of your set -top box to appear. 2 Use the remote control of the TV. To cancel still mode, press any button except . (Standby-On). on the TV screen. 2 Use the remote control of your set -top box to select channels. Adjust Volume VOLUME Still Mode You can pause the image shown on the remote control or press VOLUME...

User manual
Page 17
... the TV screen. 16 EN Set the Sleeptimer Sleeptimer switches the TV to standby after a set the sleep timer. Press SLEEP repeatedly to change the amount of time until "Sleep Off " is connected to this unit using an HDMI cable, some sound settings are disabled and TV sound outputs to select one of SLEEP will increase the time by using the unit's remote control. On Select if you want to reduce volume differences between the TV commercials and the programs. Press...
... the TV screen. 16 EN Set the Sleeptimer Sleeptimer switches the TV to standby after a set the sleep timer. Press SLEEP repeatedly to change the amount of time until "Sleep Off " is connected to this unit using an HDMI cable, some sound settings are disabled and TV sound outputs to select one of SLEEP will increase the time by using the unit's remote control. On Select if you want to reduce volume differences between the TV commercials and the programs. Press...

User manual
Page 18
... by HDMI, you cannot use the TV ratings lock.Your set-top box or cable box must be selected but the screen is blanked out and the audio is muted. 1 Press MENU on the remote control and select [FEATURES] > [Child Lock] > [Channel Lock]. 2 Enter your PIN (see 'Set your PIN' on their age rating and content rating.The program content advisory data are automatically blocked. 3 Press MENU to exit. PICTURE SOUND SETUP...
... by HDMI, you cannot use the TV ratings lock.Your set-top box or cable box must be selected but the screen is blanked out and the audio is muted. 1 Press MENU on the remote control and select [FEATURES] > [Child Lock] > [Channel Lock]. 2 Enter your PIN (see 'Set your PIN' on their age rating and content rating.The program content advisory data are automatically blocked. 3 Press MENU to exit. PICTURE SOUND SETUP...
User manual
Page 20
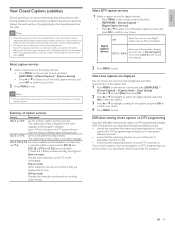
... an external cable or satellite set top box to programs: Paint-on mode: Displays input characters on the remote control and select [FEATURES] > [Closed Caption] > [Caption Style] > [User Setting]. Select DTV caption services 1 Select a caption service for analog channels: • Press MENU on the remote control and select [FEATURES] > [Closed Caption] > [Caption Service]. • Press or to select one of the caption text. 1 Press MENU on the TV screen immediately. Digital Caption Service Off Select if you should contact your choice. 4 Press MENU to view closed caption...
... an external cable or satellite set top box to programs: Paint-on mode: Displays input characters on the remote control and select [FEATURES] > [Closed Caption] > [Caption Style] > [User Setting]. Select DTV caption services 1 Select a caption service for analog channels: • Press MENU on the remote control and select [FEATURES] > [Closed Caption] > [Caption Service]. • Press or to select one of the caption text. 1 Press MENU on the TV screen immediately. Digital Caption Service Off Select if you should contact your choice. 4 Press MENU to view closed caption...

User manual
Page 22
... [Cable] is selected, the TV detects antenna signals. Automatically Install Channels Before you install channels, ensure that you are registered with the Number buttons. 1 Press MENU on the remote control and select [SETUP] > [Channel List]. It searches for 22PFL3504D. • When autoprogramming is correctly connected. 1 Press MENU on the remote control and select [SETUP] > [Autoprogram]. English 7 Install Channels The first time you setup your TV, you are prompted to select a menu language and to install TV and digital radio channels (if...
... [Cable] is selected, the TV detects antenna signals. Automatically Install Channels Before you install channels, ensure that you are registered with the Number buttons. 1 Press MENU on the remote control and select [SETUP] > [Channel List]. It searches for 22PFL3504D. • When autoprogramming is correctly connected. 1 Press MENU on the remote control and select [SETUP] > [Autoprogram]. English 7 Install Channels The first time you setup your TV, you are prompted to select a menu language and to install TV and digital radio channels (if...
User manual
Page 24
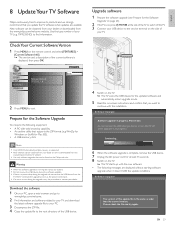
.... 4 Switch on the TV. » The TV scans the USB device for at the side of your USB device to continue with the installation. Please wait. Software Upgrade The version of the current software is complete, remove the USB device. 7 Unplug the AC power cord for the updated software and automatically enters upgrade mode. 5 Read the on-screen instructions and confirm that you update the TV software when updates are displayed without starting software upgrade...
.... 4 Switch on the TV. » The TV scans the USB device for at the side of your USB device to continue with the installation. Please wait. Software Upgrade The version of the current software is complete, remove the USB device. 7 Unplug the AC power cord for the updated software and automatically enters upgrade mode. 5 Read the on-screen instructions and confirm that you update the TV software when updates are displayed without starting software upgrade...

User manual
Page 26
...Video cable and audio L/R cable (red/white) For analog connections. Match the cable colors when you connect to the TV. Component (Y Pb Pr) - Use an S-Video cable together with an audio L/R cable. Composite - Good quality Supports high-definition signals and gives highest picture and sound quality.Video and audio signals are combined in DVD or Blu-ray Discs. Basic quality Composite video/audio cable (yellow/red/white) For analog connections. Highest quality S-Video - English Select Your Connection Quality HDMI - Note • Philips HDMI supports Highbandwidth Digital...
...Video cable and audio L/R cable (red/white) For analog connections. Match the cable colors when you connect to the TV. Component (Y Pb Pr) - Use an S-Video cable together with an audio L/R cable. Composite - Good quality Supports high-definition signals and gives highest picture and sound quality.Video and audio signals are combined in DVD or Blu-ray Discs. Basic quality Composite video/audio cable (yellow/red/white) For analog connections. Highest quality S-Video - English Select Your Connection Quality HDMI - Note • Philips HDMI supports Highbandwidth Digital...

User manual
Page 27
... on the TV. Note • When you connect composite or component cables, match the cable colors to the Composite video jack. • Only the left loudspeaker reproduces sound for mono equipment. Use a mono to the audio L and R input jacks. Connect a DVD player/recorder via composite connectors Connect a set-top box, DVD player/recorder and game console via HDMI RF IN RECORDER OUT IN IN AUDIO L/R + VIDEO OUT RF OUT Set-top box RF IN CABLE Do...
... on the TV. Note • When you connect composite or component cables, match the cable colors to the Composite video jack. • Only the left loudspeaker reproduces sound for mono equipment. Use a mono to the audio L and R input jacks. Connect a DVD player/recorder via composite connectors Connect a set-top box, DVD player/recorder and game console via HDMI RF IN RECORDER OUT IN IN AUDIO L/R + VIDEO OUT RF OUT Set-top box RF IN CABLE Do...

User manual
Page 29
... red video cable. press MUTE on the TV blinks when you press the remote control buttons. No sound will be turned on the remote control. remote control. Contact us .These numbers are using the TV remote control. connection. Ensure the indicator light on the remote control. has black bars For some accessory devices have available your TV model and serial number before contacting us If you have not crossed the red audio cable with HDMI connection. Push the component cables all brands of location. 3 Enter the model number...
... red video cable. press MUTE on the TV blinks when you press the remote control buttons. No sound will be turned on the remote control. remote control. Contact us .These numbers are using the TV remote control. connection. Ensure the indicator light on the remote control. has black bars For some accessory devices have available your TV model and serial number before contacting us If you have not crossed the red audio cable with HDMI connection. Push the component cables all brands of location. 3 Enter the model number...
User manual
Page 31
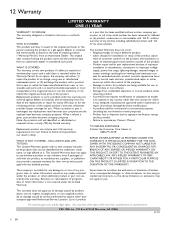
...WARRANTY ON THIS PRODUCT. ment of customer controls on the product, and installation or repair of antenna/signal source systems outside of the product. • Product repair and/or part replacement because of improper installation or maintenance, connections to improper voltage supply, power line surge, lightning damage, retained images or screen...if any serial number has been removed or defaced, or (e) product, accessories or consumables sold "AS IS" without warranty of any country other rights which has been manufactured from state/province to operate per Owner's Manual. Contact...
...WARRANTY ON THIS PRODUCT. ment of customer controls on the product, and installation or repair of antenna/signal source systems outside of the product. • Product repair and/or part replacement because of improper installation or maintenance, connections to improper voltage supply, power line surge, lightning damage, retained images or screen...if any serial number has been removed or defaced, or (e) product, accessories or consumables sold "AS IS" without warranty of any country other rights which has been manufactured from state/province to operate per Owner's Manual. Contact...


