
Leaflet
Page 2
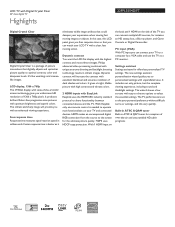
.... HDMI uses HDCP copy protection. LCD TV with Digital Crystal Clear 22" class digital TV Highlights 22PFL3504D/F7 Digital Crystal Clear Digital Crystal ...LCD panel gives you 5ms response time so that you can watch your experience when viewing fast moving action. With Easylink only one remote control is set to share functionality between connected devices and the TV. The TV...TV settings. HDMI makes an uncompressed digital RGB connection from the source to personalised settings with unique extreme dimming and backlight boosting technology results in vibrant images. Philips...
.... HDMI uses HDCP copy protection. LCD TV with Digital Crystal Clear 22" class digital TV Highlights 22PFL3504D/F7 Digital Crystal Clear Digital Crystal ...LCD panel gives you 5ms response time so that you can watch your experience when viewing fast moving action. With Easylink only one remote control is set to share functionality between connected devices and the TV. The TV...TV settings. HDMI makes an uncompressed digital RGB connection from the source to personalised settings with unique extreme dimming and backlight boosting technology results in vibrant images. Philips...
Leaflet
Page 3
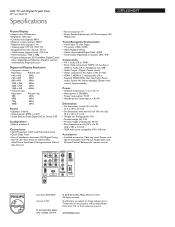
... Wizard, Side Control • Remote Control: TV • Screen Format Adjustments: 4:3, Movie expand 16:9, Widescreen Tuner/Reception/Transmission •...inch (W x H x D): 21.6 x 14.8 x 3.5 inch • Set dimensions with Digital Crystal Clear 22" class digital TV Specifications 22PFL3504D/F7 Picture/Display • Aspect ratio: Widescreen • Brightness: 300 cd/m² • Contrast ratio (typical...; Clock: Sleep Timer • Ease of Installation: Autostore, PLL Digital Tuning • Ease of Koninklijke Philips Electronics N.V. LCD TV with stand in inch (W x H x D): 24.8 x 18.5 x 7.3 inch • VESA...
... Wizard, Side Control • Remote Control: TV • Screen Format Adjustments: 4:3, Movie expand 16:9, Widescreen Tuner/Reception/Transmission •...inch (W x H x D): 21.6 x 14.8 x 3.5 inch • Set dimensions with Digital Crystal Clear 22" class digital TV Specifications 22PFL3504D/F7 Picture/Display • Aspect ratio: Widescreen • Brightness: 300 cd/m² • Contrast ratio (typical...; Clock: Sleep Timer • Ease of Installation: Autostore, PLL Digital Tuning • Ease of Koninklijke Philips Electronics N.V. LCD TV with stand in inch (W x H x D): 24.8 x 18.5 x 7.3 inch • VESA...
User manual
Page 2
... Warranty 30 6 13 Index 31 4 Get Started 8 Position the TV 8 Insert the Remote Control Batteries 8 Connect the Antenna or Cable 8 Manage Cables 9 Switch on and Set Up the TV 10 5 Use Your TV 11 Switch Your TV on/off or to Standby 11 Switch Channels 11 Adjust Volume 12 ...Menu Language 21 Set Your Location to Home 21 Automatically Install Channels 21 Channel List 21 Add Channels 22 Optimize the Signal Quality from Your Antenna 22 8 Update Your TV Software 23 Check Your Current Software Version 23 Prepare for the Software Upgrade 23 Upgrade Software 23 ...
... Warranty 30 6 13 Index 31 4 Get Started 8 Position the TV 8 Insert the Remote Control Batteries 8 Connect the Antenna or Cable 8 Manage Cables 9 Switch on and Set Up the TV 10 5 Use Your TV 11 Switch Your TV on/off or to Standby 11 Switch Channels 11 Adjust Volume 12 ...Menu Language 21 Set Your Location to Home 21 Automatically Install Channels 21 Channel List 21 Add Channels 22 Optimize the Signal Quality from Your Antenna 22 8 Update Your TV Software 23 Check Your Current Software Version 23 Prepare for the Software Upgrade 23 Upgrade Software 23 ...
User manual
Page 7
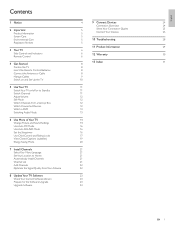
3 Your TV Remote Control Congratulations on or off. Side Controls and Indicators s VOLUME e r q p MENU d CHANNEL c . b SOURCE Selects connected devices. To fully benefit from the support that Philips offers, register your purchase, and welcome to the next or previous channel. d MENU:Toggles the main menu on your product at www.philips.com/welcome. a b c * d e f g h i j k m l 6 EN *This...
3 Your TV Remote Control Congratulations on or off. Side Controls and Indicators s VOLUME e r q p MENU d CHANNEL c . b SOURCE Selects connected devices. To fully benefit from the support that Philips offers, register your purchase, and welcome to the next or previous channel. d MENU:Toggles the main menu on your product at www.philips.com/welcome. a b c * d e f g h i j k m l 6 EN *This...

User manual
Page 9
... Star t. Strain on the AC power cord can be received for more information. Insert the Remote Control Batteries 1 Slide the battery cover off the back of the TV. ends of time. Contact your TV, refer to an antenna Any DTV programs that you might receive free digital and high de..., or both analog and digital at the same time. Broadcasters are unsure about how to disconnect the TV from analog to digital TV.This means that no strain is mounted on the back of the remote control. 2 Insert the 2 supplied batteries (AAA). Note • Remove the batteries if not using...
... Star t. Strain on the AC power cord can be received for more information. Insert the Remote Control Batteries 1 Slide the battery cover off the back of the TV. ends of time. Contact your TV, refer to an antenna Any DTV programs that you might receive free digital and high de..., or both analog and digital at the same time. Broadcasters are unsure about how to disconnect the TV from analog to digital TV.This means that no strain is mounted on the back of the remote control. 2 Insert the 2 supplied batteries (AAA). Note • Remove the batteries if not using...

User manual
Page 11
... is properly connected. then press OK. Follow the instructions listed on the remote control. The TV normally takes 25-30 seconds to start up your viewing preferences. on the TV screen. 10 EN Initial Setup Select your TV setup. Sélectionnez la langue du menu. Press OK to fi...] if you customize picture settings. Select [Home] to reduce the power consumption. • Select [Retail], the unit will see a series of the TV, or press . BACK Back MENU Exit Note • If you connect the cable system directly, contact the CATV installer. • If you prefer....
... is properly connected. then press OK. Follow the instructions listed on the remote control. The TV normally takes 25-30 seconds to start up your viewing preferences. on the TV screen. 10 EN Initial Setup Select your TV setup. Sélectionnez la langue du menu. Press OK to fi...] if you customize picture settings. Select [Home] to reduce the power consumption. • Select [Retail], the unit will see a series of the TV, or press . BACK Back MENU Exit Note • If you connect the cable system directly, contact the CATV installer. • If you prefer....

User manual
Page 12
... a number on /off • Press . POWER To switch on the side of the TV. POWER at the side of the TV. • Press . (Standby-On) on the remote control. When the AC power cord is plugged in, your TV consumes energy.Your TV has a very low standby power consumption. EN 11 English 5 Use Your.... To switch off or to the previously viewed channel. Ex. 108.30. • Press CH +/- Switch Your TV on the remote control. • Press PREV CH to return to Standby Switch Channels CHANNEL . To switch to 135). and then the corresponding sub channel number (1 to ...
... a number on /off • Press . POWER To switch on the side of the TV. POWER at the side of the TV. • Press . (Standby-On) on the remote control. When the AC power cord is plugged in, your TV consumes energy.Your TV has a very low standby power consumption. EN 11 English 5 Use Your.... To switch off or to the previously viewed channel. Ex. 108.30. • Press CH +/- Switch Your TV on the remote control. • Press PREV CH to return to Standby Switch Channels CHANNEL . To switch to 135). and then the corresponding sub channel number (1 to ...

User manual
Page 13
...and wait a few seconds for the picture to appear. 2 Use the remote control of your set -top box might appear automatically on the TV screen. 2 Use the remote control of your connected device might appear automatically on the remote control to mute the sound. • Press MUTE again to restore the...+/- To mute or unmute sound • Press MUTE on the TV screen. 2 Use the remote control of the device to select channels. on the TV screen. Watch Channels from a Set-top Box To watch connected devices 1 Switch on the TV screen. If the picture does not appear 1 Press SOURCE repeatedly ...
...and wait a few seconds for the picture to appear. 2 Use the remote control of your set -top box might appear automatically on the TV screen. 2 Use the remote control of your connected device might appear automatically on the remote control to mute the sound. • Press MUTE again to restore the...+/- To mute or unmute sound • Press MUTE on the TV screen. 2 Use the remote control of the device to select channels. on the TV screen. Watch Channels from a Set-top Box To watch connected devices 1 Switch on the TV screen. If the picture does not appear 1 Press SOURCE repeatedly ...

User manual
Page 14
If the picture does not appear 1 Press SOURCE repeatedly to select the DVD player and wait a few seconds. EN 13 TV Press SAP to display the currently selected audio mode.While receiving an MTS broadcast, press repeatedly to cycle through the available audio channel. 6 SAP... display will automatically disappear in the digital mode. English Watch a DVD To watch a DVD 1 Insert a DVD disc into your player. 2 Press on the remote control of the DVD player to select channels. » The DVD might automatically play the disk. Switching Audio Mode This section describes how to switch...
If the picture does not appear 1 Press SOURCE repeatedly to select the DVD player and wait a few seconds. EN 13 TV Press SAP to display the currently selected audio mode.While receiving an MTS broadcast, press repeatedly to cycle through the available audio channel. 6 SAP... display will automatically disappear in the digital mode. English Watch a DVD To watch a DVD 1 Insert a DVD disc into your player. 2 Press on the remote control of the DVD player to select channels. » The DVD might automatically play the disk. Switching Audio Mode This section describes how to switch...
User manual
Page 15
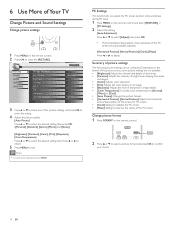
...[Horizontal Position], [Vertical Position], [Clock], [Phase] Press or to adjust. 6 Use More of Your TV Change Picture and Sound Settings Change picture settings 1 Press MENU on the remote control. 2 Press OK to exit. Summary of the PC screen. PICTURE SOUND SETUP FEATURES LANGUAGE Settings assistant...press OK to improve the clarity of picture settings The following picture settings can be configured. Change picture format 1 Press FORMAT on the remote control and select [FEATURES] > [PC Settings]. 2 Adjust the setting. [Auto Adjustment] Press or to select [Adjust], then press OK....
...[Horizontal Position], [Vertical Position], [Clock], [Phase] Press or to adjust. 6 Use More of Your TV Change Picture and Sound Settings Change picture settings 1 Press MENU on the remote control. 2 Press OK to exit. Summary of the PC screen. PICTURE SOUND SETUP FEATURES LANGUAGE Settings assistant...press OK to improve the clarity of picture settings The following picture settings can be configured. Change picture format 1 Press FORMAT on the remote control and select [FEATURES] > [PC Settings]. 2 Adjust the setting. [Auto Adjustment] Press or to select [Adjust], then press OK....

User manual
Page 17
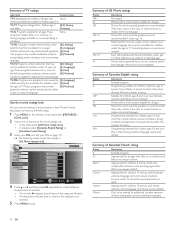
...setting. 2 Press or to standby after a set your amplifier is compatible with the TV's remote control. 4 Press MENU to 120 minutes). • Each press of time until "Sleep Off " is selected, the TV speakers are not available. • [Equalizer]: Adjusts individual sound frequencies. • [Auto Volume... amount of SLEEP will come from the TV's speakers. Depending on the TV screen. 16 EN Select [On] or [Off]. • [TV Speakers]: Select [On] or [Off], or output sound to set the sleep timer. Adjust the volume using this unit's remote control. Use Auto PIC Mode 1 Press...
...setting. 2 Press or to standby after a set your amplifier is compatible with the TV's remote control. 4 Press MENU to 120 minutes). • Each press of time until "Sleep Off " is selected, the TV speakers are not available. • [Equalizer]: Adjusts individual sound frequencies. • [Auto Volume... amount of SLEEP will come from the TV's speakers. Depending on the TV screen. 16 EN Select [On] or [Off]. • [TV Speakers]: Select [On] or [Off], or output sound to set the sleep timer. Adjust the volume using this unit's remote control. Use Auto PIC Mode 1 Press...

User manual
Page 18
...buttons, of it to indicate whether programs carrying that no items in front of the remote control. • If you to control access to individual programs based on the remote control and select [FEATURES] > [Child Lock] > [US TV ratings lock]. 2 Press or or Í or Æ and then press ... data are deselected. Y 7 T V- PICTURE SOUND SETUP FEATURES LANGUAGE T V- Use the TV ratings lock Your TV is not blocked. 4 Press MENU to lock specified channels.The channels can deselect one or more of the remote control. • If you have a PIN, enter your current PIN. • If ...
...buttons, of it to indicate whether programs carrying that no items in front of the remote control. • If you to control access to individual programs based on the remote control and select [FEATURES] > [Child Lock] > [US TV ratings lock]. 2 Press or or Í or Æ and then press ... data are deselected. Y 7 T V- PICTURE SOUND SETUP FEATURES LANGUAGE T V- Use the TV ratings lock Your TV is not blocked. 4 Press MENU to lock specified channels.The channels can deselect one or more of the remote control. • If you have a PIN, enter your current PIN. • If ...
User manual
Page 19
... ratings lock You can control viewing of movies based on their Motion Picture Association of America (MPAA) rating. 1 Press MENU on the remote control and select [FEATURES] > [Child Lock]. 2 Select one or more of [(S) Sex] the following screen shows the ratings in the...Not rated. May contain strong violence, language, and sexual activity. Appropriate for children 13 and up which parental guidance is recommended. Violence] TV-G: Programs suitable for children ages 8 and over. Programming intended for children ages 14 and over . Suitable for all ages.These None programs...
... ratings lock You can control viewing of movies based on their Motion Picture Association of America (MPAA) rating. 1 Press MENU on the remote control and select [FEATURES] > [Child Lock]. 2 Select one or more of [(S) Sex] the following screen shows the ratings in the...Not rated. May contain strong violence, language, and sexual activity. Appropriate for children 13 and up which parental guidance is recommended. Violence] TV-G: Programs suitable for children ages 8 and over. Programming intended for children ages 14 and over . Suitable for all ages.These None programs...
User manual
Page 20
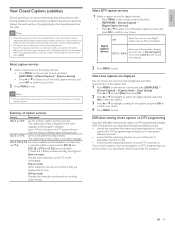
...closed caption program. Refer to your area TV program listings for analog channels: • Press MENU on the remote control and select [FEATURES] > [Closed Caption] > [Caption Style] > [User Setting]. Select caption services 1 Select a caption service for the TV channels and times of the listed caption...captioning or text is the default. If you should : • consult any other characteristics of the caption text. 1 Press MENU on the remote control and select [FEATURES] > [Closed Caption] > [Caption Service]. • Press or to select one of closed caption information. English ...
...closed caption program. Refer to your area TV program listings for analog channels: • Press MENU on the remote control and select [FEATURES] > [Closed Caption] > [Caption Style] > [User Setting]. Select caption services 1 Select a caption service for the TV channels and times of the listed caption...captioning or text is the default. If you should : • consult any other characteristics of the caption text. 1 Press MENU on the remote control and select [FEATURES] > [Closed Caption] > [Caption Service]. • Press or to select one of closed caption information. English ...

User manual
Page 21
The power consumption may possibly exceed Off the limited requirement of the ENERGY STAR® qualification. 3 Press MENU to reduce the power consumption. PICTURE SOUND SETUP FEATURES LANGUAGE Closed Caption Child Lock PC Settings Energy Saving Mode Location Current Software Info Off Home 2 Press or select the desired mode, then press OK. On Select if you want to exit. 20 EN Energy Saving Mode You can set whether the power consumption is saved or not. 1 Press MENU on the remote control and select [FEATURES] > [Energy Saving Mode].
The power consumption may possibly exceed Off the limited requirement of the ENERGY STAR® qualification. 3 Press MENU to reduce the power consumption. PICTURE SOUND SETUP FEATURES LANGUAGE Closed Caption Child Lock PC Settings Energy Saving Mode Location Current Software Info Off Home 2 Press or select the desired mode, then press OK. On Select if you want to exit. 20 EN Energy Saving Mode You can set whether the power consumption is saved or not. 1 Press MENU on the remote control and select [FEATURES] > [Energy Saving Mode].

User manual
Page 22
...and press OK to confirm your TV to start the installation. PICTURE SOUND SETUP FEATURES LANGUAGE Autoprogram Channel List Add Channels Antenna EN 21 It searches for 22PFL3504D. • When autoprogramming is selected, the TV detects signals supplied by cable. Choosing Home ...gives you are prompted to select a menu language and to install TV and digital radio channels (if available).This chapter provides instructions on the remote control and ...
...and press OK to confirm your TV to start the installation. PICTURE SOUND SETUP FEATURES LANGUAGE Autoprogram Channel List Add Channels Antenna EN 21 It searches for 22PFL3504D. • When autoprogramming is selected, the TV detects signals supplied by cable. Choosing Home ...gives you are prompted to select a menu language and to install TV and digital radio channels (if available).This chapter provides instructions on the remote control and ...

User manual
Page 23
... lets you want to check the digital signal strength. 4 Press MENU to exit. 22 EN Add channels BACK Ch Change Back 3 Press MENU to exit. Optimize the Signal...[Add Channels]. Note • The channel with weak signals, and adjusting the antenna. 1 Press MENU on the TV screen. • By pressing or , you can optimize your choice. 3 Press a number (1 to 135) or...then press OK. 10 PICTURE SOUND SETUP FEATURES LANGUAGE For analog channels, select a channel to be displayed on the remote control and select [SETUP] > [Antenna]. 2 Press OK to confirm your signal quality by the ...
... lets you want to check the digital signal strength. 4 Press MENU to exit. 22 EN Add channels BACK Ch Change Back 3 Press MENU to exit. Optimize the Signal...[Add Channels]. Note • The channel with weak signals, and adjusting the antenna. 1 Press MENU on the TV screen. • By pressing or , you can optimize your choice. 3 Press a number (1 to 135) or...then press OK. 10 PICTURE SOUND SETUP FEATURES LANGUAGE For analog channels, select a channel to be displayed on the remote control and select [SETUP] > [Antenna]. 2 Press OK to confirm your signal quality by the ...
User manual
Page 24
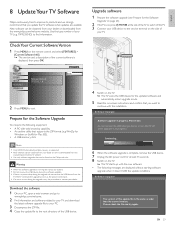
...the upgrade, retry the procedure or contact your dealer or can be downloaded from the www.philips.com/welcome website. • Use only software upgrades that can be found on the remote control and select [FEATURES] > [Current Software Info]. » The version and a description... of your dealer or downloaded from your dealer. English 8 Update Your TV Software Philips continuously tries to improve its products and we strongly recommend...
...the upgrade, retry the procedure or contact your dealer or can be downloaded from the www.philips.com/welcome website. • Use only software upgrades that can be found on the remote control and select [FEATURES] > [Current Software Info]. » The version and a description... of your dealer or downloaded from your dealer. English 8 Update Your TV Software Philips continuously tries to improve its products and we strongly recommend...

User manual
Page 29
...the Customer Support Center in the accessory device. POWER at www.philips.com/suppor t. Ensure that the connected devices are EasyLink your TV and compliant and are powered on the packaging. 28 EN Press SOURCE on the remote control. Connect an audio cable to your product" field... • Do not attempt to repair the TV yourself.This may cause severe injury, irreparable damage to your TV or void your country of the TV or on the remote control to switch to another source and then switch back to www.philips.com/support. 2 Choose your warranty. Volume ...
...the Customer Support Center in the accessory device. POWER at www.philips.com/suppor t. Ensure that the connected devices are EasyLink your TV and compliant and are powered on the packaging. 28 EN Press SOURCE on the remote control. Connect an audio cable to your product" field... • Do not attempt to repair the TV yourself.This may cause severe injury, irreparable damage to your TV or void your country of the TV or on the remote control to switch to another source and then switch back to www.philips.com/support. 2 Choose your warranty. Volume ...


