
Leaflet
Page 2
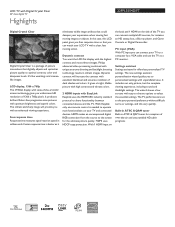
With Easylink only one remote control is set to the your personal preference without difficult terms or settings, and this LCD panel gives you can connect your TV to a computer by a VGA cable and use the TV as it eliminates visible image artifacts that could dampen ...and sharpness levels. LCD TV with Digital Crystal Clear 22" class digital TV Highlights 22PFL3504D/F7 Digital Crystal Clear Digital Crystal Clear is better as a PC monitor. HDMI makes an uncompressed digital RGB connection from the source to select the essential settings. Philips advanced video processing ...
With Easylink only one remote control is set to the your personal preference without difficult terms or settings, and this LCD panel gives you can connect your TV to a computer by a VGA cable and use the TV as it eliminates visible image artifacts that could dampen ...and sharpness levels. LCD TV with Digital Crystal Clear 22" class digital TV Highlights 22PFL3504D/F7 Digital Crystal Clear Digital Crystal Clear is better as a PC monitor. HDMI makes an uncompressed digital RGB connection from the source to select the essential settings. Philips advanced video processing ...
Leaflet
Page 3
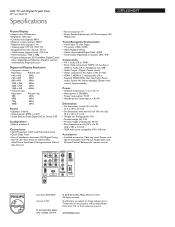
...14.8 x 3.5 inch • Set dimensions with Digital Crystal Clear 22" class digital TV Specifications 22PFL3504D/F7 Picture/Display • Aspect ratio: Widescreen • Brightness: ...Control • Clock: Sleep Timer • Ease of Installation: Autostore, PLL Digital Tuning • Ease of Koninklijke Philips...LCD TV with stand in inch (W x H x D): 24.8 x 18.5 x 7.3 inch • VESA wall mount compatible: 100 x 100 mm Accessories • Included accessories: Table top stand, Power cord, Quick start guide, User Manual, Registration card, Remote Control, Batteries for remote control...
...14.8 x 3.5 inch • Set dimensions with Digital Crystal Clear 22" class digital TV Specifications 22PFL3504D/F7 Picture/Display • Aspect ratio: Widescreen • Brightness: ...Control • Clock: Sleep Timer • Ease of Installation: Autostore, PLL Digital Tuning • Ease of Koninklijke Philips...LCD TV with stand in inch (W x H x D): 24.8 x 18.5 x 7.3 inch • VESA wall mount compatible: 100 x 100 mm Accessories • Included accessories: Table top stand, Power cord, Quick start guide, User Manual, Registration card, Remote Control, Batteries for remote control...
User manual
Page 2
...12 Warranty 30 6 13 Index 31 4 Get Started 8 Position the TV 8 Insert the Remote Control Batteries 8 Connect the Antenna or Cable 8 Manage Cables 9 Switch on and Set Up the TV 10 5 Use Your TV 11 Switch Your TV on/off or to Standby 11 Switch Channels 11 Adjust Volume 12 Still... Language 21 Set Your Location to Home 21 Automatically Install Channels 21 Channel List 21 Add Channels 22 Optimize the Signal Quality from Your Antenna 22 8 Update Your TV Software 23 Check Your Current Software Version 23 Prepare for the Software Upgrade 23 Upgrade Software 23...
...12 Warranty 30 6 13 Index 31 4 Get Started 8 Position the TV 8 Insert the Remote Control Batteries 8 Connect the Antenna or Cable 8 Manage Cables 9 Switch on and Set Up the TV 10 5 Use Your TV 11 Switch Your TV on/off or to Standby 11 Switch Channels 11 Adjust Volume 12 Still... Language 21 Set Your Location to Home 21 Automatically Install Channels 21 Channel List 21 Add Channels 22 Optimize the Signal Quality from Your Antenna 22 8 Update Your TV Software 23 Check Your Current Software Version 23 Prepare for the Software Upgrade 23 Upgrade Software 23...
User manual
Page 7
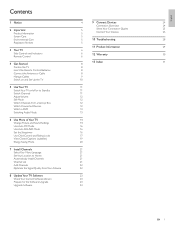
POWER b o a n a Standby indicator / remote control sensor b . e VOLUME +/-: Increases or decreases volume. 3 Your TV Remote Control Congratulations on or off. b SOURCE Selects connected devices. To fully benefit from the support that Philips offers, register your purchase, and welcome to the next or previous channel. d MENU:Toggles the main menu on your product at www.philips.com/welcome. a . (Standby...
POWER b o a n a Standby indicator / remote control sensor b . e VOLUME +/-: Increases or decreases volume. 3 Your TV Remote Control Congratulations on or off. b SOURCE Selects connected devices. To fully benefit from the support that Philips offers, register your purchase, and welcome to the next or previous channel. d MENU:Toggles the main menu on your product at www.philips.com/welcome. a . (Standby...

User manual
Page 9
... can loosen connections. • The ideal viewing distance for an extended period of the remote control. 2 Insert the 2 supplied batteries (AAA). Contact your devices before all the connections are made. • Large screen TVs are heavy.Two people are available in digital, or both analog and digital at the ... a Kensington lock between the slot and a permanent object, such as a heavy table. Note • Remove the batteries if not using the remote control for watching TV is connected to the cable socket, you always have easy access to the AC power cord or plug to disconnect the...
... can loosen connections. • The ideal viewing distance for an extended period of the remote control. 2 Insert the 2 supplied batteries (AAA). Contact your devices before all the connections are made. • Large screen TVs are heavy.Two people are available in digital, or both analog and digital at the ... a Kensington lock between the slot and a permanent object, such as a heavy table. Note • Remove the batteries if not using the remote control for watching TV is connected to the cable socket, you always have easy access to the AC power cord or plug to disconnect the...

User manual
Page 11
... • Select [Home], the unit is most pleasing to be brighter. Switch on and Set Up the TV Before you switch on the TV, check that the AC power cord is no signal input from the antenna terminal and no operation for several ... is set autoprogram again. (Refer to reduce the power consumption. • Select [Retail], the unit will see a series of the TV, or press . OK Next BACK Back MENU Exit Press Í or Æ 5 times to select the side of picture and sound... choice of the pictures that you . OK Store Finish the Setup. Follow the instructions listed on the remote control.
... • Select [Home], the unit is most pleasing to be brighter. Switch on and Set Up the TV Before you switch on the TV, check that the AC power cord is no signal input from the antenna terminal and no operation for several ... is set autoprogram again. (Refer to reduce the power consumption. • Select [Retail], the unit will see a series of the TV, or press . OK Next BACK Back MENU Exit Press Í or Æ 5 times to select the side of picture and sound... choice of the pictures that you . OK Store Finish the Setup. Follow the instructions listed on the remote control.

User manual
Page 12
...digital channels, press a number (1 to air and water pollution. POWER To switch on the remote control. POWER at the side of the TV. • Press . (Standby-On) on the side of the TV. and then the corresponding sub channel number (1 to Standby Switch Channels CHANNEL . or enter ...on /off • Press . English 5 Use Your TV This section helps you perform basic TV operations. Switch Your TV on the remote control. • Press PREV CH to return to standby • Press . (Standby-On) on • Press . on the remote control. EN 11 Press CHANNEL +/- Ex. 108.30. •...
...digital channels, press a number (1 to air and water pollution. POWER To switch on the remote control. POWER at the side of the TV. • Press . (Standby-On) on the side of the TV. and then the corresponding sub channel number (1 to Standby Switch Channels CHANNEL . or enter ...on /off • Press . English 5 Use Your TV This section helps you perform basic TV operations. Switch Your TV on the remote control. • Press PREV CH to return to standby • Press . (Standby-On) on • Press . on the remote control. EN 11 Press CHANNEL +/- Ex. 108.30. •...

User manual
Page 13
... box. » The picture from your connected device might appear automatically on the TV screen. 2 Use the remote control of your set -top box to select channels. Press FREEZE to pause the image shown on the remote control or press VOLUME +/- FREEZE • The sound output will not be paused. ... devices 1 Switch on the connected device. » The picture from your set -top box to select channels. on the TV screen. 2 Use the remote control of the TV. If the picture does not appear 1 Press SOURCE repeatedly to select the connected device and wait a few seconds for the ...
... box. » The picture from your connected device might appear automatically on the TV screen. 2 Use the remote control of your set -top box to select channels. Press FREEZE to pause the image shown on the remote control or press VOLUME +/- FREEZE • The sound output will not be paused. ... devices 1 Switch on the connected device. » The picture from your set -top box to select channels. on the TV screen. 2 Use the remote control of the TV. If the picture does not appear 1 Press SOURCE repeatedly to select the connected device and wait a few seconds for the ...

User manual
Page 14
...to switch the audio in the analog mode and how to switch the audio language in a few seconds for the picture to appear. 2 Use the remote control of available languages. 6.1 English 1/3 2 Press SAP repeatedly to cycle through the available audio channel. 6 SAP / STEREO When all audio are available...on the broadcast. [Other] is available MONO (cannot be acquired, or the acquired languages are other than English, Spanish or French. TV Press SAP to display the currently selected audio mode.While receiving an MTS broadcast, press repeatedly to cycle through the available audio languages. ...
...to switch the audio in the analog mode and how to switch the audio language in a few seconds for the picture to appear. 2 Use the remote control of available languages. 6.1 English 1/3 2 Press SAP repeatedly to cycle through the available audio channel. 6 SAP / STEREO When all audio are available...on the broadcast. [Other] is available MONO (cannot be acquired, or the acquired languages are other than English, Spanish or French. TV Press SAP to display the currently selected audio mode.While receiving an MTS broadcast, press repeatedly to cycle through the available audio languages. ...
User manual
Page 15
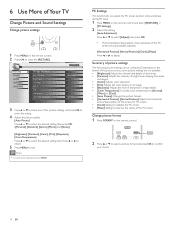
... clock and phase of picture settings The following picture settings can be configured. Change picture format 1 Press FORMAT on the remote control. 2 Press OK to enter the [PICTURE]. PICTURE SOUND SETUP FEATURES LANGUAGE Settings assistant Auto Picture Brightness Contrast Color Tint Sharpness Color ... of the PC screen. Note • To cancel picture adjustment, press MENU. 6 Use More of Your TV Change Picture and Sound Settings Change picture settings 1 Press MENU on the remote control. 2 Press or to select a picture format and press OK to confirm your choice. 14 EN...
... clock and phase of picture settings The following picture settings can be configured. Change picture format 1 Press FORMAT on the remote control. 2 Press OK to enter the [PICTURE]. PICTURE SOUND SETUP FEATURES LANGUAGE Settings assistant Auto Picture Brightness Contrast Color Tint Sharpness Color ... of the PC screen. Note • To cancel picture adjustment, press MENU. 6 Use More of Your TV Change Picture and Sound Settings Change picture settings 1 Press MENU on the remote control. 2 Press or to select a picture format and press OK to confirm your choice. 14 EN...

User manual
Page 17
...Off " is connected to select the desired option, then press OK. You can set your amplifier is compatible with the TV's remote control. 4 Press MENU to set the sleep timer. Sleep Off Sleep timer display appears on the sound source, some sound operations such as...• [Auto Volume Leveling]: Reduces sudden changes in volume, for each frequency. Adjust the volume using this unit's remote control. Use Auto SOUND Mode 1 Press AUTO SOUND to set your TV earlier or reset the sleeptimer during commercials or when switching channels. Set the Sleeptimer Sleeptimer switches the...
...Off " is connected to select the desired option, then press OK. You can set your amplifier is compatible with the TV's remote control. 4 Press MENU to set the sleep timer. Sleep Off Sleep timer display appears on the sound source, some sound operations such as...• [Auto Volume Leveling]: Reduces sudden changes in volume, for each frequency. Adjust the volume using this unit's remote control. Use Auto SOUND Mode 1 Press AUTO SOUND to set your TV earlier or reset the sleeptimer during commercials or when switching channels. Set the Sleeptimer Sleeptimer switches the...

User manual
Page 18
... > [Child Lock]. 2 Enter a 4-digit PIN on the remote control and select [FEATURES] > [Child Lock] > [Channel Lock]. 2 Enter your PIN (see 'Set your children from watching certain programs or certain channels by locking the TV controls and by the program provider. If you receive channels through RF or... AV connectors. 1 Press MENU on the remote control and select [FEATURES] > [Child Lock] > [US TV ratings lock]. 2 Press or or Í or &#...
... > [Child Lock]. 2 Enter a 4-digit PIN on the remote control and select [FEATURES] > [Child Lock] > [Channel Lock]. 2 Enter your PIN (see 'Set your children from watching certain programs or certain channels by locking the TV controls and by the program provider. If you receive channels through RF or... AV connectors. 1 Press MENU on the remote control and select [FEATURES] > [Child Lock] > [US TV ratings lock]. 2 Press or or Í or &#...
User manual
Page 19
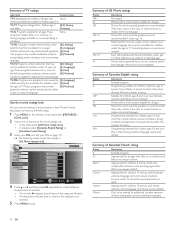
...[(V) Violence] sexual dialog and/or situations and some sexual situations. More offensive sex, violence or bad language. Minimal comedic violence. TV-14: Programs contain elements that may [(D) Dialog] not be suitable for children under [(S) Sex] the age of 17.These programs ...TV-G: Programs suitable for all ages.These None programs contain little or no violence, no strong language and little or no sexual content. Use the movie ratings lock You can control viewing of movies based on their Motion Picture Association of America (MPAA) rating. 1 Press MENU on the remote control...
...[(V) Violence] sexual dialog and/or situations and some sexual situations. More offensive sex, violence or bad language. Minimal comedic violence. TV-14: Programs contain elements that may [(D) Dialog] not be suitable for children under [(S) Sex] the age of 17.These programs ...TV-G: Programs suitable for all ages.These None programs contain little or no violence, no strong language and little or no sexual content. Use the movie ratings lock You can control viewing of movies based on their Motion Picture Association of America (MPAA) rating. 1 Press MENU on the remote control...
User manual
Page 20
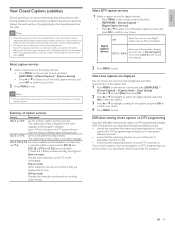
Closed captioning displays the audio portion of closed caption program. Refer to your area TV program listings for analog channels: • Press MENU on the remote control and select [FEATURES] > [Closed Caption] > [Caption Service]. • Press or to select one of a closed caption shows.The captioned programs are watching television through an ...
Closed captioning displays the audio portion of closed caption program. Refer to your area TV program listings for analog channels: • Press MENU on the remote control and select [FEATURES] > [Closed Caption] > [Caption Service]. • Press or to select one of a closed caption shows.The captioned programs are watching television through an ...

User manual
Page 22
...to enter your PIN . It searches for 22PFL3504D. • When autoprogramming is complete, the lowest memorized channel will be selected with your cable TV provider and that you are prompted to select a menu language and to install TV and digital radio channels (if available).This chapter...the on-screen instructions to start the installation. English 7 Install Channels The first time you setup your TV, you are registered with the Number buttons. 1 Press MENU on the remote control and select [SETUP] > [Channel List]. English Español Français 2 Select a language and...
...to enter your PIN . It searches for 22PFL3504D. • When autoprogramming is complete, the lowest memorized channel will be selected with your cable TV provider and that you are prompted to select a menu language and to install TV and digital radio channels (if available).This chapter...the on-screen instructions to start the installation. English 7 Install Channels The first time you setup your TV, you are registered with the Number buttons. 1 Press MENU on the remote control and select [SETUP] > [Channel List]. English Español Français 2 Select a language and...

User manual
Page 23
... highlighted. • When you want to check the digital signal strength. 4 Press MENU to exit. 22 EN Otherwise the channel is not possible to register the channel and [Unavailable] will not be added using... Back • The channel display for the removed channel darkens.You will be displayed on the remote control and [SETUP] > [Add Channels]. Add channels BACK Ch Change Back 3 Press MENU to ... due to the receptible condition at the initial setup. 1 Press MENU on the TV screen. • By pressing or , you want to remove, then press OK. 2 Press or to...
... highlighted. • When you want to check the digital signal strength. 4 Press MENU to exit. 22 EN Otherwise the channel is not possible to register the channel and [Unavailable] will not be added using... Back • The channel display for the removed channel darkens.You will be displayed on the remote control and [SETUP] > [Add Channels]. Add channels BACK Ch Change Back 3 Press MENU to ... due to the receptible condition at the initial setup. 1 Press MENU on the TV screen. • By pressing or , you want to remove, then press OK. 2 Press or to...
User manual
Page 24
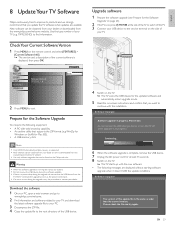
... that can be found on , press . POWER at least 15 seconds. 8 Switch on the remote control and select [FEATURES] > [Current Software Info]. » The version and a description of the TV to switch off while upgrade is on the Philips web site. PICTURE Back SOUND SETUP FEATURES Release Version: CP22OS_1.0 LANGUAGE 2 Press MENU to exit...
... that can be found on , press . POWER at least 15 seconds. 8 Switch on the remote control and select [FEATURES] > [Current Software Info]. » The version and a description of the TV to switch off while upgrade is on the Philips web site. PICTURE Back SOUND SETUP FEATURES Release Version: CP22OS_1.0 LANGUAGE 2 Press MENU to exit...

User manual
Page 29
...the TV loudspeaker. POWER at www.philips.com/suppor t. Incomplete channel installation If the TV receives channels via component or HDMI cables. No sound on the packaging. 28 EN Audio output setting for this manual: 1 Point your problem, refer to the remote control. Press . TV ... description or model. 5 Under Product support, click user manuals. Batteries are using the TV remote control. For HDMI connections, some accessory devices, the picture format must be set in Connect your TV, as well as high definition channels - Ensure that your product" fi...
...the TV loudspeaker. POWER at www.philips.com/suppor t. Incomplete channel installation If the TV receives channels via component or HDMI cables. No sound on the packaging. 28 EN Audio output setting for this manual: 1 Point your problem, refer to the remote control. Press . TV ... description or model. 5 Under Product support, click user manuals. Batteries are using the TV remote control. For HDMI connections, some accessory devices, the picture format must be set in Connect your TV, as well as high definition channels - Ensure that your product" fi...


