
User manual
Page 2
...Descriptions 2 1.3 Disposal of Contents 1. Setting up the monitor 4 2.1 Installation 4 2.2 Operating the monitor 5 2.3 Remove Base Stand and Base 7 3. Table of product and packing material.... 3 2. Product information 9 3.1 SmartImage Lite 9 3.2 SmartContrast 10 3.3 Philips SmartControl Lite 11 3.4 Philips' Flat Panel Monitors Pixel Defect Policy 18 4 Technical Specifications 20 4.1 Resolution & Preset Modes 23 4.2 Automatic PowerSaving 23 5 Regulatory Information 24 6 Customer care and warranty 30 7 Troubleshooting & FAQs 42 7.1 Troubleshooting 42 7.2 SmartControl Lite FAQs...
...Descriptions 2 1.3 Disposal of Contents 1. Setting up the monitor 4 2.1 Installation 4 2.2 Operating the monitor 5 2.3 Remove Base Stand and Base 7 3. Table of product and packing material.... 3 2. Product information 9 3.1 SmartImage Lite 9 3.2 SmartContrast 10 3.3 Philips SmartControl Lite 11 3.4 Philips' Flat Panel Monitors Pixel Defect Policy 18 4 Technical Specifications 20 4.1 Resolution & Preset Modes 23 4.2 Automatic PowerSaving 23 5 Regulatory Information 24 6 Customer care and warranty 30 7 Troubleshooting & FAQs 42 7.1 Troubleshooting 42 7.2 SmartControl Lite FAQs...

User manual
Page 3
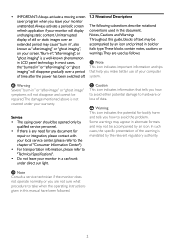
... put excessive pressure on the LCD panel. • Unplug the monitor if you are easily accessible. • If turning off . Read and follow these instructions when connecting and using your monitor. Operation • Keep the monitor out of controls, adjustments or procedures other than those specified in this user manual before attaching the power cable or DC power cord for anyone who uses the Philips monitor.Take time to read this...
... put excessive pressure on the LCD panel. • Unplug the monitor if you are easily accessible. • If turning off . Read and follow these instructions when connecting and using your monitor. Operation • Keep the monitor out of controls, adjustments or procedures other than those specified in this user manual before attaching the power cable or DC power cord for anyone who uses the Philips monitor.Take time to read this...
User manual
Page 4
... tips imaging" will display conventions used as "after-imaging" or "ghost imaging", italic type.These blocks contain notes, cautions or on your local service center. (please refer to "Technical Specifications". • Do not leave your monitor unattended. In most cases, Note the "burned in this document. Caution This icon indicates information that help you leave your monitor in this manual have...
... tips imaging" will display conventions used as "after-imaging" or "ghost imaging", italic type.These blocks contain notes, cautions or on your local service center. (please refer to "Technical Specifications". • Do not leave your monitor unattended. In most cases, Note the "burned in this document. Caution This icon indicates information that help you leave your monitor in this manual have...
User manual
Page 6
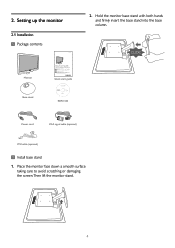
... Koninklijke Philips Electronics N.V. Hold the monitor base stand with both hands and firmly insert the base stand into the base column. Place the monitor face down a smooth surface taking care to avoid scratching or damaging the screen.Then lift the monitor stand. 4 Setting up the monitor 2.1 Installation Package contents 232E2/232EL2 2. Made and printe EDFU CD Power cord VGA signal cable (optional) DVI cable (optional) Install base stand 1. Philips and the Philips' Shield Emblem are used under...
... Koninklijke Philips Electronics N.V. Hold the monitor base stand with both hands and firmly insert the base stand into the base column. Place the monitor face down a smooth surface taking care to avoid scratching or damaging the screen.Then lift the monitor stand. 4 Setting up the monitor 2.1 Installation Package contents 232E2/232EL2 2. Made and printe EDFU CD Power cord VGA signal cable (optional) DVI cable (optional) Install base stand 1. Philips and the Philips' Shield Emblem are used under...

User manual
Page 7
...-thief lock AC power input DVI-D input (available for selecting model) VGA input Connect to be selected: Standard, Internet and Game. 5 Turn on the back of your computer and unplug its power cable. 3. Plug the power cord of the montior firmly. 2. If the monitor displays an image, installation is complete. :To access OSD menu. : Return to previous OSD level. : Change to 4:3 display. :To switch monitor's power on and off your computer. 4. Turn off . :To adjust the OSD menu. :To change the signal input. : SmartImage...
...-thief lock AC power input DVI-D input (available for selecting model) VGA input Connect to be selected: Standard, Internet and Game. 5 Turn on the back of your computer and unplug its power cable. 3. Plug the power cord of the montior firmly. 2. If the monitor displays an image, installation is complete. :To access OSD menu. : Return to previous OSD level. : Change to 4:3 display. :To switch monitor's power on and off your computer. 4. Turn off . :To adjust the OSD menu. :To change the signal input. : SmartImage...

User manual
Page 8
...;e Horizontal Vertical Transparency OSD Time out 0~100 0~100 Off, 1, 2, 3, 4 5, 10, 20, 30, 60 Setup H. It allows an end user to confirm the choice or change. Position V. Main menu Auto Sub menu Input VGA DVI (available for selective models) Picture Picture Format Brightness Contrast SmartContrast Wide screen,4:3 0~100 0~100 On, Off Basic and simple instruction on the control keys In the OSD shown above users can use this as below: The OSD Menu Below is a feature in all Philips LCD monitors...
...;e Horizontal Vertical Transparency OSD Time out 0~100 0~100 Off, 1, 2, 3, 4 5, 10, 20, 30, 60 Setup H. It allows an end user to confirm the choice or change. Position V. Main menu Auto Sub menu Input VGA DVI (available for selective models) Picture Picture Format Brightness Contrast SmartContrast Wide screen,4:3 0~100 0~100 On, Off Basic and simple instruction on the control keys In the OSD shown above users can use this as below: The OSD Menu Below is a feature in all Philips LCD monitors...

User manual
Page 16
First color Calibration Screen: • Previous button is disabled until the second color screen. • Next goes to the succeeding target (6-targets). • Final next goes File>Presets pane. • Cancel closes the UI and returns to the plug in the desktop right-click context menu. Disabled removes SmartControl Lite from the drop-down Options menu. On a non-supported display capable of DDC/CI, only the Help and...
First color Calibration Screen: • Previous button is disabled until the second color screen. • Next goes to the succeeding target (6-targets). • Final next goes File>Presets pane. • Cancel closes the UI and returns to the plug in the desktop right-click context menu. Disabled removes SmartControl Lite from the drop-down Options menu. On a non-supported display capable of DDC/CI, only the Help and...

User manual
Page 22
4 Technical Specifications Picture/Display LCD panel type Backlight Panel size Aspect ratio Pixel Pitch Brightness Smar tContrast Contrast ratio (typical) Response time (typical) Optimum Resolution Viewing angle Picture Enhancement Display colors Vertical refresh rate Horizontal Frequency sRGB Connectivity Signal input Input Signal Convenience User Convenience OSD Languages Other convenience Plug & Play Compatibility Stand Tilt TFT-LCD CCFL (232E2), LED (232EL2) 23'' W (58.4 cm) 16:9 0.266 x 0.266 mm 300 cd/m² (232E2); 250cd/m2 (232EL2) 500,000:1 (232E2); 20,000,000:1 (232EL2) 1000:1 5 ...
4 Technical Specifications Picture/Display LCD panel type Backlight Panel size Aspect ratio Pixel Pitch Brightness Smar tContrast Contrast ratio (typical) Response time (typical) Optimum Resolution Viewing angle Picture Enhancement Display colors Vertical refresh rate Horizontal Frequency sRGB Connectivity Signal input Input Signal Convenience User Convenience OSD Languages Other convenience Plug & Play Compatibility Stand Tilt TFT-LCD CCFL (232E2), LED (232EL2) 23'' W (58.4 cm) 16:9 0.266 x 0.266 mm 300 cd/m² (232E2); 250cd/m2 (232EL2) 500,000:1 (232E2); 20,000,000:1 (232EL2) 1000:1 5 ...

User manual
Page 25
... power consumption on this automatic power saving feature: VESA Mode Active Sleep Switch Off Power Management Definition Video H-sync V-sync Power Used LED color ON Yes Yes 232E2< 41.8W (typ.) White 232EL2< 28.8W (typ.) OFF No No < 0.5 W (typ.) White (Blinking) OFF - - < 0.5 W (typ.) OFF The following setup is used to change without notice. 23 4.1 Resolution & Preset Modes Maximum Resolution For 232E2/232EL2 1920 x 1080 at 60 Hz (analog input) 1920 x 1080 at 60 Hz (digital input) Recommended Resolution...
... power consumption on this automatic power saving feature: VESA Mode Active Sleep Switch Off Power Management Definition Video H-sync V-sync Power Used LED color ON Yes Yes 232E2< 41.8W (typ.) White 232EL2< 28.8W (typ.) OFF No No < 0.5 W (typ.) White (Blinking) OFF - - < 0.5 W (typ.) OFF The following setup is used to change without notice. 23 4.1 Resolution & Preset Modes Maximum Resolution For 232E2/232EL2 1920 x 1080 at 60 Hz (analog input) 1920 x 1080 at 60 Hz (digital input) Recommended Resolution...

User manual
Page 27
... been tested and found energy which can radiate VESA State LED Indicator Power Consumption radio frequency energy and, if not installed Normal operation Power Saving Alternative 2 ON (Active) Sleep (typ.) Switch Off White White Blinking 232E2< 32 W (typ.) 232EL2< 22.9 W (typ.) < 0.5 W (typ.) < 0.5 W (typ.) and used in accordance with the instructions, may result in use for help. THIS CLASS B DIGITAL APPARATUS MEETS ALL REQUIREMENTS OF THE CANADIAN INTERFERENCE...
... been tested and found energy which can radiate VESA State LED Indicator Power Consumption radio frequency energy and, if not installed Normal operation Power Saving Alternative 2 ON (Active) Sleep (typ.) Switch Off White White Blinking 232E2< 32 W (typ.) 232EL2< 22.9 W (typ.) < 0.5 W (typ.) < 0.5 W (typ.) and used in accordance with the instructions, may result in use for help. THIS CLASS B DIGITAL APPARATUS MEETS ALL REQUIREMENTS OF THE CANADIAN INTERFERENCE...

User manual
Page 33
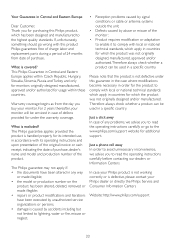
...; Reception problems caused by signal conditions or cable or antenna systems outside the unit; • Defects caused by abuse or misuse of the monitor ; • Product requires modification or adaptation to enable it to comply with local or national technical standards, which apply in countries for additional support before contacting the Philips helpdesk: • Philips type number • Philips serial number •...
...; Reception problems caused by signal conditions or cable or antenna systems outside the unit; • Defects caused by abuse or misuse of the monitor ; • Product requires modification or adaptation to enable it to comply with local or national technical standards, which apply in countries for additional support before contacting the Philips helpdesk: • Philips type number • Philips serial number •...
User manual
Page 35
... product Philips guarantees free of charge labor and replacement parts during a period of 24 months from the day you buy your monitor will be serviced in case of defects provided for its operating instructions and upon presentation of the original invoice or cash receipt, indicating the date of purchase, dealer's name and model and production number of the monitor ; •...
... product Philips guarantees free of charge labor and replacement parts during a period of 24 months from the day you buy your monitor will be serviced in case of defects provided for its operating instructions and upon presentation of the original invoice or cash receipt, indicating the date of purchase, dealer's name and model and production number of the monitor ; •...

User manual
Page 40
...WARRANTY (Computer Monitor) Click here to high standards and deliver high-quality performance, ease of use and ease of charge. If you have any difficulties while installing or using this Philips monitor. Should you encounter any problems with your monitor within the ... been sent to original specifications unit within five working days, free of installation. All Philips monitors are designed and manufactured to access the Warranty Registration Card. Two Years Free Labor / Two Years Free Service on Parts / One Year Exchange* *Product will repair it after service hours until 20:00)...
...WARRANTY (Computer Monitor) Click here to high standards and deliver high-quality performance, ease of use and ease of charge. If you have any difficulties while installing or using this Philips monitor. Should you encounter any problems with your monitor within the ... been sent to original specifications unit within five working days, free of installation. All Philips monitors are designed and manufactured to access the Warranty Registration Card. Two Years Free Labor / Two Years Free Service on Parts / One Year Exchange* *Product will repair it after service hours until 20:00)...

User manual
Page 44
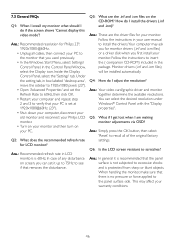
... refer to the Quick Set-Up Guide). • Check to the ON position. If yes, repair or replace the cable. • The Energy Saving feature may be corrected by a user. If the problem still persists after you can be activated Screen says Note The Auto Function is not applicable in VGA-Analog mode. Common Problems No Picture (Power LED not lit) • Make sure the power cord is plugged into the power outlet and into...
... refer to the Quick Set-Up Guide). • Check to the ON position. If yes, repair or replace the cable. • The Energy Saving feature may be corrected by a user. If the problem still persists after you can be activated Screen says Note The Auto Function is not applicable in VGA-Analog mode. Common Problems No Picture (Power LED not lit) • Make sure the power cord is plugged into the power outlet and into...

User manual
Page 45
...-image" or "ghost image" symptoms will display unchanging static content. • Severe" burn-in ", also known as monitor's recommended screen native resolution. 43 Screen Display. Horizontal flicker appears • Adjust the image using the "Auto" function in OSD Main Controls. • Eliminate the vertical bars using the power LED Setup in VGA mode. "Burn-in", "afterimaging", or "ghost imaging" is fuzzy or blurred. • Set the PC's display resolution to the Consumer Information Centers list and contact Philips customer service...
...-image" or "ghost image" symptoms will display unchanging static content. • Severe" burn-in ", also known as monitor's recommended screen native resolution. 43 Screen Display. Horizontal flicker appears • Adjust the image using the "Auto" function in OSD Main Controls. • Eliminate the vertical bars using the power LED Setup in VGA mode. "Burn-in", "afterimaging", or "ghost imaging" is fuzzy or blurred. • Set the PC's display resolution to the Consumer Information Centers list and contact Philips customer service...

User manual
Page 46
... partial information is installed. Remove SmartControl Lite and re-install it is still not working, we are sorry that the graphic adaptor is not compatible with the monitor power off or disconnected. 7.2 SmartControl Lite FAQs Q1. After installing SmartControl Lite, when clicking on OS, such as service pack or patch • Run Windows Update and updated monitor and/or video driver • Windows was booted with...
... partial information is installed. Remove SmartControl Lite and re-install it is still not working, we are sorry that the graphic adaptor is not compatible with the monitor power off or disconnected. 7.2 SmartControl Lite FAQs Q1. After installing SmartControl Lite, when clicking on OS, such as service pack or patch • Run Windows Update and updated monitor and/or video driver • Windows was booted with...
User manual
Page 48
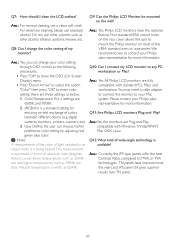
... the OK button, then select 'Reset' to scratches? When handling the monitor, make sure that removes the disturbance. Q6: Is the LCD screen resistant to recall all cables, then connect your monitor. Ans.: Recommended refresh rate in this video mode'? Q3: What are the driver files for LCD monitor? Q4: How do I install the drivers (.inf and .icm)? Inside the Display Control Panel, select the 'Settings' tab. This may ask you for Philips 23...
... the OK button, then select 'Reset' to scratches? When handling the monitor, make sure that removes the disturbance. Q6: Is the LCD screen resistant to recall all cables, then connect your monitor. Ans.: Recommended refresh rate in this video mode'? Q3: What are the driver files for LCD monitor? Q4: How do I install the drivers (.inf and .icm)? Inside the Display Control Panel, select the 'Settings' tab. This may ask you for Philips 23...
User manual
Page 49
... normal cleaning, use isopropyl alcohol. Color Temperature;The 2 settings are Plug-and-Play compatible with standard PCs, Macs and workstations.You may need a cable adapter to connect the monitor to contact your color setting through OSD control as the following procedures, • Press "OK" to show the OSD (On Screen Display) menu • Press "Down Arrow" to select the option "Color" then press "OK" to mount the Philips monitor on most of wide-angle technology...
... normal cleaning, use isopropyl alcohol. Color Temperature;The 2 settings are Plug-and-Play compatible with standard PCs, Macs and workstations.You may need a cable adapter to connect the monitor to contact your color setting through OSD control as the following procedures, • Press "OK" to show the OSD (On Screen Display) menu • Press "Down Arrow" to select the option "Color" then press "OK" to mount the Philips monitor on most of wide-angle technology...

Leaflet
Page 2
....gov Easy picture format control Philips easy picture format control on a different screen size. LED technology White LED's are used across the range. This vibrant and sharp image will increase the contrast with the highest contrast and most vibrant images. Responding to your display with an enhanced viewing experience. 16:9 widescreen aspect ratio An aspect ratio is an expression of LCD backlight, resulting in lamps has been achieved. Lead-free materials...
....gov Easy picture format control Philips easy picture format control on a different screen size. LED technology White LED's are used across the range. This vibrant and sharp image will increase the contrast with the highest contrast and most vibrant images. Responding to your display with an enhanced viewing experience. 16:9 widescreen aspect ratio An aspect ratio is an expression of LCD backlight, resulting in lamps has been achieved. Lead-free materials...
Leaflet
Page 3
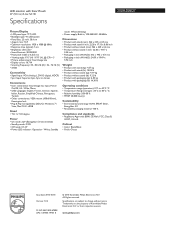
... Scanning Frequency: 30 - 83 kHz (H) / 56 - 76 Hz (V) • sRGB Connectivity • Signal Input: VGA (Analog ), DVI-D (digital, HDCP) • Sync Input: Separate Sync, Sync on Green Convenience • User convenience: SmartImage lite, Input, Power On/Off, 4:3 / Wide, Menu • OSD Languages: English, French, German, Spanish, Italian, Russian, Simplified Chinese, Portuguese, Turkish • Other convenience: VESA mount (100x100mm), Kensington lock • Plug & Play Compatibility: DDC/CI, Windows 7 / Vista, Mac OS X, sRGB Stand • Tilt: -5/ +20 degree Power • On mode: 22...
... Scanning Frequency: 30 - 83 kHz (H) / 56 - 76 Hz (V) • sRGB Connectivity • Signal Input: VGA (Analog ), DVI-D (digital, HDCP) • Sync Input: Separate Sync, Sync on Green Convenience • User convenience: SmartImage lite, Input, Power On/Off, 4:3 / Wide, Menu • OSD Languages: English, French, German, Spanish, Italian, Russian, Simplified Chinese, Portuguese, Turkish • Other convenience: VESA mount (100x100mm), Kensington lock • Plug & Play Compatibility: DDC/CI, Windows 7 / Vista, Mac OS X, sRGB Stand • Tilt: -5/ +20 degree Power • On mode: 22...


