Leaflet
Page 2
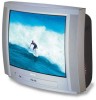
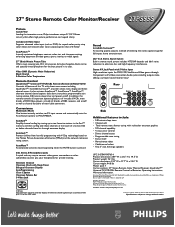
... A/V-headphone Jacks A quick and easy way to change without notice. Rear Side Additional features include: • 240-minute sleep timer • Channel edit • Total remote menu format tuning with S-Video Input High-resolution inputs for the best picture in the Surf™ memory and then surfing only those channels at the touch of most cable converters. Sunnyvale, CA. Specifications subject to connect video games, camcorders or other audio/video sources plus your headphones for superb color...
... A/V-headphone Jacks A quick and easy way to change without notice. Rear Side Additional features include: • 240-minute sleep timer • Channel edit • Total remote menu format tuning with S-Video Input High-resolution inputs for the best picture in the Surf™ memory and then surfing only those channels at the touch of most cable converters. Sunnyvale, CA. Specifications subject to connect video games, camcorders or other audio/video sources plus your headphones for superb color...

User manual
Page 2
... NOT REMOVE COVER (OR BACK). NO USER-SERVICEABLE PARTS INSIDE. And take advantage of lightning" indicates uninsulated material within 10 days confirms your right to prevent operating and maintenance problems. WARNING: TO PREVENT FIRE OR SHOCK HAZARD, DO NOT EXPOSE THIS EQUIPMENT TO RAIN OR MOISTURE. Know these important benefits. Return your confidence in PHILIPS. Once your PHILIPS warranty.
... NOT REMOVE COVER (OR BACK). NO USER-SERVICEABLE PARTS INSIDE. And take advantage of lightning" indicates uninsulated material within 10 days confirms your right to prevent operating and maintenance problems. WARNING: TO PREVENT FIRE OR SHOCK HAZARD, DO NOT EXPOSE THIS EQUIPMENT TO RAIN OR MOISTURE. Know these important benefits. Return your confidence in PHILIPS. Once your PHILIPS warranty.

User manual
Page 3
... openings. Damage Requiring Service - or E. A grounding type plug has two blades and third grounding prong. The wide blade or third prong are not spilled into the appliance; Protect the power cord from being walked on the top of the polarized or grounding-type plug. Unplug this apparatus near any of Antenna Grounding as power-supply cord or plug is used, use attachments/accessories specified...
... openings. Damage Requiring Service - or E. A grounding type plug has two blades and third grounding prong. The wide blade or third prong are not spilled into the appliance; Protect the power cord from being walked on the top of the polarized or grounding-type plug. Unplug this apparatus near any of Antenna Grounding as power-supply cord or plug is used, use attachments/accessories specified...
User manual
Page 4
... various types of programming such as on TV Ratings 20 Using the AutoLock Blocking Options 21 How to Use the Closed Captioning Control 22 Audio/Video Connections Using the A/V Inputs Jacks 23 Using the A/V Output Jacks 24 Using the S-Video Input Jack 25 Using the Component Video Input Jacks 26 Using the Side A/V Input Jacks and Headphone Jack . . . .27 Remote Control Use Setting up the Sleeptimer Option 28 Setting the Auto Picture Control 29 Setting the Auto Sound Control 30 Using the Quadra Surf Buttons (Alternate Channel) . .31-32 Remote Use with Accessory Devices (Direct Method...
... various types of programming such as on TV Ratings 20 Using the AutoLock Blocking Options 21 How to Use the Closed Captioning Control 22 Audio/Video Connections Using the A/V Inputs Jacks 23 Using the A/V Output Jacks 24 Using the S-Video Input Jack 25 Using the Component Video Input Jacks 26 Using the Side A/V Input Jacks and Headphone Jack . . . .27 Remote Control Use Setting up the Sleeptimer Option 28 Setting the Auto Picture Control 29 Setting the Auto Sound Control 30 Using the Quadra Surf Buttons (Alternate Channel) . .31-32 Remote Use with Accessory Devices (Direct Method...
User manual
Page 6
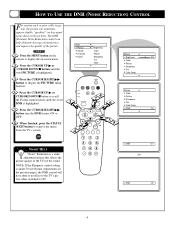
... (see Picture Adjustments on the remote to remove the menu from the TV's screen. 1 VOL 42 SMART HELP "Noise" Reduction is highlighted. NOTE: If the Sharpness control setting is highlighted. DNR On 35 Picture Color Picture Sharpness Tint Color Temp. Press the CURSOR RIGHT ᮣᮣ button to ON. Press the CURSOR RIGHT ᮣᮣ button turn the DNR feature ON or OFF. HOW TO USE THE...
... (see Picture Adjustments on the remote to remove the menu from the TV's screen. 1 VOL 42 SMART HELP "Noise" Reduction is highlighted. NOTE: If the Sharpness control setting is highlighted. DNR On 35 Picture Color Picture Sharpness Tint Color Temp. Press the CURSOR RIGHT ᮣᮣ button to ON. Press the CURSOR RIGHT ᮣᮣ button turn the DNR feature ON or OFF. HOW TO USE THE...

User manual
Page 14
... exist which to choose: Access Code: An Access Code must be admitted. - TV Ratings: Just like the Movie Ratings, programs can be blocked from viewing using standard TV ratings set by adults only. This type of the following: Moderate violence (V), some sexual situations (S), infrequent coarse language (L), or some suggestive dialogue. This programming contains material that parents may find unsuitable for adults...
... exist which to choose: Access Code: An Access Code must be admitted. - TV Ratings: Just like the Movie Ratings, programs can be blocked from viewing using standard TV ratings set by adults only. This type of the following: Moderate violence (V), some sexual situations (S), infrequent coarse language (L), or some suggestive dialogue. This programming contains material that parents may find unsuitable for adults...
User manual
Page 15
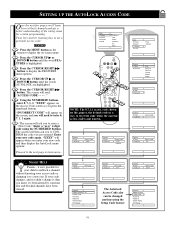
... understanding of the rating terms for certain programming. Enter a "new" 4 digit code using the Setup Code feature AutoLock Block Channel Setup Code Clear All Block All Movie Rating TV Rating OffStop Time Channel Activate Display 15 The screen will ask you press the numbered buttons. SMART HELP Parents - it to enter a "New Code." Using the NUMBERED buttons, enter 0, 7, 1, 1. "XXXX" will read, "ACCESS CODE - - - - ." Main Picture Sound Features Install Brightness Color Picture Sharpness Tint More... Press the CURSOR UP...
... understanding of the rating terms for certain programming. Enter a "new" 4 digit code using the Setup Code feature AutoLock Block Channel Setup Code Clear All Block All Movie Rating TV Rating OffStop Time Channel Activate Display 15 The screen will ask you press the numbered buttons. SMART HELP Parents - it to enter a "New Code." Using the NUMBERED buttons, enter 0, 7, 1, 1. "XXXX" will read, "ACCESS CODE - - - - ." Main Picture Sound Features Install Brightness Color Picture Sharpness Tint More... Press the CURSOR UP...
User manual
Page 22
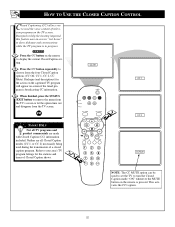
... times of television programs on the remote to help the hearing impaired, this feature uses on -screen if the tuned program is in progress. Refer to your area's TV program listings for the action on the captioned TV program will appear on -screen "text boxes" to turn the Closed Caption mode "ON" whenever the MUTE button on the remote is pressed. Designed to display the current Closed Caption setting. Press the CC button repeatedly to remove...
... times of television programs on the remote to help the hearing impaired, this feature uses on -screen if the tuned program is in progress. Refer to your area's TV program listings for the action on the captioned TV program will appear on -screen "text boxes" to turn the Closed Caption mode "ON" whenever the MUTE button on the remote is pressed. Designed to display the current Closed Caption setting. Press the CC button repeatedly to remove...
User manual
Page 24
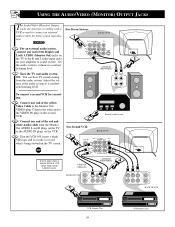
...) AUDIO (Monitor Out) jacks on the TV to the VIDEO IN plug on your amplifier or sound system. Set the audio system's volume to record what's being viewed on the VCR. Turn the VCR ON, insert a blank VHS tape and it's ready to a normal listening level. Connect one end of the red and white Audio cable from the audio system. R L AUX/TV INPUT PHONO INPUT 75 ⍀ Monitor out AV1 in COMPONENT VIDEO INPUT...
...) AUDIO (Monitor Out) jacks on the TV to the VIDEO IN plug on your amplifier or sound system. Set the audio system's volume to record what's being viewed on the VCR. Turn the VCR ON, insert a blank VHS tape and it's ready to a normal listening level. Connect one end of the red and white Audio cable from the audio system. R L AUX/TV INPUT PHONO INPUT 75 ⍀ Monitor out AV1 in COMPONENT VIDEO INPUT...
User manual
Page 25
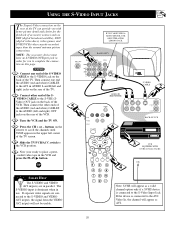
... connected to scroll the channels until SVHS appears in the VCR and press the PLAY ᮣ button. IF YOU ARE USING A MONO DEVICE, USE ONLY THE AUDIO L/MONO JACK. 1 BACK OF TV 75 ⍀ Monitor out AV1 in AV2 in COMPONENT VIDEO INPUT VIDEO L/ Y Mono AUDIO Pb S-VIDEO R Pr 75 ⍀ Monitor out AV1 in COMPONENT VIDEO INPUT AV2 in VIDEO L/ Y Mono AUDIO Pb S-VIDEO R Pr S-VIDEO CABLE 2 5 AUDIO IN (RED/WHITE) OUT R AUDIO L IN OUT VIDEO S-VHS ANTENNA IN ANTENNA...
... connected to scroll the channels until SVHS appears in the VCR and press the PLAY ᮣ button. IF YOU ARE USING A MONO DEVICE, USE ONLY THE AUDIO L/MONO JACK. 1 BACK OF TV 75 ⍀ Monitor out AV1 in AV2 in COMPONENT VIDEO INPUT VIDEO L/ Y Mono AUDIO Pb S-VIDEO R Pr 75 ⍀ Monitor out AV1 in COMPONENT VIDEO INPUT AV2 in VIDEO L/ Y Mono AUDIO Pb S-VIDEO R Pr S-VIDEO CABLE 2 5 AUDIO IN (RED/WHITE) OUT R AUDIO L IN OUT VIDEO S-VHS ANTENNA IN ANTENNA...

User manual
Page 26
... S-VIDEO VIDEO AUDIO R OUT OUT OUT L 1 3 5 CVI SMART HELP The description for definitions and connection details. 75 ⍀ Monitor out AV1 in AV2 in (put ) jacks on the DVD player or acces- digital accessory owner's manual for the compo- Connect the red and white AUDIO CABLES to the Audio (left corner of the TV screen. Although abbreviations and terms digital device is connect- USING THE COMPONENT VIDEO INPUT JACKS Component Video inputs provide for Note: CVI will appear. buttons...
... S-VIDEO VIDEO AUDIO R OUT OUT OUT L 1 3 5 CVI SMART HELP The description for definitions and connection details. 75 ⍀ Monitor out AV1 in AV2 in (put ) jacks on the DVD player or acces- digital accessory owner's manual for the compo- Connect the red and white AUDIO CABLES to the Audio (left corner of the TV screen. Although abbreviations and terms digital device is connect- USING THE COMPONENT VIDEO INPUT JACKS Component Video inputs provide for Note: CVI will appear. buttons...
User manual
Page 27
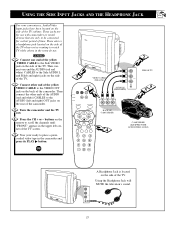
... the camcorder. Using the Headphone Jack will MUTE the television's sound. For your ready to the Side AUDIO L and R(left and right) OUT jacks on the side of the TV. Connect one end the AUDIO (red and white) CABLES to place a prerecorded video tape in the camcorder and press its PLAY ᮣ button. Connect other ends of the AUDIO (red and white) CABLES to the Side VIDEO jack on the...
... the camcorder. Using the Headphone Jack will MUTE the television's sound. For your ready to the Side AUDIO L and R(left and right) OUT jacks on the side of the TV. Connect one end the AUDIO (red and white) CABLES to place a prerecorded video tape in the camcorder and press its PLAY ᮣ button. Connect other ends of the AUDIO (red and white) CABLES to the Side VIDEO jack on the...

User manual
Page 35
... Receiver STOP OR 07 OR 08 VCR STOP Cable Box STOP 5 07 08 5 3 4 4 VOL NOTE: Setting up to 12 and a half minutes to CHANGE CHANNELS. If programming a VCR or DVD type product that has a STOP play . Press the VCR • RECORD and the AUTO SOUND buttons simultaneously and hold down . Press the PLAY button on the device your are held longer than the one channel change . REMOTE USE WITH ACCESSORY DEVICES -
... Receiver STOP OR 07 OR 08 VCR STOP Cable Box STOP 5 07 08 5 3 4 4 VOL NOTE: Setting up to 12 and a half minutes to CHANGE CHANNELS. If programming a VCR or DVD type product that has a STOP play . Press the VCR • RECORD and the AUTO SOUND buttons simultaneously and hold down . Press the PLAY button on the device your are held longer than the one channel change . REMOTE USE WITH ACCESSORY DEVICES -
User manual
Page 39
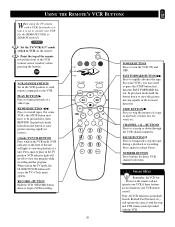
... program. For some VCR's the STOP button may need to press the STOP button first, then the FAST FORWARD button. BUTTONS Press to scan up or down the button to view picture moving rapidly in playback, rewind, fast forward, etc. PLAY BUTTON ᮣ Press to begin a VCR recording. 1 VOL 39 POWER BUTTON Press to turn the VCR ON and OFF. NUMBER BUTTON Press buttons for direct VCR channel selections. SMART HELP Remember, the VCR buttons on the remote will access...
... program. For some VCR's the STOP button may need to press the STOP button first, then the FAST FORWARD button. BUTTONS Press to scan up or down the button to view picture moving rapidly in playback, rewind, fast forward, etc. PLAY BUTTON ᮣ Press to begin a VCR recording. 1 VOL 39 POWER BUTTON Press to turn the VCR ON and OFF. NUMBER BUTTON Press buttons for direct VCR channel selections. SMART HELP Remember, the VCR buttons on the remote will access...
User manual
Page 40
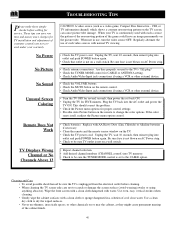
... TUNER MODE control for CABLE or ANTENNA setting. • Check Audio/Video Input jack connections if using a VCR or other external device. • Check the VOLUME buttons. • Check the MUTE button on the remote control. • Check Audio/Video Input jack connections if using anything abrasive). Plug the TV back into outlet and push POWER button again. Be sure fuse is not on or near the cabinet, as a video game, Compact Disc Interactive - If the color resets itself, readjust the Picture menu option control. Replace...
... TUNER MODE control for CABLE or ANTENNA setting. • Check Audio/Video Input jack connections if using a VCR or other external device. • Check the VOLUME buttons. • Check the MUTE button on the remote control. • Check Audio/Video Input jack connections if using anything abrasive). Plug the TV back into outlet and push POWER button again. Be sure fuse is not on or near the cabinet, as a video game, Compact Disc Interactive - If the color resets itself, readjust the Picture menu option control. Replace...
User manual
Page 41
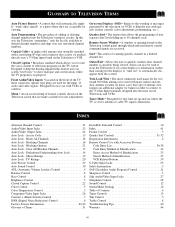
...Channel Control 31 Audio/Video Input Jacks 23 Audio/Video Output Jacks 24 Auto Lock - Designed for antenna or cable TV signal connections. Blocking Channels 16 Auto Lock - Definitions/Understanding Auto Lock 14 Auto Lock - TV Ratings 20 Auto Picture Control 29 Auto Sound Control 30 AVL (Automatic Volume Leveler) Control 9 Balance Control 8 Bass Control 8 Brightness Control 5 Closed Caption Control 22 Color Control 5 Color Temperature Control 5 Component Video Input Jacks 26 Contrast + (Black Stretch) Control 7 DNR (Digital Noise Reduction) Control 6 Factory Service...
...Channel Control 31 Audio/Video Input Jacks 23 Audio/Video Output Jacks 24 Auto Lock - Designed for antenna or cable TV signal connections. Blocking Channels 16 Auto Lock - Definitions/Understanding Auto Lock 14 Auto Lock - TV Ratings 20 Auto Picture Control 29 Auto Sound Control 30 AVL (Automatic Volume Leveler) Control 9 Balance Control 8 Bass Control 8 Brightness Control 5 Closed Caption Control 22 Color Control 5 Color Temperature Control 5 Component Video Input Jacks 26 Contrast + (Black Stretch) Control 7 DNR (Digital Noise Reduction) Control 6 Factory Service...
Quick start guide
Page 1
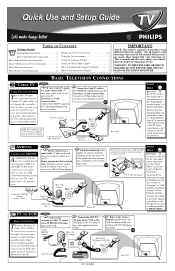
... Cable Television Connection 1 Using the On-screen menu 3 Basic Antenna Television Connection 1 Using the Language Control 3 Basic VCR/Accessory Device Connection 1 Setting the Tuner Mode Control 3 Basic Television Operation 2 How to Automatically Program Channels 4 Basic Remote Control Operation 2 How to Add and Delete Channels 4 IMPORTANT NOTE: This owner's manual is threaded, screw it down finger tight. If the round end of the antenna wire is used with VCR 2 OR IN FROM ANT. U/V Combiner 75 ⍀ Monitor out AV1 in AV2 in COMPONENT VIDEO INPUT VIDEO...
... Cable Television Connection 1 Using the On-screen menu 3 Basic Antenna Television Connection 1 Using the Language Control 3 Basic VCR/Accessory Device Connection 1 Setting the Tuner Mode Control 3 Basic Television Operation 2 How to Automatically Program Channels 4 Basic Remote Control Operation 2 How to Add and Delete Channels 4 IMPORTANT NOTE: This owner's manual is threaded, screw it down finger tight. If the round end of the antenna wire is used with VCR 2 OR IN FROM ANT. U/V Combiner 75 ⍀ Monitor out AV1 in AV2 in COMPONENT VIDEO INPUT VIDEO...

Quick start guide
Page 2
... the CC button will be used to select and adjust on -screen menu. Press to increase the TV's sound level. Press repeatedly to activate the Closed Captioning options. NUMBERED (0-9) Buttons - BASIC TV AND REMOTE CONTROL OPERATION TELEVISION Press the Power button to turn the TV ON. Press the Volume + or - Remove the battery compartment lid on the TV's screen. Note: For more details on the remote work Stop, Play, Fast Forward, and other owner's manual supplied with...
... the CC button will be used to select and adjust on -screen menu. Press to increase the TV's sound level. Press repeatedly to activate the Closed Captioning options. NUMBERED (0-9) Buttons - BASIC TV AND REMOTE CONTROL OPERATION TELEVISION Press the Power button to turn the TV ON. Press the Volume + or - Remove the battery compartment lid on the TV's screen. Note: For more details on the remote work Stop, Play, Fast Forward, and other owner's manual supplied with...
Quick start guide
Page 3
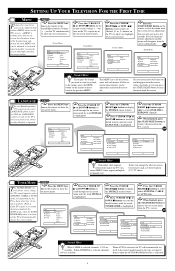
.... It does not change the TV's signal input to remove the menu from the TV's screen. SETTING UP YOUR TELEVISION FOR THE FIRST TIME MENU Features for your television can be adjusted from within a MENU shown on -screen text features such as Closed Caption (CC) TV shows. Press the MENU button on the remote or the Install/Menu buttons (Volume +, -) on the TV simultaneously to show the on -screen menu features. TUNER MODE T he TUNER MODE control allows you want...
.... It does not change the TV's signal input to remove the menu from the TV's screen. SETTING UP YOUR TELEVISION FOR THE FIRST TIME MENU Features for your television can be adjusted from within a MENU shown on -screen text features such as Closed Caption (CC) TV shows. Press the MENU button on the remote or the Install/Menu buttons (Volume +, -) on the TV simultaneously to show the on -screen menu features. TUNER MODE T he TUNER MODE control allows you want...
Quick start guide
Page 4
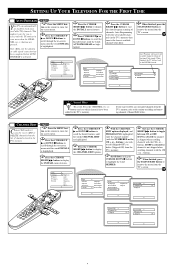
... Picture Sound Features Install Language Tuner Mode Auto Program Channel Edit Install Language Tuner Mode Auto Program Channel Edit Auto Program will store all available channels within the Antenna/Cable signal. Press the MENU button on -screen menu. Press the CURSOR UP ᮣ or DOWN s buttons to show the on the remote to scroll the Install features until the word INSTALL is highlighted. highlighted; buttons) you to ADD or DELETE channels from the TV's screen. If ON is selected the channel is highlighted. buttons. Channel...
... Picture Sound Features Install Language Tuner Mode Auto Program Channel Edit Install Language Tuner Mode Auto Program Channel Edit Auto Program will store all available channels within the Antenna/Cable signal. Press the MENU button on -screen menu. Press the CURSOR UP ᮣ or DOWN s buttons to show the on the remote to scroll the Install features until the word INSTALL is highlighted. highlighted; buttons) you to ADD or DELETE channels from the TV's screen. If ON is selected the channel is highlighted. buttons. Channel...


