
User manual
Page 2
... satisfaction. For the safety of everyone in a PHILIPS product. CAUTION: To prevent electric shock, match wide blade of plug to accessories from the manufacturer - directly from our convenient home shopping network. Dear PHILIPS product owner: Thank you for your confidence in PHILIPS.You've selected one of the most comprehensive warranties and outstanding service networks in the industry.What's more, your date...
... satisfaction. For the safety of everyone in a PHILIPS product. CAUTION: To prevent electric shock, match wide blade of plug to accessories from the manufacturer - directly from our convenient home shopping network. Dear PHILIPS product owner: Thank you for your confidence in PHILIPS.You've selected one of the most comprehensive warranties and outstanding service networks in the industry.What's more, your date...

User manual
Page 3
...particu- An outdoor antenna should be connected to the grounding system of the building, as close to the point of cable entry as power-supply cord or plug is used for long periods of Antenna Grounding as recommended by qualified service personnel when: A. ...operate normally or exhibits a marked change in accordance with + and - National Electric Code GROUND CLAMP ANTENNA LEAD IN WIRE ANTENNA DISCHARGE UNIT (NEC SECTION 810-20) ELECTRIC SERVICE EQUIPMENT 3 GROUNDING CONDUCTORS (NEC SECTION 810-21) GROUND CLAMPS POWER SERVICE GROUNDING ELECTRODE SYSTEM (NEC ART 250, PART...
...particu- An outdoor antenna should be connected to the grounding system of the building, as close to the point of cable entry as power-supply cord or plug is used for long periods of Antenna Grounding as recommended by qualified service personnel when: A. ...operate normally or exhibits a marked change in accordance with + and - National Electric Code GROUND CLAMP ANTENNA LEAD IN WIRE ANTENNA DISCHARGE UNIT (NEC SECTION 810-20) ELECTRIC SERVICE EQUIPMENT 3 GROUNDING CONDUCTORS (NEC SECTION 810-21) GROUND CLAMPS POWER SERVICE GROUNDING ELECTRODE SYSTEM (NEC ART 250, PART...

User manual
Page 4
... through the onscreen Sound menu. The four factory-set controls (Speech, Movie, Music, and Multimedia) enable you to use the Format Controls 20 Close Captioning 21 Sleeptimer 21 AutoPicture 22 AutoSound 22 Quadrasurf 23 Alternate Channel 24 REMOTE CONTROL RELATED FEATURES Code-Entry for Accessories 25 Search Method for Accessories 26 Remote Control Direct Entry Codes for various types of programming, such as VCRs, DVD players, cable converters, and satellite receivers. Channel Edit makes it...
... through the onscreen Sound menu. The four factory-set controls (Speech, Movie, Music, and Multimedia) enable you to use the Format Controls 20 Close Captioning 21 Sleeptimer 21 AutoPicture 22 AutoSound 22 Quadrasurf 23 Alternate Channel 24 REMOTE CONTROL RELATED FEATURES Code-Entry for Accessories 25 Search Method for Accessories 26 Remote Control Direct Entry Codes for various types of programming, such as VCRs, DVD players, cable converters, and satellite receivers. Channel Edit makes it...

User manual
Page 6
...TO USE THE TUNER MODE CONTROL T he TUNER MODE control allows you to change the TV's input signal to either Antenna, Cable, or Auto mode. 6 When finished, press the STATUS /EXIT button to remove the onscreen menu from the TV's screen. Main Picture Sound Features Install Brightness Color Picture Sharpness Tint More... 2 1 46 3 VOL 5 2 4 Main Picture Sound Features Install Language Tuner Mode Auto Program Channel Edit Fine Tune Install Language Tuner Mode Auto Program Channel Edit Fine Tune English Antenna OR Install Language Tuner Mode Auto Program Channel Edit Fine Tune English...
...TO USE THE TUNER MODE CONTROL T he TUNER MODE control allows you to change the TV's input signal to either Antenna, Cable, or Auto mode. 6 When finished, press the STATUS /EXIT button to remove the onscreen menu from the TV's screen. Main Picture Sound Features Install Brightness Color Picture Sharpness Tint More... 2 1 46 3 VOL 5 2 4 Main Picture Sound Features Install Language Tuner Mode Auto Program Channel Edit Fine Tune Install Language Tuner Mode Auto Program Channel Edit Fine Tune English Antenna OR Install Language Tuner Mode Auto Program Channel Edit Fine Tune English...

User manual
Page 7
...the MENU button on the type of channels. Main Picture Sound Features Install Brightness Color Picture Sharpness Tint More... 2 1 46 2 VOL 3 4 5 Main Picture Sound Features Install Language Tuner Mode Auto Program Channel Edit Fine Tune Install Language Tuner Mode Auto Program Channel Edit Fine Tune Auto Program Channel 12 Auto Program Channel 13 Auto Program Channel 14 HELPFUL HINTS When CABLE is selected, channels 2-69 are pressed. Note: Make sure the antenna or cable signal connection has been completed before AUTO PROGRAM is activated. 7 When ANTENNA is selected...
...the MENU button on the type of channels. Main Picture Sound Features Install Brightness Color Picture Sharpness Tint More... 2 1 46 2 VOL 3 4 5 Main Picture Sound Features Install Language Tuner Mode Auto Program Channel Edit Fine Tune Install Language Tuner Mode Auto Program Channel Edit Fine Tune Auto Program Channel 12 Auto Program Channel 13 Auto Program Channel 14 HELPFUL HINTS When CABLE is selected, channels 2-69 are pressed. Note: Make sure the antenna or cable signal connection has been completed before AUTO PROGRAM is activated. 7 When ANTENNA is selected...

User manual
Page 11
... Picture Sound Features Install Brightness Color Picture Sharpness Tint More... 1 6 5 2 VOL 4 3 5 Main Picture Sound Features Install Timer Rotation AutoLock Active Control Digi. Demo Features Timer Rotation 0 AutoLock Active Control Digi. With Demo Mode On, a split screen demo will be very minimal. 6 Press the STATUS/EXIT button to remove the menu from the screen. Note: You can also turn the Digital Picture Demo On or Off by adjusting the screen in a clockwise or counterclockwise direction. 1 Press the MENU button on the remote control...
... Picture Sound Features Install Brightness Color Picture Sharpness Tint More... 1 6 5 2 VOL 4 3 5 Main Picture Sound Features Install Timer Rotation AutoLock Active Control Digi. Demo Features Timer Rotation 0 AutoLock Active Control Digi. With Demo Mode On, a split screen demo will be very minimal. 6 Press the STATUS/EXIT button to remove the menu from the screen. Note: You can also turn the Digital Picture Demo On or Off by adjusting the screen in a clockwise or counterclockwise direction. 1 Press the MENU button on the remote control...

User manual
Page 12
... q or DOWN u buttons repeatedly to a specific channel when it powers itself On or Off Once or Daily. The TV's clock settings may be sure to the Timer menu. Pic. Start Time: Use the numbered buttons to enter the time you want the TV to turn itself on. 1 Press the MENU button on the remote control to go directly to press "0" and then the hour number for the selected item. The...
... q or DOWN u buttons repeatedly to a specific channel when it powers itself On or Off Once or Daily. The TV's clock settings may be sure to the Timer menu. Pic. Start Time: Use the numbered buttons to enter the time you want the TV to turn itself on. 1 Press the MENU button on the remote control to go directly to press "0" and then the hour number for the selected item. The...

User manual
Page 14
... block individual channels including the A/V inputs. AutoLock™ offers various BLOCKING controls from viewing using standard TV ratings set by adults and therefore may watch. PG-13: Parents Strongly Cautioned - After an access code has been programmed, you to be viewed by their parents. PG: Parental Guidance Suggested - Channel Block - UNDERSTANDING AUTOLOCK™ CONTROLS T he AutoLock™ feature is specifically designed to block ALL channels and A/V inputs at...
... block individual channels including the A/V inputs. AutoLock™ offers various BLOCKING controls from viewing using standard TV ratings set by adults and therefore may watch. PG-13: Parents Strongly Cautioned - After an access code has been programmed, you to be viewed by their parents. PG: Parental Guidance Suggested - Channel Block - UNDERSTANDING AUTOLOCK™ CONTROLS T he AutoLock™ feature is specifically designed to block ALL channels and A/V inputs at...

User manual
Page 16
... channels or the A/V Inputs you want to block out or censor. When ON is selected, press the CURSOR RIGHT r button to remove the menu from the screen. BLOCK/CLEAR ALL CHANNELS AT THE SAME TIME After blocking specific channels there may come a time when you want to block or clear all blocked channels. When On is the factory default and can be used to remove the menu from viewing...
... channels or the A/V Inputs you want to block out or censor. When ON is selected, press the CURSOR RIGHT r button to remove the menu from the screen. BLOCK/CLEAR ALL CHANNELS AT THE SAME TIME After blocking specific channels there may come a time when you want to block or clear all blocked channels. When On is the factory default and can be used to remove the menu from viewing...
User manual
Page 22
... different factory set the Picture Menu Controls will become your current program source or content. 1 Press the AUTO PICTURE button on the remote control. NOTE: The way you choose to set the Sound Menu Controls will be displayed on the screen. 2 Press the AUTO PICTURE button repeatedly to select between the four settings. (Personal, Theatre, Music, or Voice) NOTE: The way you choose to set sound options. 1 Press the AUTO SOUND button on the remote control. The current Auto Picture setting will...
... different factory set the Picture Menu Controls will become your current program source or content. 1 Press the AUTO PICTURE button on the remote control. NOTE: The way you choose to set the Sound Menu Controls will be displayed on the screen. 2 Press the AUTO PICTURE button repeatedly to select between the four settings. (Personal, Theatre, Music, or Voice) NOTE: The way you choose to set sound options. 1 Press the AUTO SOUND button on the remote control. The current Auto Picture setting will...

User manual
Page 26
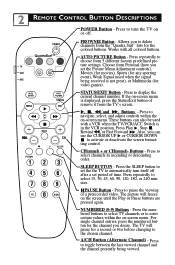
... ACCESSORIES The Search Method of programming your are attempting to program to CHANGE CHANNELS. 5 When the STOP command happens release the two buttons. Please read all other accessory devices. 4 Press the VCR • RECORD and the AUTO SOUND buttons simultaneously and hold down . REMOTE USE - Press the PLAY button. 3 Place the TV/VCR/ACC Mode Switch in the proper position. Or, for Cable Boxes and Satellite Receivers, as...
... ACCESSORIES The Search Method of programming your are attempting to program to CHANGE CHANNELS. 5 When the STOP command happens release the two buttons. Please read all other accessory devices. 4 Press the VCR • RECORD and the AUTO SOUND buttons simultaneously and hold down . REMOTE USE - Press the PLAY button. 3 Place the TV/VCR/ACC Mode Switch in the proper position. Or, for Cable Boxes and Satellite Receivers, as...

User manual
Page 30
... TV power cord. Are they might cause permanent marring of the TV screen • Shopping channel logos and pricing displays-bright and shown constantly or repeatedly in letterbox when viewing a DVD disc • Some DVD Discs are encoded with standard (4:3) aspect ratio. • Video-game images and scoreboards • Television station logos-present a problem if they are set . Remote Does Not Work • Check the batteries. With the DVD Player in direct...
... TV power cord. Are they might cause permanent marring of the TV screen • Shopping channel logos and pricing displays-bright and shown constantly or repeatedly in letterbox when viewing a DVD disc • Some DVD Discs are encoded with standard (4:3) aspect ratio. • Video-game images and scoreboards • Television station logos-present a problem if they are set . Remote Does Not Work • Check the batteries. With the DVD Player in direct...
Quick start guide
Page 4
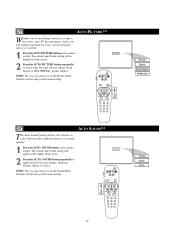
... event), Weak Signal (used with all colored buttons. q, u, s, and r, Buttons - A/CH Button (Alternate Channel) - Works with a VCR when the TV/VCR/ACC Switch is displayed, press the Status/Exit button of remove it from 5 different factory predefined picture settings. Press to select channels in the VCR position. Press repeatedly to turn itself off . Press to choose from the TV's screen. 2 REMOTE CONTROL BUTTON DESCRIPTIONS POWER Button - Press Play q, Stop u, Rewinds, or Fast Forward r, Also, you set period of a prerecorded video.
... event), Weak Signal (used with all colored buttons. q, u, s, and r, Buttons - A/CH Button (Alternate Channel) - Works with a VCR when the TV/VCR/ACC Switch is displayed, press the Status/Exit button of remove it from 5 different factory predefined picture settings. Press to select channels in the VCR position. Press repeatedly to turn itself off . Press to choose from the TV's screen. 2 REMOTE CONTROL BUTTON DESCRIPTIONS POWER Button - Press Play q, Stop u, Rewinds, or Fast Forward r, Also, you set period of a prerecorded video.

Quick start guide
Page 7
..., set the OUTPUT CHANNEL SWITCH on the back of the cable box to the AV1 channel for the cable box signal. Tune the TV to the 75 ohm input on the back of the television. NOTE: Press the CH+ or CH- Once tuned, change channels at the cable box. on the TV remote control to tune to CH 3 or 4. Cable Box (w/Audio/Video Outputs): This connection will supply Stereo sound. 4 Connect the Cable Company supplied cable to the cable signal IN(put) plug...
..., set the OUTPUT CHANNEL SWITCH on the back of the cable box to the AV1 channel for the cable box signal. Tune the TV to the 75 ohm input on the back of the television. NOTE: Press the CH+ or CH- Once tuned, change channels at the cable box. on the TV remote control to tune to CH 3 or 4. Cable Box (w/Audio/Video Outputs): This connection will supply Stereo sound. 4 Connect the Cable Company supplied cable to the cable signal IN(put) plug...
Quick start guide
Page 8
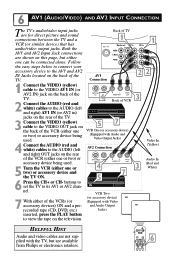
... CH+ or CH- VOL Video Output Jacks) 4 Connect the AUDIO (red and white) cables to the AUDIO (left and right) AV1 IN (or AV2 in) Back of VCR jacks on the rear of the AV1 TV. buttons to set the TV to the VIDEO OUT jack on the television. 6 AV1 (AUDIO/VIDEO) AND AV2 INPUT CONNECTION The TV's audio/video input jacks are not sup- Connection 1 Connect the VIDEO (yellow) cable to the VIDEO AV1 IN (or AV2 IN...
... CH+ or CH- VOL Video Output Jacks) 4 Connect the AUDIO (red and white) cables to the AUDIO (left and right) AV1 IN (or AV2 in) Back of VCR jacks on the rear of the AV1 TV. buttons to set the TV to the VIDEO OUT jack on the television. 6 AV1 (AUDIO/VIDEO) AND AV2 INPUT CONNECTION The TV's audio/video input jacks are not sup- Connection 1 Connect the VIDEO (yellow) cable to the VIDEO AV1 IN (or AV2 IN...

Quick start guide
Page 10
... Red) S-VIDEO VIDEO AUDIO R OUT OUT OUT L Audio Cables (Red & White) 3 5 Accessory Device Equipped with DVD players. buttons to scroll the available channels until CVI appears in Video Input jack. When a Component Video Device is best not to have a video signal connected to the AV1 in the upper left and right) output jacks on the DVD Player. When using composite video or S-Video connections). 1 Connect the Component (Y, Pb, Pr) Video OUT jacks from the DVD player (or similar device) to your DVD or digital accessory owner's manual for...
... Red) S-VIDEO VIDEO AUDIO R OUT OUT OUT L Audio Cables (Red & White) 3 5 Accessory Device Equipped with DVD players. buttons to scroll the available channels until CVI appears in Video Input jack. When a Component Video Device is best not to have a video signal connected to the AV1 in the upper left and right) output jacks on the DVD Player. When using composite video or S-Video connections). 1 Connect the Component (Y, Pb, Pr) Video OUT jacks from the DVD player (or similar device) to your DVD or digital accessory owner's manual for...
Quick start guide
Page 12
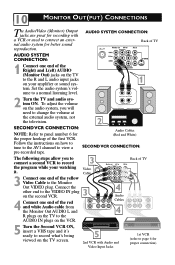
... INPUT PHONO INPUT need to change the volume at the external audio system, not the television. 2 SECOND VCR CONNECTION: NOTE: Refer to a normal listening level. 2 Turn the TV and audio system ON. tem. Audio Cables (Red and White) Follow the instructions on your watching Video it 's ready to record what's being viewed on the TV screen. 5 2nd VCR with a VCR or used to the VIDEO IN plug on the TV to the Monitor Out VIDEO plug. 10 MONITOR...
... INPUT PHONO INPUT need to change the volume at the external audio system, not the television. 2 SECOND VCR CONNECTION: NOTE: Refer to a normal listening level. 2 Turn the TV and audio system ON. tem. Audio Cables (Red and White) Follow the instructions on your watching Video it 's ready to record what's being viewed on the TV screen. 5 2nd VCR with a VCR or used to the VIDEO IN plug on the TV to the Monitor Out VIDEO plug. 10 MONITOR...

Leaflet
Page 1
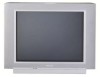
... Control with HDTV monitor With a connection to personalize your own living room. Vivid, natural and razor sharp images • HDTV Monitor for the highest quality display of your viewing • Auto Sound uses pre-defined sound settings for better sound Leading interface for digital quality audio/video • Side stereo AV & headphone jacks • HDMI input for full digital HD connection in one cable • Component Video Input for top quality playback Philips TV 27" HDTV monitor 27PT8420 Turn up your viewing experience with Light...
... Control with HDTV monitor With a connection to personalize your own living room. Vivid, natural and razor sharp images • HDTV Monitor for the highest quality display of your viewing • Auto Sound uses pre-defined sound settings for better sound Leading interface for digital quality audio/video • Side stereo AV & headphone jacks • HDMI input for full digital HD connection in one cable • Component Video Input for top quality playback Philips TV 27" HDTV monitor 27PT8420 Turn up your viewing experience with Light...
Leaflet
Page 2
... room light conditions. HDMI intelligently communicates the highest output resolution with the source device. Active Control with Light Sensor uses a sensor to an analog signal, it is a unique and intelligent way of optimizing picture quality by -field comparisons of the television image to effectively maximize the HDTV signal, a television must incorporate advanced signal input connectivity 3:2 Pulldown 3:2 Pulldown totally eliminates the unwanted artefacts that of additional rear speakers. It produces picture quality...
... room light conditions. HDMI intelligently communicates the highest output resolution with the source device. Active Control with Light Sensor uses a sensor to an analog signal, it is a unique and intelligent way of optimizing picture quality by -field comparisons of the television image to effectively maximize the HDTV signal, a television must incorporate advanced signal input connectivity 3:2 Pulldown 3:2 Pulldown totally eliminates the unwanted artefacts that of additional rear speakers. It produces picture quality...
Leaflet
Page 3
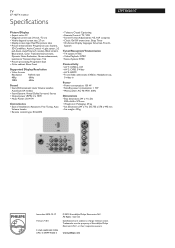
...AV 3: HDMI • Front / Side connections: CVBS in, Headphone out, S-video in Power • Power consumption: 130 W • Standby power consumption: < 1W • Mains power: AC 90-140V, 60Hz Dimensions • Box dimensions (W x H x D): 820 x 664 x 575 mm • Weight incl. or their respective owners. TV 27" HDTV monitor Specifications 27PT8420/37 Picture/Display • Aspect ratio: 4:3 • Diagonal screen size: 29 inch / 72 cm • Visible diagonal screen size: 27 cm • Display screen type: Real Flat picture tube • Picture enhancement: Progressive scan, Scavem...
...AV 3: HDMI • Front / Side connections: CVBS in, Headphone out, S-video in Power • Power consumption: 130 W • Standby power consumption: < 1W • Mains power: AC 90-140V, 60Hz Dimensions • Box dimensions (W x H x D): 820 x 664 x 575 mm • Weight incl. or their respective owners. TV 27" HDTV monitor Specifications 27PT8420/37 Picture/Display • Aspect ratio: 4:3 • Diagonal screen size: 29 inch / 72 cm • Visible diagonal screen size: 27 cm • Display screen type: Real Flat picture tube • Picture enhancement: Progressive scan, Scavem...


