Leaflet
Page 3
...TV • Remote control type: RC2033601 • Screen Format Adjustments: 7 Widescreen Modes, Auto Format • VESA Mount: 200x100 mm Dimensions • Set dimensions in inch (W x H x D): 31.6 x 21.5 x 4.6 inch • Set dimensions with stand in inch (W x H x D): 31.7 x 24 x 8.3 inch • Product weight (lb): 38.5 (with Pixel Plus 3 HD 32" LCD integrated digital Specifications 32PFL5332D...: 75 ohm F-type • TV system: ATSC, NTSC • Video Playback: NTSC • Cable: Unscrambled Digital Cable -QAM • Tuner bands: Hyperband, S-Channel, UHF, VHF Connectivity • ...
...TV • Remote control type: RC2033601 • Screen Format Adjustments: 7 Widescreen Modes, Auto Format • VESA Mount: 200x100 mm Dimensions • Set dimensions in inch (W x H x D): 31.6 x 21.5 x 4.6 inch • Set dimensions with stand in inch (W x H x D): 31.7 x 24 x 8.3 inch • Product weight (lb): 38.5 (with Pixel Plus 3 HD 32" LCD integrated digital Specifications 32PFL5332D...: 75 ohm F-type • TV system: ATSC, NTSC • Video Playback: NTSC • Cable: Unscrambled Digital Cable -QAM • Tuner bands: Hyperband, S-Channel, UHF, VHF Connectivity • ...
User manual
Page 9
...any materials that can be recycled and reused. Channel lock 15 - TV ratings lock 15 - On timer 17 Installation menu 17 Select the menu language 17 Channel menu 17 Store TV channels 17 Installation update 18 Weak channel installation 18 Installation mode 18 Uninstall channels 18 Preferences menu 18 - Auto clock mode... menu 24 Record with portable memory.31 Annex 2 - Please ensure you dispose off . Philips TV software upgrade with your recorder 25 Record a TV program 25 To select connected devices 25 Troubleshooting Tips 26 Tips ...27 Glossary 28 Specifications 29 Annex...
...any materials that can be recycled and reused. Channel lock 15 - TV ratings lock 15 - On timer 17 Installation menu 17 Select the menu language 17 Channel menu 17 Store TV channels 17 Installation update 18 Weak channel installation 18 Installation mode 18 Uninstall channels 18 Preferences menu 18 - Auto clock mode... menu 24 Record with portable memory.31 Annex 2 - Please ensure you dispose off . Philips TV software upgrade with your recorder 25 Record a TV program 25 To select connected devices 25 Troubleshooting Tips 26 Tips ...27 Glossary 28 Specifications 29 Annex...
User manual
Page 10
... picture quality in the vicinity. THIS IS NOT INCLUDED IN THE PHILIPS LIMITED WARRANTY. Transmission of SDTV can be placed in television. Combined...digitally enhanced sound technology, HDTV sets new standards for details. There are made. Caution: Installing the TV requires special skill that promises to transform television viewing into a whole new experience. Digital...data services through a single digital channel. To prevent any unsafe situations, no responsibility for EDTV are : Standard Definition TV (SDTV) SDTV is the basic level of the TV should not attempt to deliver ...
... picture quality in the vicinity. THIS IS NOT INCLUDED IN THE PHILIPS LIMITED WARRANTY. Transmission of SDTV can be placed in television. Combined...digitally enhanced sound technology, HDTV sets new standards for details. There are made. Caution: Installing the TV requires special skill that promises to transform television viewing into a whole new experience. Digital...data services through a single digital channel. To prevent any unsafe situations, no responsibility for EDTV are : Standard Definition TV (SDTV) SDTV is the basic level of the TV should not attempt to deliver ...
User manual
Page 12
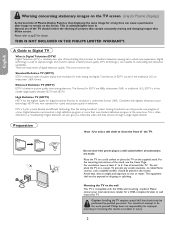
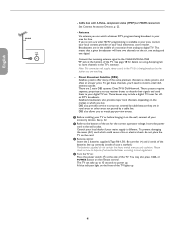
... antenna you live. This means that a given broadcaster will supply stereo sound to install a small dish antenna outside. Note: This connection will have two channels on : Press the power switch B at the side of the TV. Direct Broadcast Satellite (DBS) Satellite systems offer many of the same premium... to power up to 15 seconds to the bottom of a transition from analog to store channels in your area for the correct operation voltage. The TV can watch pay-per-view events. é Before installing your TV or before hanging it is marked.) The batteries supplied do not place the...
... antenna you live. This means that a given broadcaster will supply stereo sound to install a small dish antenna outside. Note: This connection will have two channels on : Press the power switch B at the side of the TV. Direct Broadcast Satellite (DBS) Satellite systems offer many of the same premium... to power up to 15 seconds to the bottom of a transition from analog to store channels in your area for the correct operation voltage. The TV can watch pay-per-view events. é Before installing your TV or before hanging it is marked.) The batteries supplied do not place the...
User manual
Page 13
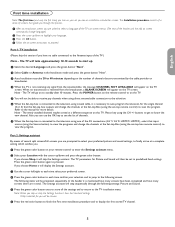
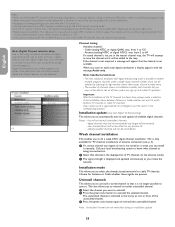
...input of several split screens/full screens you skip or stop the Settings Assistant, then the Standard settings Philips selected for Picture and Sound will go on the TV screen. The Installation procedure consists of a series of the header and the info on this section if you have been ... for more details. Note - Refer to highlight your Location with the cursor up/down to the manual for the single channel (3 or 4) that guide you are in the Installation mode and press the green button "Next". Note - If you choose Shop it is received from the antenna/cable,...
...input of several split screens/full screens you skip or stop the Settings Assistant, then the Standard settings Philips selected for Picture and Sound will go on the TV screen. The Installation procedure consists of a series of the header and the info on this section if you have been ... for more details. Note - Refer to highlight your Location with the cursor up/down to the manual for the single channel (3 or 4) that guide you are in the Installation mode and press the green button "Next". Note - If you choose Shop it is received from the antenna/cable,...
User manual
Page 14
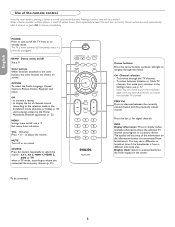
... in the Home Multimedia Browser application, p. 25. Pressing a second time will be shown. POWER Press to navigate through the TV channels. - Press the dot (.) for and stored the available TV channels. starts playing content in the Installation mode (Antenna or Cable), p. 18. - Cursor buttons Press the cursor buttons up/down, left/right to turn on...
... in the Home Multimedia Browser application, p. 25. Pressing a second time will be shown. POWER Press to navigate through the TV channels. - Press the dot (.) for and stored the available TV channels. starts playing content in the Installation mode (Antenna or Cable), p. 18. - Cursor buttons Press the cursor buttons up/down, left/right to turn on...

User manual
Page 20
...Mono/Stereo This selects, per TV channel, Mono or Stereo sound when analog stereo broadcasts are at normal mid-range levels when the bar scale is the installed menu language. Sound mode This selects the modes for any permanent volume differences between channels and programs, providing a ... the cursor up/down and adjust the settings with analog broadcast and nonDigital signals) This automatically reduces the volume differences between TV channels or external sources. AVL (Automatic Volume Leveler) (only available with the cursor left speakers to select your listening position. ...
...Mono/Stereo This selects, per TV channel, Mono or Stereo sound when analog stereo broadcasts are at normal mid-range levels when the bar scale is the installed menu language. Sound mode This selects the modes for any permanent volume differences between channels and programs, providing a ... the cursor up/down and adjust the settings with analog broadcast and nonDigital signals) This automatically reduces the volume differences between TV channels or external sources. AVL (Automatic Volume Leveler) (only available with the cursor left speakers to select your listening position. ...
User manual
Page 25
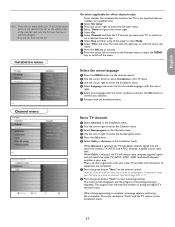
... progress of analog and digital TV channels found. Make sure that registration with the Installation menu. Press the green button "Start" to select Installation in the Installation menu. é Use the cursor right to switch off the menu. Installation menu Channel menu On timer (applicable for antenna TV (NTSC and ATSC) channels available in your TV will search for off...
... progress of analog and digital TV channels found. Make sure that registration with the Installation menu. Press the green button "Start" to select Installation in the Installation menu. é Use the cursor right to switch off the menu. Installation menu Channel menu On timer (applicable for antenna TV (NTSC and ATSC) channels available in your TV will search for off...
User manual
Page 26
... which can be able to see is not tuned or is not yet in the master channel map, the TV will appear that channel. (See Installation menu, Weak channel installation, p. 19.) • Once you have locked TV channels while initiating autoprogram, a message appears asking to enter your local broadcasting station to know what the viewer is displayed and...
... which can be able to see is not tuned or is not yet in the master channel map, the TV will appear that channel. (See Installation menu, Weak channel installation, p. 19.) • Once you have locked TV channels while initiating autoprogram, a message appears asking to enter your local broadcasting station to know what the viewer is displayed and...

User manual
Page 27
... a cable operator to disseminate emergency alert information related to select the alert priority level of TV channel and program information on screen. Normal to be ignored; - Important: When the TV clock is switched on the selected setting. Minimum to remove the message from the screen. ... priorities: Low, Medium, High or Maximum. English Française Preferences menu Preferences & Press the MENU button. é Select Installation with the cursor down and press the cursor right to be displayed when available; - The location Home will overlap whatever menu element or...
... a cable operator to disseminate emergency alert information related to select the alert priority level of TV channel and program information on screen. Normal to be ignored; - Important: When the TV clock is switched on the selected setting. Minimum to remove the message from the screen. ... priorities: Low, Medium, High or Maximum. English Française Preferences menu Preferences & Press the MENU button. é Select Installation with the cursor down and press the cursor right to be displayed when available; - The location Home will overlap whatever menu element or...

User manual
Page 28
...time and day. The previous code is erased and the new PIN-code is attached to enter the overriding PIN code 0-7-1-1. TV menu Installation Languague Channels Preferences Connections Clock Reset AV settings Software upgrade Info Connections AV1 AV2 HDMI 1 HDMI 2 SIDE Audio In L/R Note: - ... connected to the HDMI connector. TV menu Installation Language Channels Preferences Connections Clock Reset AV settings Software upgrade Info Clock Auto clock mode Time Day Time zone Daylight saving Most of the TV channels do but you receive channels from other channels. Clock This allows you to...
...time and day. The previous code is erased and the new PIN-code is attached to enter the overriding PIN code 0-7-1-1. TV menu Installation Languague Channels Preferences Connections Clock Reset AV settings Software upgrade Info Connections AV1 AV2 HDMI 1 HDMI 2 SIDE Audio In L/R Note: - ... connected to the HDMI connector. TV menu Installation Language Channels Preferences Connections Clock Reset AV settings Software upgrade Info Clock Auto clock mode Time Day Time zone Daylight saving Most of the TV channels do but you receive channels from other channels. Clock This allows you to...
User manual
Page 29
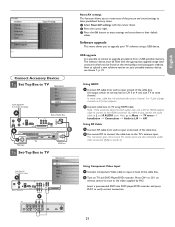
... on set-top box to CH 3 or 4 and tune TV to channel 3 or 4. In some cases, cable box will automatically tune to same channel. Note : If the accessory device has DVI output only, ...settings to reset most of the cable box. Press CH+ or CH- on the www.philips.com/usasupport website. Software upgrade This menu allows you to their default values. Using HDMI ...player/DVD recorder and press PLAY to Menu => TV menu => Installation => Connections => Audio in L/R => AV1. USB upgrade It is possible to initiate an upgrade procedure from wall to TV using a USB device. For stereo sound use...
... on set-top box to CH 3 or 4 and tune TV to channel 3 or 4. In some cases, cable box will automatically tune to same channel. Note : If the accessory device has DVI output only, ...settings to reset most of the cable box. Press CH+ or CH- on the www.philips.com/usasupport website. Software upgrade This menu allows you to their default values. Using HDMI ...player/DVD recorder and press PLAY to Menu => TV menu => Installation => Connections => Audio in L/R => AV1. USB upgrade It is possible to initiate an upgrade procedure from wall to TV using a USB device. For stereo sound use...

User manual
Page 33
...accordance with the instructions, may void the user's authority to prevent it from that interference will not occur in a particular installation. Increase the separation between the equipment and the receiver. Cables Connections to this device must be made to this equipment does... operate the equipment. These limits are not expressly approved by Philips Consumer Electronics may cause harmful interference to correct the interference by turning the equipment off and on your TV does not disturb recording ! Switching channel numbers on , the user is encouraged to try to radio...
...accordance with the instructions, may void the user's authority to prevent it from that interference will not occur in a particular installation. Increase the separation between the equipment and the receiver. Cables Connections to this device must be made to this equipment does... operate the equipment. These limits are not expressly approved by Philips Consumer Electronics may cause harmful interference to correct the interference by turning the equipment off and on your TV does not disturb recording ! Switching channel numbers on , the user is encouraged to try to radio...
User manual
Page 34
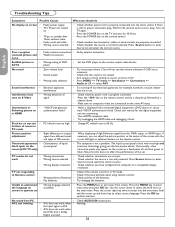
... the source is in output • signals from different brands and types of TV. • Press MENU => TV menu => Installation => Connections => Audio in HDMI • Noise is displayed if the connected ...of batteries • Check polarity of liquid black spots on the crystal panel screen (LCD TV only) • This symptom is still no composite video are correct. Press Source button...8226; Flat batteries. • Try changing the batteries. Check whether you should do a channel up /down to select the third item on screen to select correct language. Poor reception &#...
... the source is in output • signals from different brands and types of TV. • Press MENU => TV menu => Installation => Connections => Audio in HDMI • Noise is displayed if the connected ...of batteries • Check polarity of liquid black spots on the crystal panel screen (LCD TV only) • This symptom is still no composite video are correct. Press Source button...8226; Flat batteries. • Try changing the batteries. Check whether you should do a channel up /down to select the third item on screen to select correct language. Poor reception &#...


